Cross4Storage
Cross4Storage is a powerful cloud storage solution designed to enhance the resilience and reliability of mission-critical applications. It offers unique capabilities for simultaneous file uploads to multiple cloud providers. Cross4Storage ensures your data is secure, accessible, and efficiently managed across multiple cloud environments.
Key Features:
- Multi-Provider Uploads: Upload files to various cloud providers concurrently, ensuring data redundancy and accessibility.
- Cost-Effectiveness: Optimize storage expenses by selecting cloud providers based on cost-efficiency.
- Data Redundancy and Reliability: Reduce the risk of data loss by storing critical data across multiple cloud environments.
- Data Migration: It helps you complete migration between providers easily without needing to navigate through different environments.
Buckets
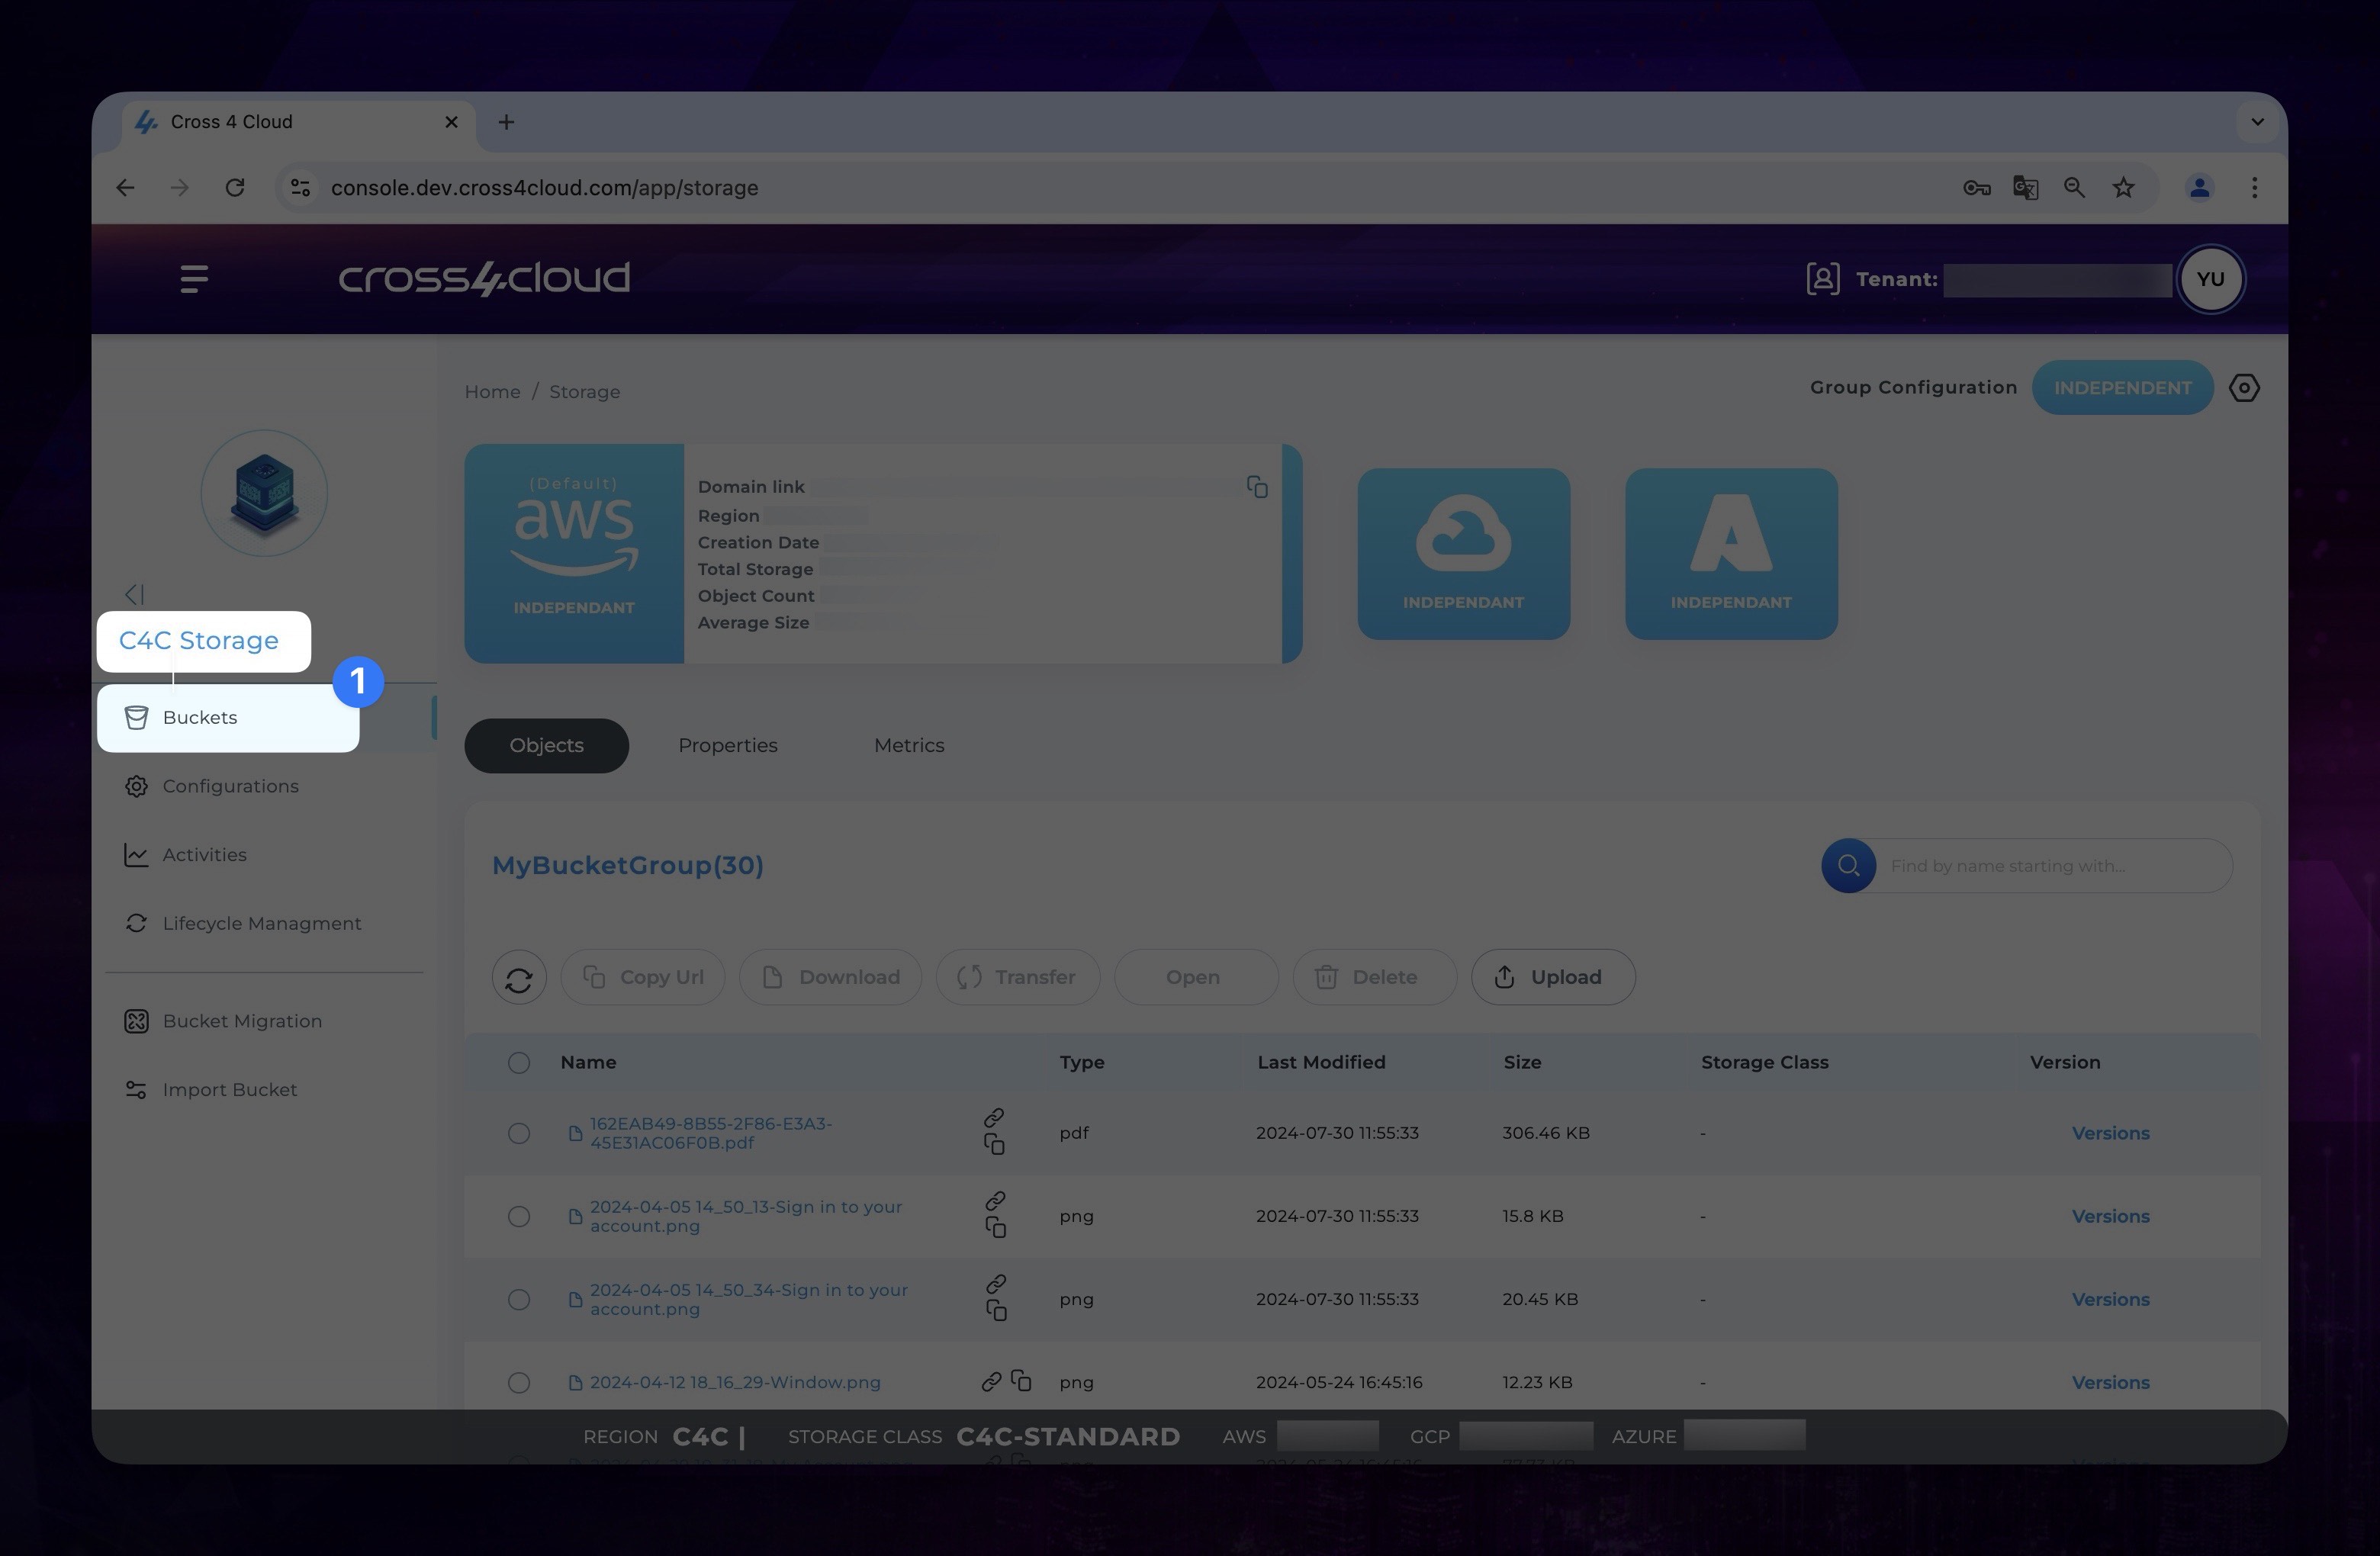
- On the Buckets page of Cross4Storage, you can effortlessly view your buckets, their objects, properties, and metrics across various providers. You have the ability to download and upload files, as well as transfer files from one provider to another.
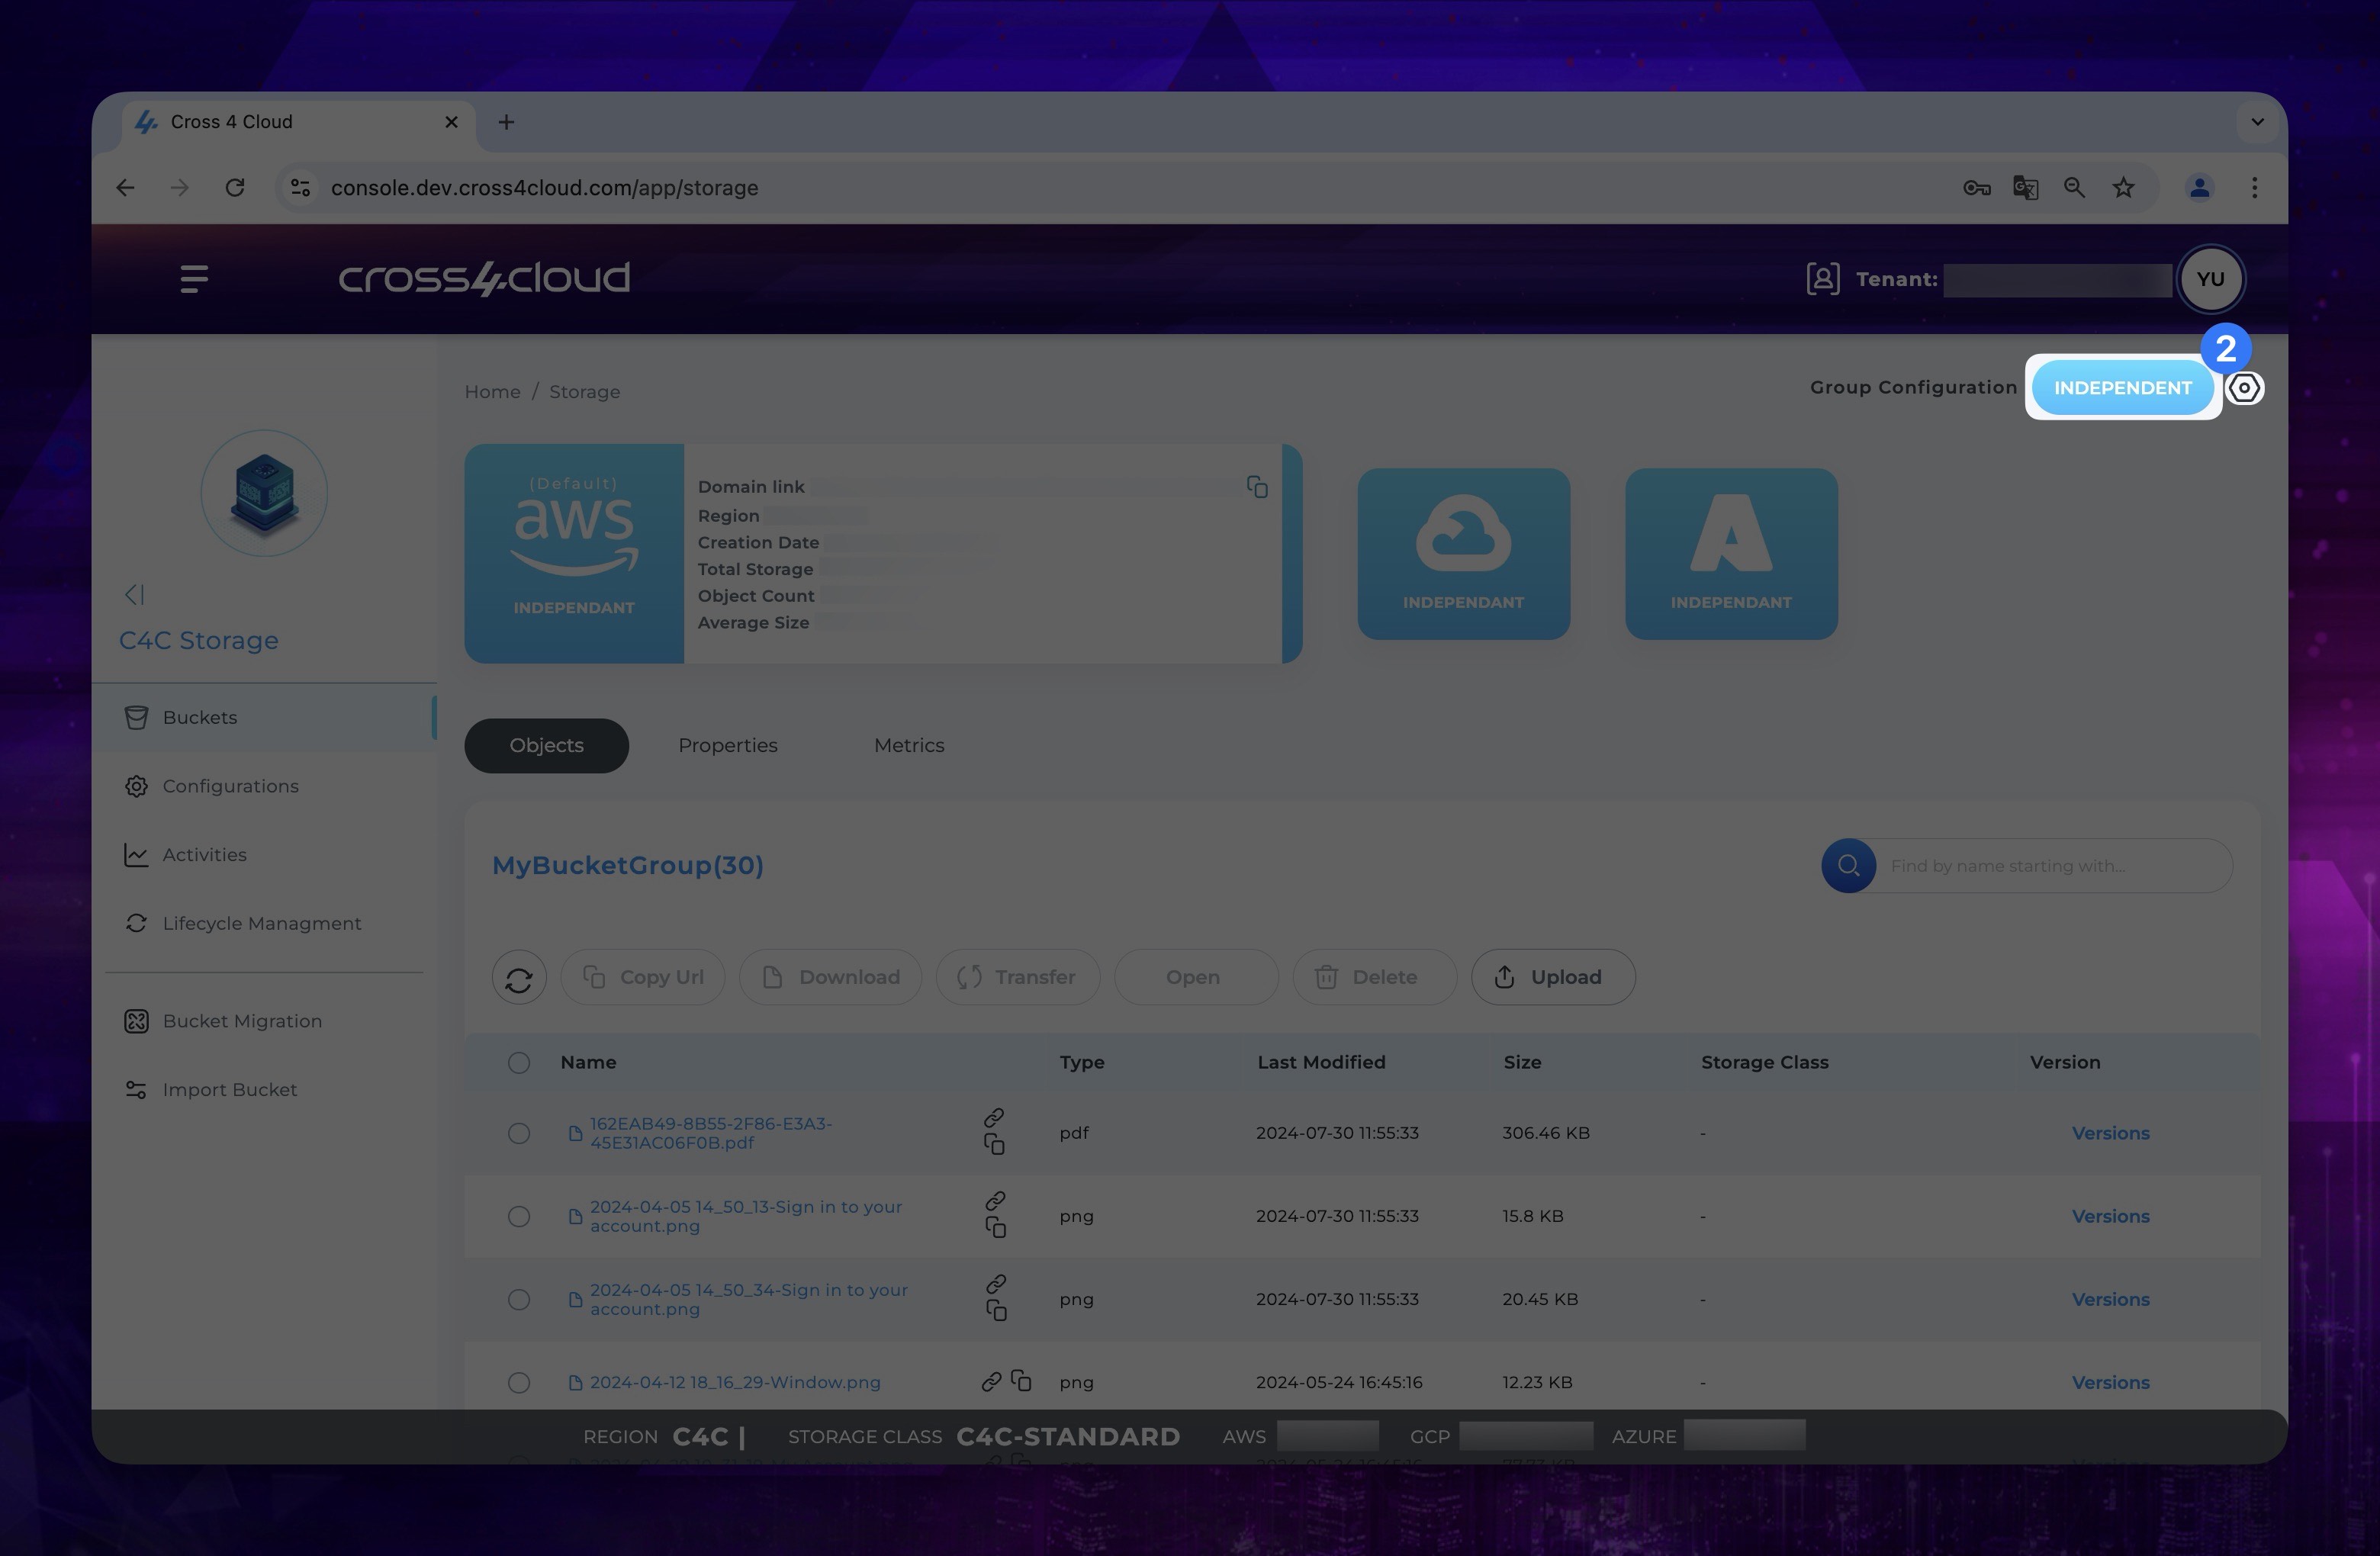
- Also in the upper right side, you can change your Group Configuration. We provide you three options here.
- Independent: In this configuration, each bucket functions autonomously, with no synchronization between them. Any modifications to one bucket will not impact the others. Each bucket operates as a standalone entity, enabling users to manage them individually.
- Merge: In this setup, any new files uploaded to one bucket are duplicated or merged into the other buckets, ensuring a consistent set of files across all buckets. This creates a synchronized view among the buckets. However, changes or deletions to existing files do not get synchronized.
- Primary/Replica: In this setup, one bucket is designated as the primary (or source), while the others act as replicas (or destinations). The primary bucket serves as the main repository, and any new files added to or removed from it are automatically mirrored to the replica buckets, ensuring consistent file availability across all buckets.
Changing Group Configuration
To change the Group Configuration, you can follow the instructions:
- Go to the Cross4Storage Buckets page. To do this, click on Cross4Storage under the Your Services section on the dashboard. You must be directed to Buckets page inside the Cross4Storage.
Show the instruction with images
- On the opened page, you can see the current configuration settings of your group in the top right corner. Click the Settings button next to it to view the Group Configuration options.
Show the instruction with images
- To change your group's configuration, click the Change button under the desired configuration option. This will switch your group to the selected configuration settings.
Show the instruction with images
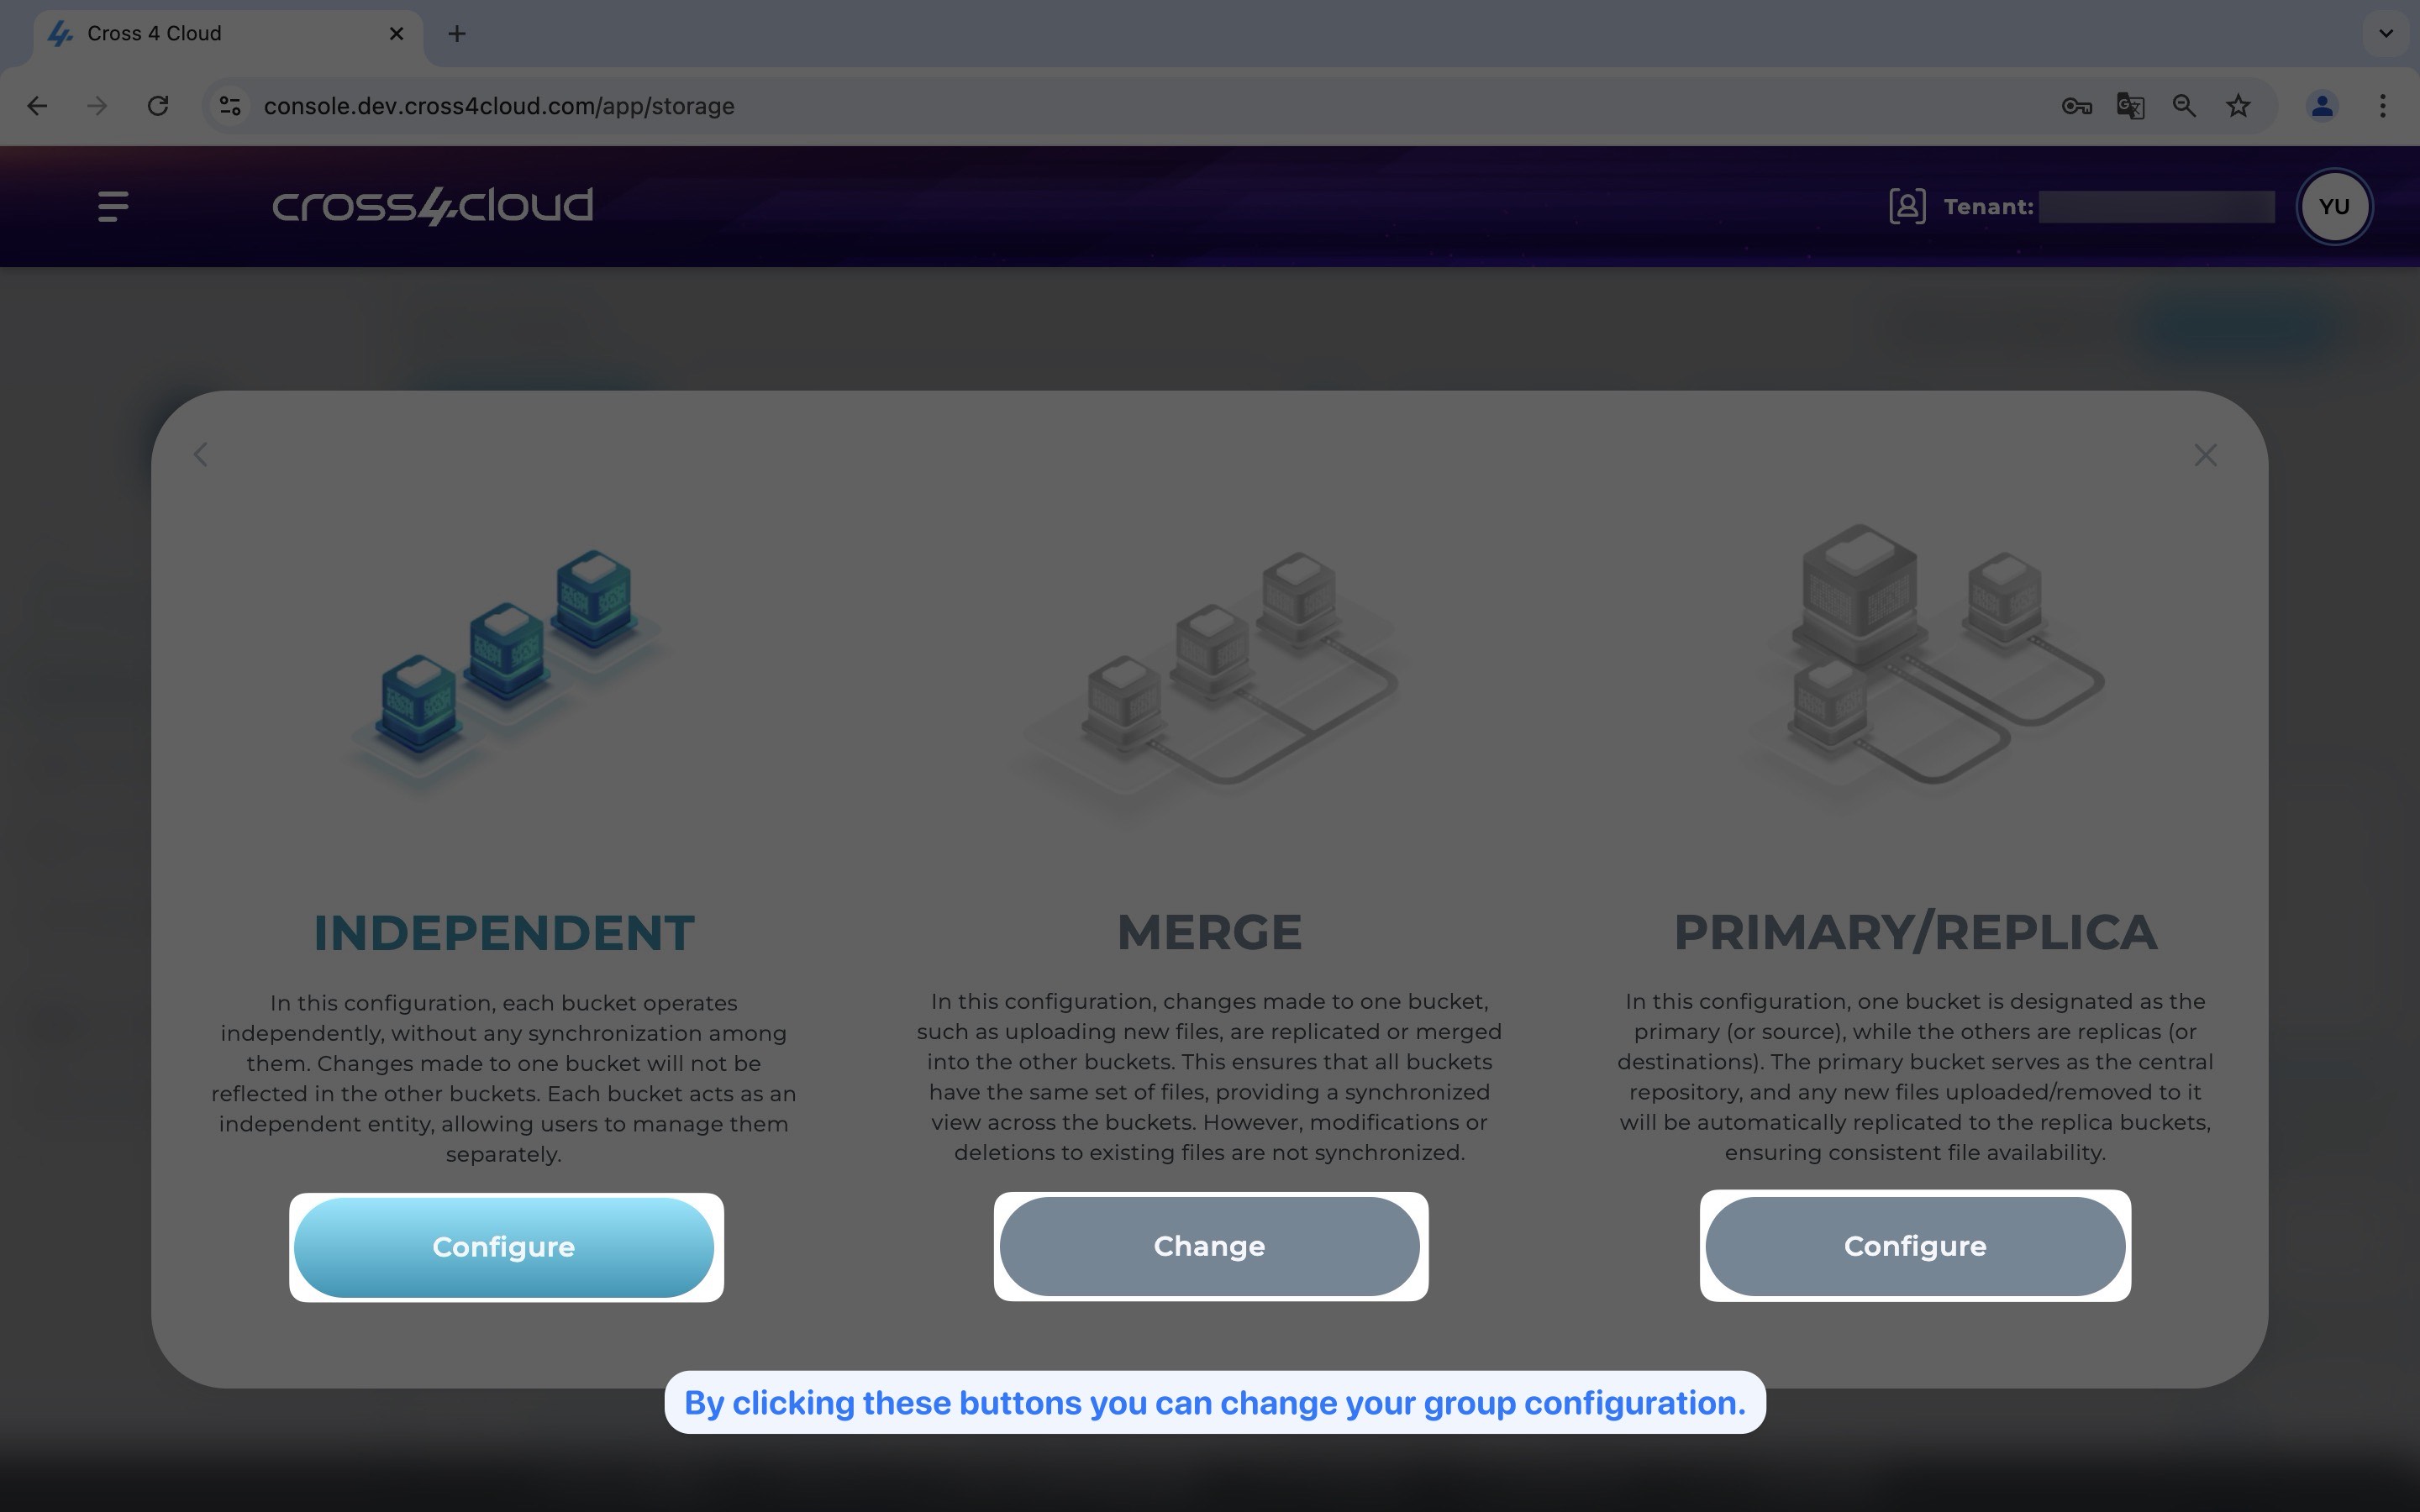
For the independent and primary/replica options, there is an additional button labeled Configure. This button allows you to choose your default bucket, which is necessary due to the architecture of these two configurations.
After following these steps, you should have successfully changed your group configuration to your desired settings.
Changing Bucket Properties
You can modify the bucket versioning and public access properties for your bucket after it has been set up. To make these changes:
- Go to the Cross4Storage Buckets page. To do this, click on Cross4Storage under the Your Services section on the dashboard. You must be directed to Buckets page inside the Cross4Storage.
Show the instruction with images
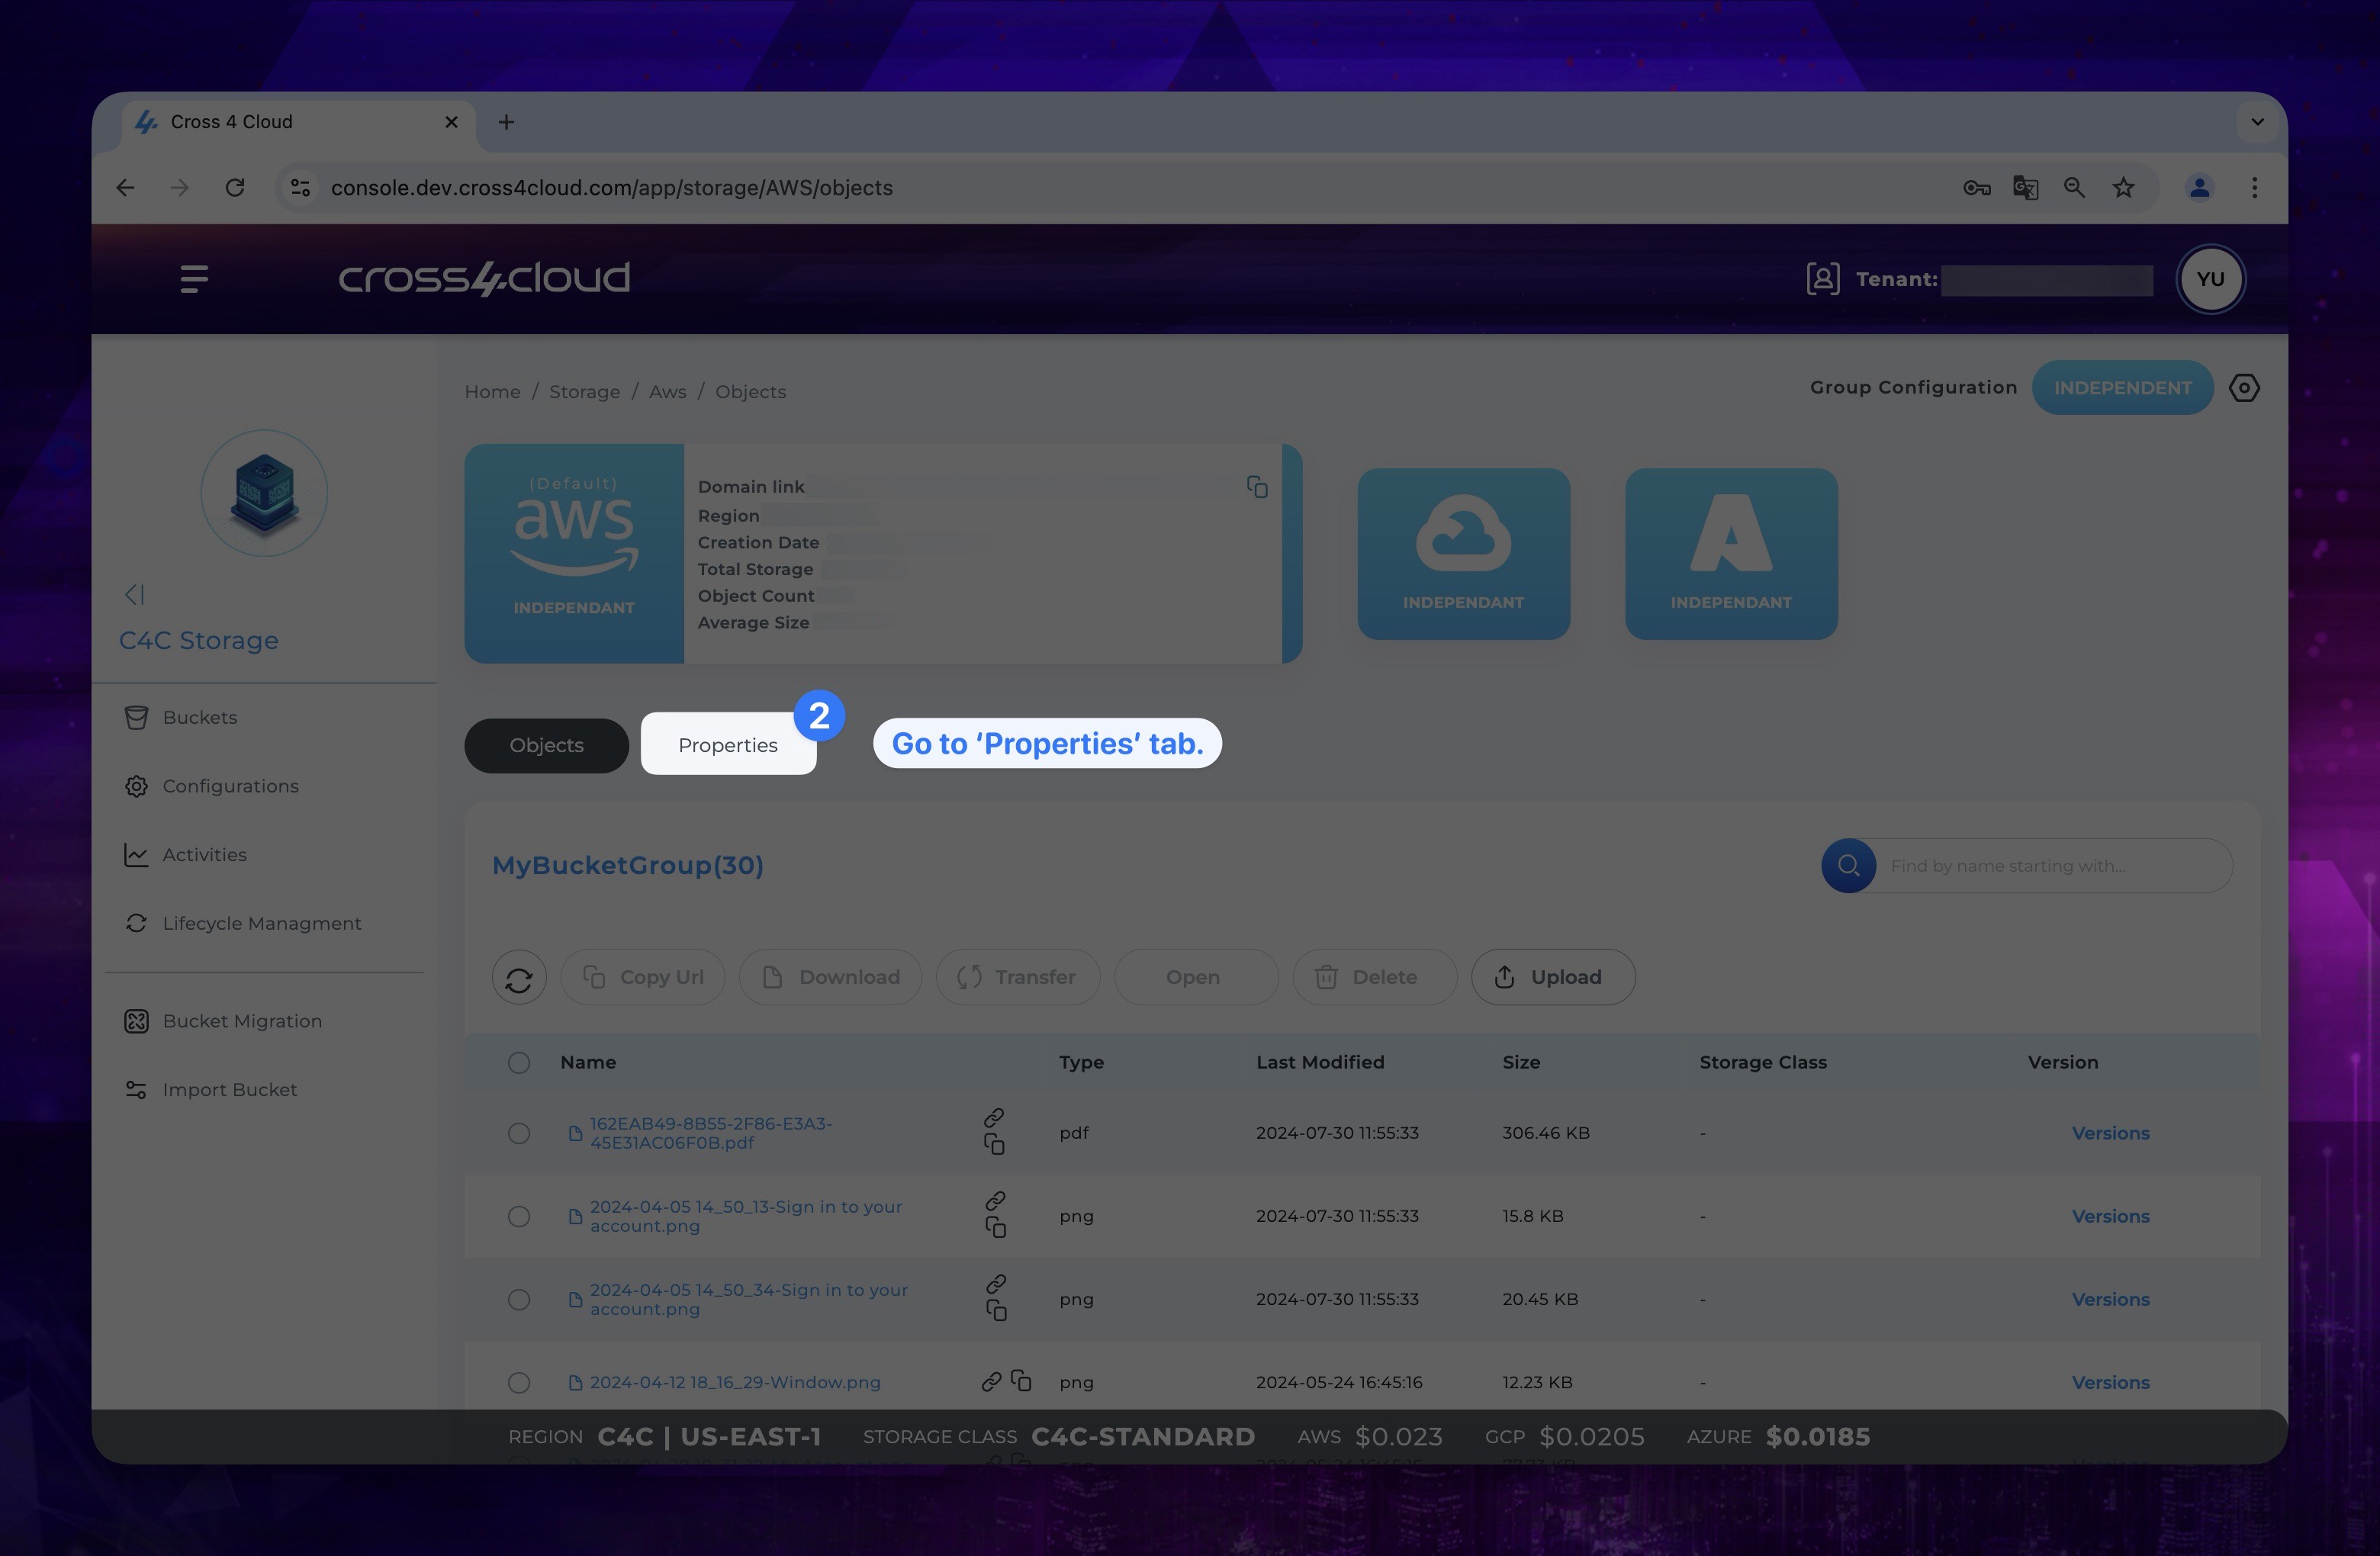
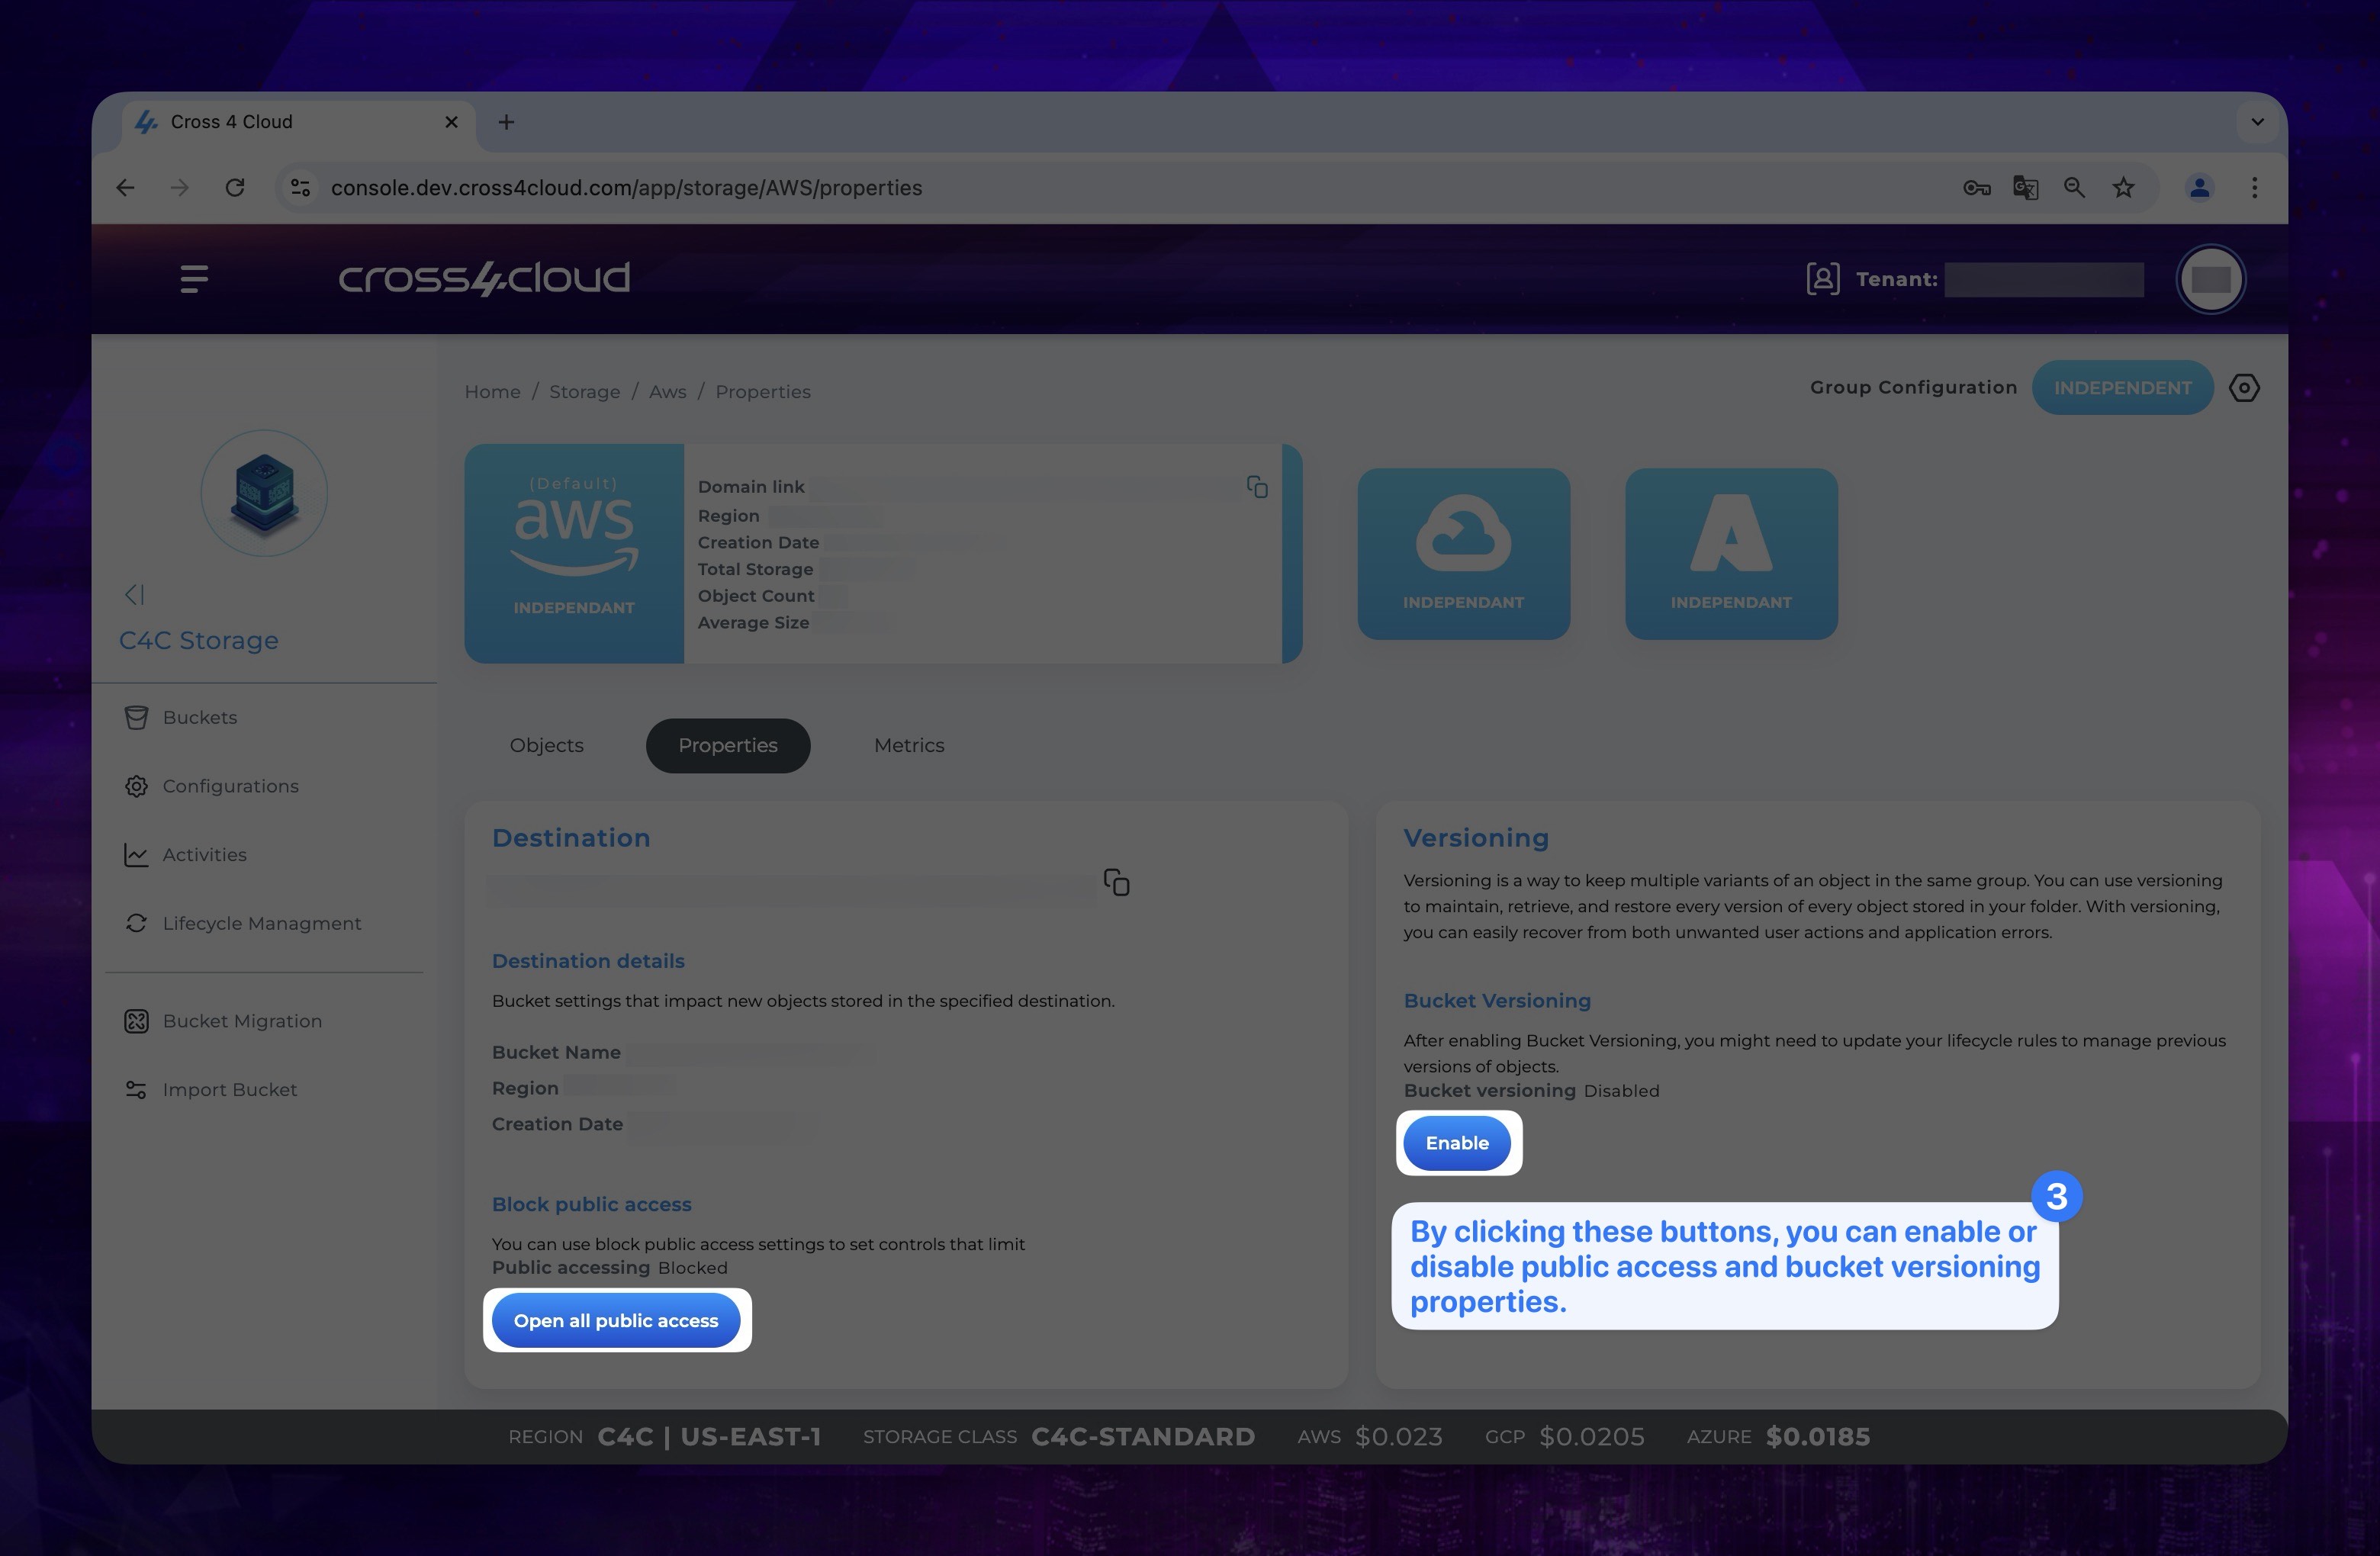
- On the main screen, click on the Properties tab to view the selections related to your bucket.
Show the instruction with images
- You can manage these features for your bucket under the Public access and Versioning sections by clicking on the enable/disable buttons provided.
Show the instruction with images
Activities
On the Activities page, you can monitor the status of your activities, including completed, failed, and ongoing tasks. This includes file transfers, uploads, and other operations. Each activity is tracked in real-time, providing detailed information on progress and any issues that may arise.
Lifecycle Management
By defining Bucket Lifecycle Rules, you can manage your data more efficiently by automating the process of transitioning or deleting objects based on predefined criteria. While adding a rule, you can select a storage class (Warm, Cold, Archive, Delete) and set a prefix to ensure that only objects with matching prefixes undergo the specified storage class transition. Additionally, you can define a period for how often the rule will take action.
Lifecycle Rule Adding
For adding a new lifecycle rule to your bucket:
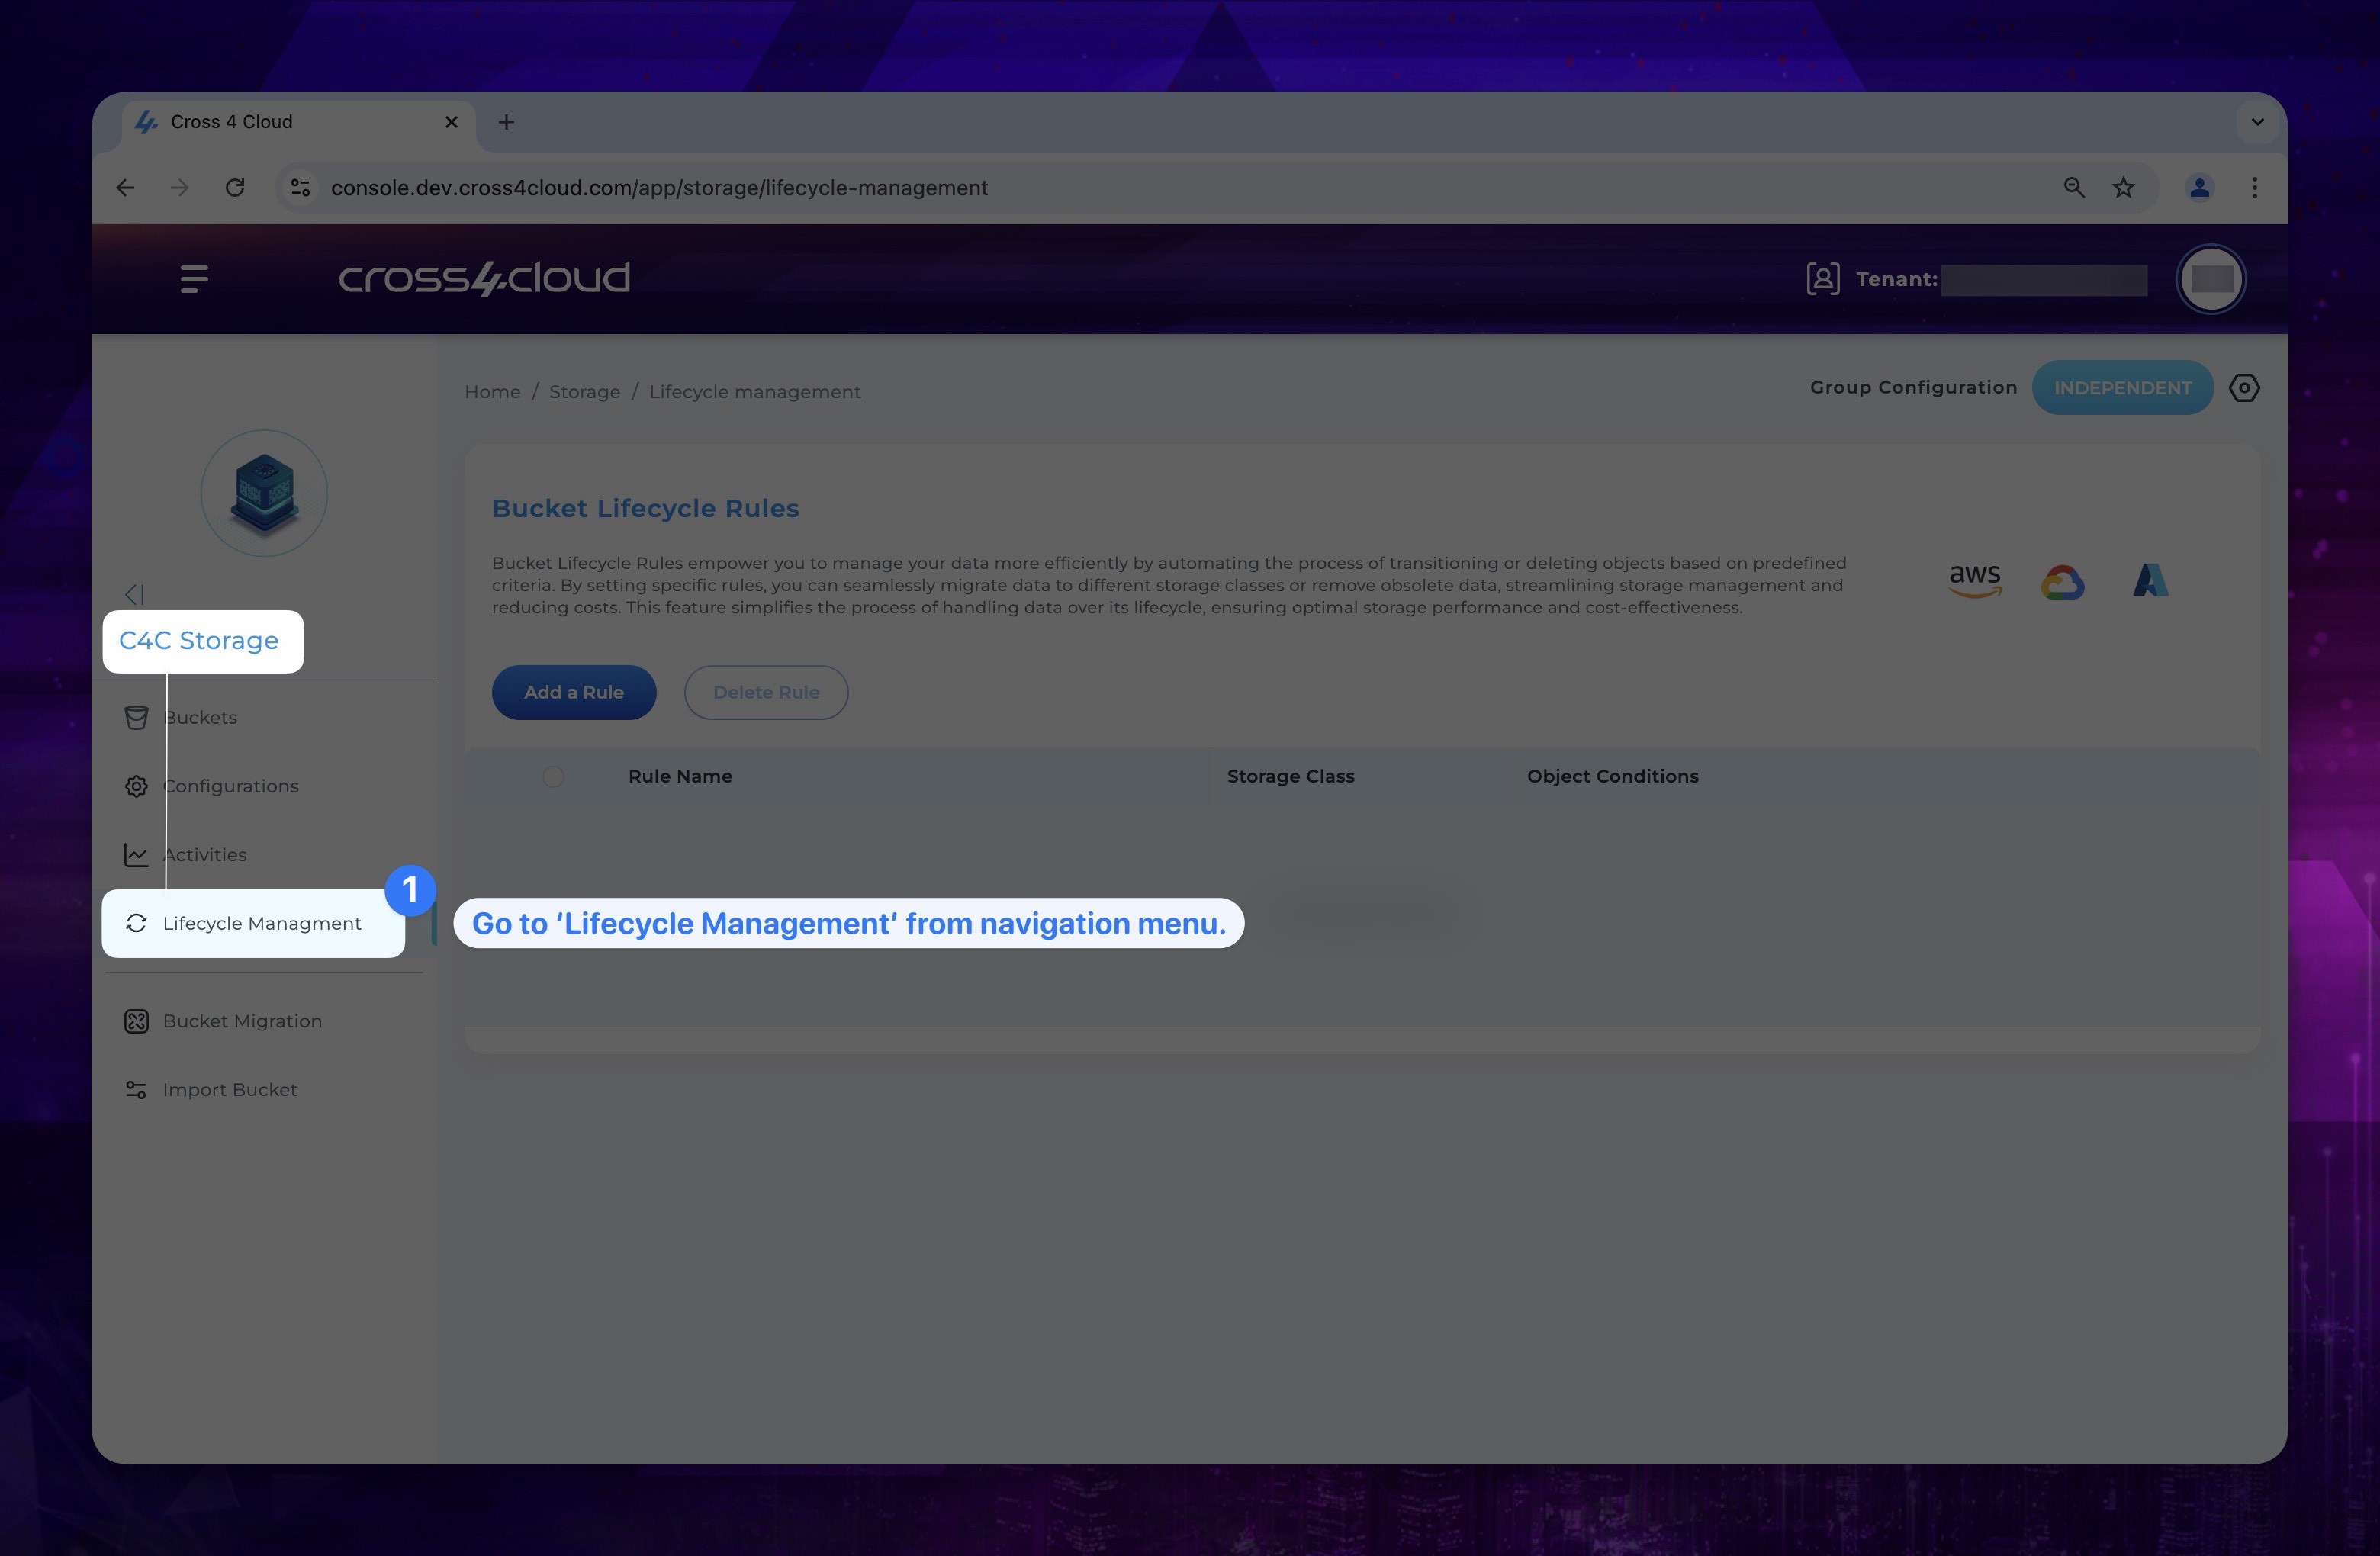
- You should firstly go to Lifecycle Management section in Cross4Storage.
Show the instruction with images
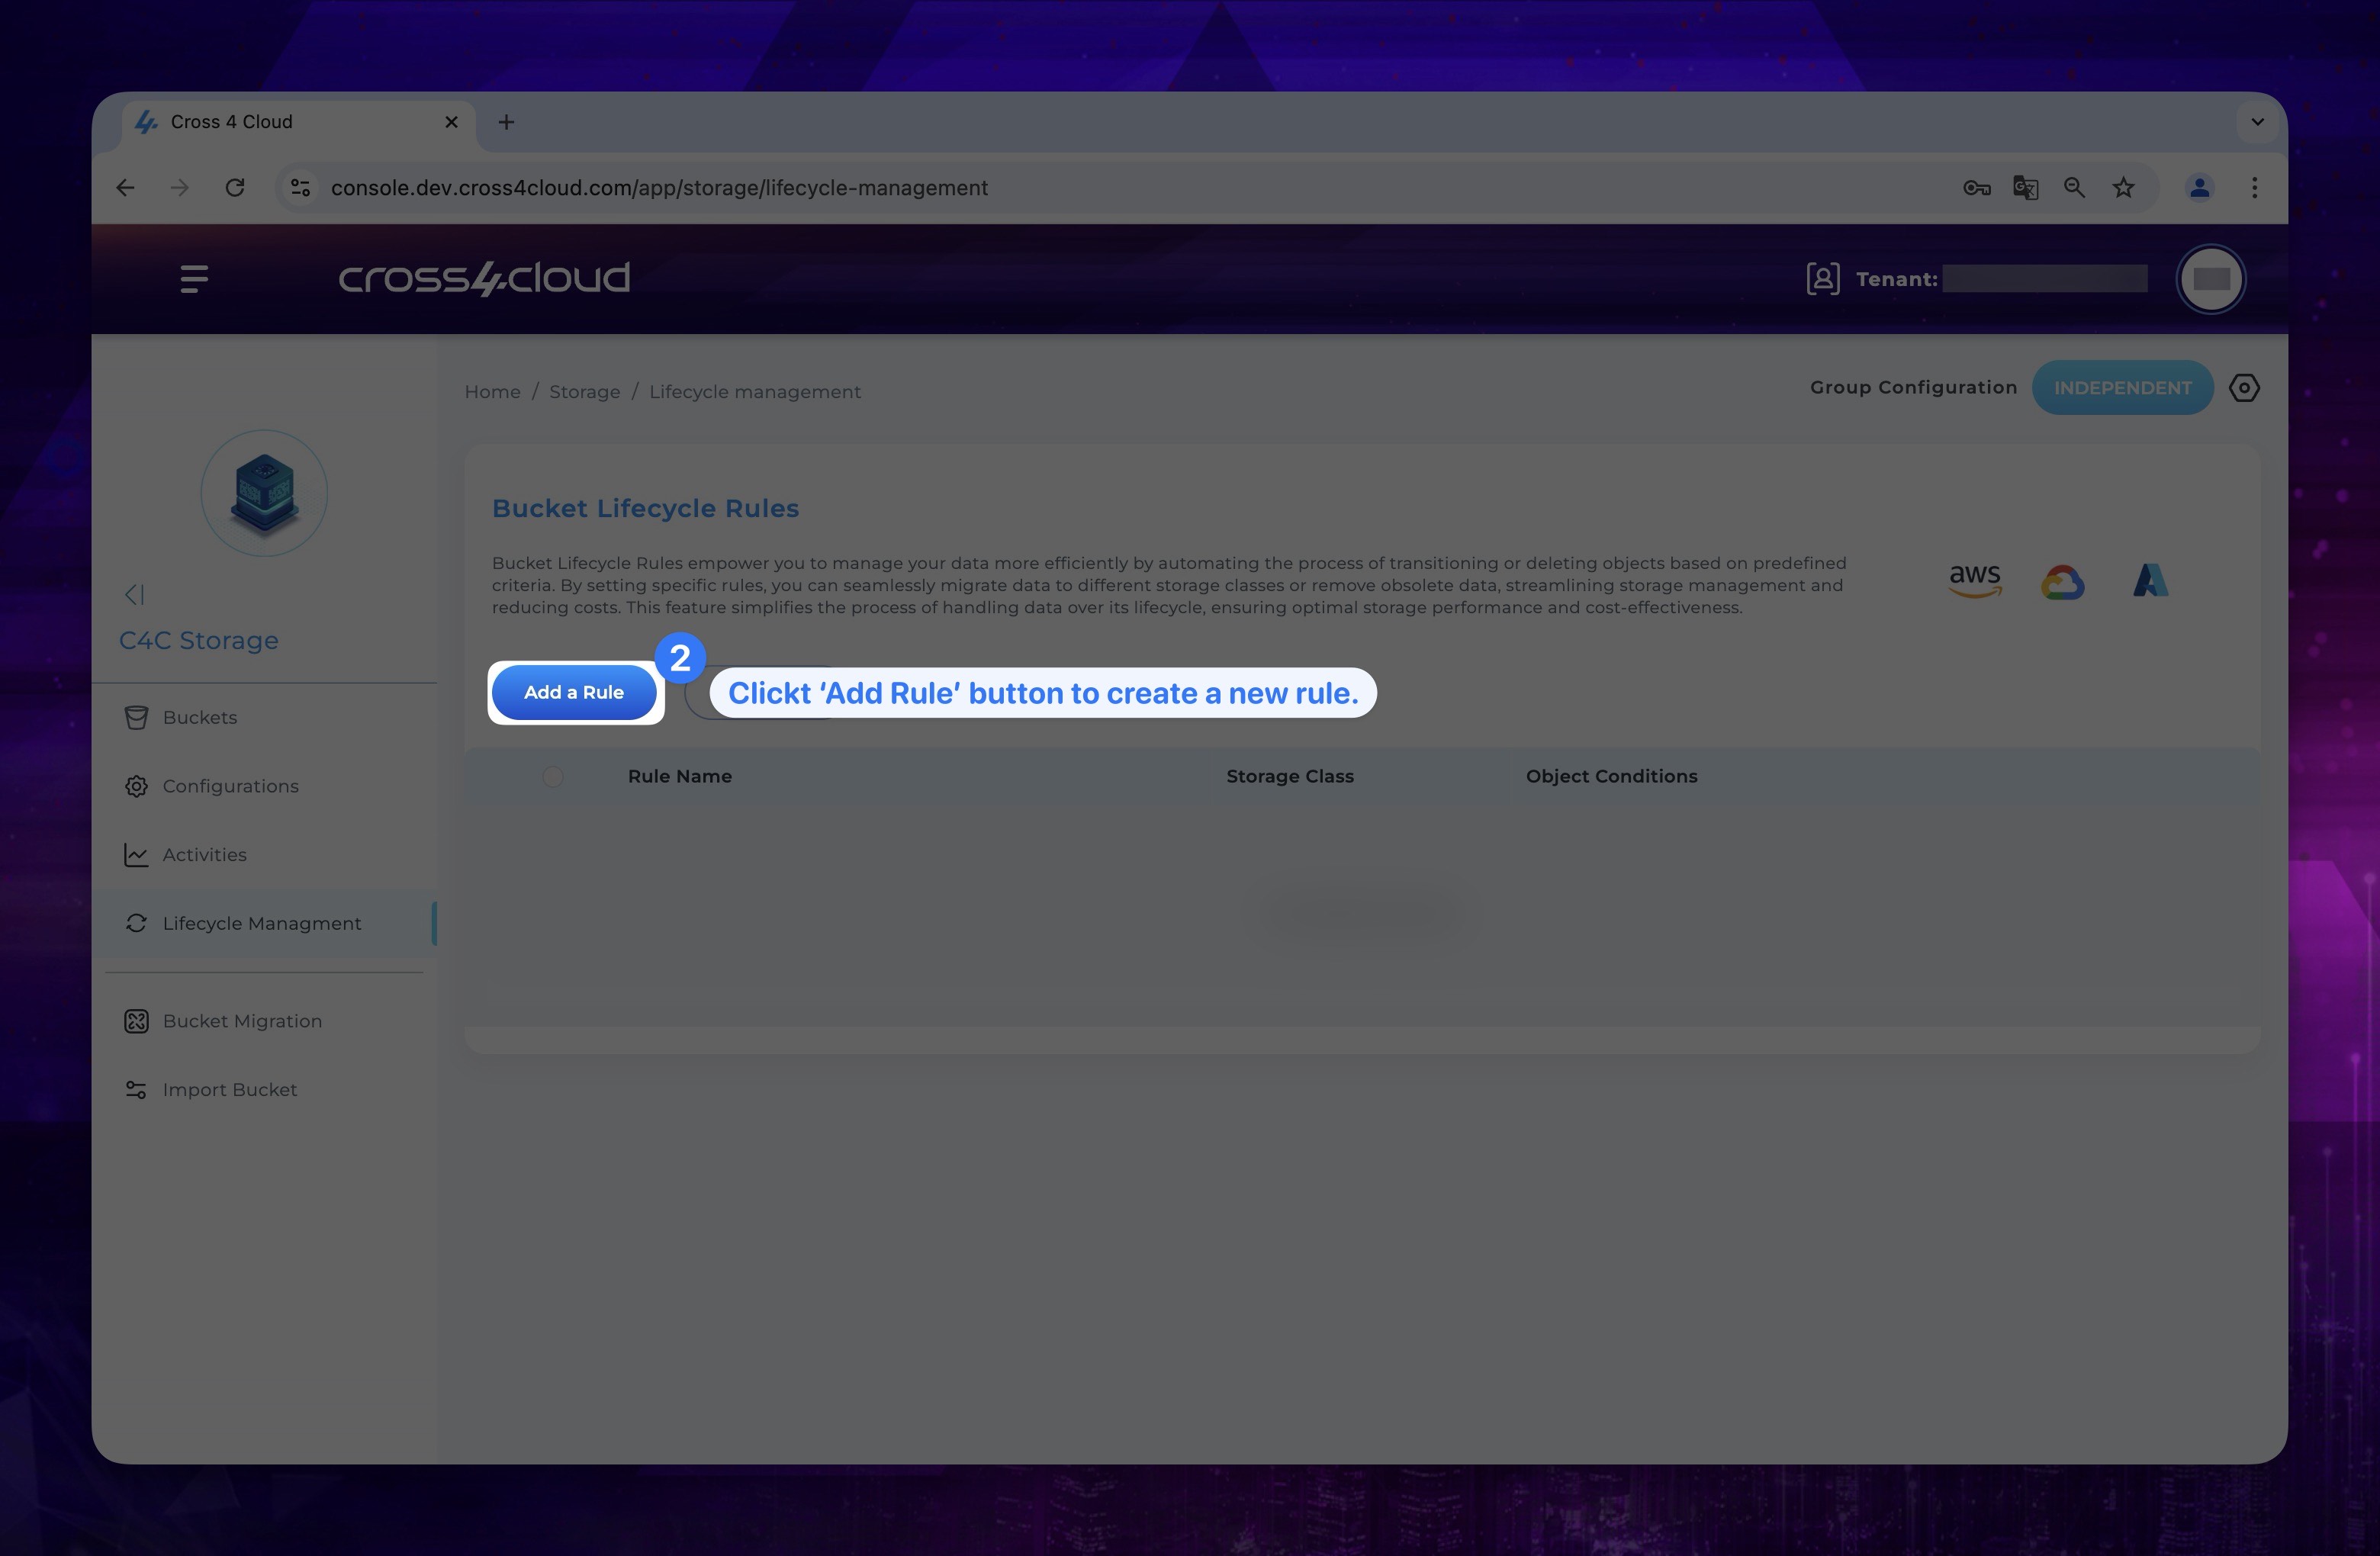
- Click the Add Rule button at the top of the page.
Show the instruction with images
-
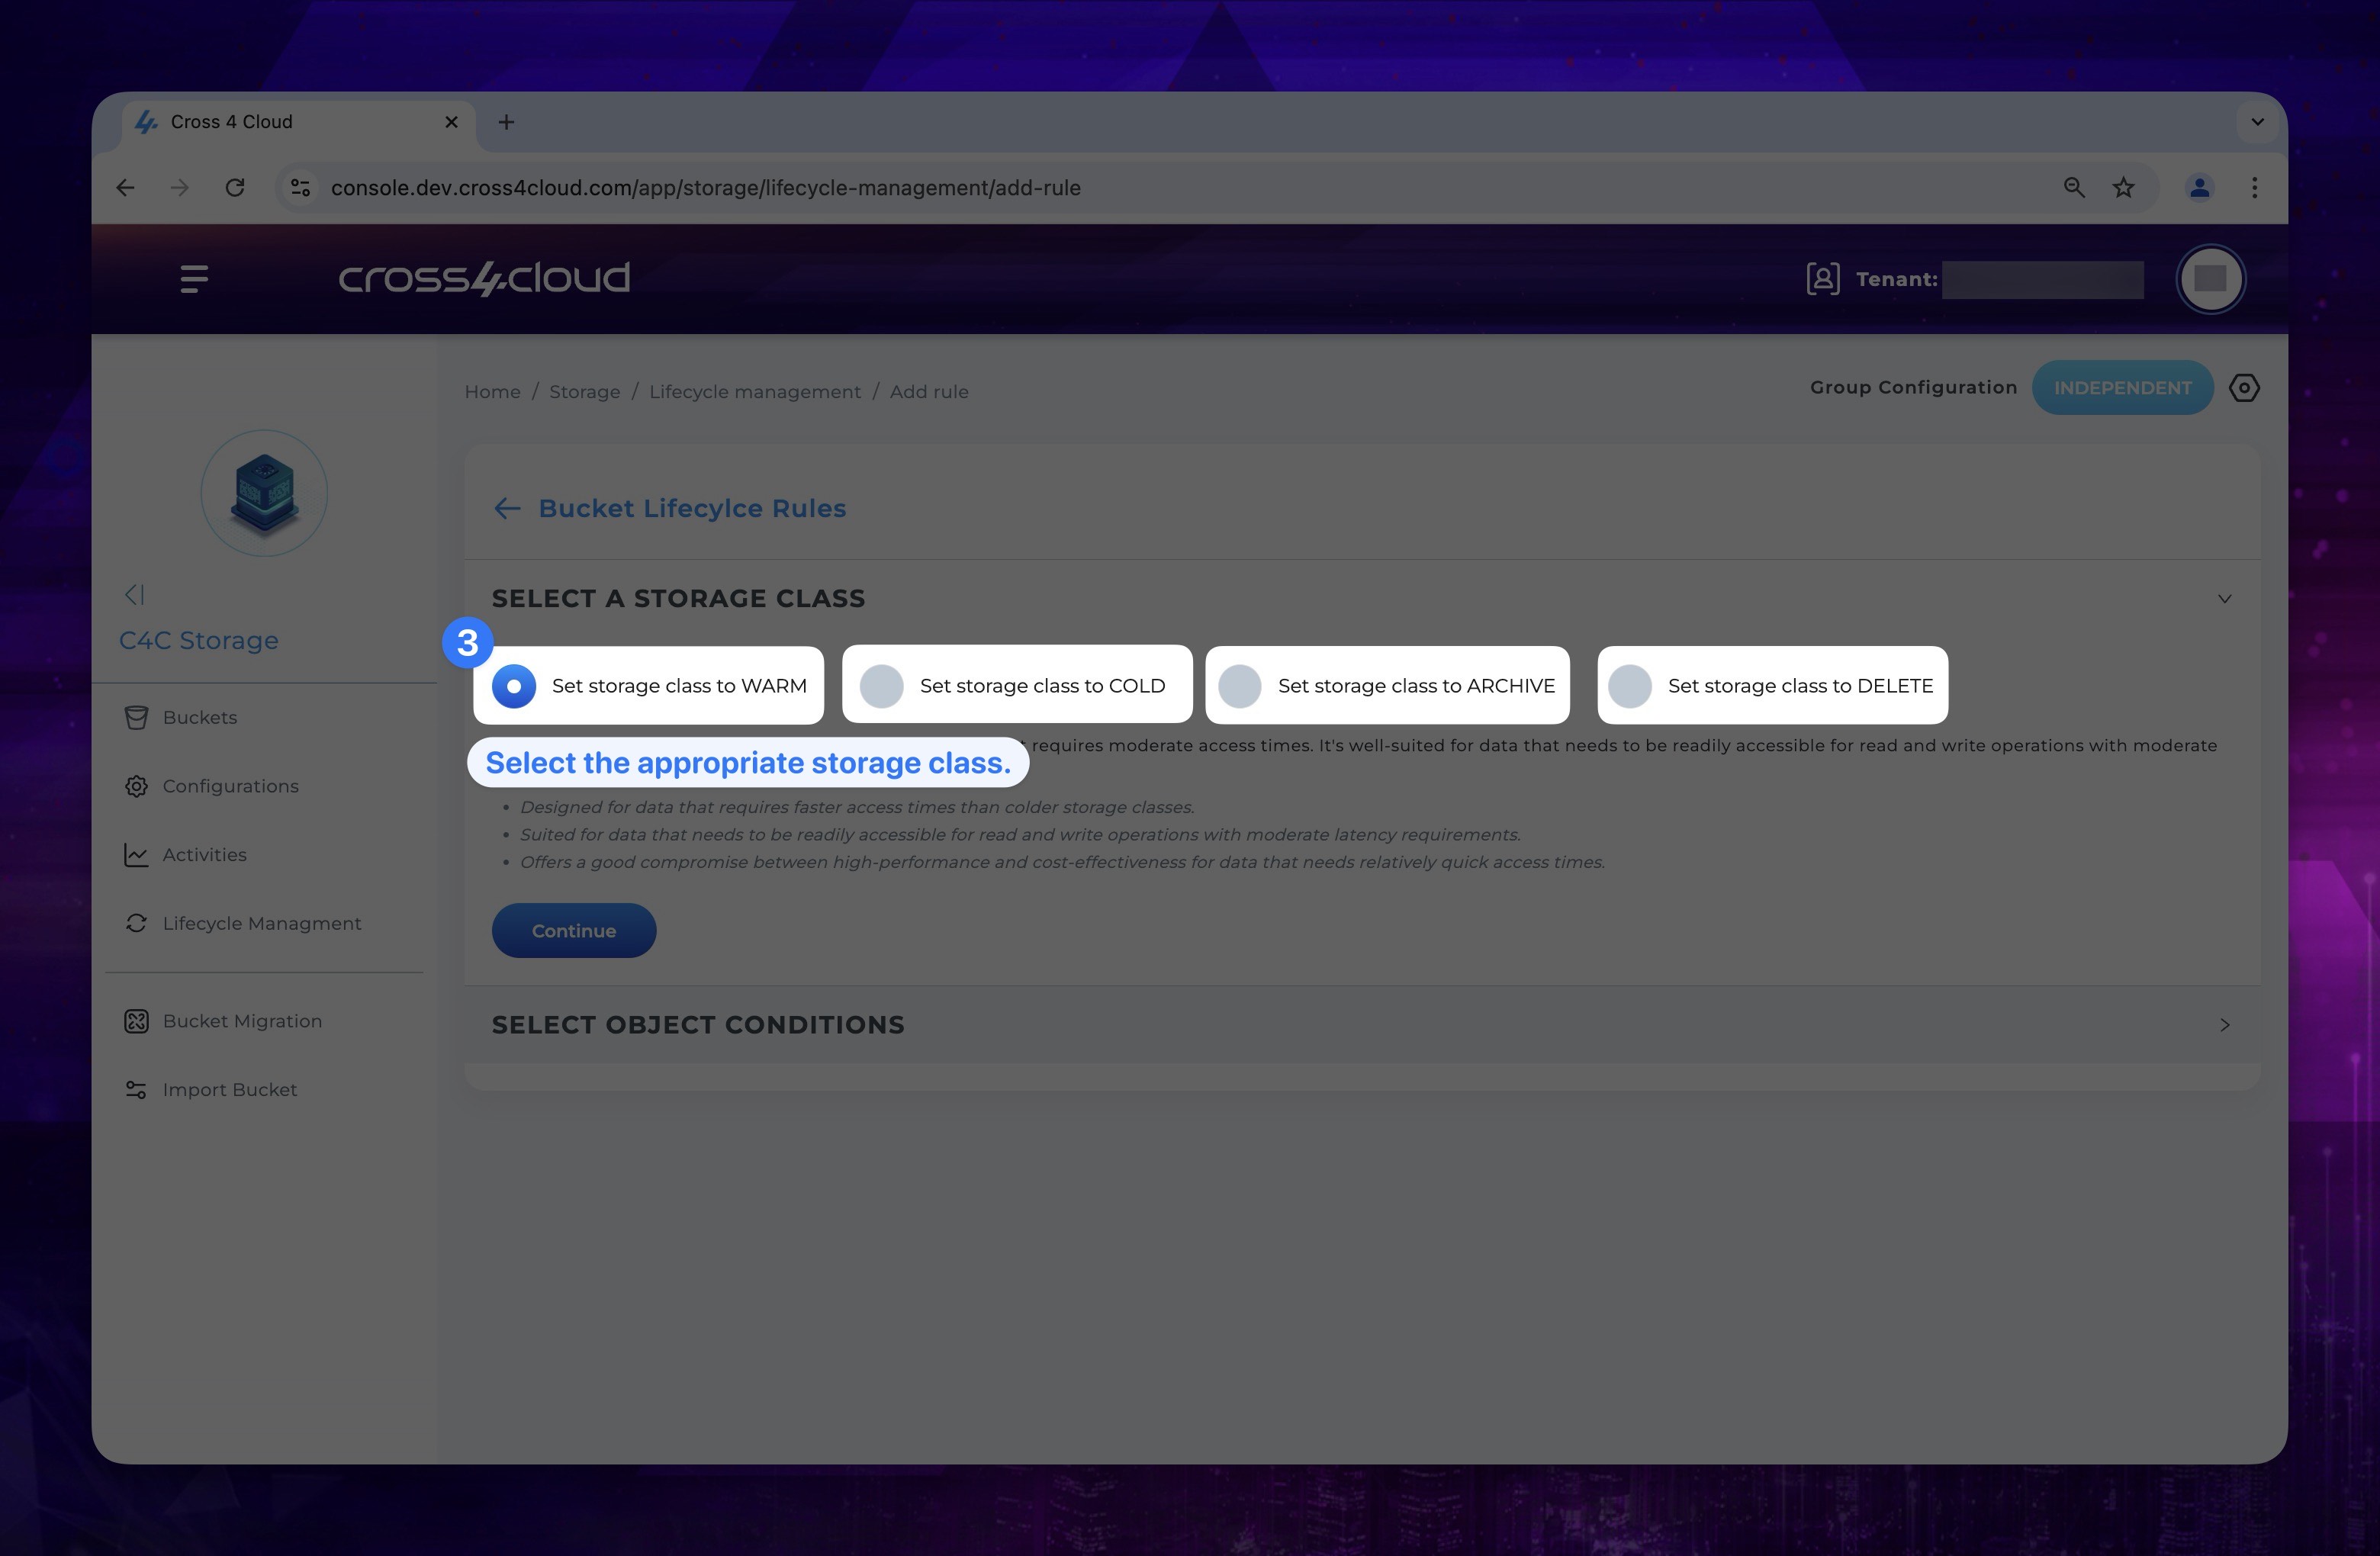
First, select the appropriate storage class for the new rule based on your requirements and click continue button. Storage classes enable you to balance costs with storage, access needs, and in some cases, data redundancy. Each storage class serves a different purpose and is designed to meet specific needs. We can simply define each storage class as:
-
Warm: Warm storage class is ideal for active data that requires moderate access times. It's well-suited for data that needs to be readily accessible for read and write operations with moderate latency requirements.
- Designed for data that requires faster access times than colder storage classes.
- Suited for data that needs to be readily accessible for read and write operations with moderate latency requirements.
- Offers a good compromise between high-performance and cost-effectiveness for data that needs relatively quick access times.
-
Cold: The cold storage class is recommended for long-term storage of data seldom accessed. It provides cost-effective retention with longer retrieval times, suitable for data that doesn't need immediate access.
- Meant for data that is rarely accessed and doesn't necessitate immediate availability.
- Provides lower storage costs but longer retrieval times compared to warmer storage classes.
- Suitable for data that needs to be retained for longer periods without the requirement for quick access times.
-
Archive: The archive storage class is recommended for long-term storage of data seldom accessed. It provides cost-effective retention with longer retrieval times, suitable for data that doesn't need immediate access.
- Intended for data that is seldom accessed and requires the lowest storage costs.
- Offers the longest retrieval times among the storage classes.
- Ideal for data that needs to be stored for extended periods, such as for compliance, regulatory, or legal requirements, where immediate access is not critical.
-
Delete: The delete storage class is recommended for long-term storage of data seldom accessed. It provides cost-effective retention with longer retrieval times, suitable for data that doesn't need immediate access.
- Intended for data that is seldom accessed and requires the lowest storage costs.
- Offers the longest retrieval times among the storage classes.
- Ideal for data that needs to be stored for extended periods, such as for compliance, regulatory, or legal requirements, where immediate access is not critical.
-
Show the instruction with images
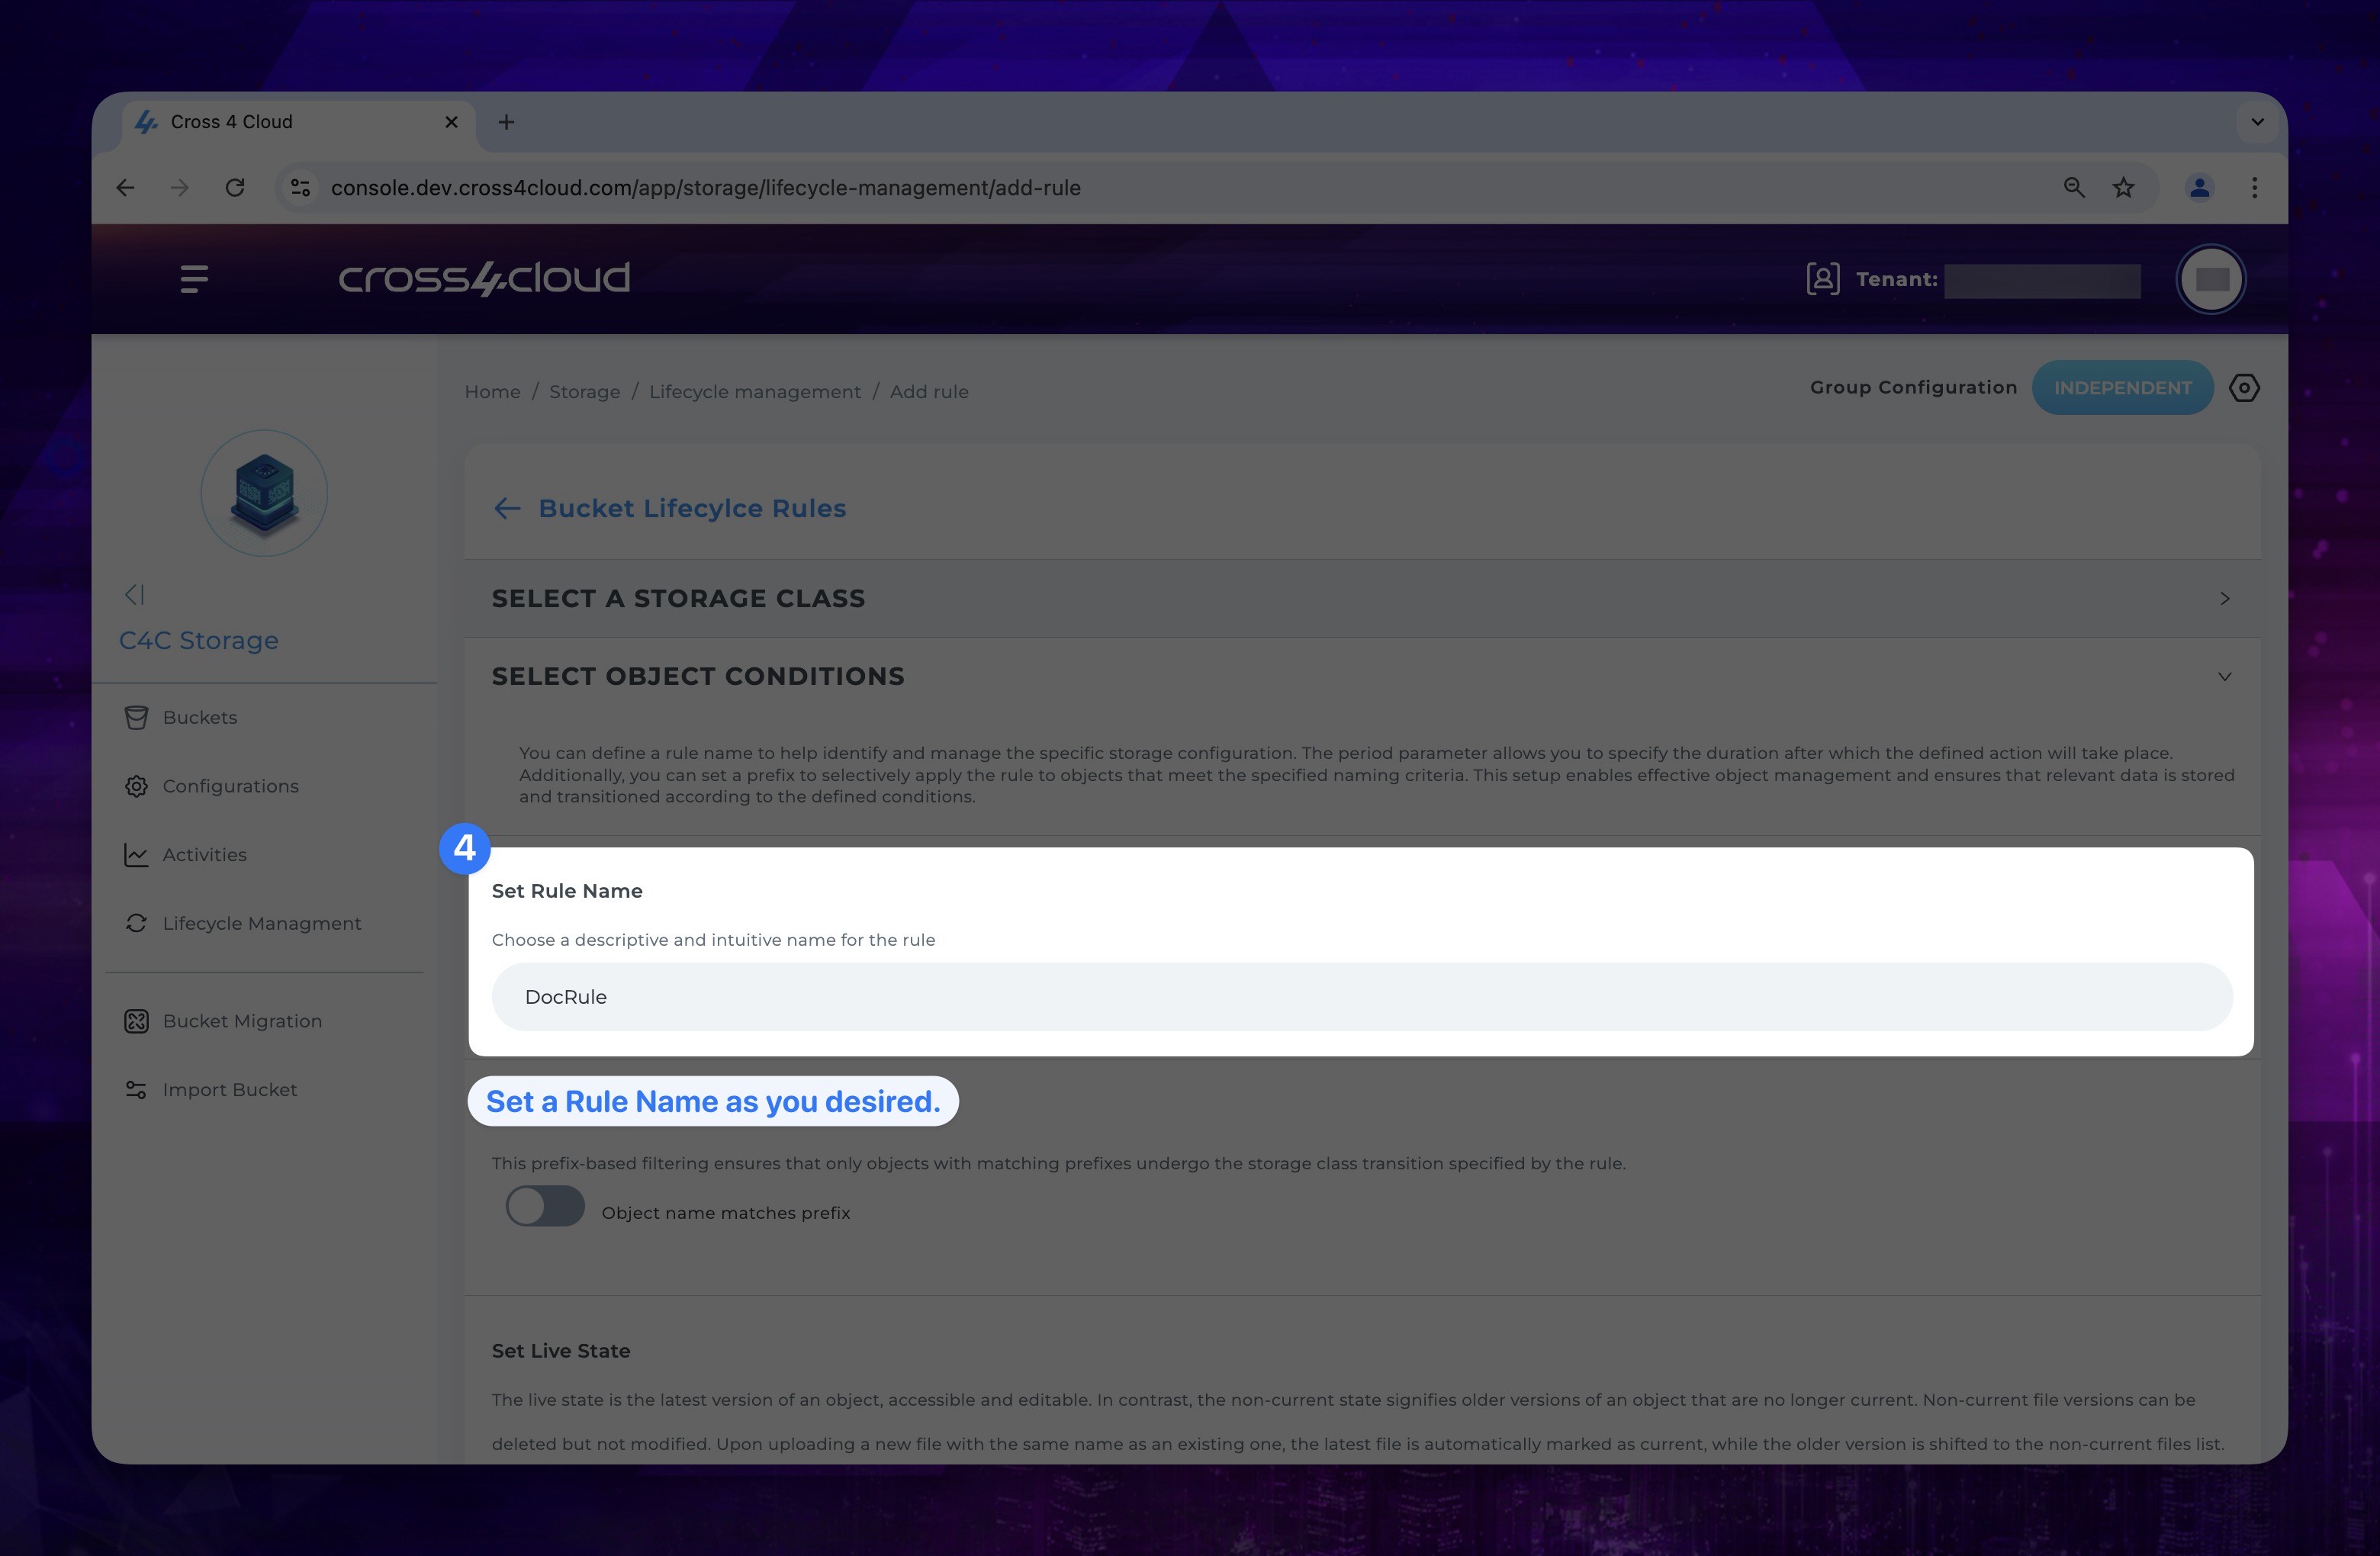
- In the Object Conditions section, you can name your rule as desired to identify later.
Show the instruction with images
-
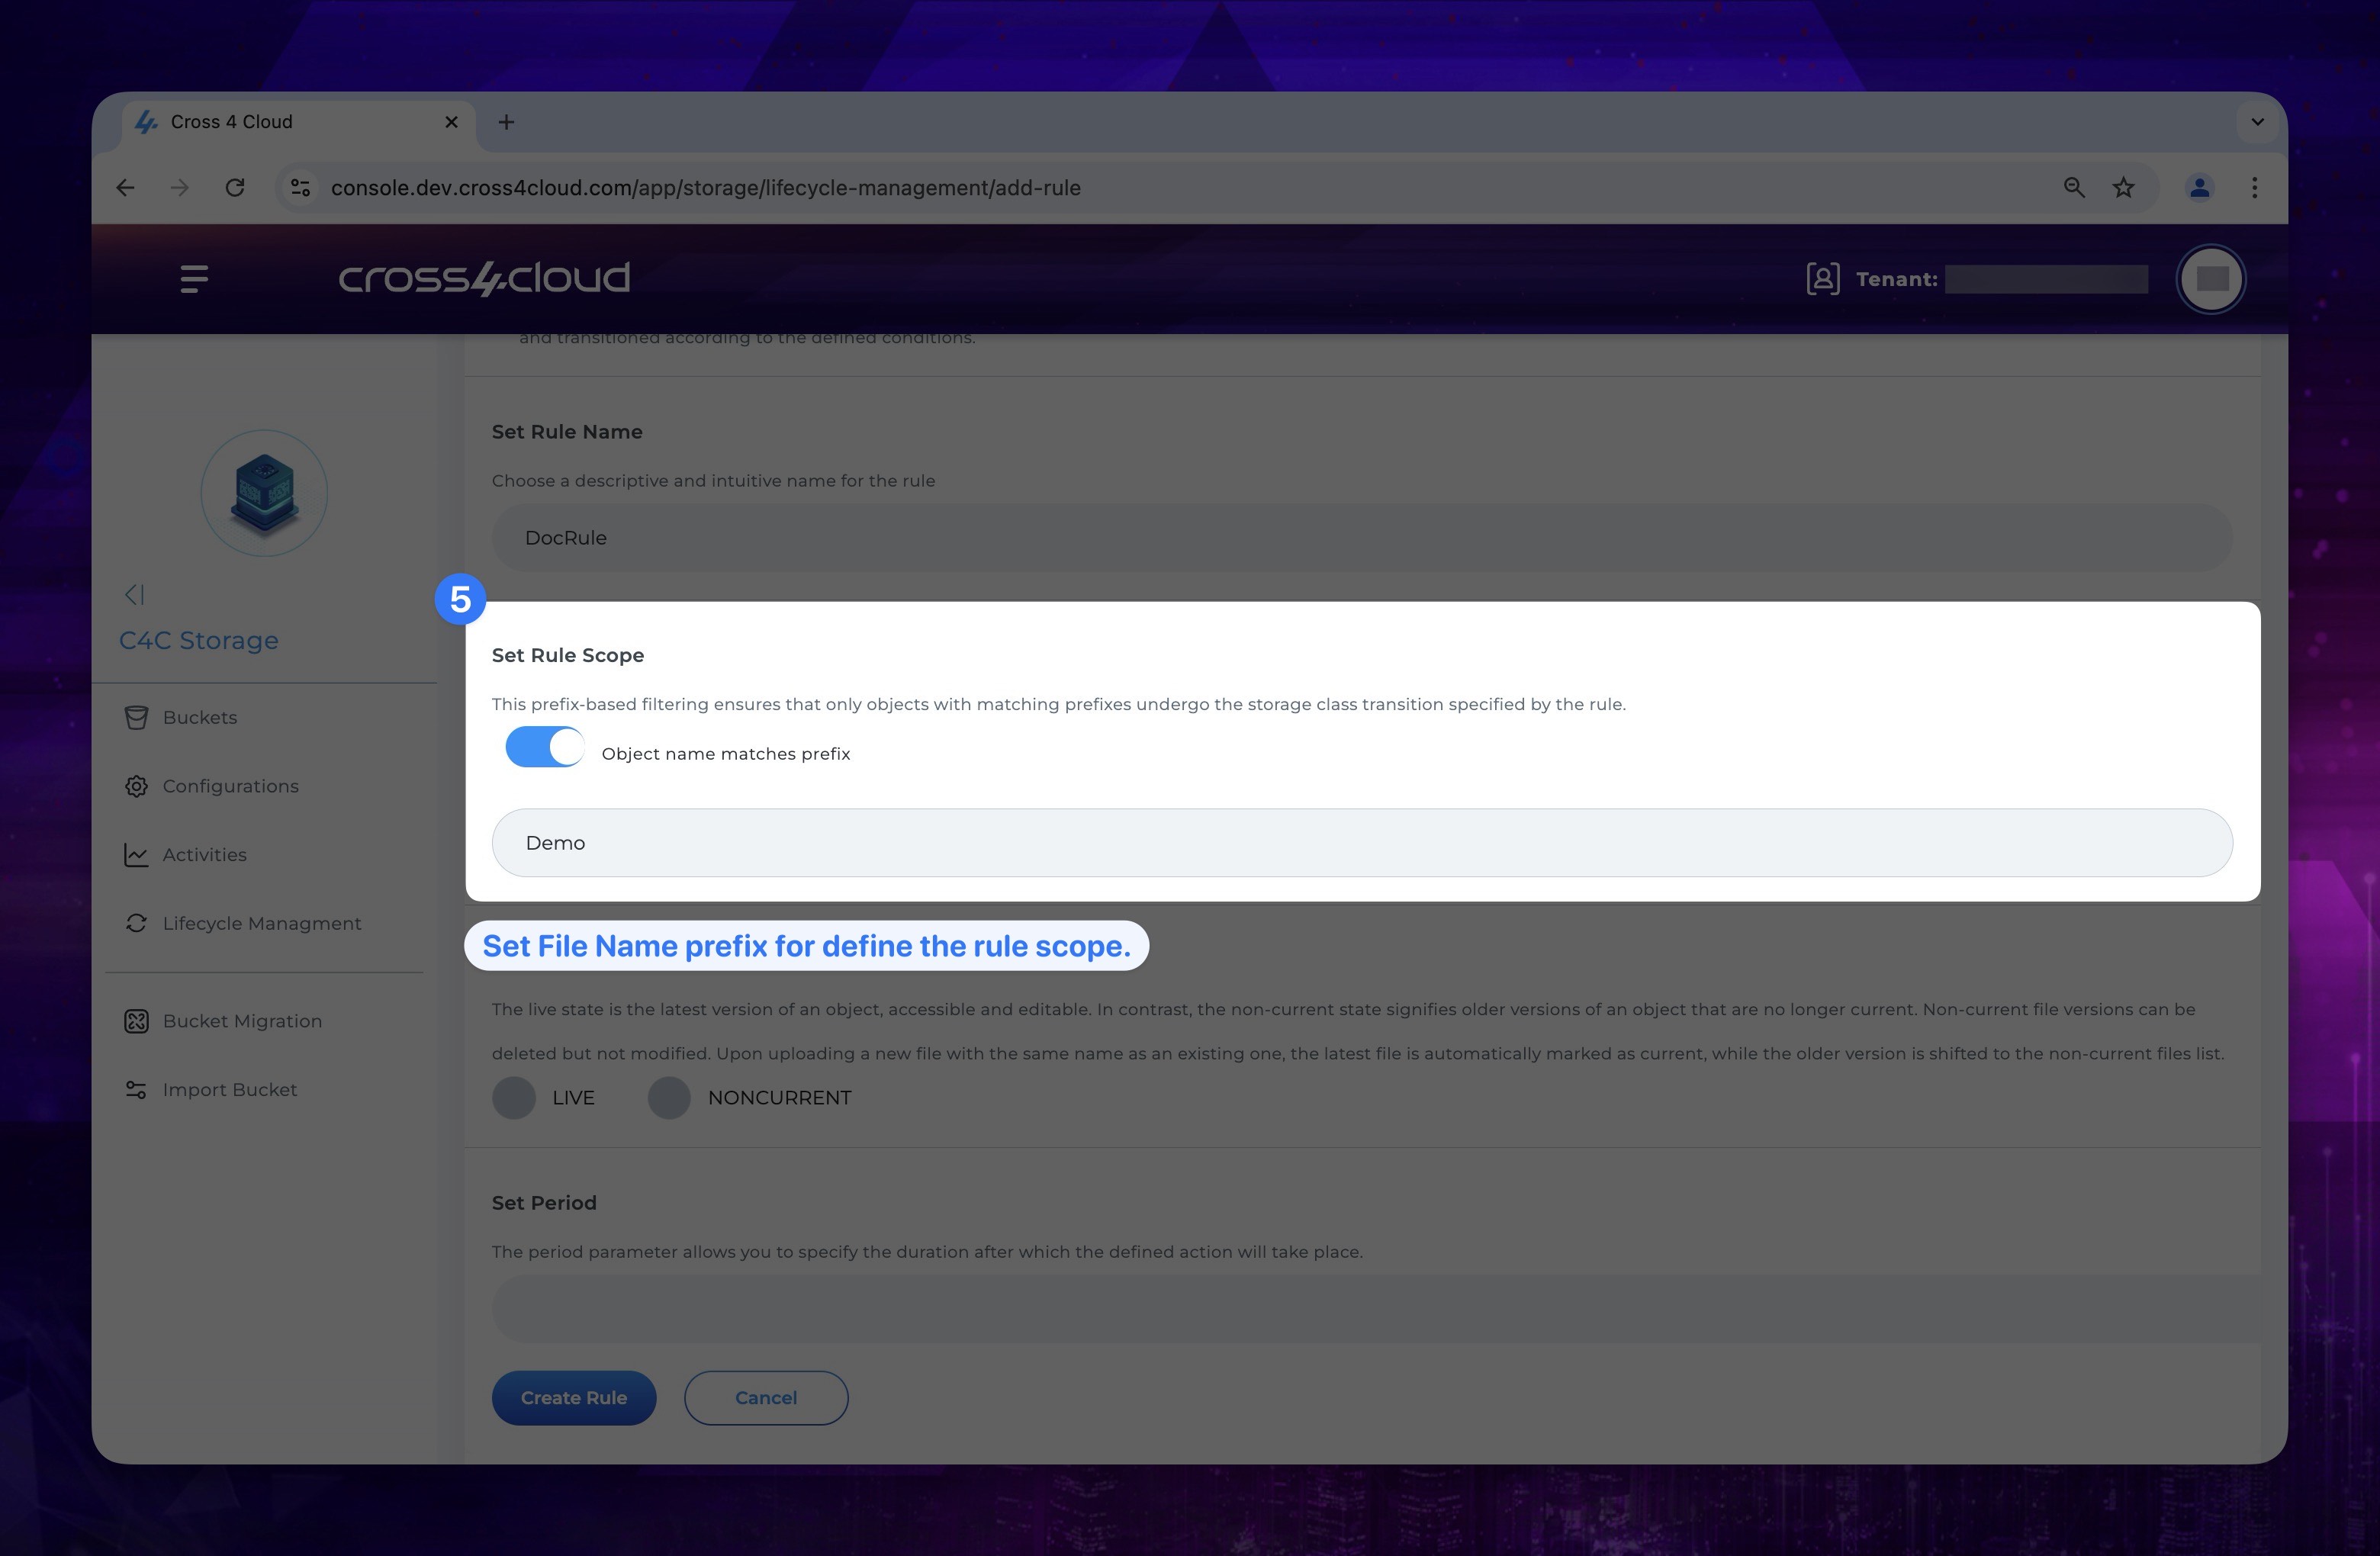
To define the scope of your rule, you can set a prefix. This means that if a file name in your storage matches the specified prefix, it will be directly included within the rule's scope.
warningIf no prefix is set for the rule, it will apply to all objects in your bucket.
Show the instruction with images
-
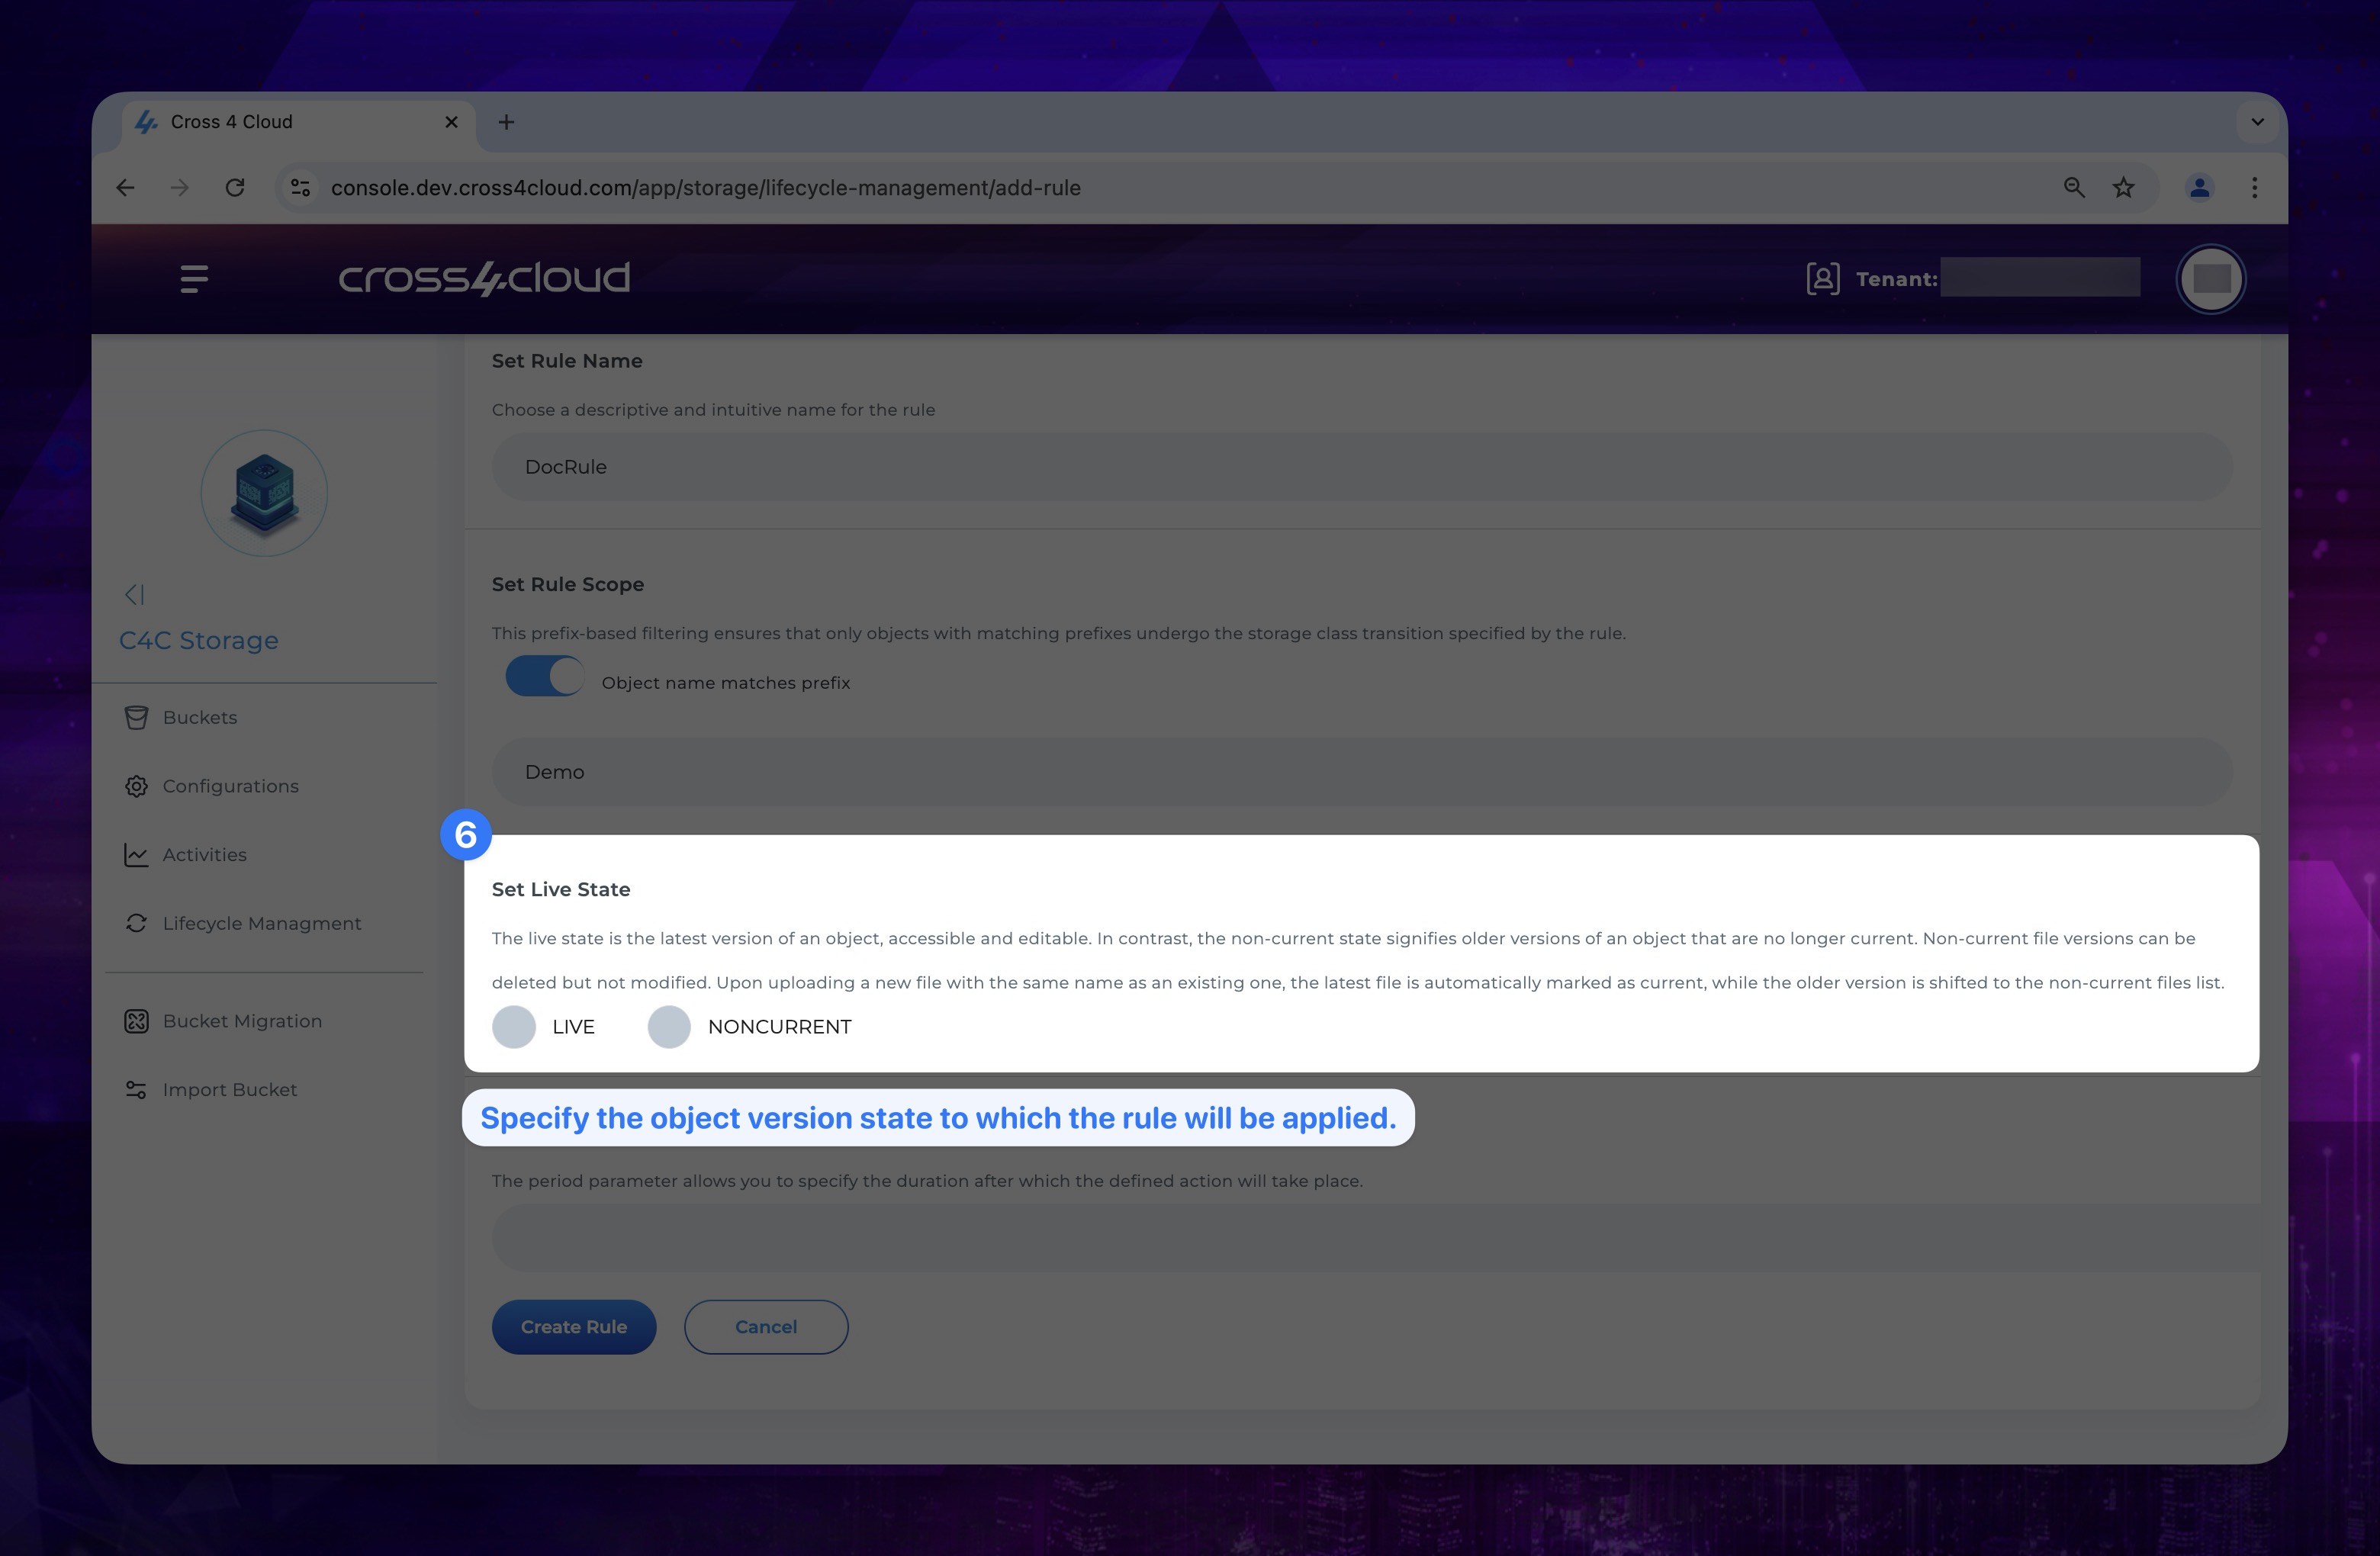
Specify the object version state to which the rule will be applied. This allows you to define whether the rule targets the live version of the objects or concurrent versions within the storage.
warningIf you have not enabled bucket versioning, the rule will automatically apply to all existing objects, as there will be no version history to consider.
Show the instruction with images
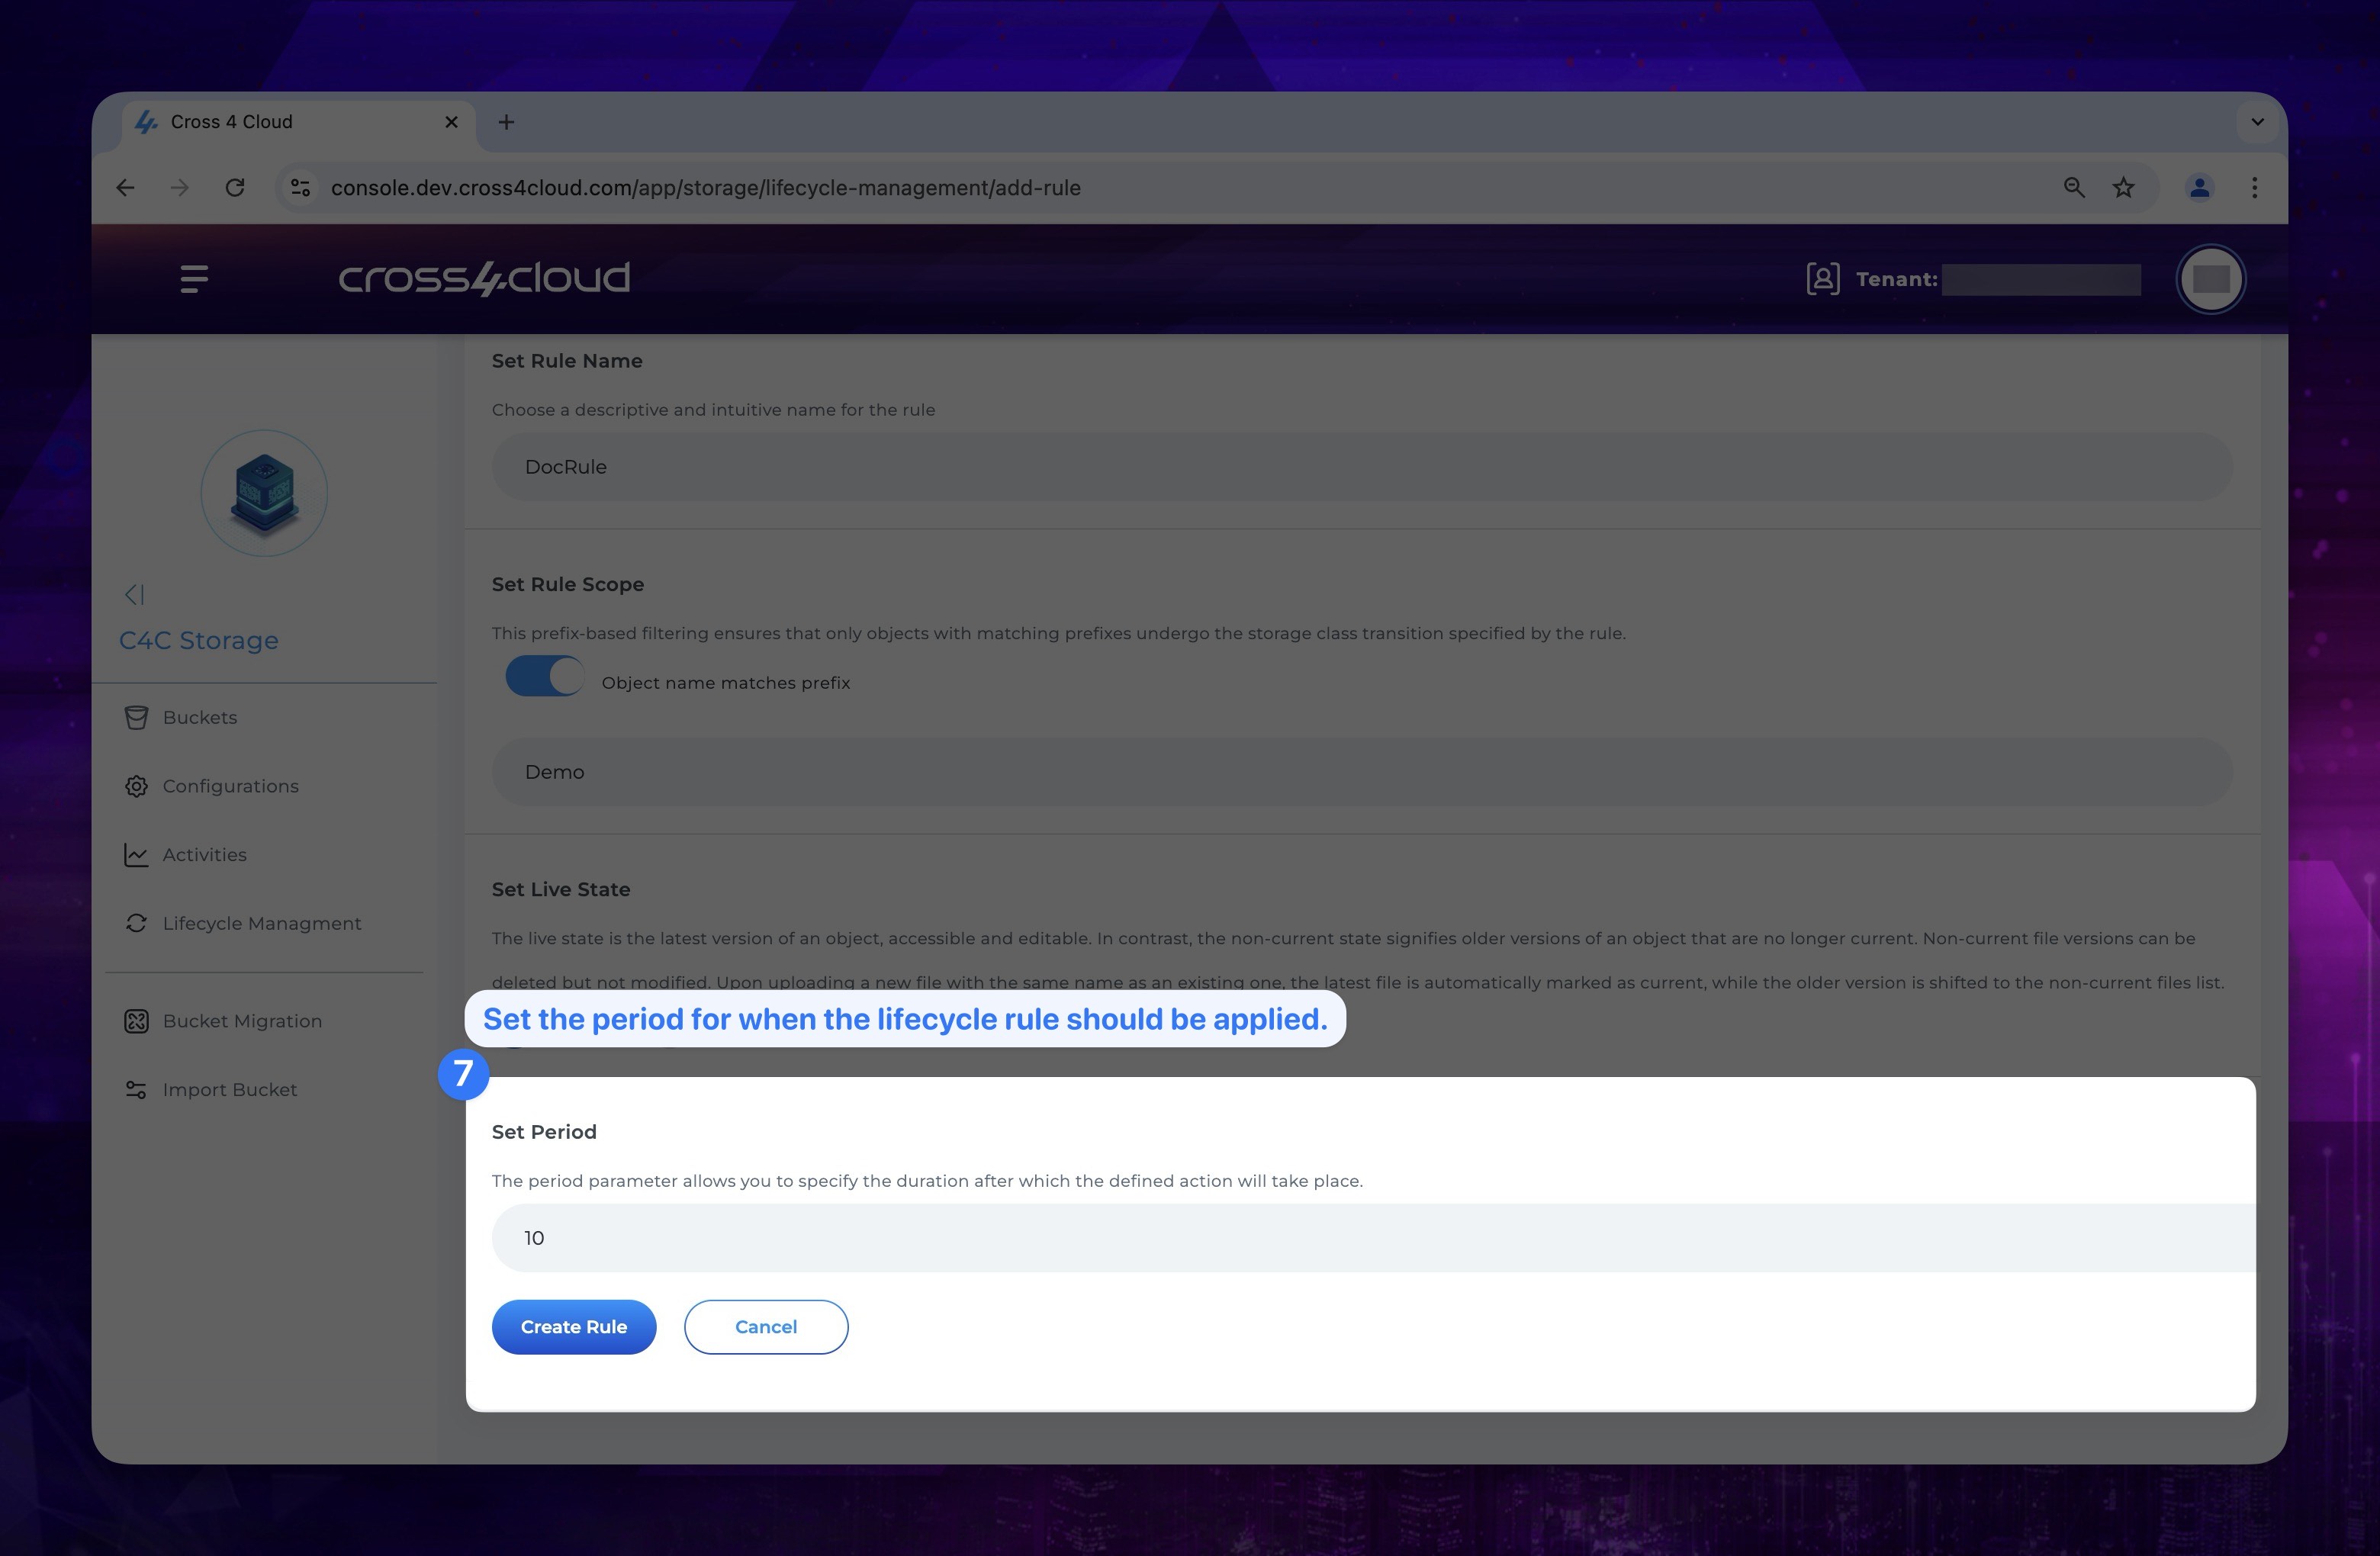
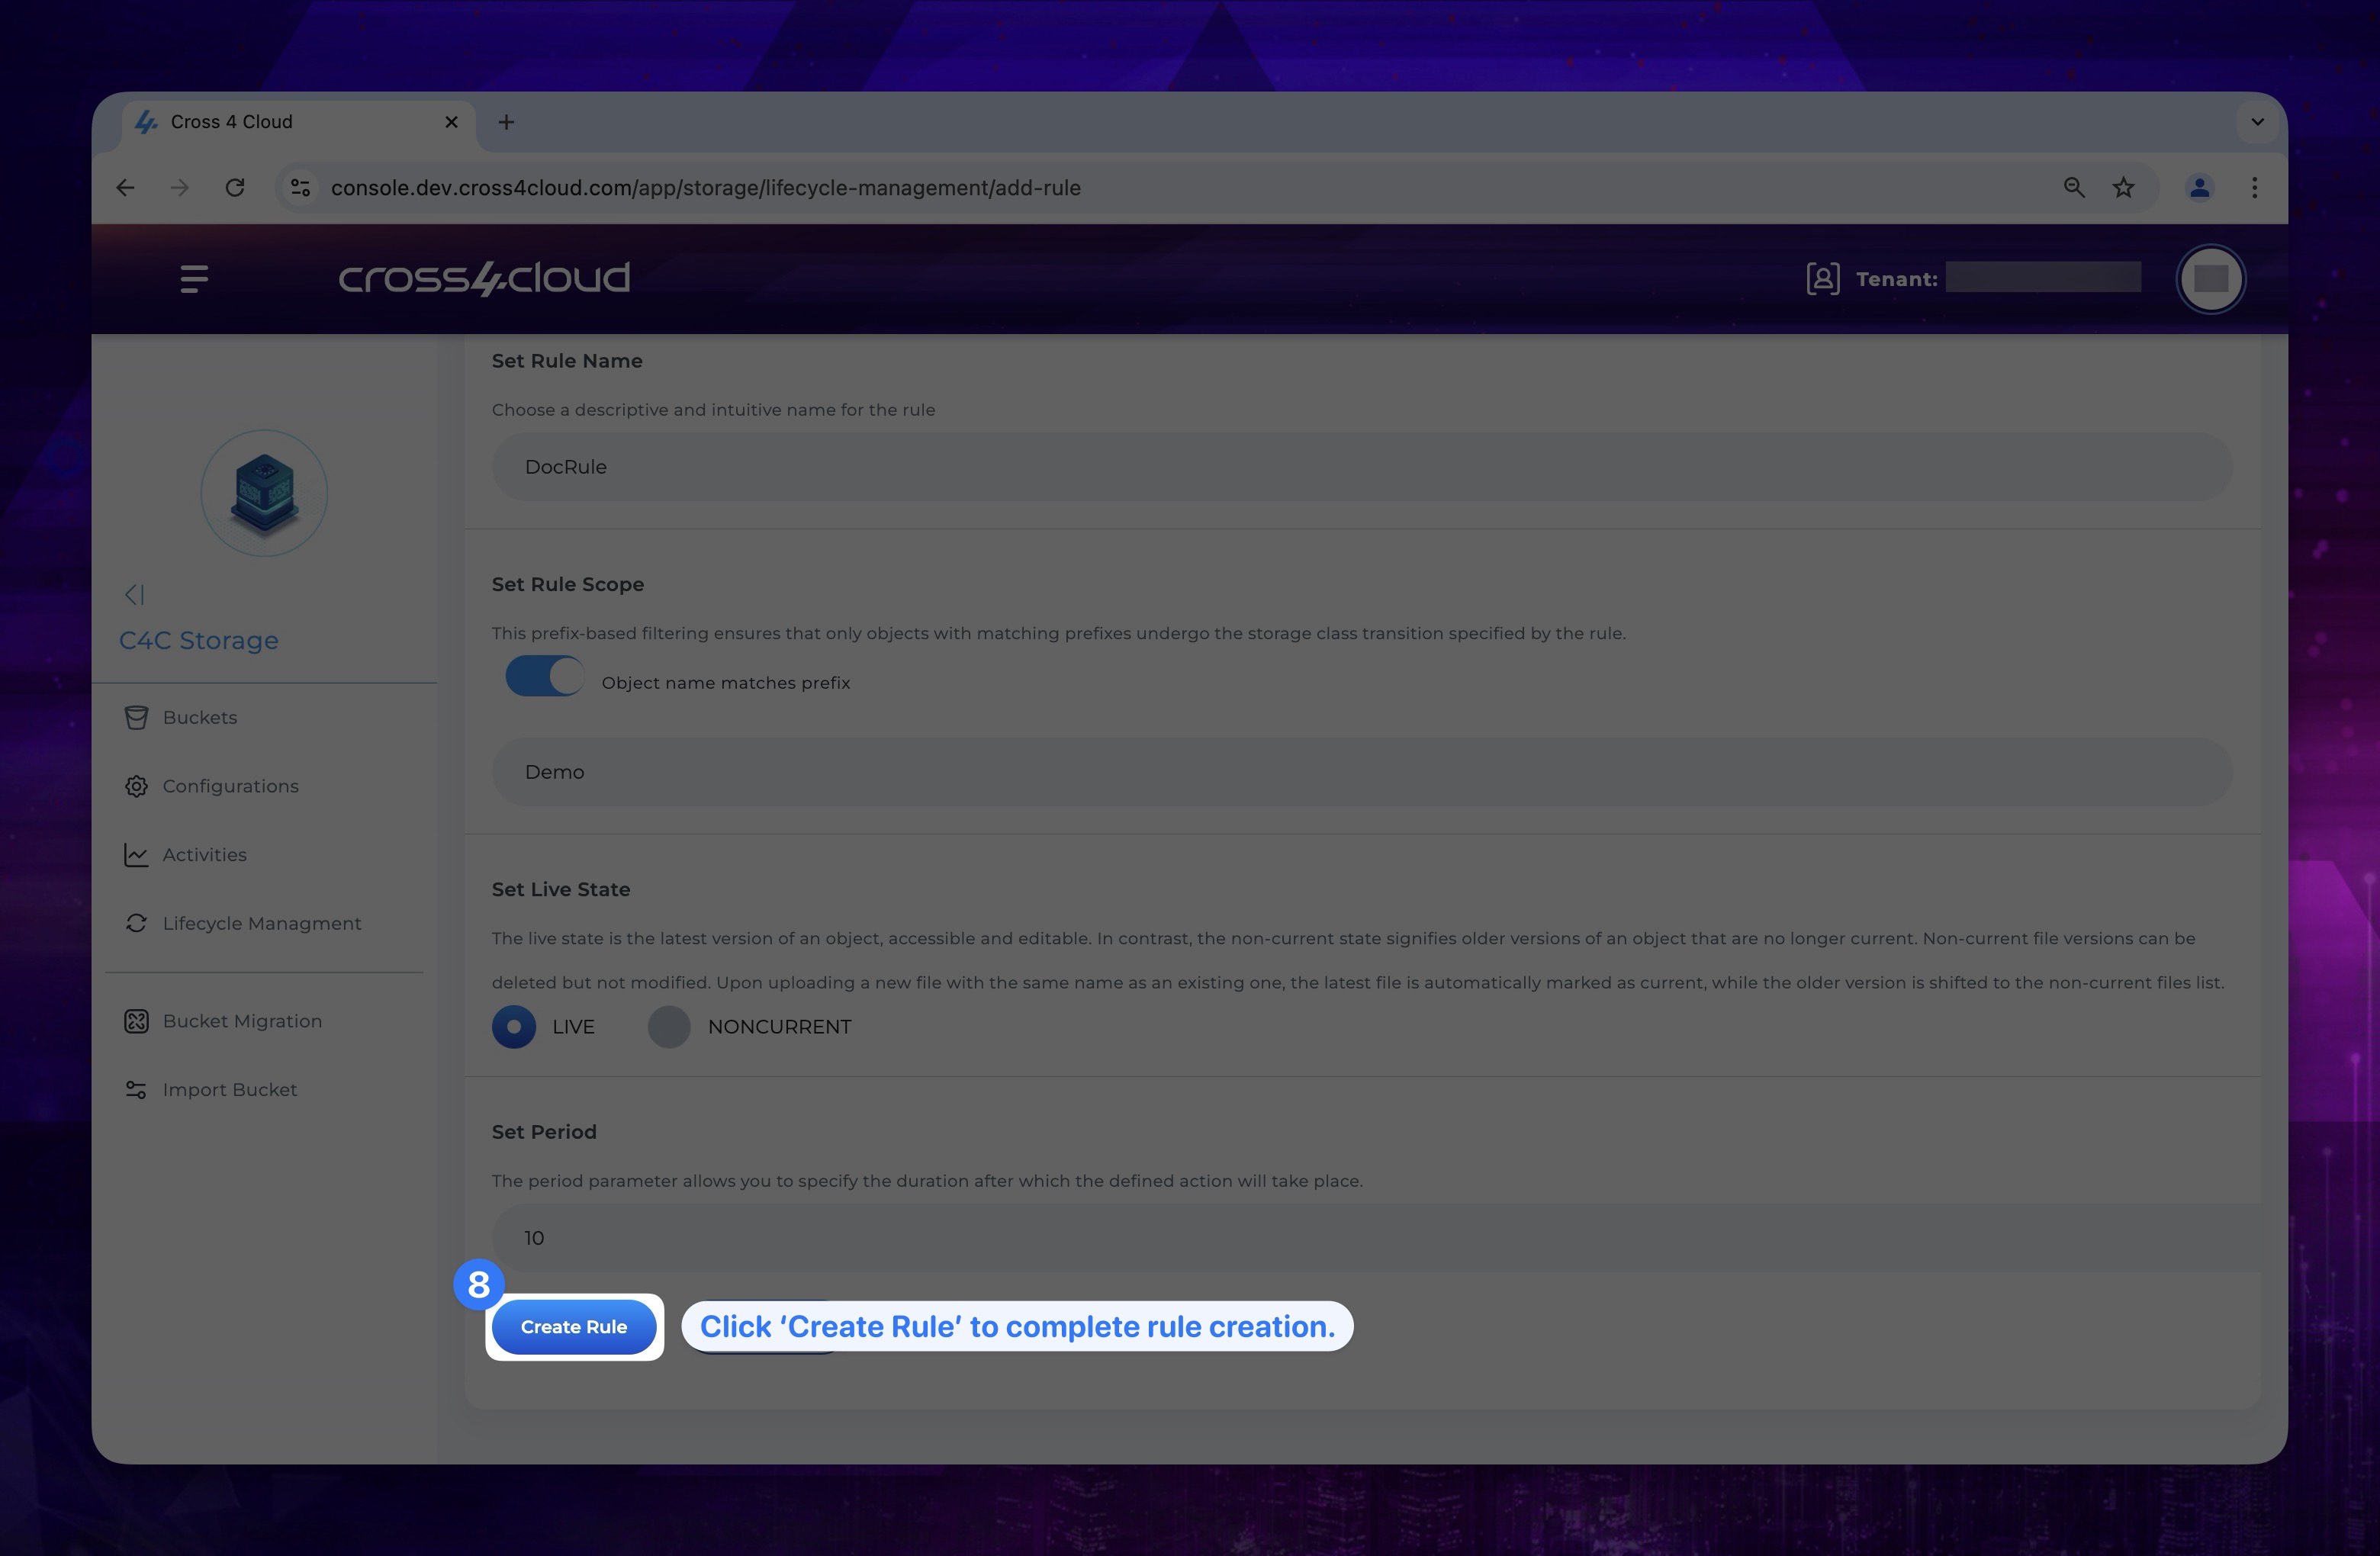
- Set the period for when the lifecycle rule should be applied. Please note that the period must be specified in days.
Show the instruction with images
- Once you have completed these configurations, click the Create Rule button to finalize the rule creation.
Show the instruction with images
Lifecycle Rule Deletion
To deactivate any rule you have created, you need to delete it. To delete a rule:
- You should firstly go to Lifecycle Management tab in Cross4Storage.
Show the instruction with images
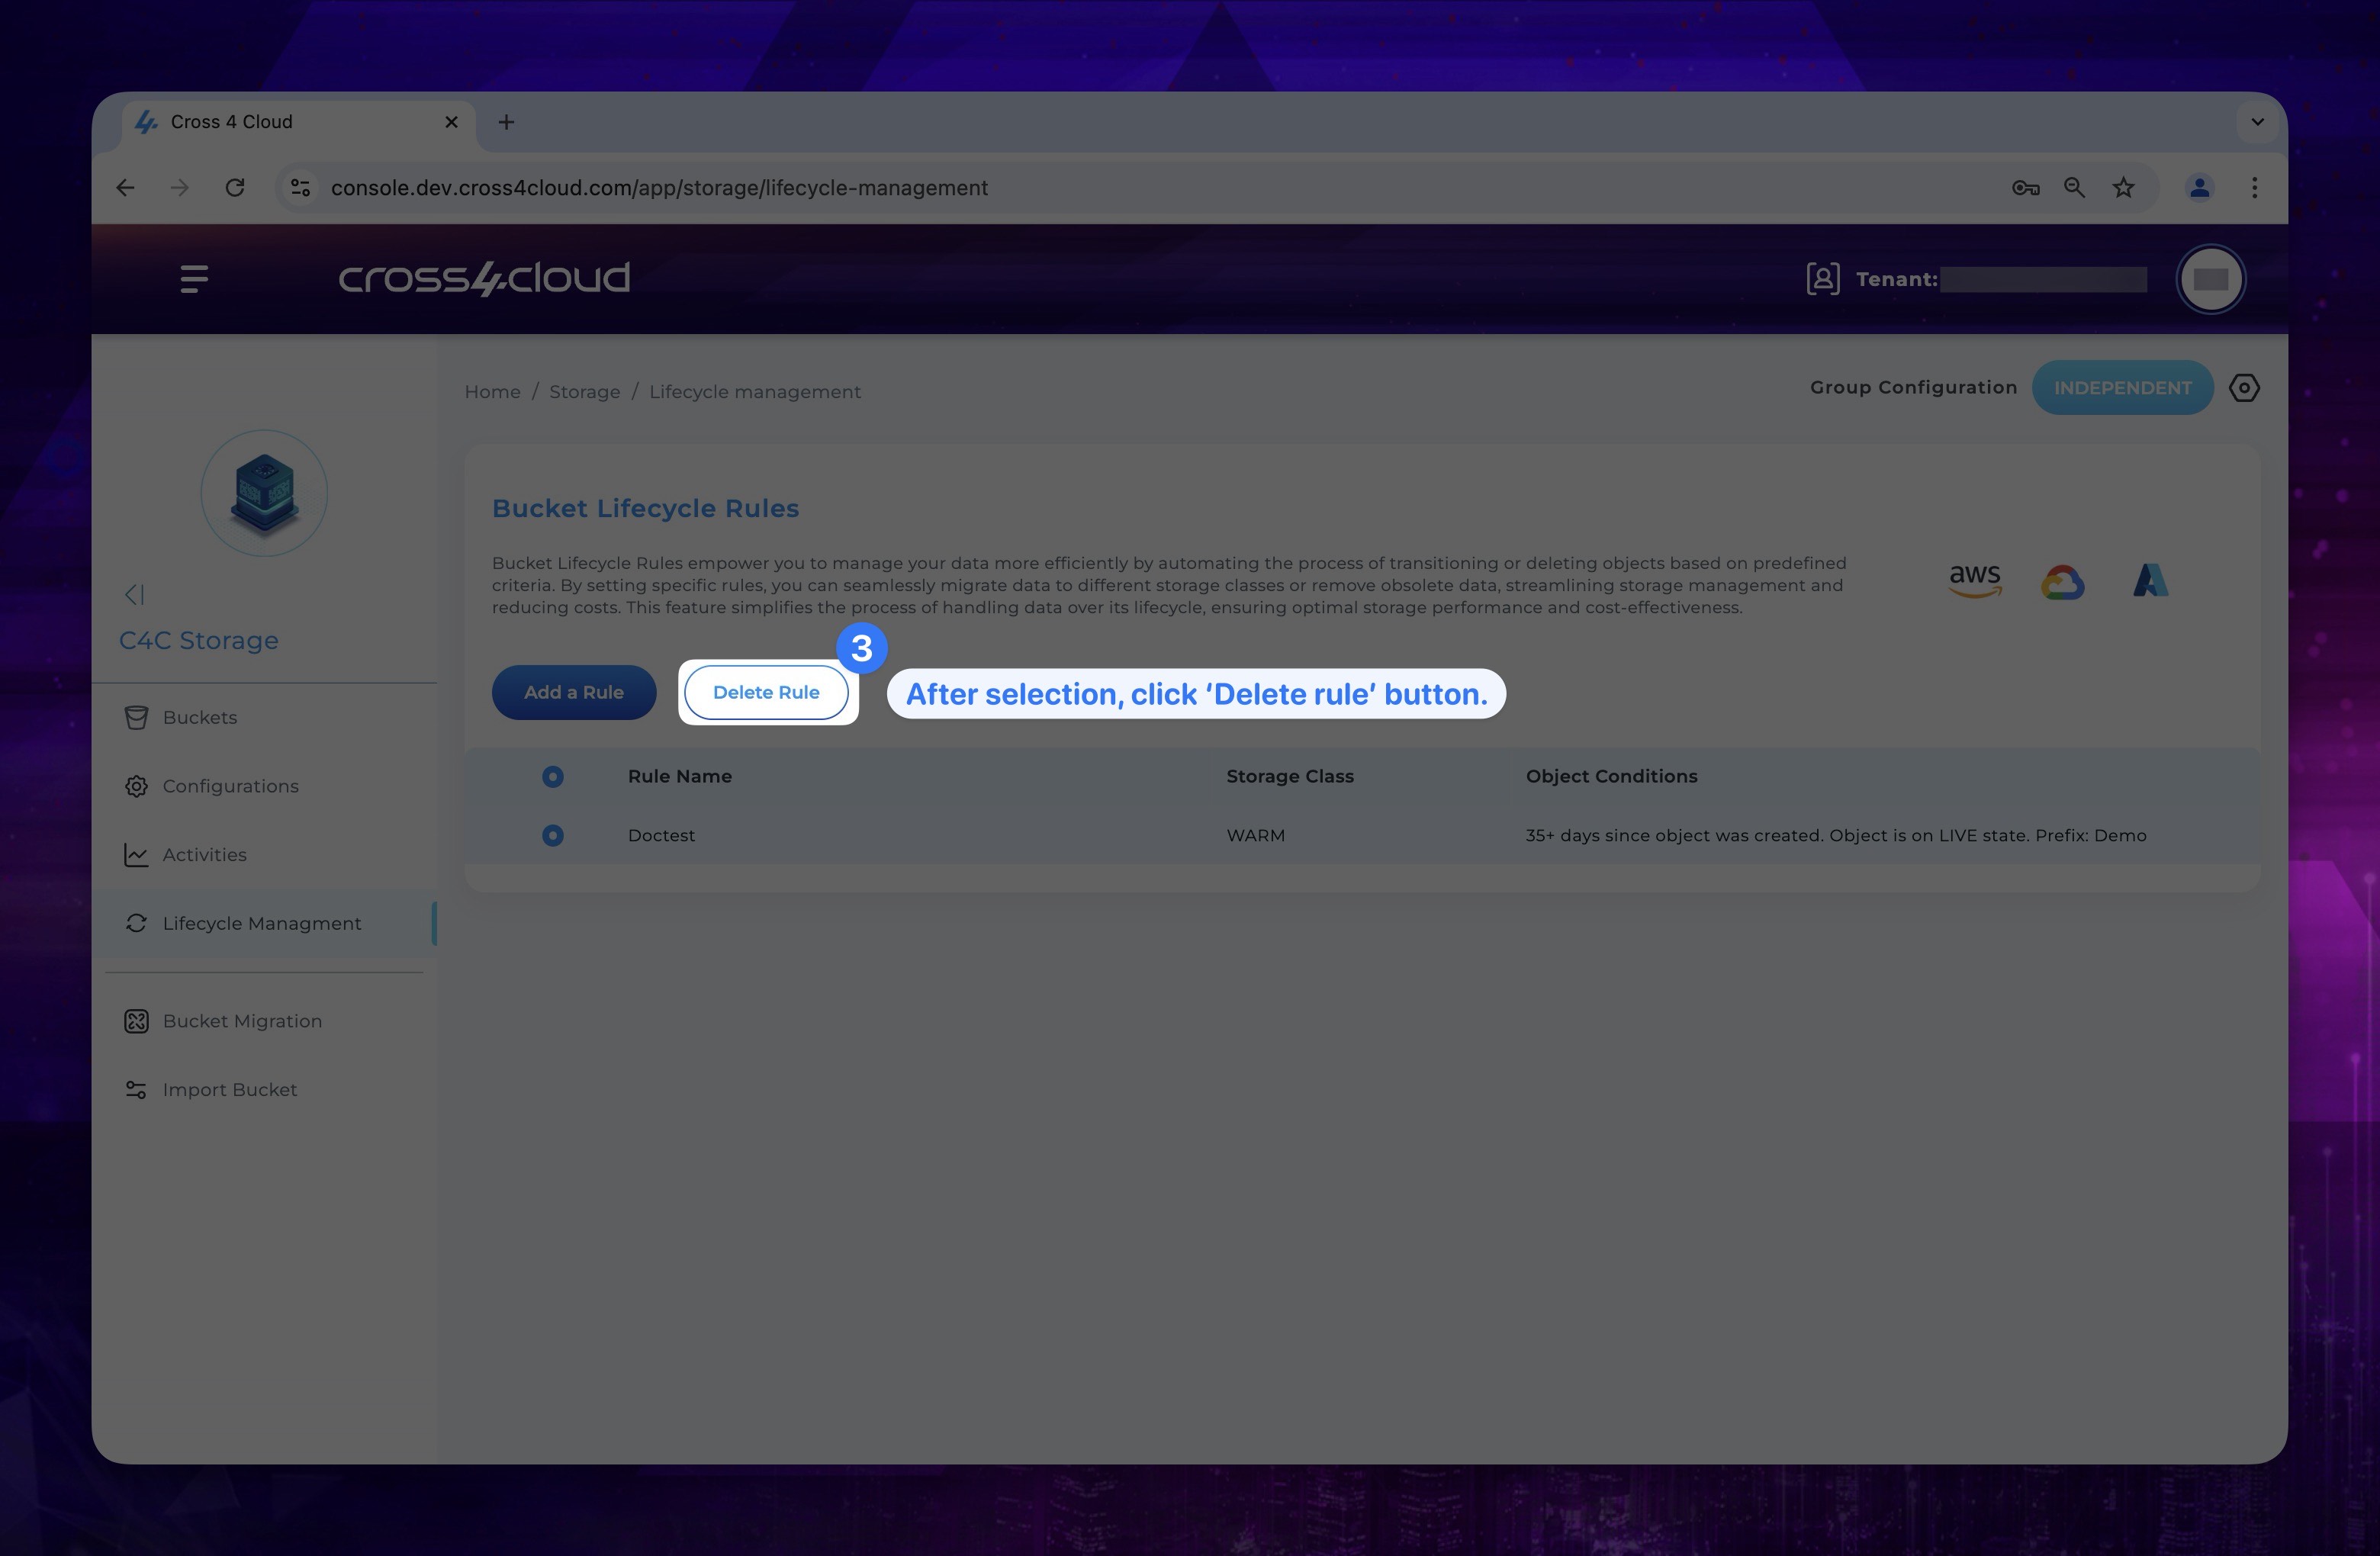
- Select the rules you want to remove from the displayed list by clicking the checkbox next to each rule.
Show the instruction with images

- After making your selections, click the Delete Rule button at the top of the page.
Show the instruction with images
Bucket Migration
Our platform provides powerful capabilities for seamless migration between cloud providers such as AWS, GCP, and Azure. This gives users the ability to seamlessly transfer their operations and data between different environments, minimizing disruptions and maximizing efficiency.
To do this, after dragging and dropping the two provider icons you want to migrate, you can select the source and target provider and start the migration process.
Please note that as per Bucket Migration logic, after migration, the selected files will be deleted from the source provider and moved to the target provider.
Import Bucket
It allows you to import a bucket from your selected provider to your group.
Configurations
On this page, you can configure the provider to be used under the related service by using the credentials obtained from providers. Alternatively, you can edit previously used credentials from this page.