Cross4Alert
Cross4Alert is a comprehensive cloud alert system that centralizes and streamlines the management of existing alarm and alert systems across various cloud providers. By monitoring your selected resource metrics, Cross4Alert sends alerts whenever conditions fall outside the parameters you��’ve set, ensuring you are promptly notified of any irregularities or issues with your specified metrics. This helps you maintain control and oversight of your cloud environment effectively. It leverages features from AWS CloudWatch Alarms, Azure Monitoring Alerts, and GCP Notification Channels.
Key Features:
- Rule-based Alarms: Customize alarms based on storage and compute metrics to suit your specific needs.
- Quota alarms: Set alarms to ensure you don’t exceed your allocated quota limits.
- Load Balancer: Create alarms based on load balancer performance metrics.
- Autoscaling: Customize alarms to monitor autoscaling activities and performance.
- Multi-Channel Notifications: Receive notifications through various channels including email, SMS, Slack, Teams, and automated calls.
- Flexible Configuration: Offers the ability to choose individual alert mechanisms for each cloud provider or apply selected rules simultaneously.
- Easy Modification and Removal: Users can modify or remove rules post-implementation, adapting to changing requirements.
Alerts
On the Alerts page, you can view a list of your created alarms. You can use the filters to narrow down your alarms by provider or status, and utilize the create alarm function to set up new alerts based on your specific needs.
Creating New Alert
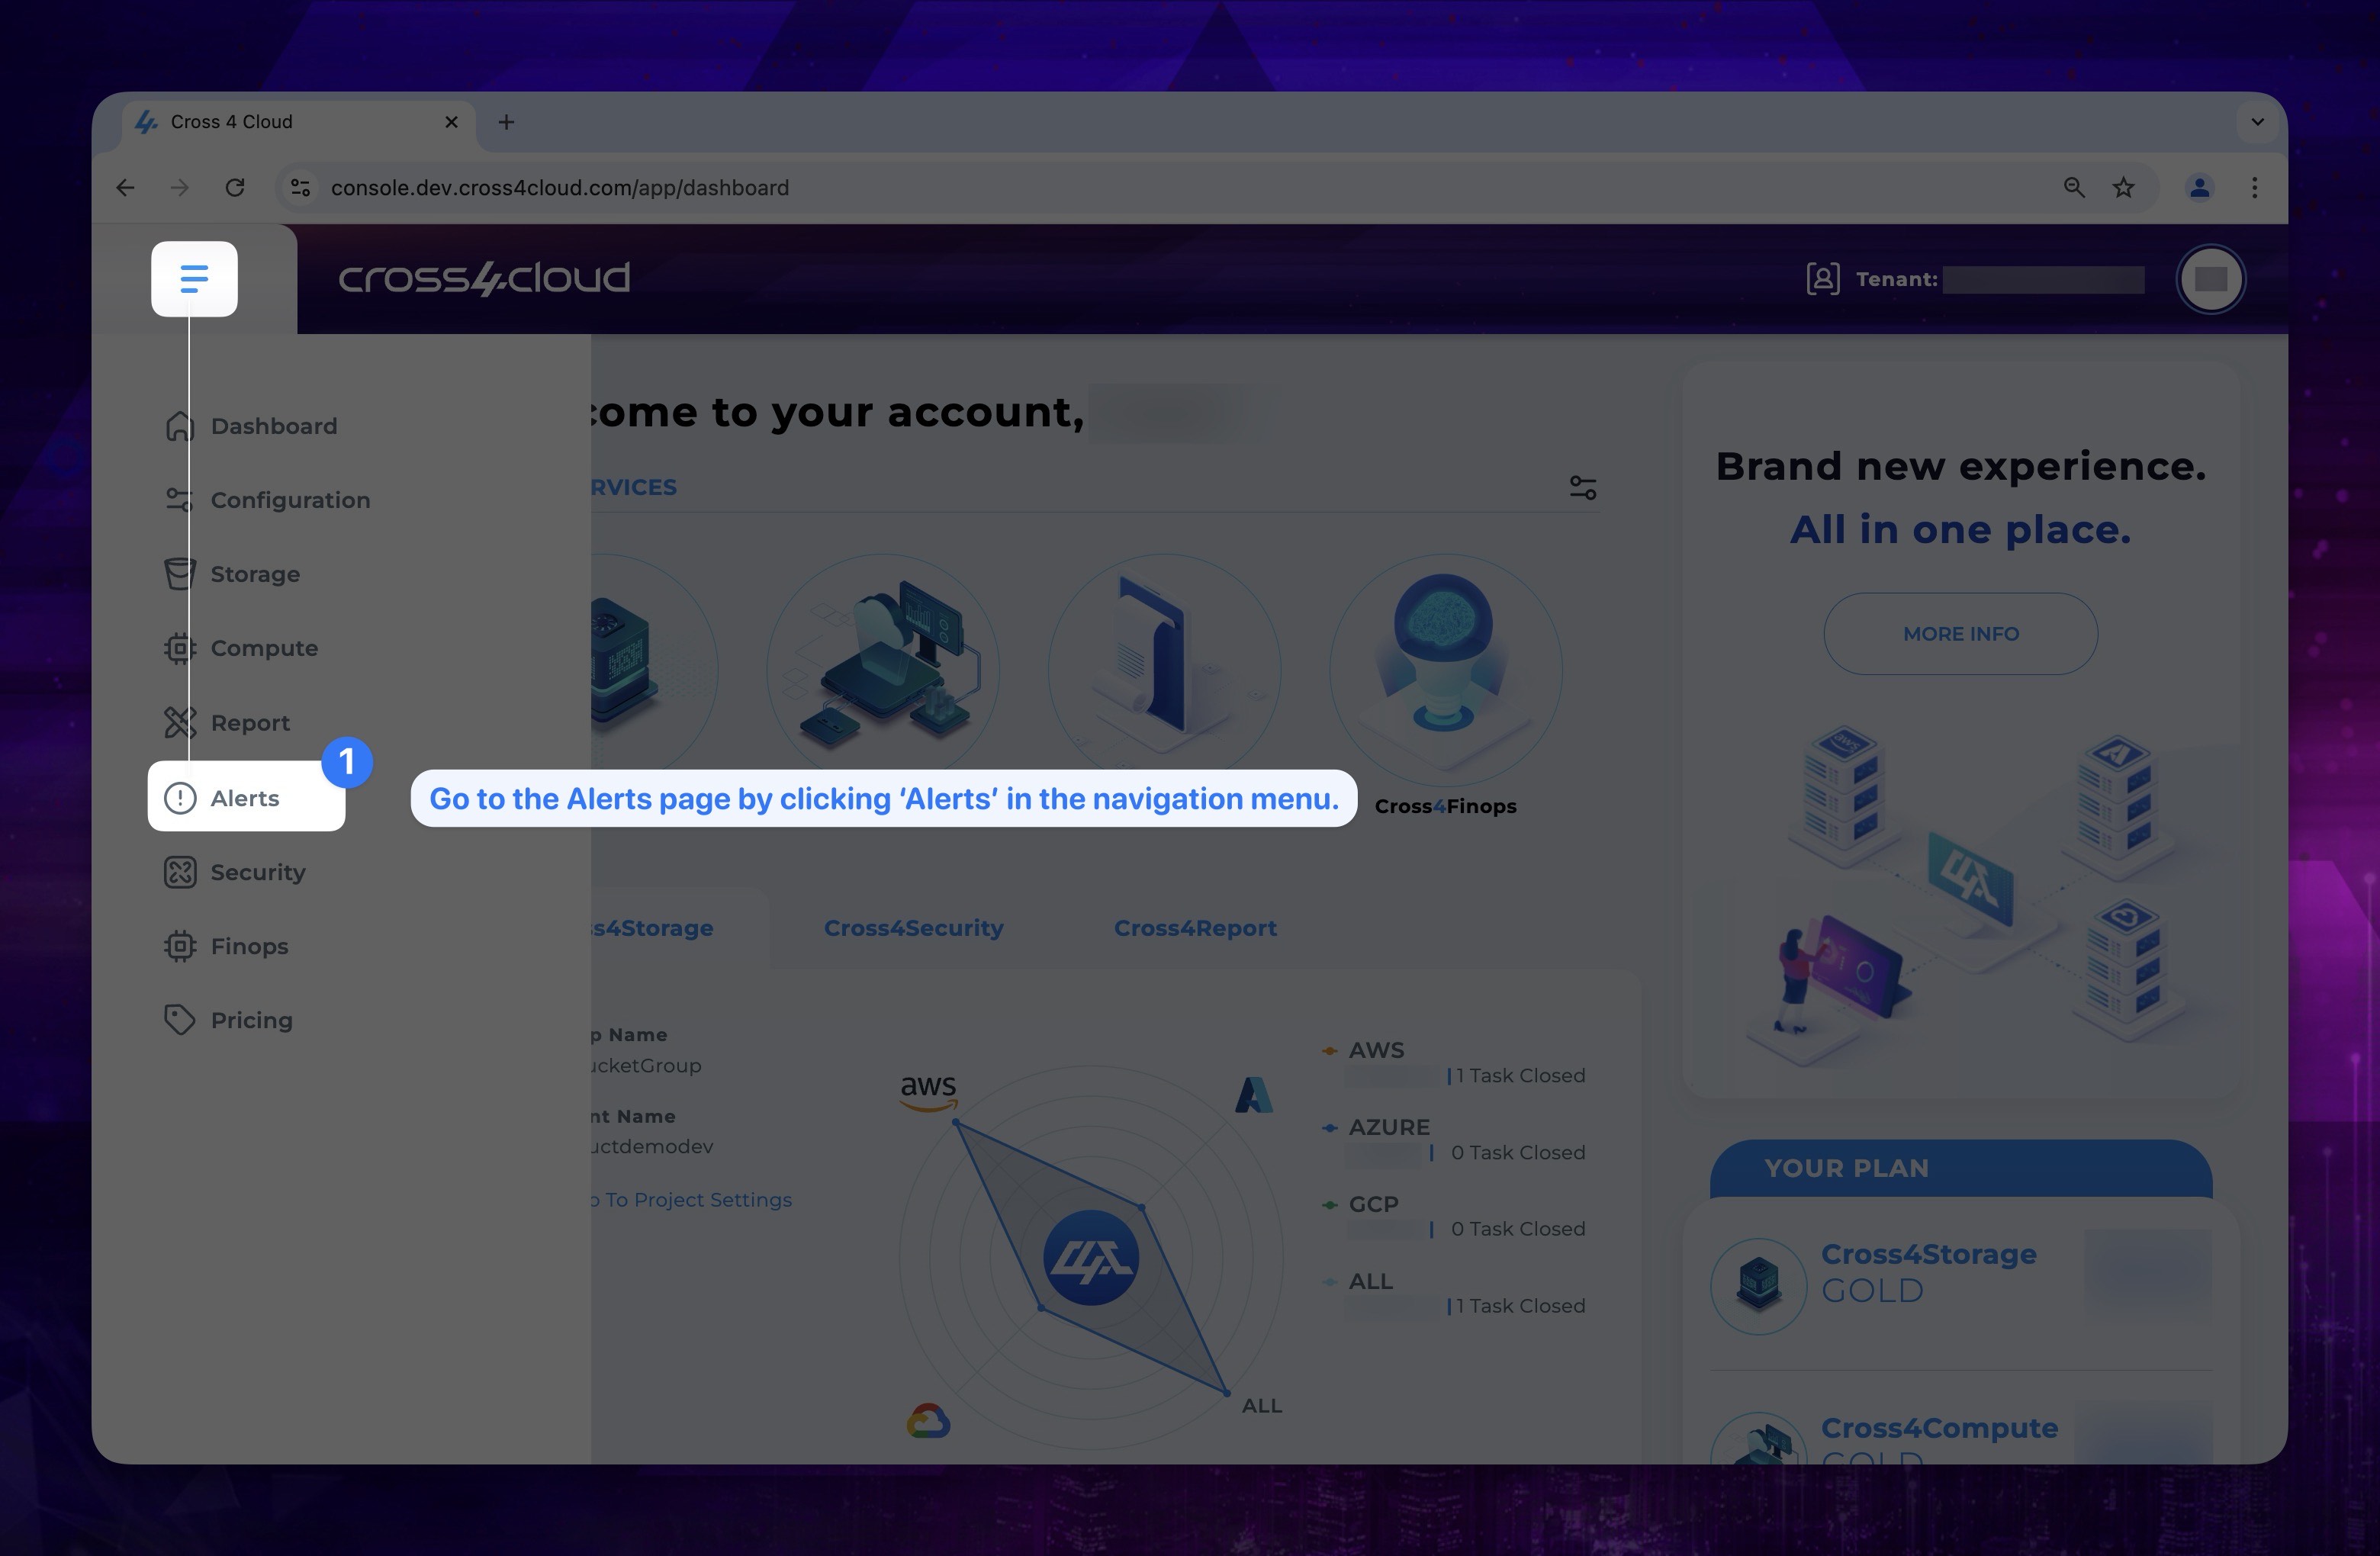
- Go to the Cross4Alert alerts page. To do this, click the menu icon top of the dashboard page and select Alerts.
Show the instruction with images
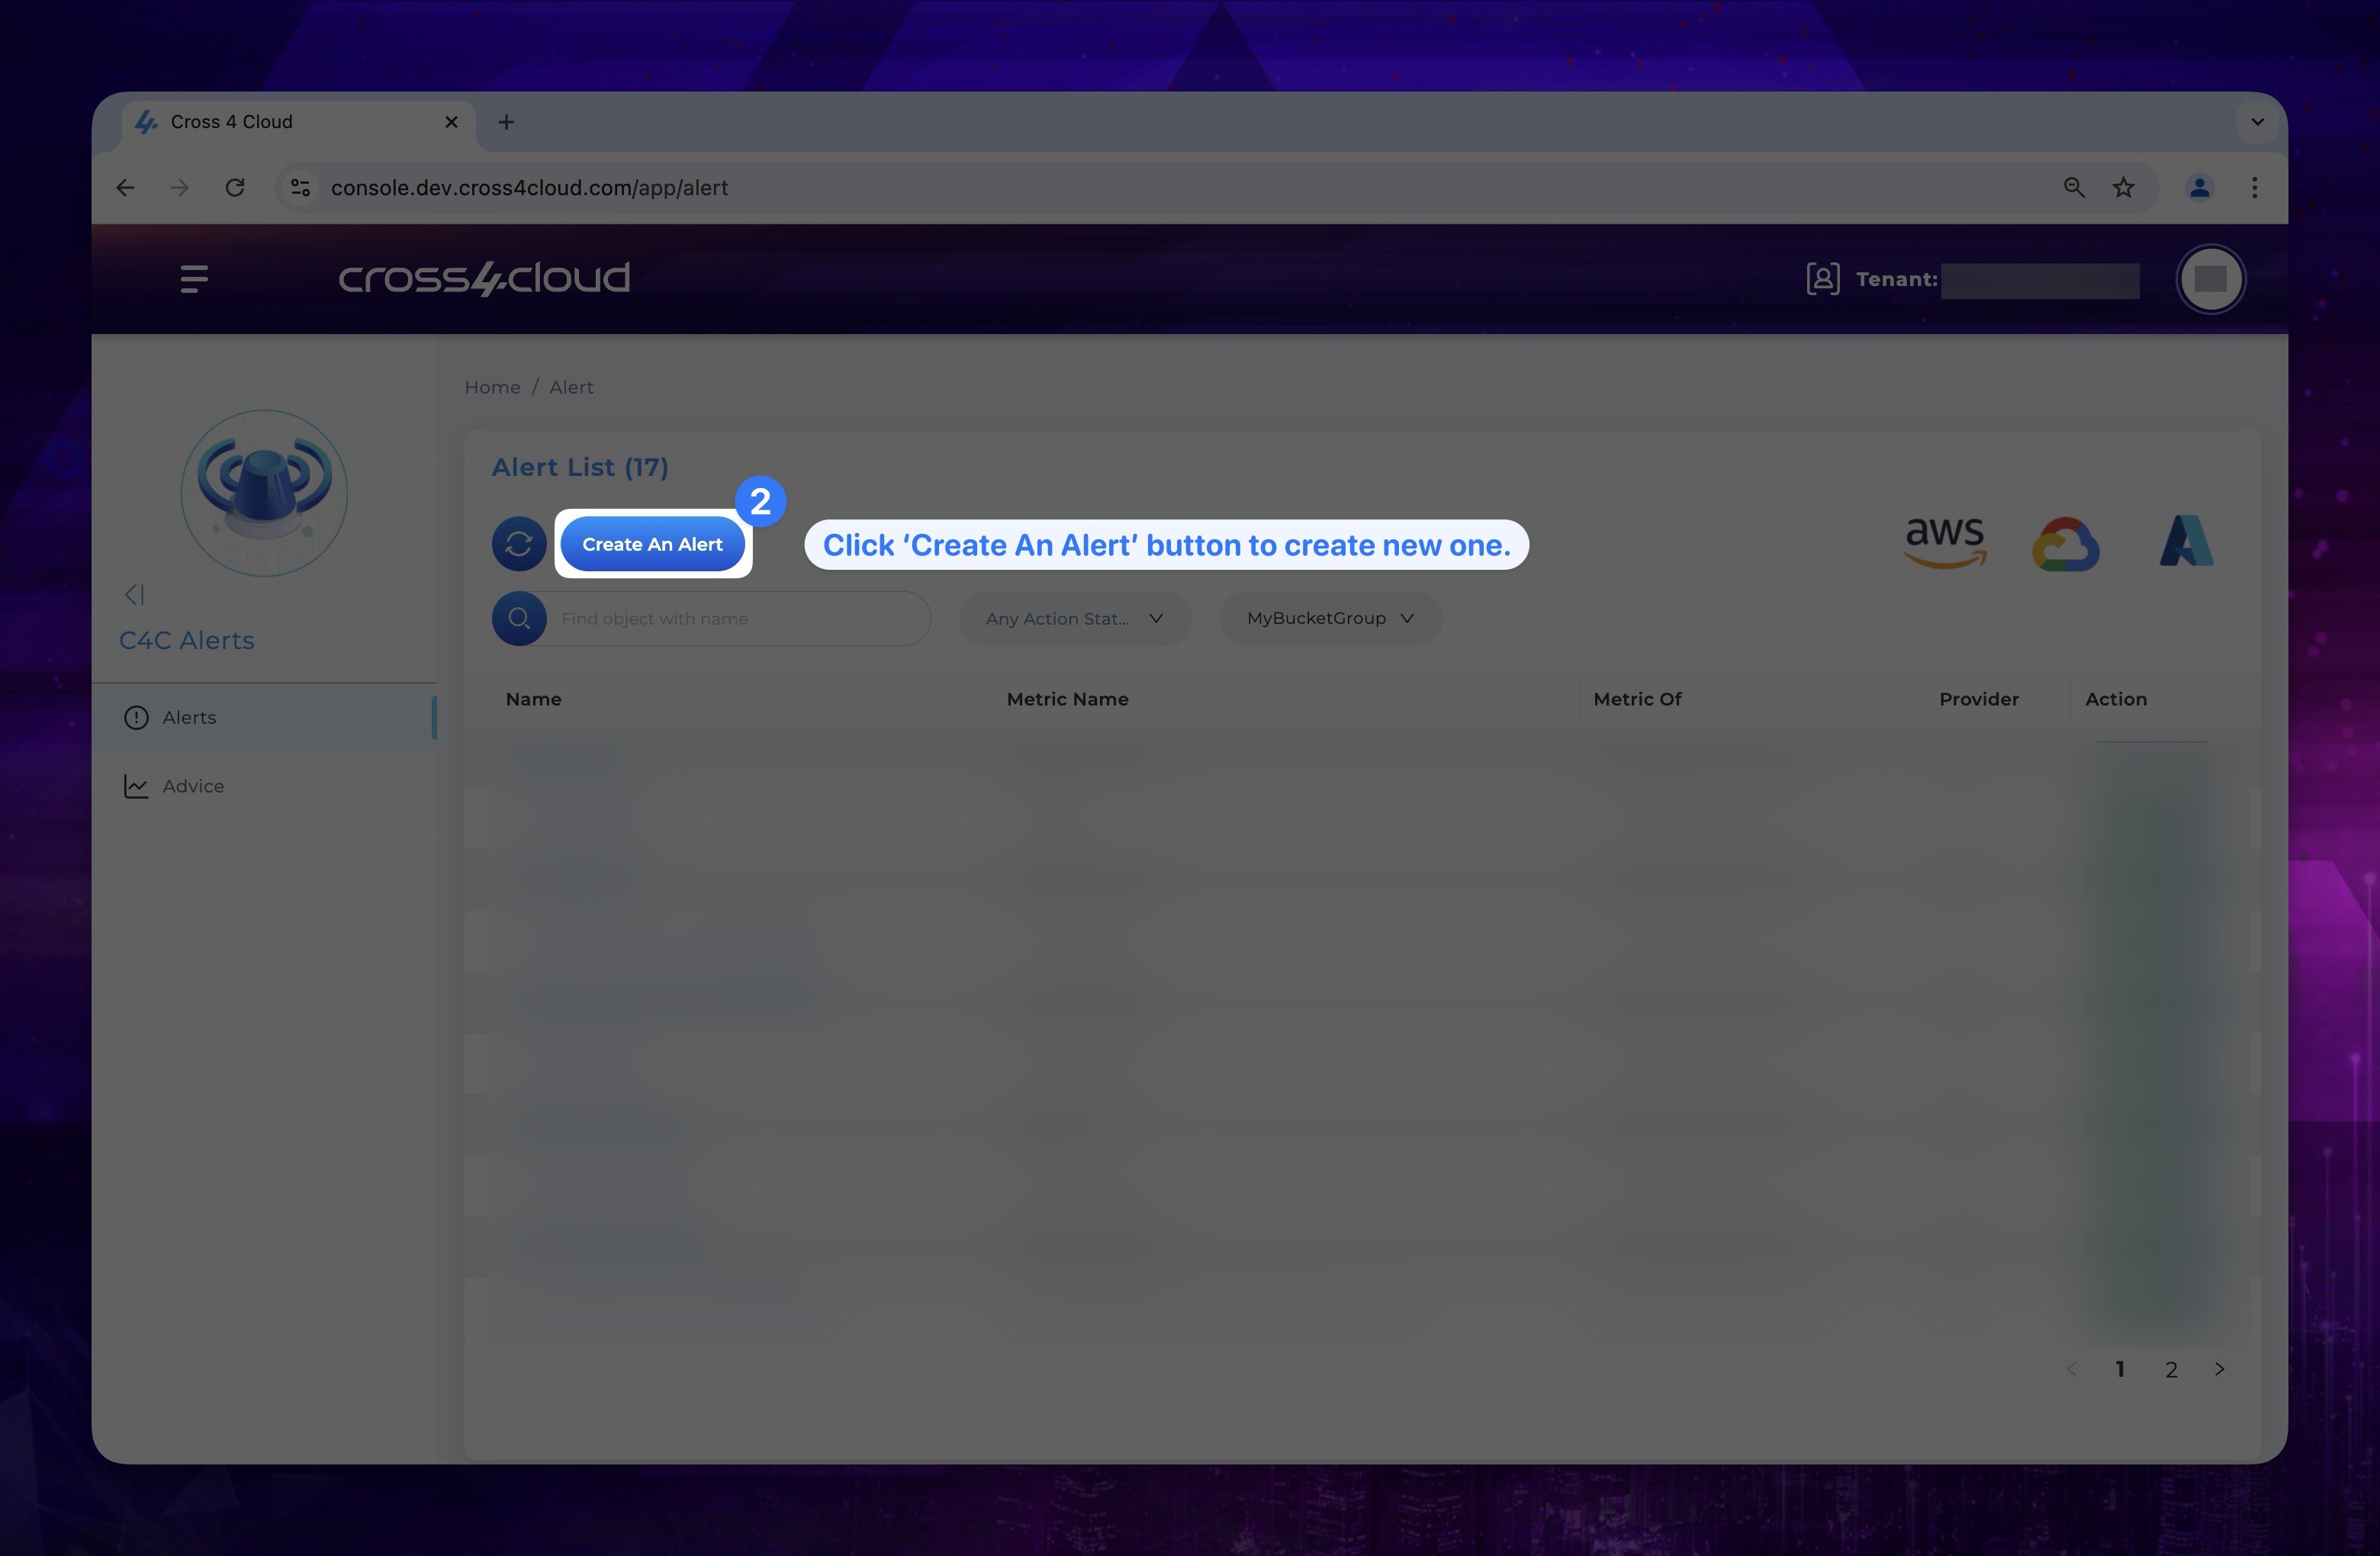
- Inside the alerts page click the Create An Alert button.
Show the instruction with images
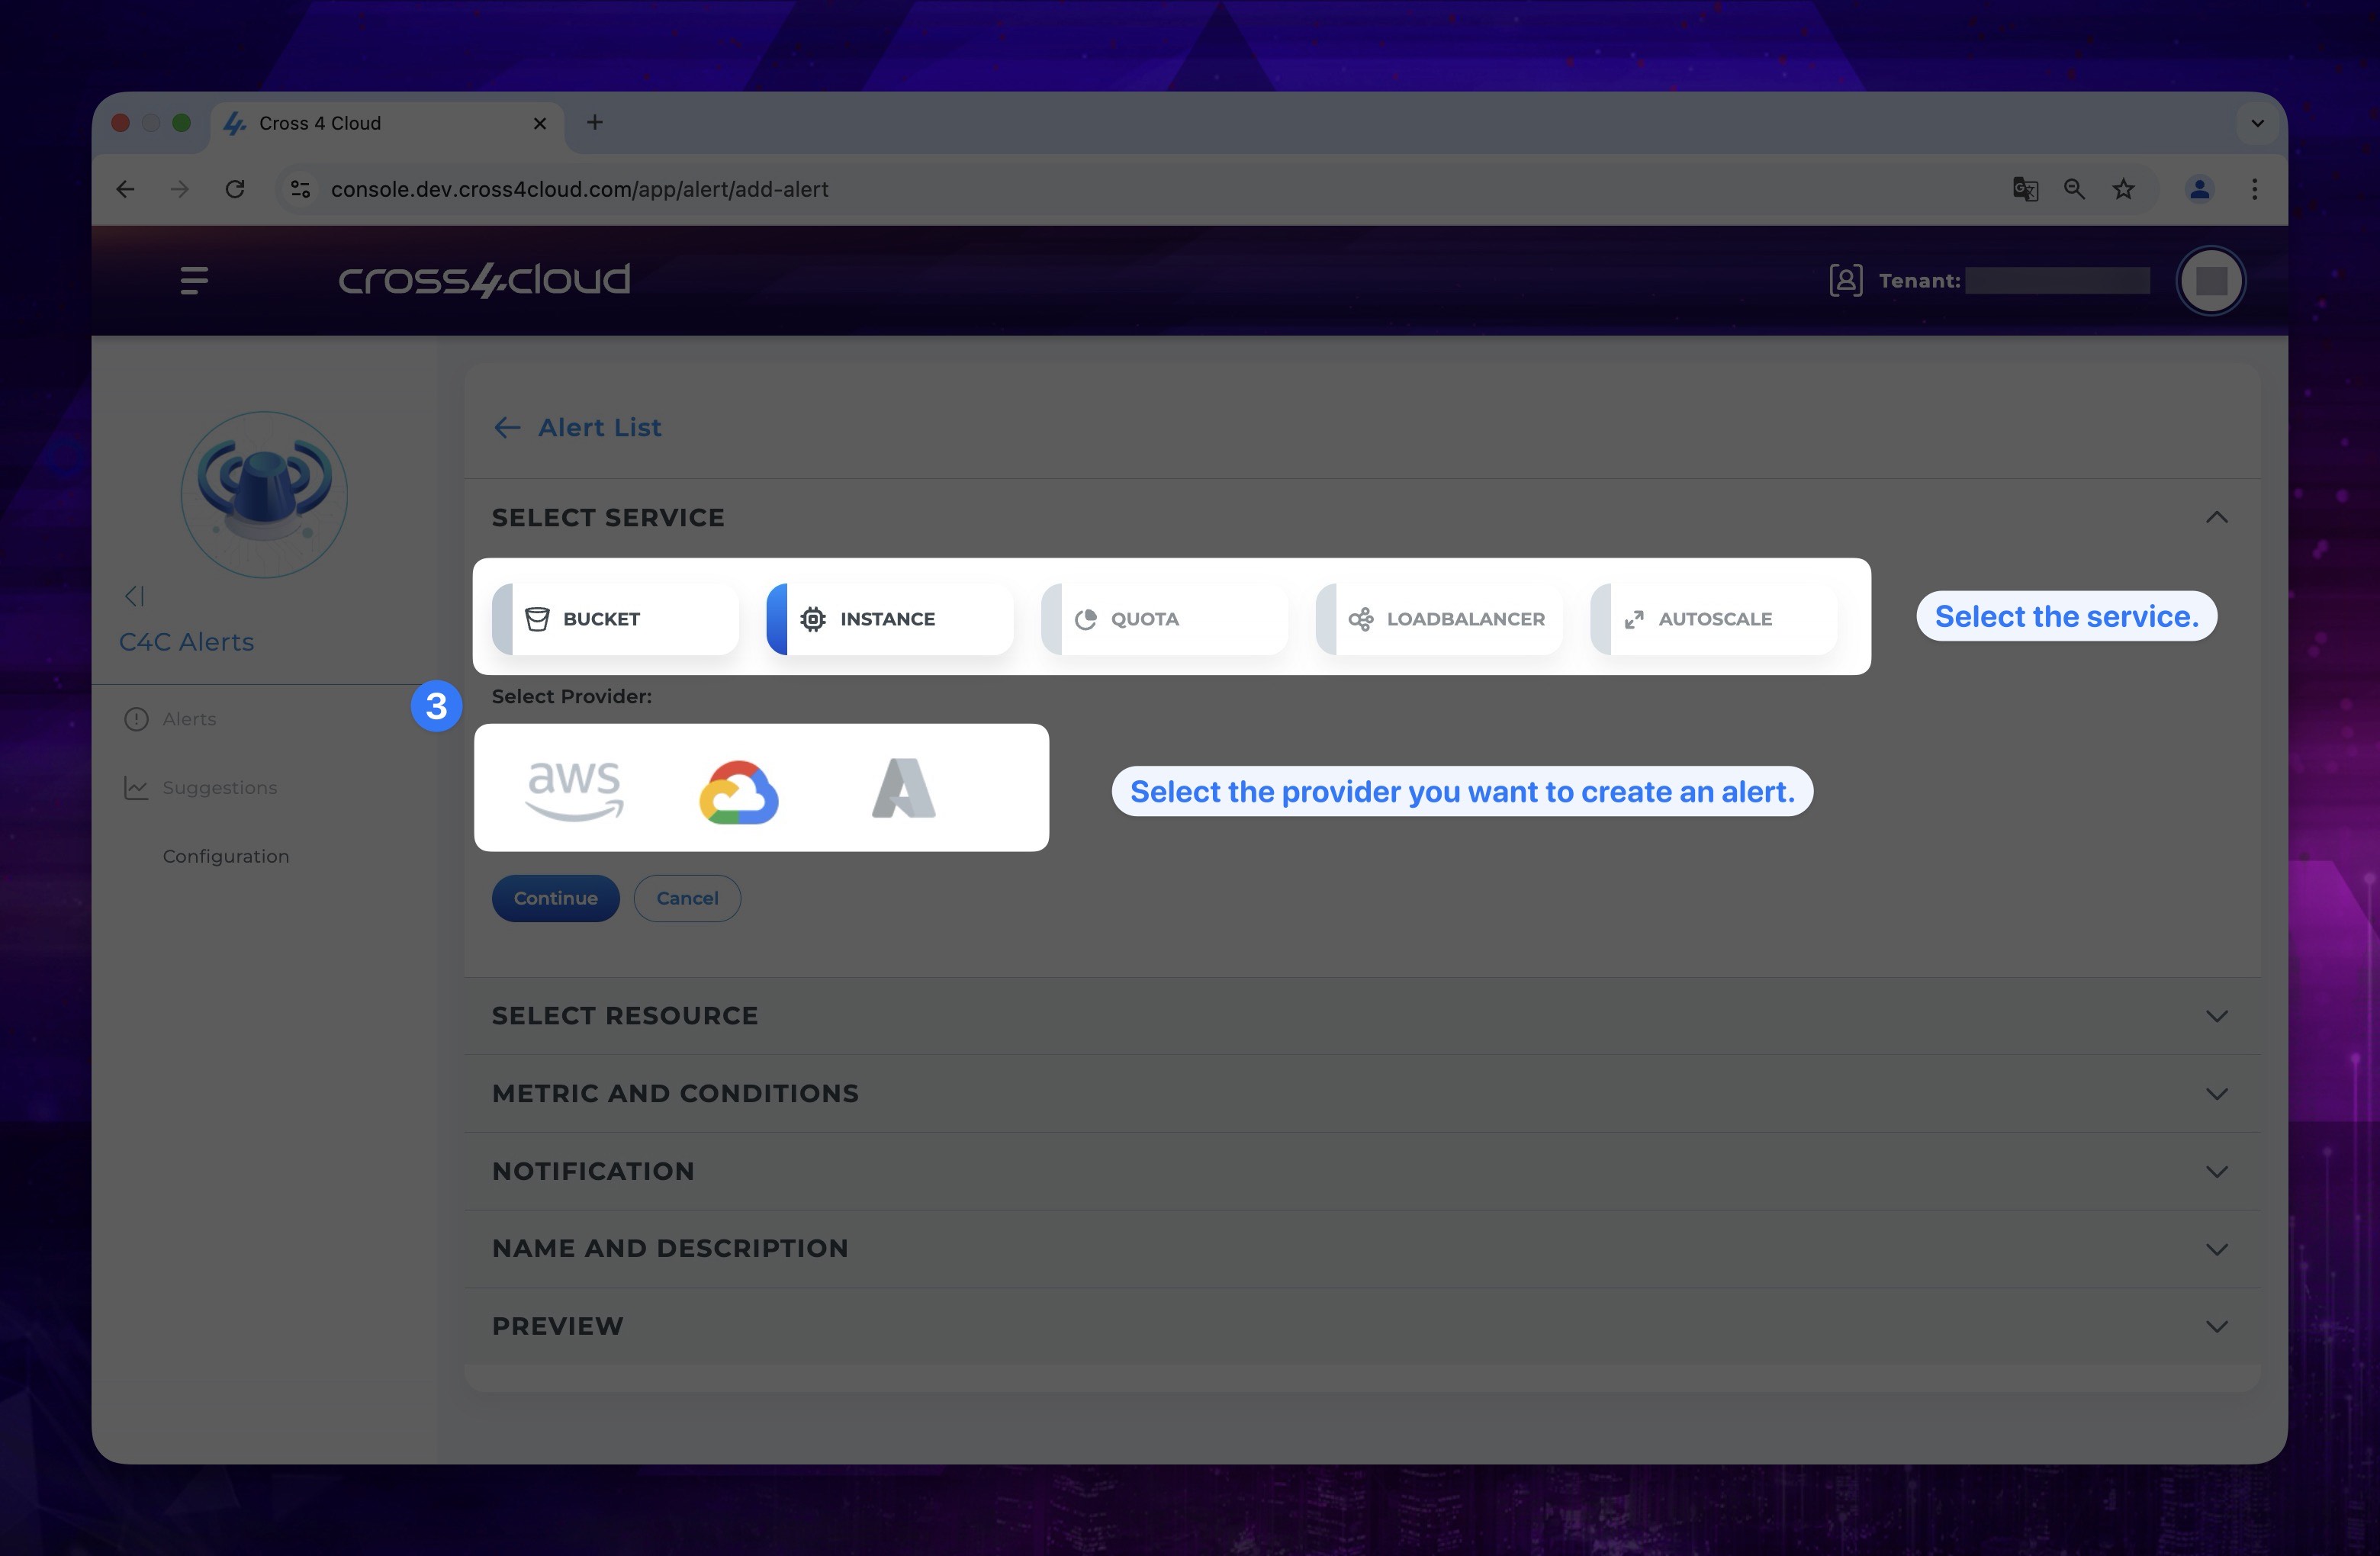
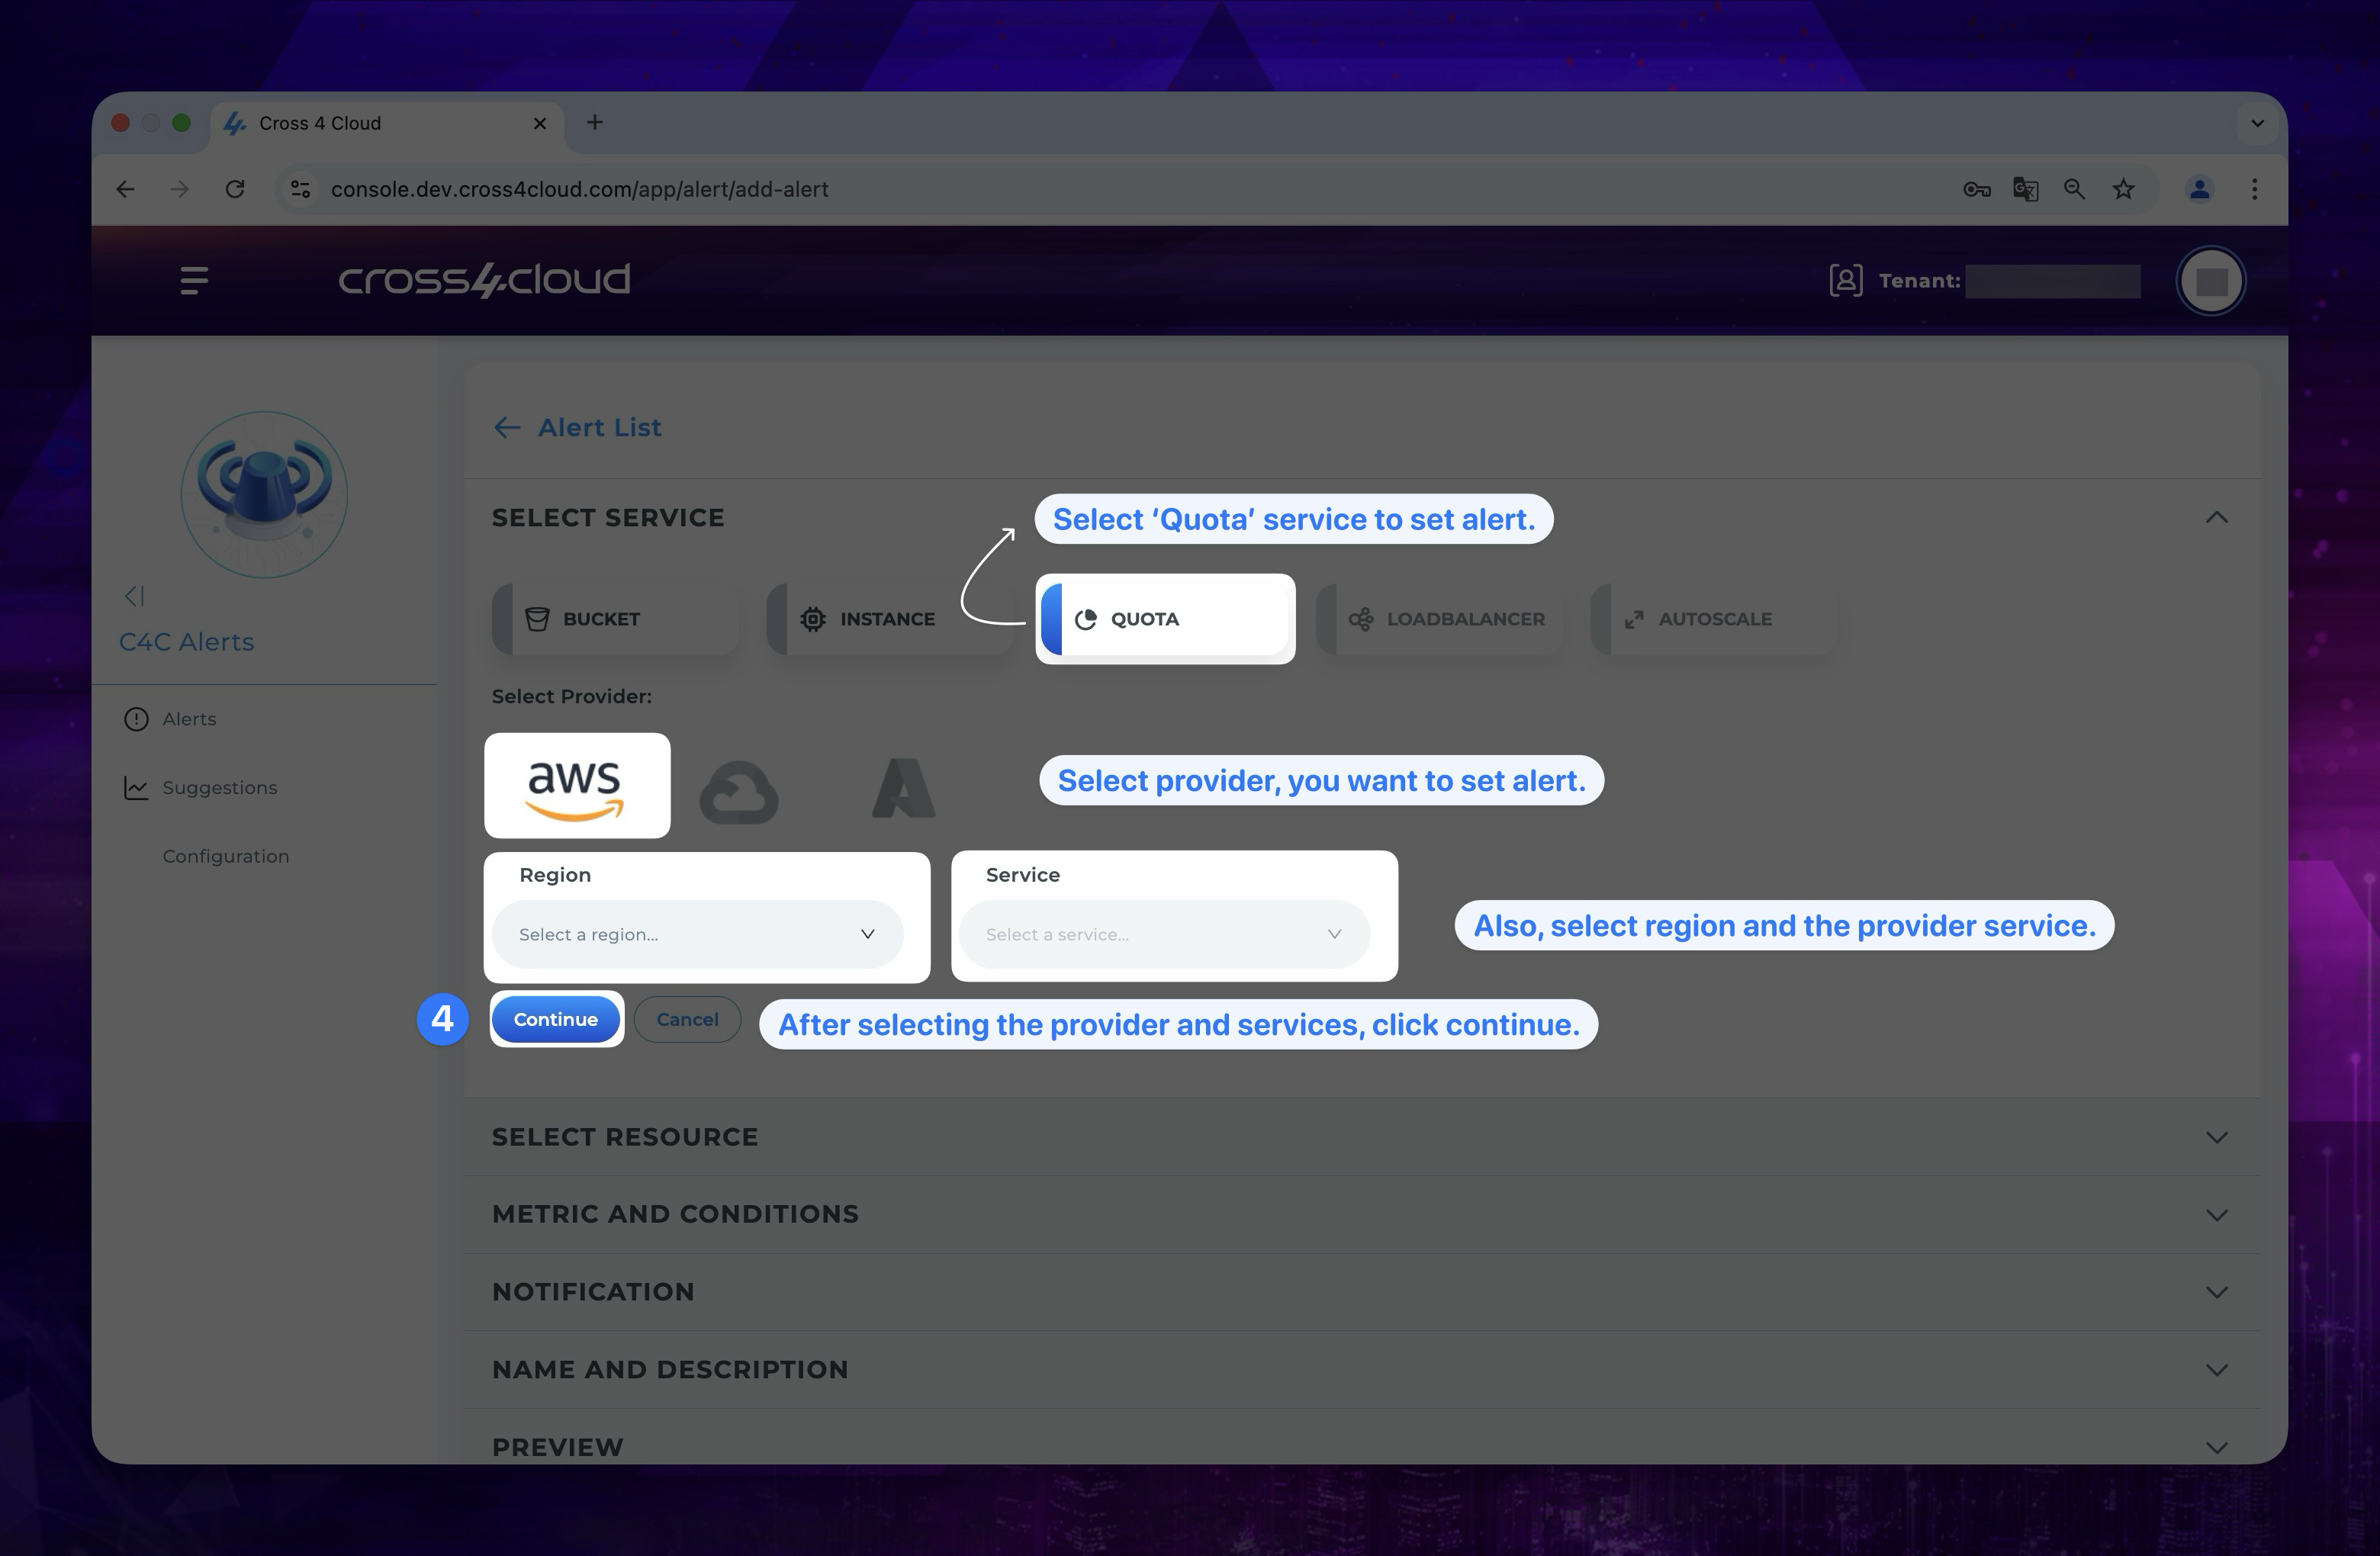
- Select the service and provider and click continue. Click the provider icon To select the provider where the alert will be created, click the provider icon.
Show the instruction with images
- Bucket and Instance
- Quota
- Load Balancer
- Autoscale
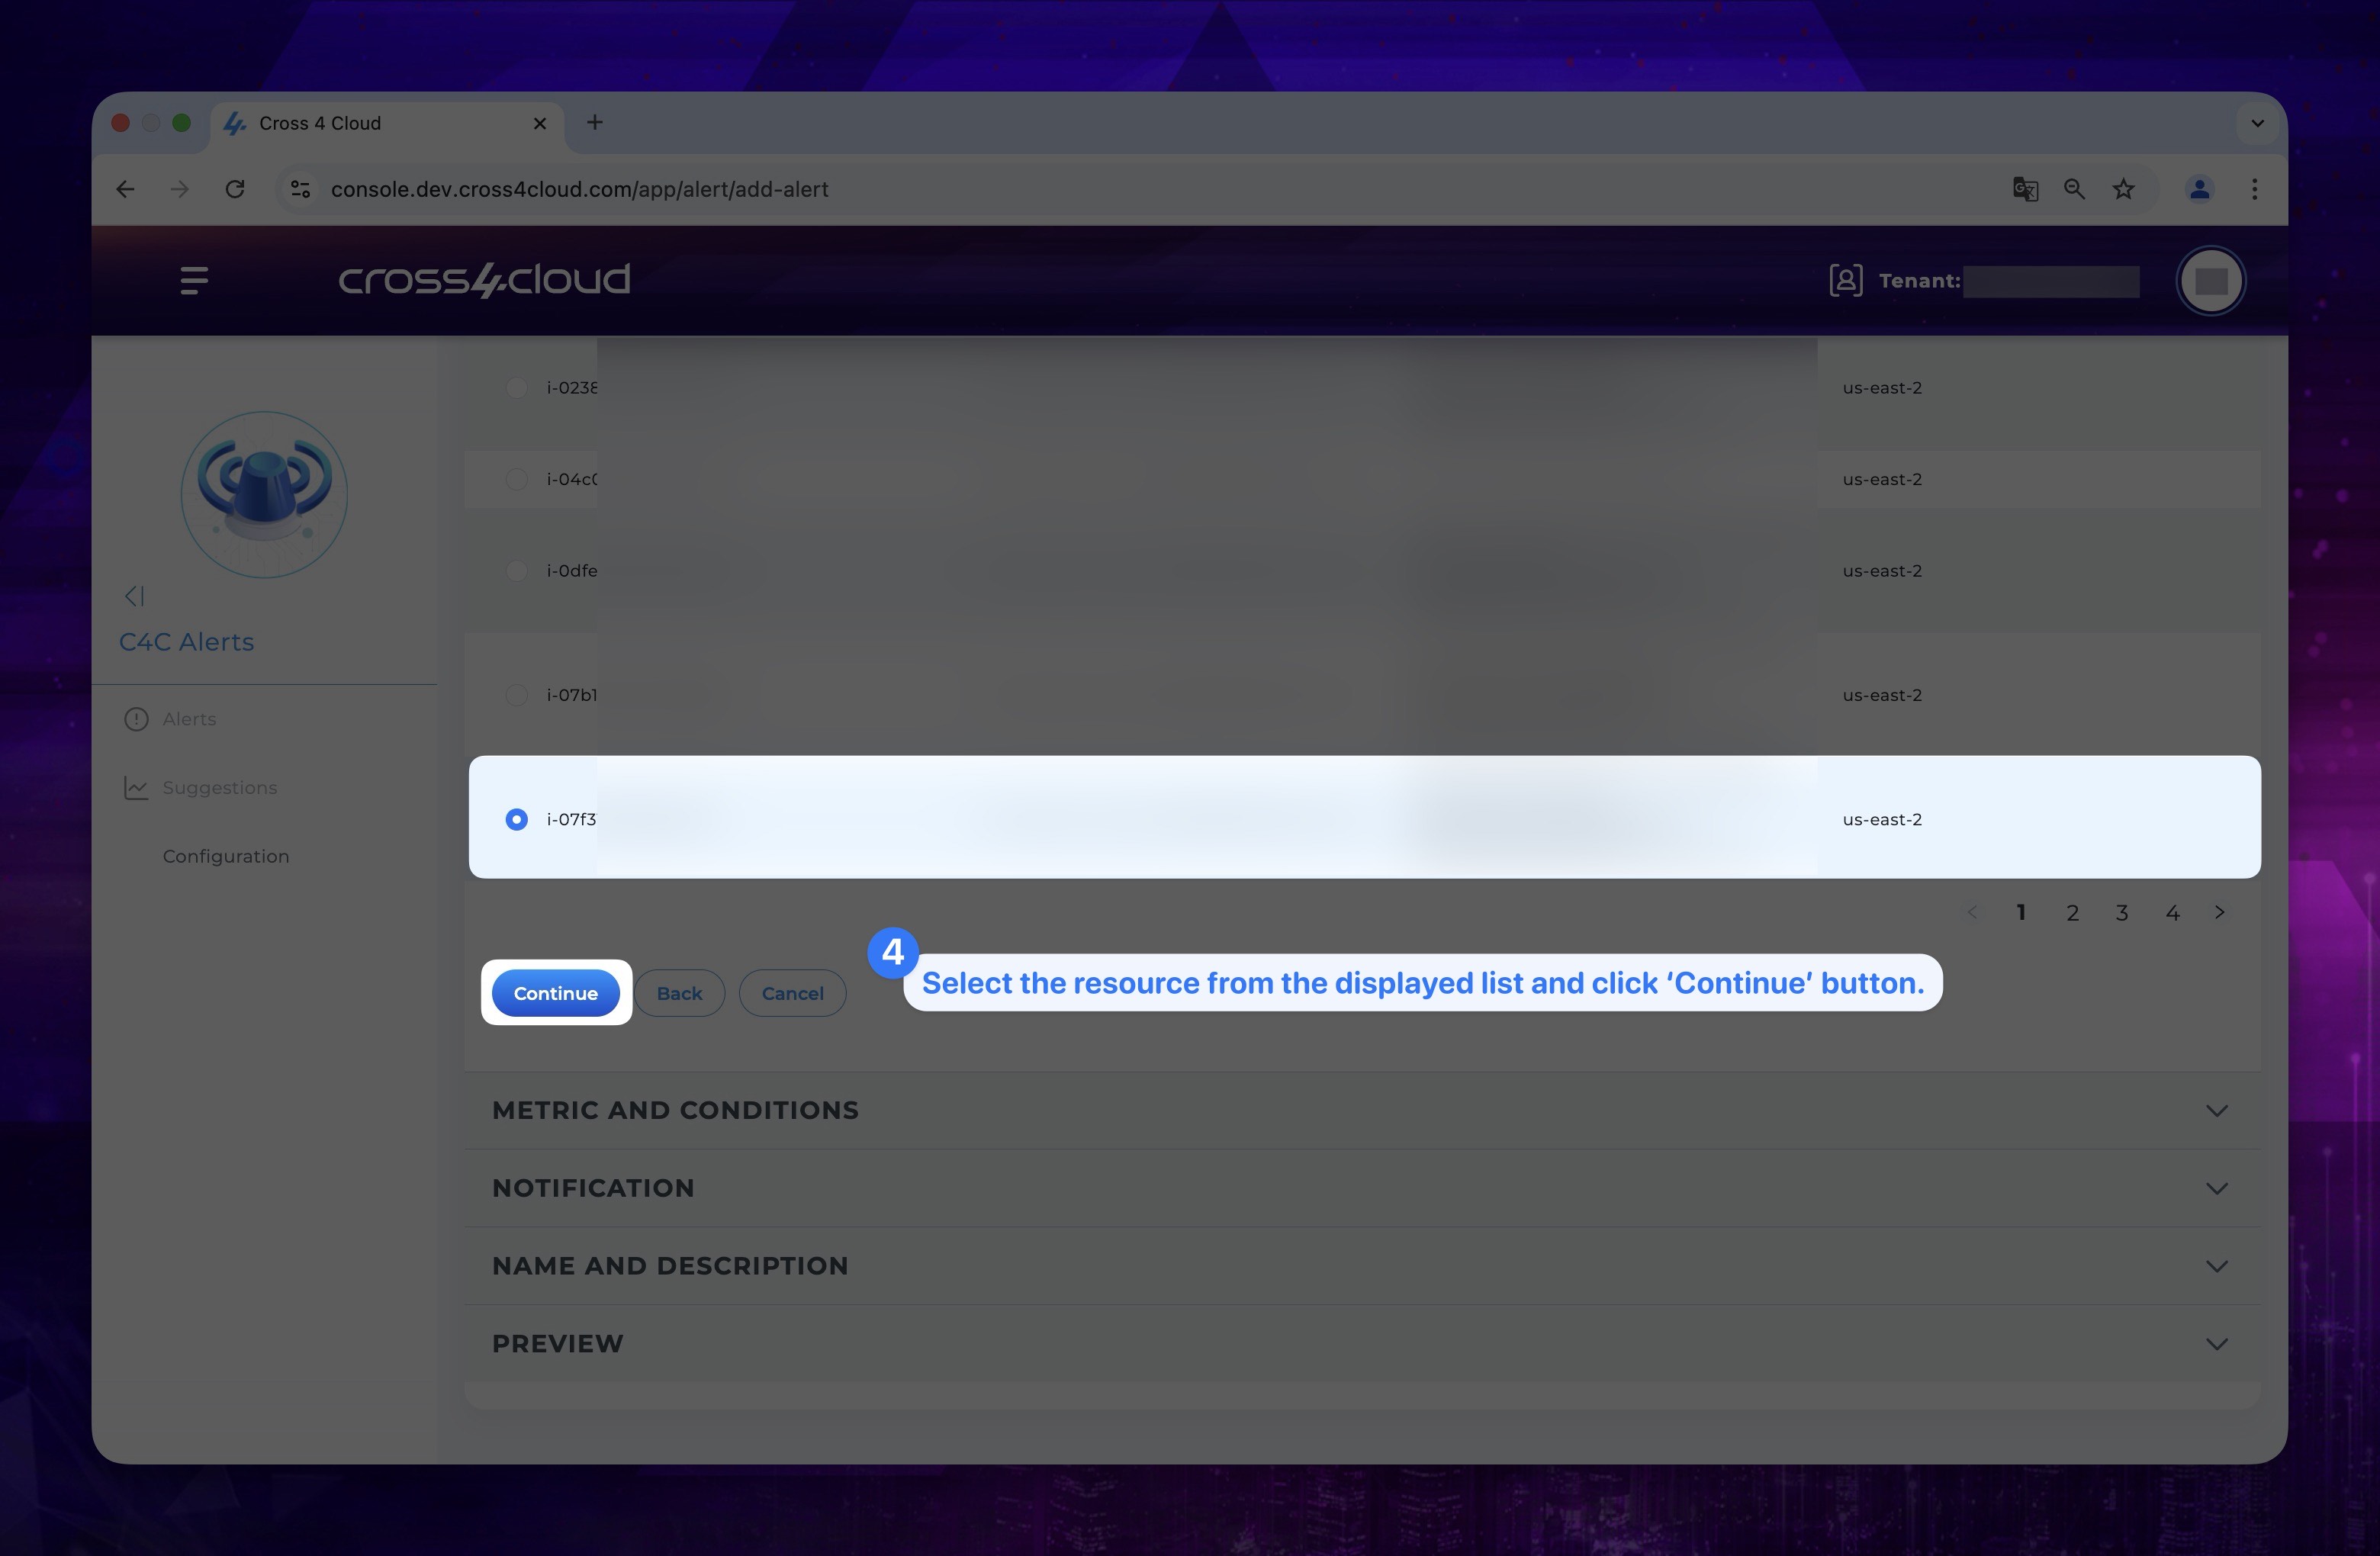
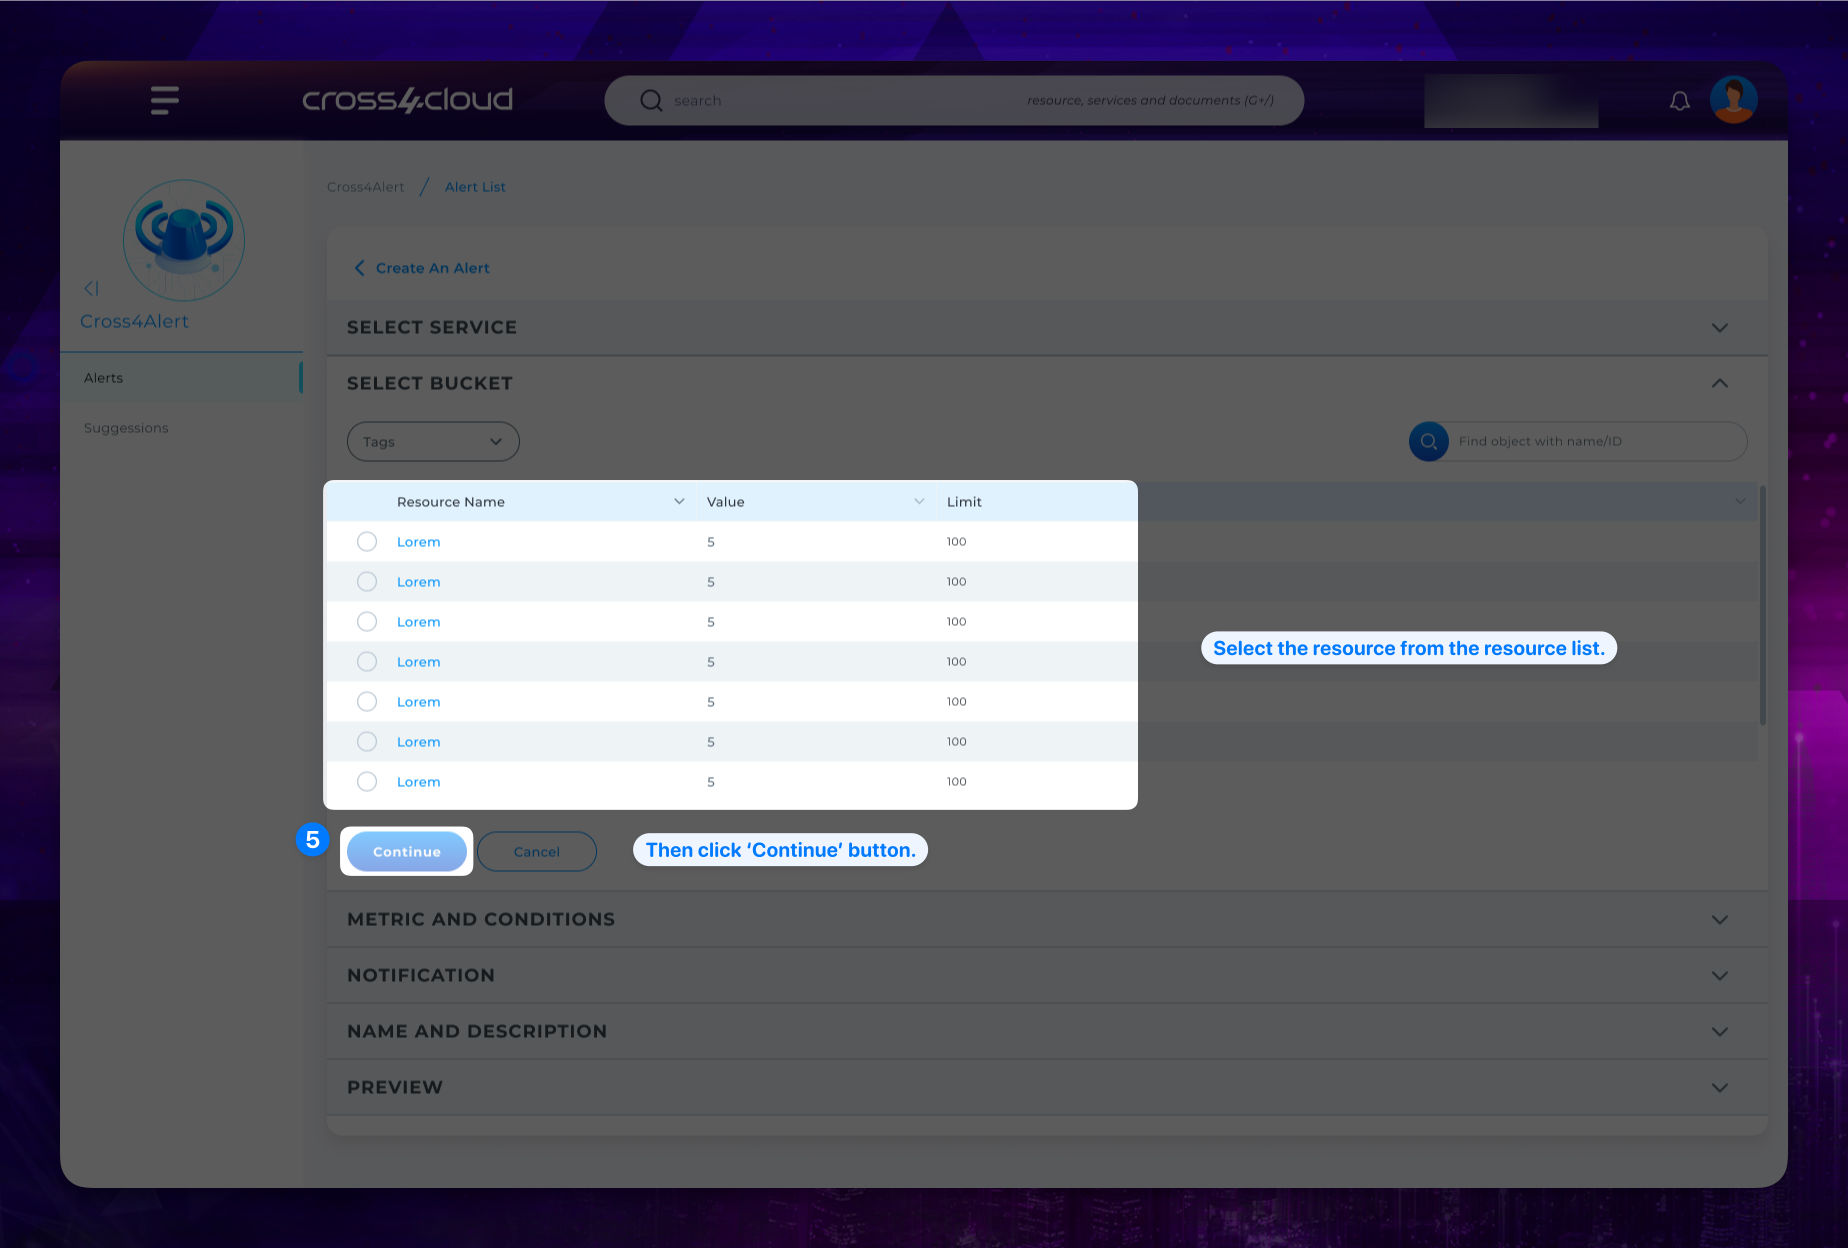
To create an alert for your desired bucket and instance metric:
- Select a resource in which you want to set the alert.
Show the instruction with images
- Metrics in the metrics and conditions section may vary depending on the selected provider. Please continue reviewing the documentation under the tab corresponding to the provider you have chosen.
- Amazon Web Services
- Google Cloud Platform
- Microsoft Azure
-
On Amazon Web Services you need to set five different metrics. These are:
- Metric Name: The Specify metric that you want to create an alarm.
- Metric Of: It represents the bucket where alert will be created.
- Statistic: Under Statistic , choose one of the statistics which predefined.
- Period: Choose the evaluation period for the alarm. When evaluating the alarm, each period is aggregated into one data point.
- Data Point: For Datapoints to alarm, specify how many evaluation periods (data points) must be in the ALARM state to trigger the alarm. (optional)
- Evaluation Period: The number of periods over which data is compared to the specified threshold. (optional)
- Whenever: For Whenever metric is, specify whether the metric must be greater than, less than, or equal to the threshold.
- Then: Under than..., specify the threshold value.
-
On Google Cloud Platform you need to set four different metrics. These are:
- Metric Name: The Specify metric that you want to create an alarm.
- Metric Of: It represents the bucket where alert will be created.
- Rolling Window Function: Rolling window function applied to the rolling window. You can monitor the rate at which a metric value changes by using the Rolling window function field to percent change.
- Rolling Window: The length of time over which the rolling window function is applied.
- Trigger Count: For Datapoints to alarm, specify how many evaluation periods (data points) must be in the ALARM state to trigger the alarm. (optional)
- Duration: The total time duration for which the condition must be met to trigger an alert. (optional)
- Whenever: For Whenever metric is, specify whether the metric must be greater than or less than to the threshold.
- Than: Under than..., specify the threshold value.
-
On Microsoft Azure you need to set three different metrics. These are:
- Metric Name: The Specify metric that you want to create an alarm.
- Time Aggregation: The method used to aggregate the metric data points over the evaluation period (e.g., Average, Minimum, Maximum, Total, Count).
- Window Size: The period over which the metric data is aggregated and evaluated.
- Evaluation Frequency: Choose how often the alert rule should run. If the frequency is smaller than the aggregation granularity, this will result in sliding window evaluation. (optional)
- Whenever: For Whenever metric is, specify whether the metric must be greater than, less than, or equal to the threshold.
- Than: Under than..., specify the threshold value.
After select these metric and conditions based on your needs click continue.
- Define the alarm state that will trigger this action.
Show the instruction with images
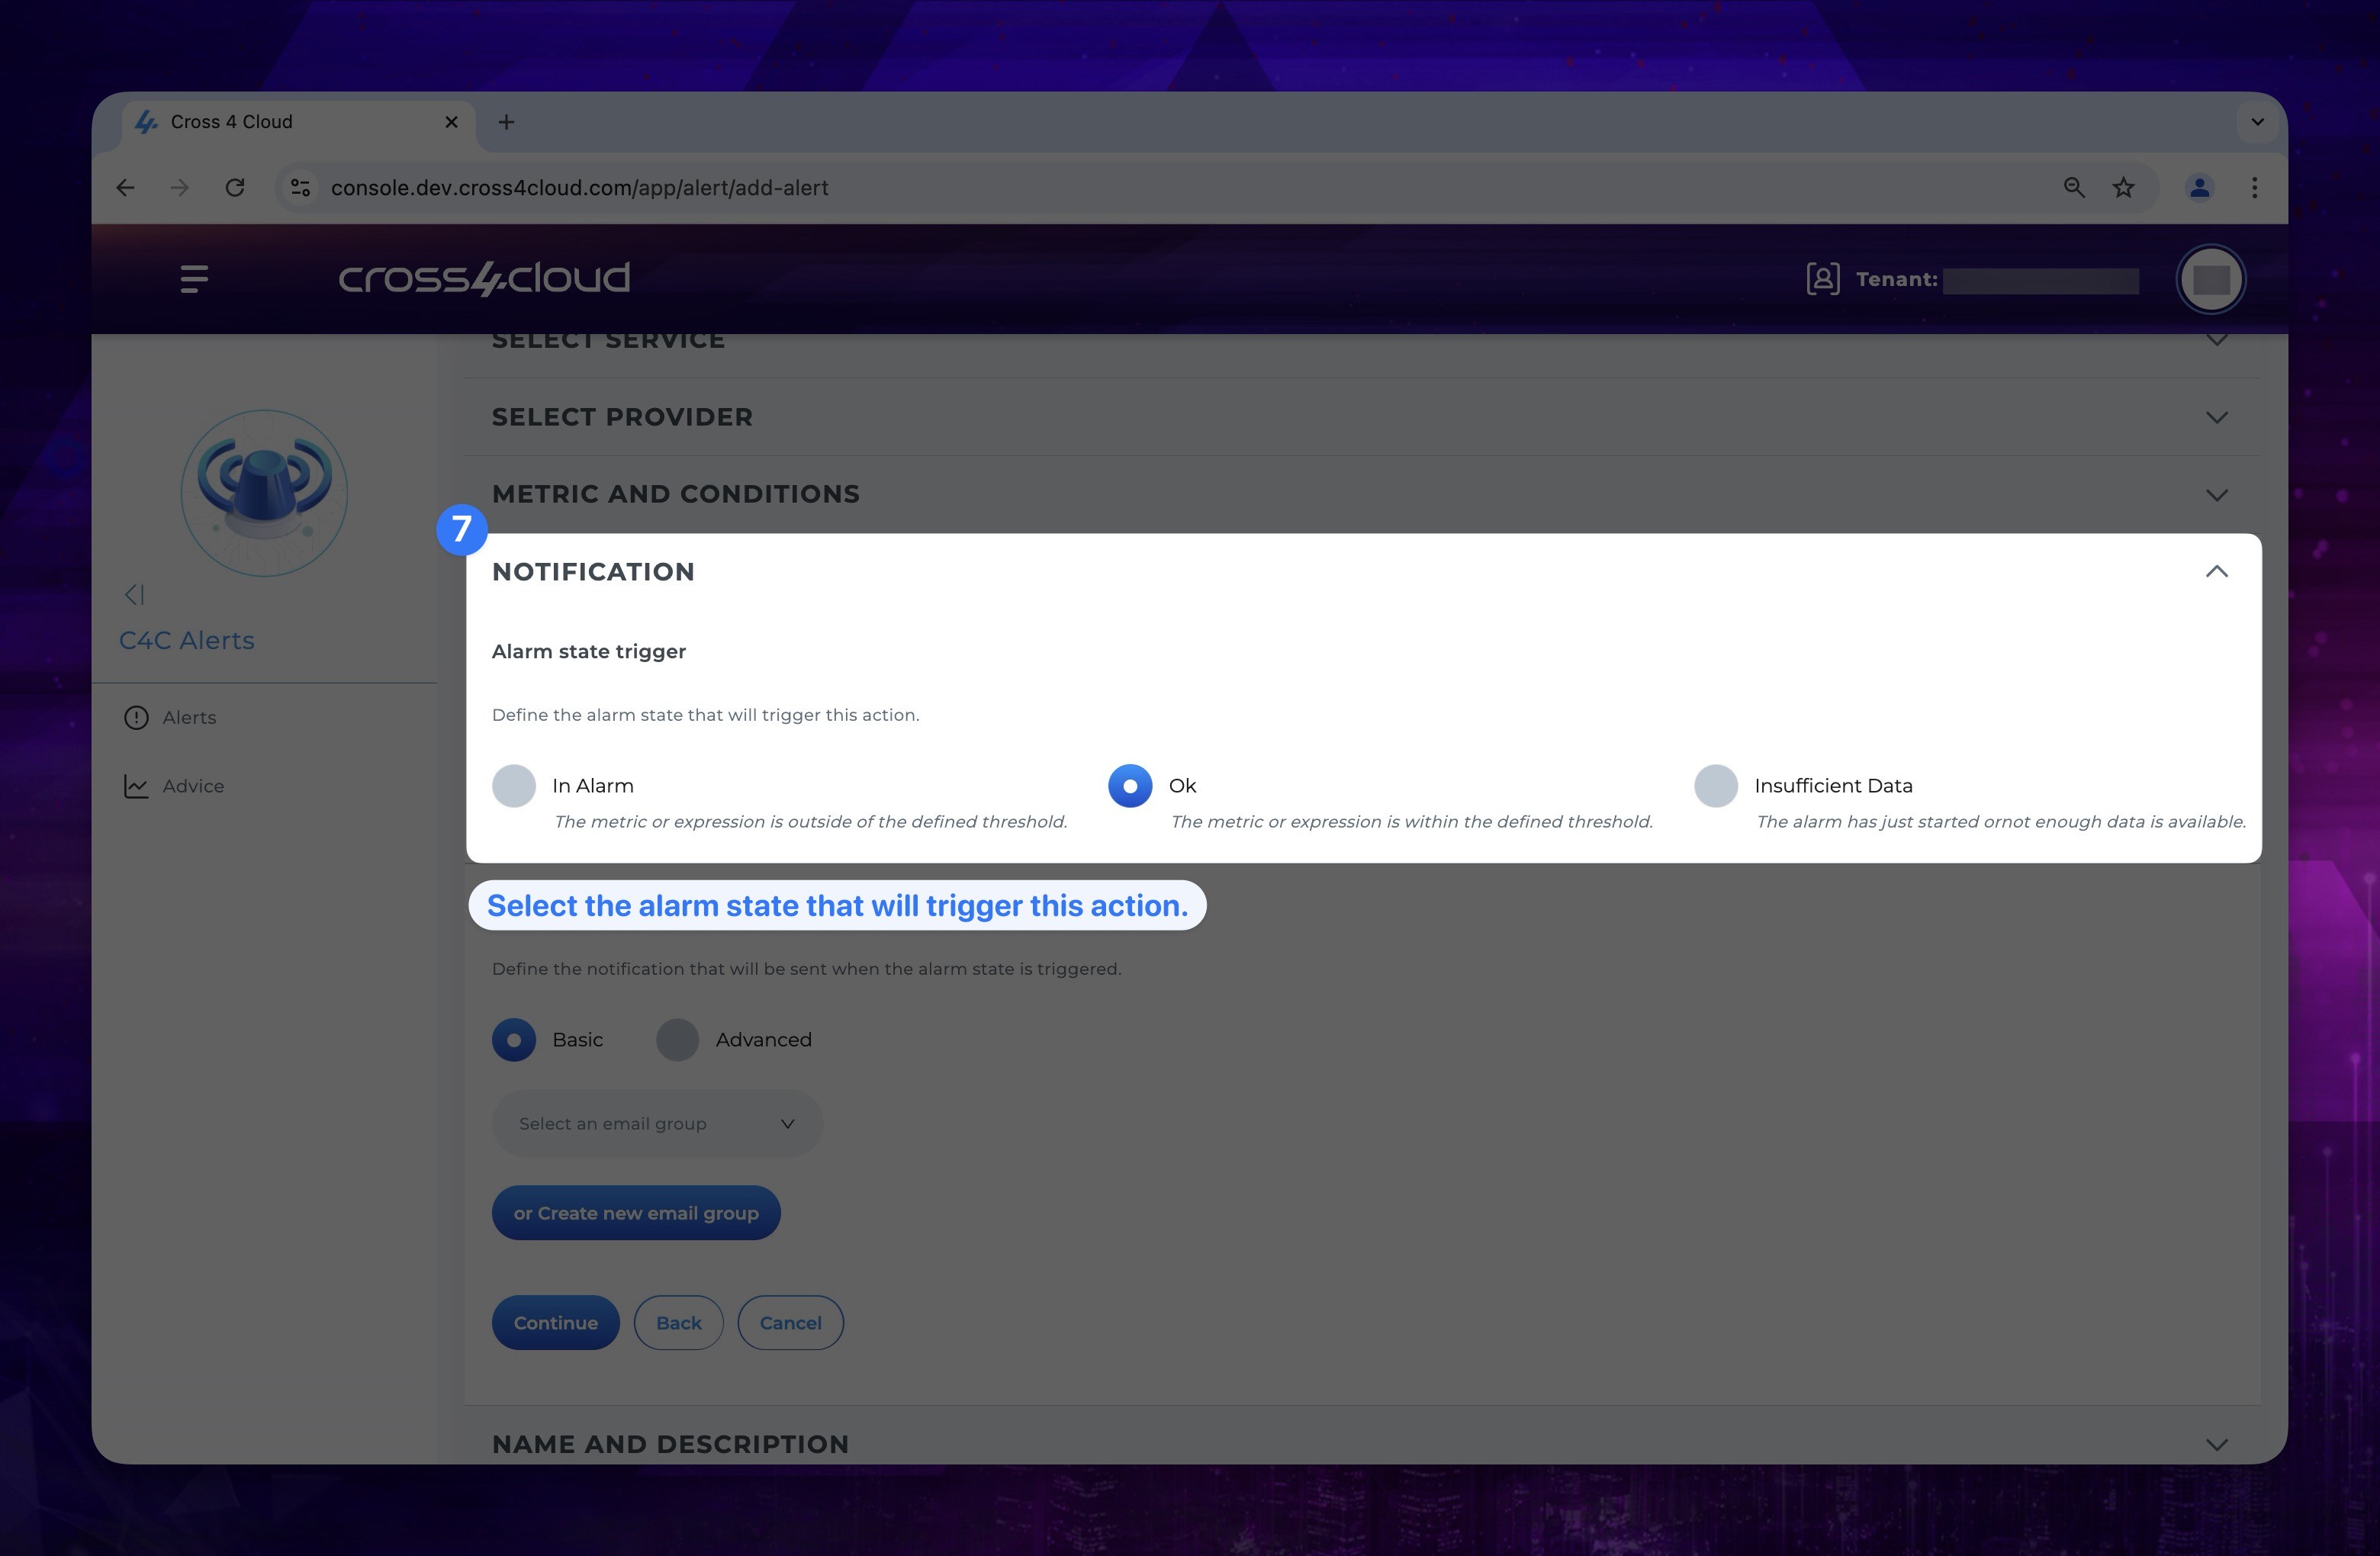
Different state triggers may be available depending on the provider you have selected.
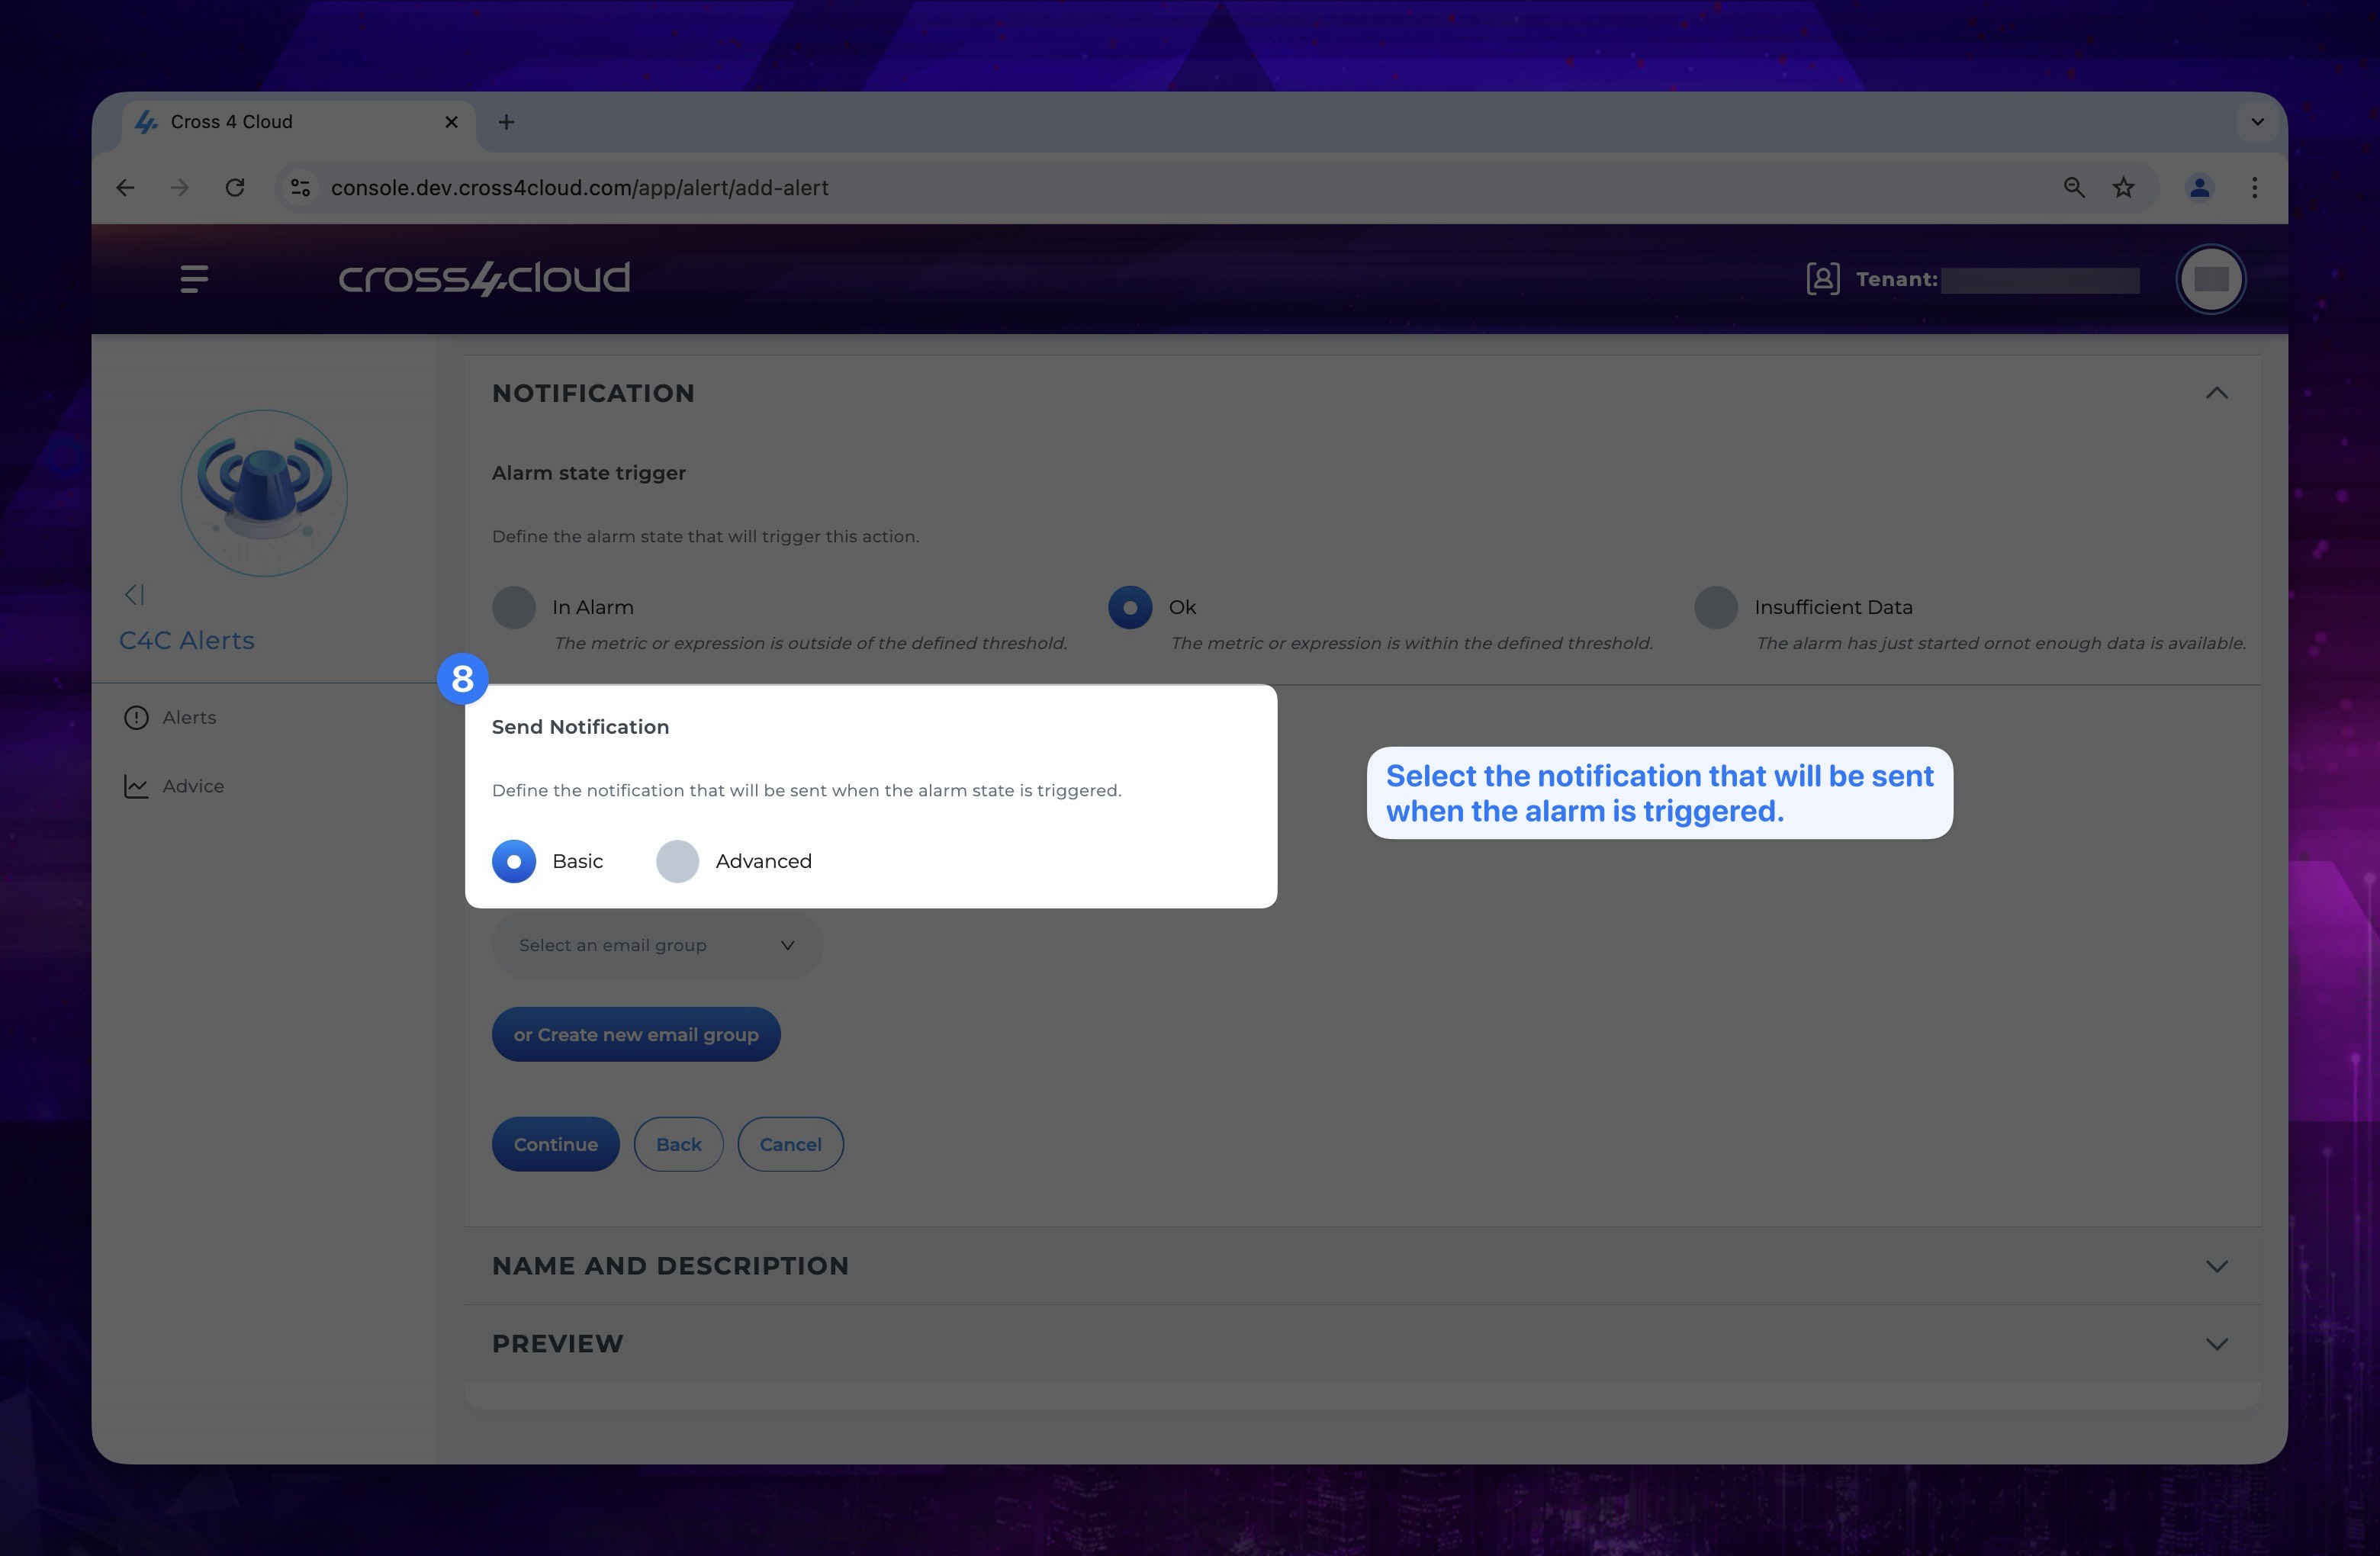
- Set the send notification option. There are two different options you can choose from: Basic or Advanced.
Show the instruction with images
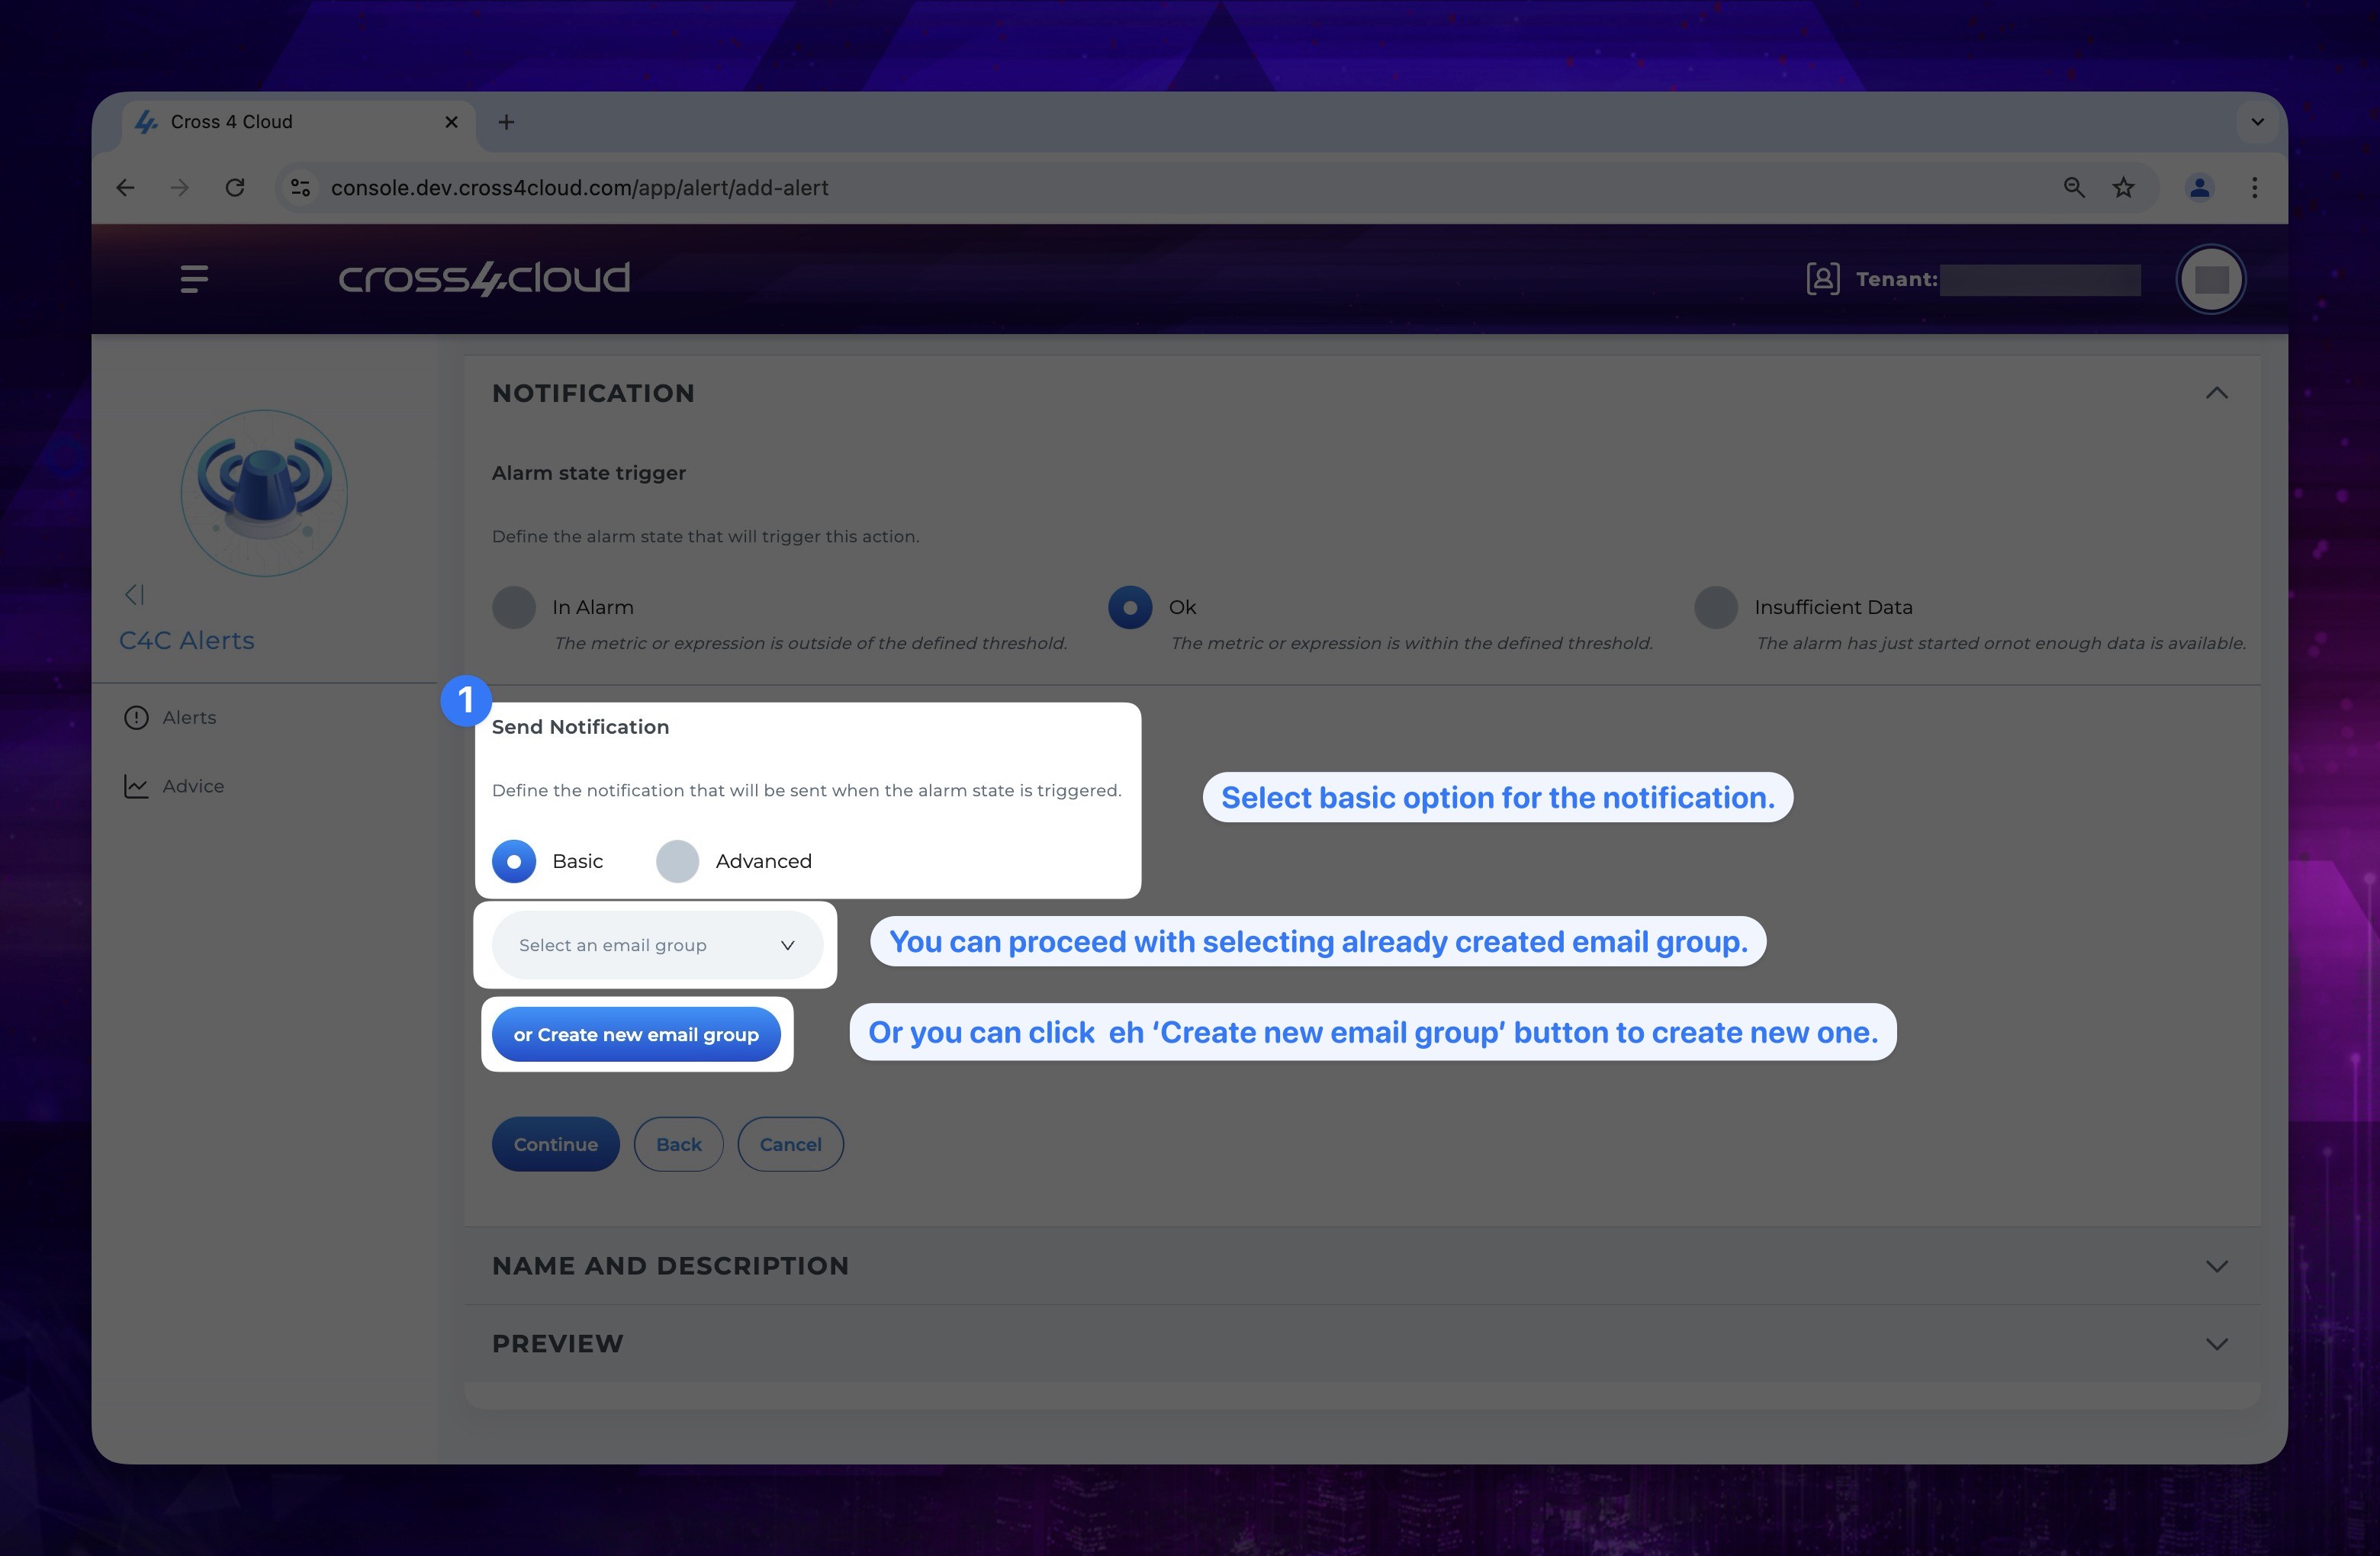
-
Basic Option: Simply create a new email group or choose an already created email group to send notifications.
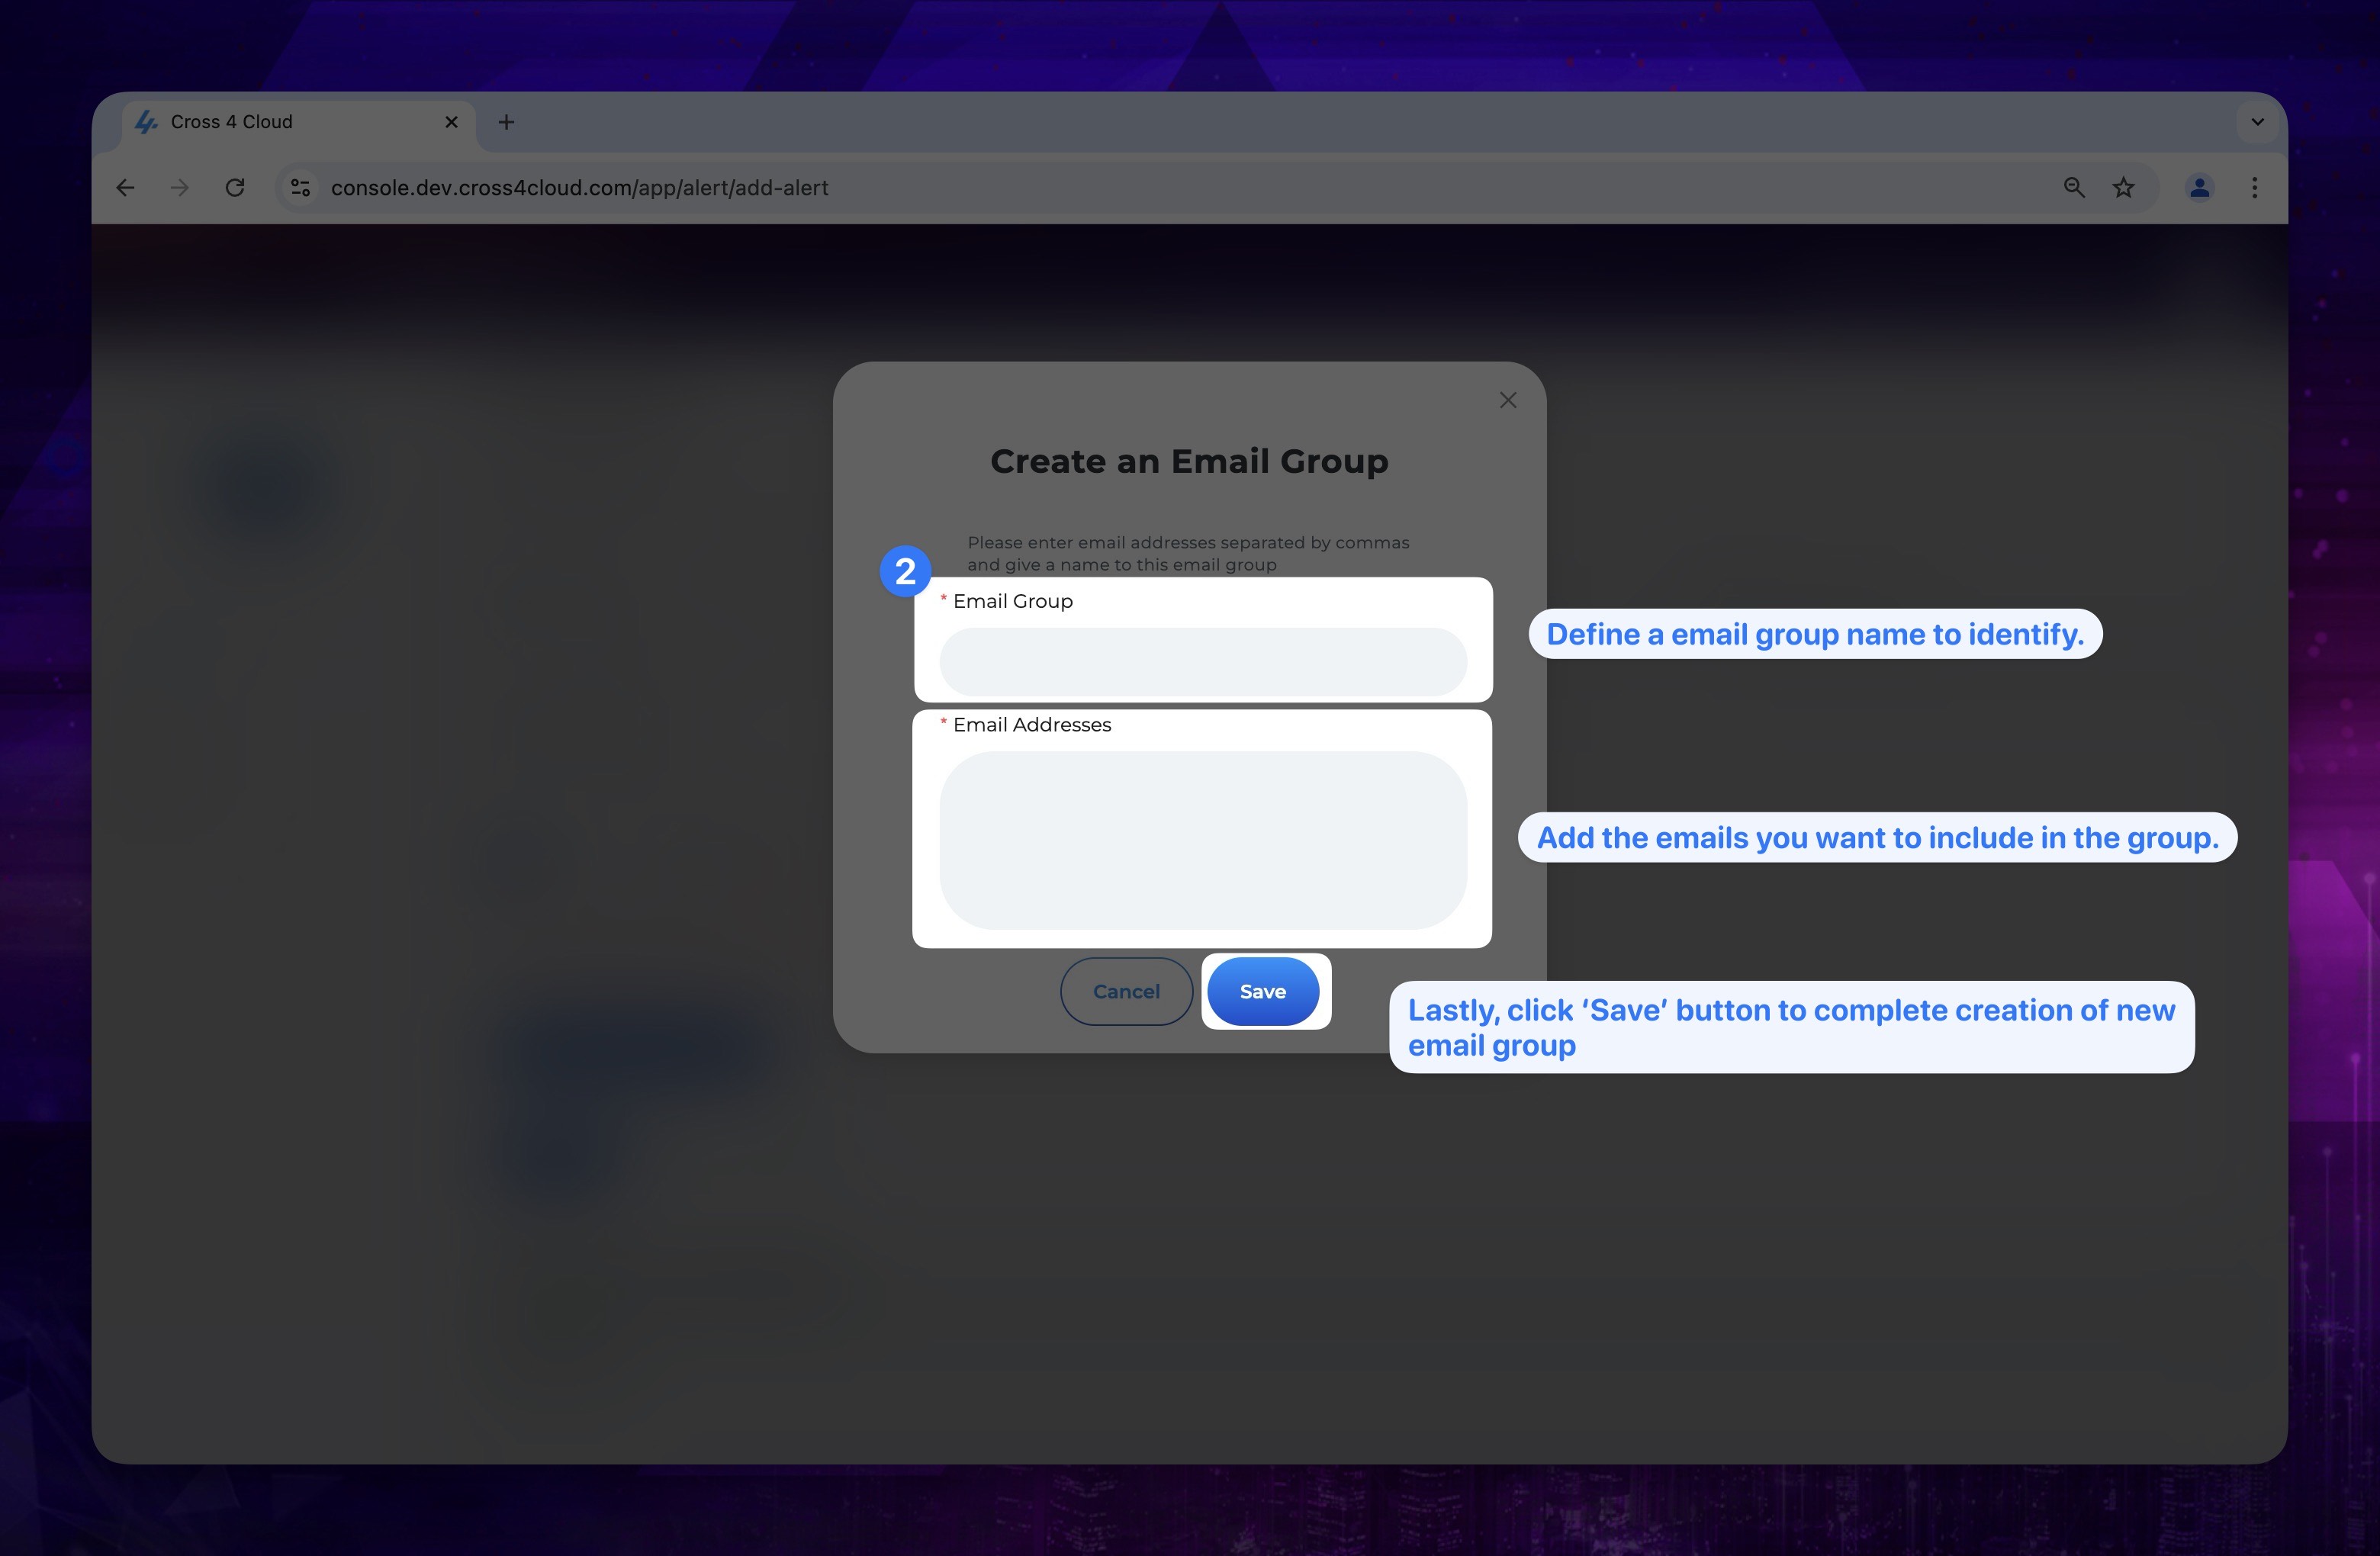
Create a new email group
- To create a new email group, select the Basic option in the Notifications section during the alarm creation process. Then, choose the Create a new email group option that appears below.
Show the instruction with images
- For your new email group, specify an email group name. Then, add the emails you want to include in the group. After that click to save button to complete creation of new email group.
Show the instruction with images
-
Advanced Option: Select your SNS topic group for sending notifications.
After select and identify notification type click continue button to proceed other steps.
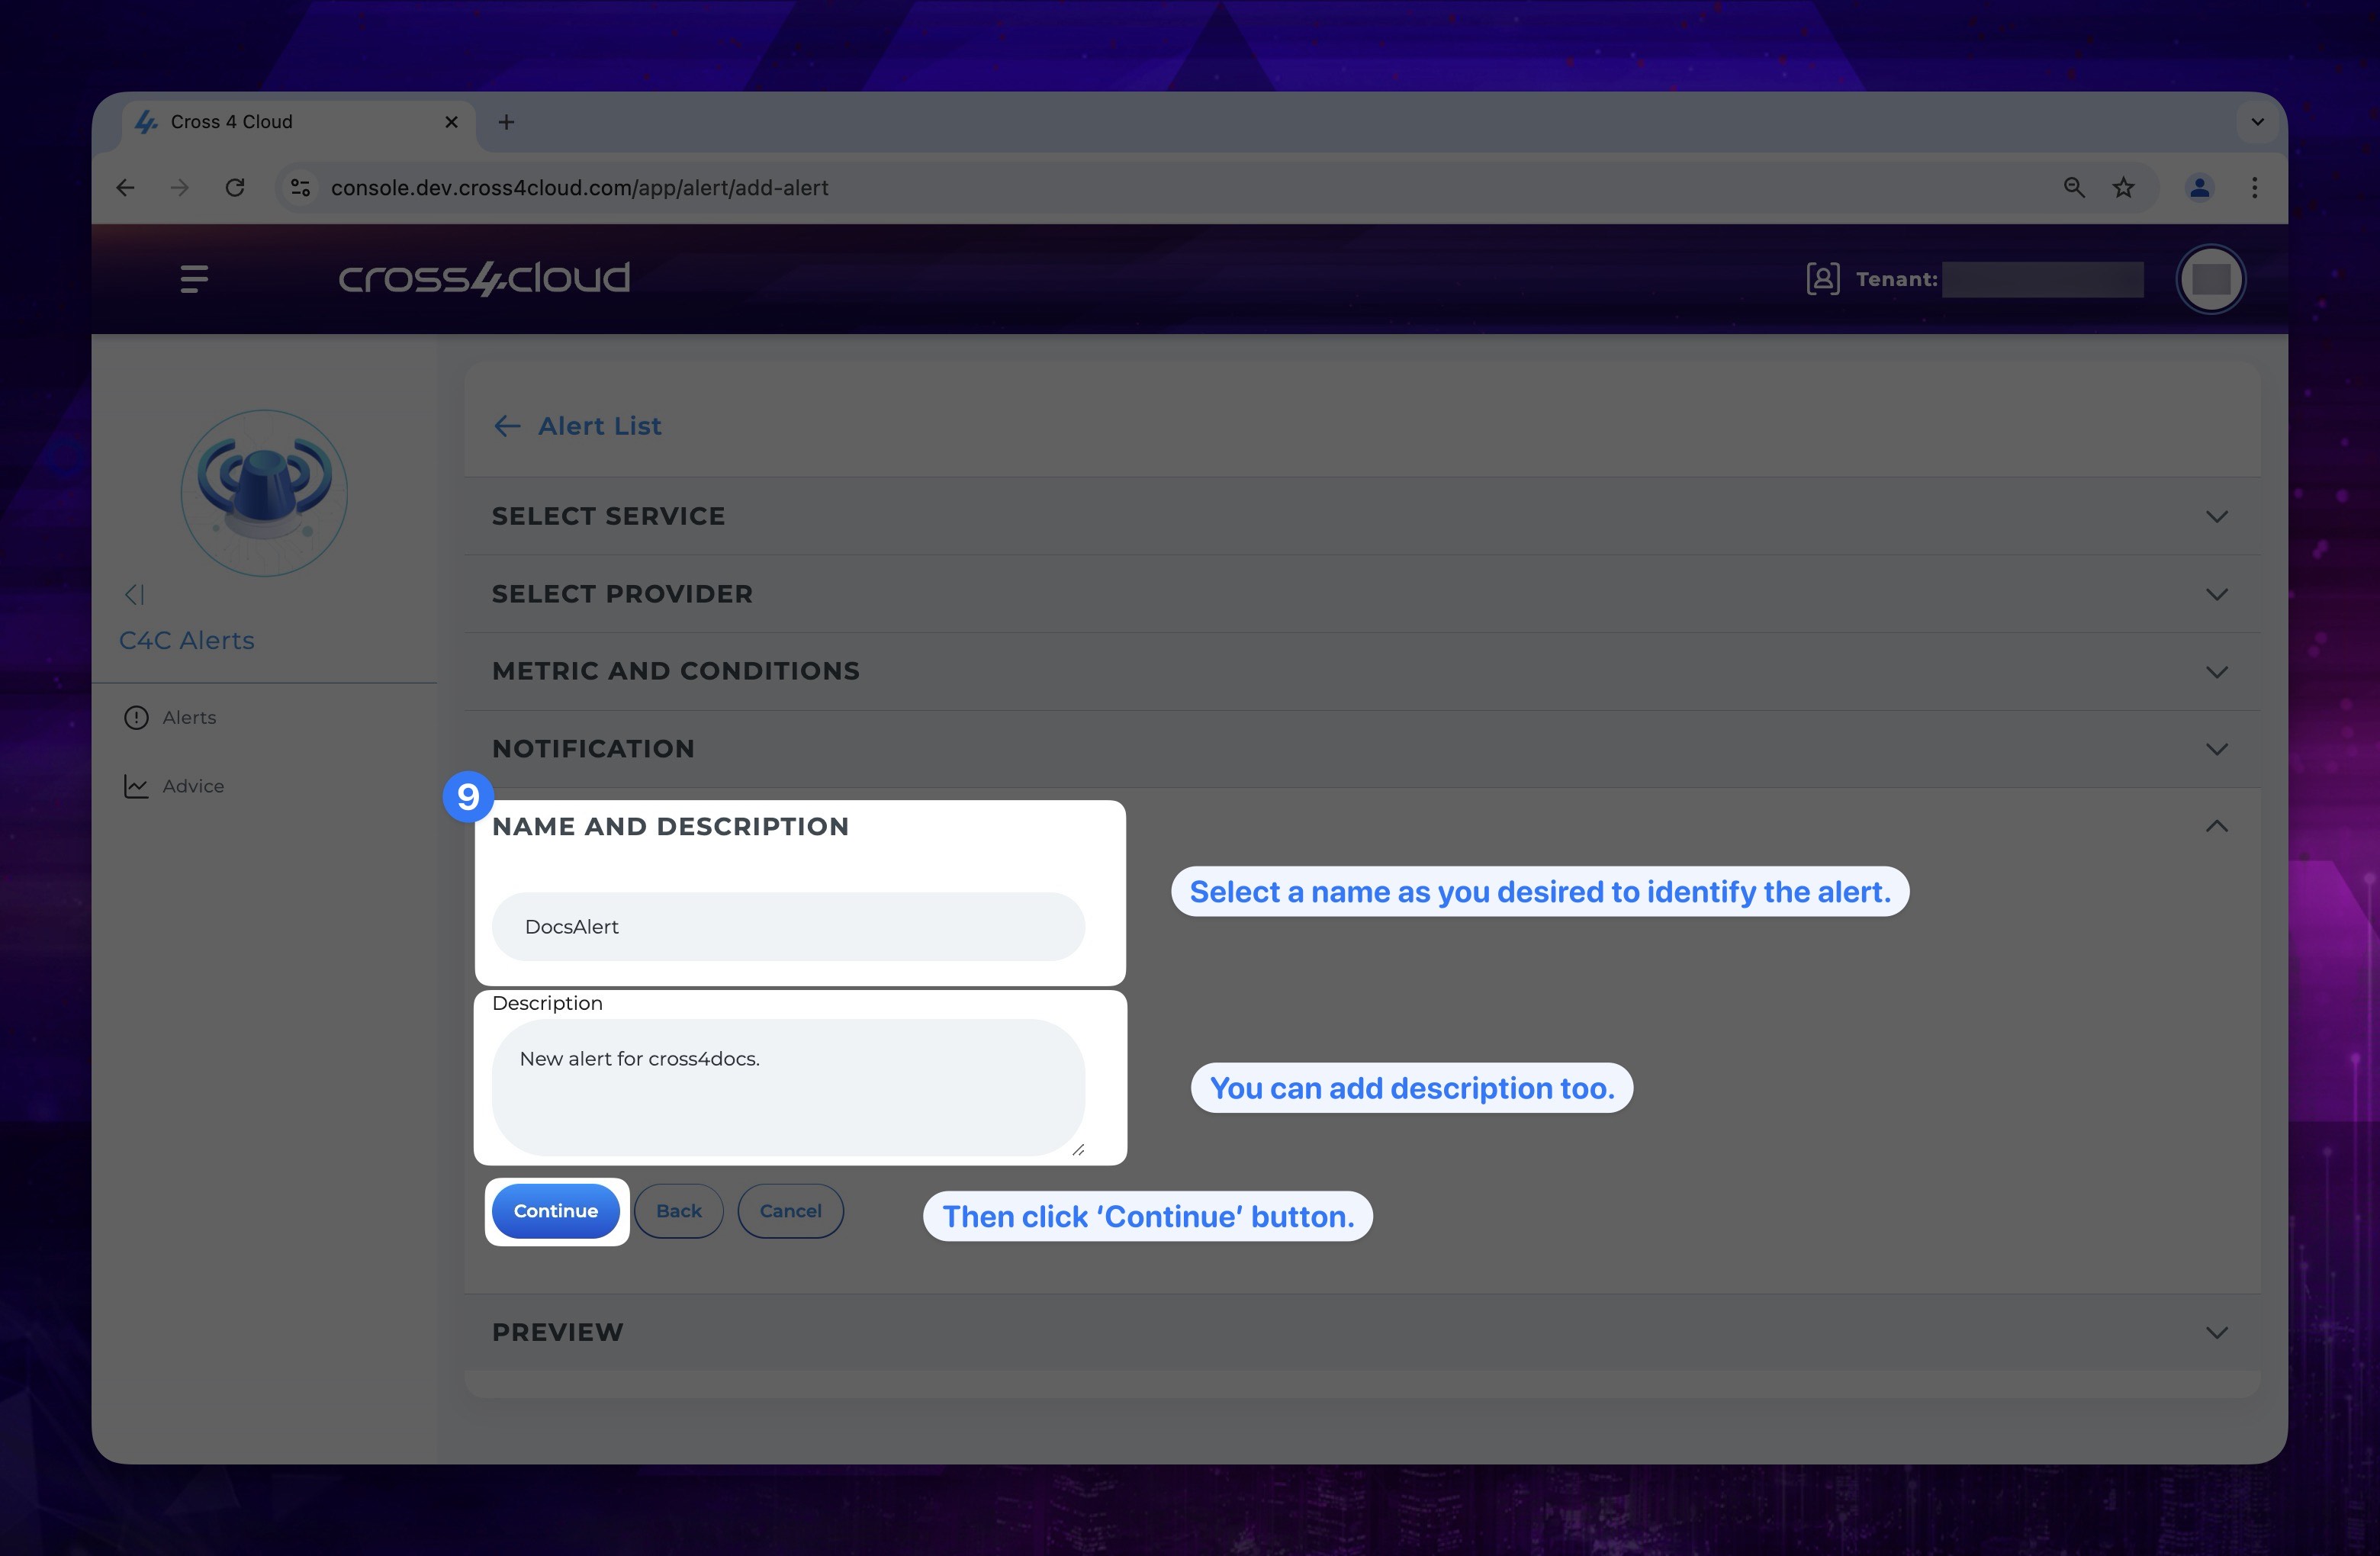
- In the Name and Description section give a name to identify the alert and click continue button.
Show the instruction with images
- In the preview section, review the details of the alert you are about to create. If any changes are needed, use the Back button to make adjustments. Once you are satisfied with the configuration, click the Create Alert button to successfully create the alert.
- Select a quota service and a region (only for AWS) and click Continue button.
Show the instruction with images
- Select a quota name that you want to set an alert and click Continue button.
Show the instruction with images
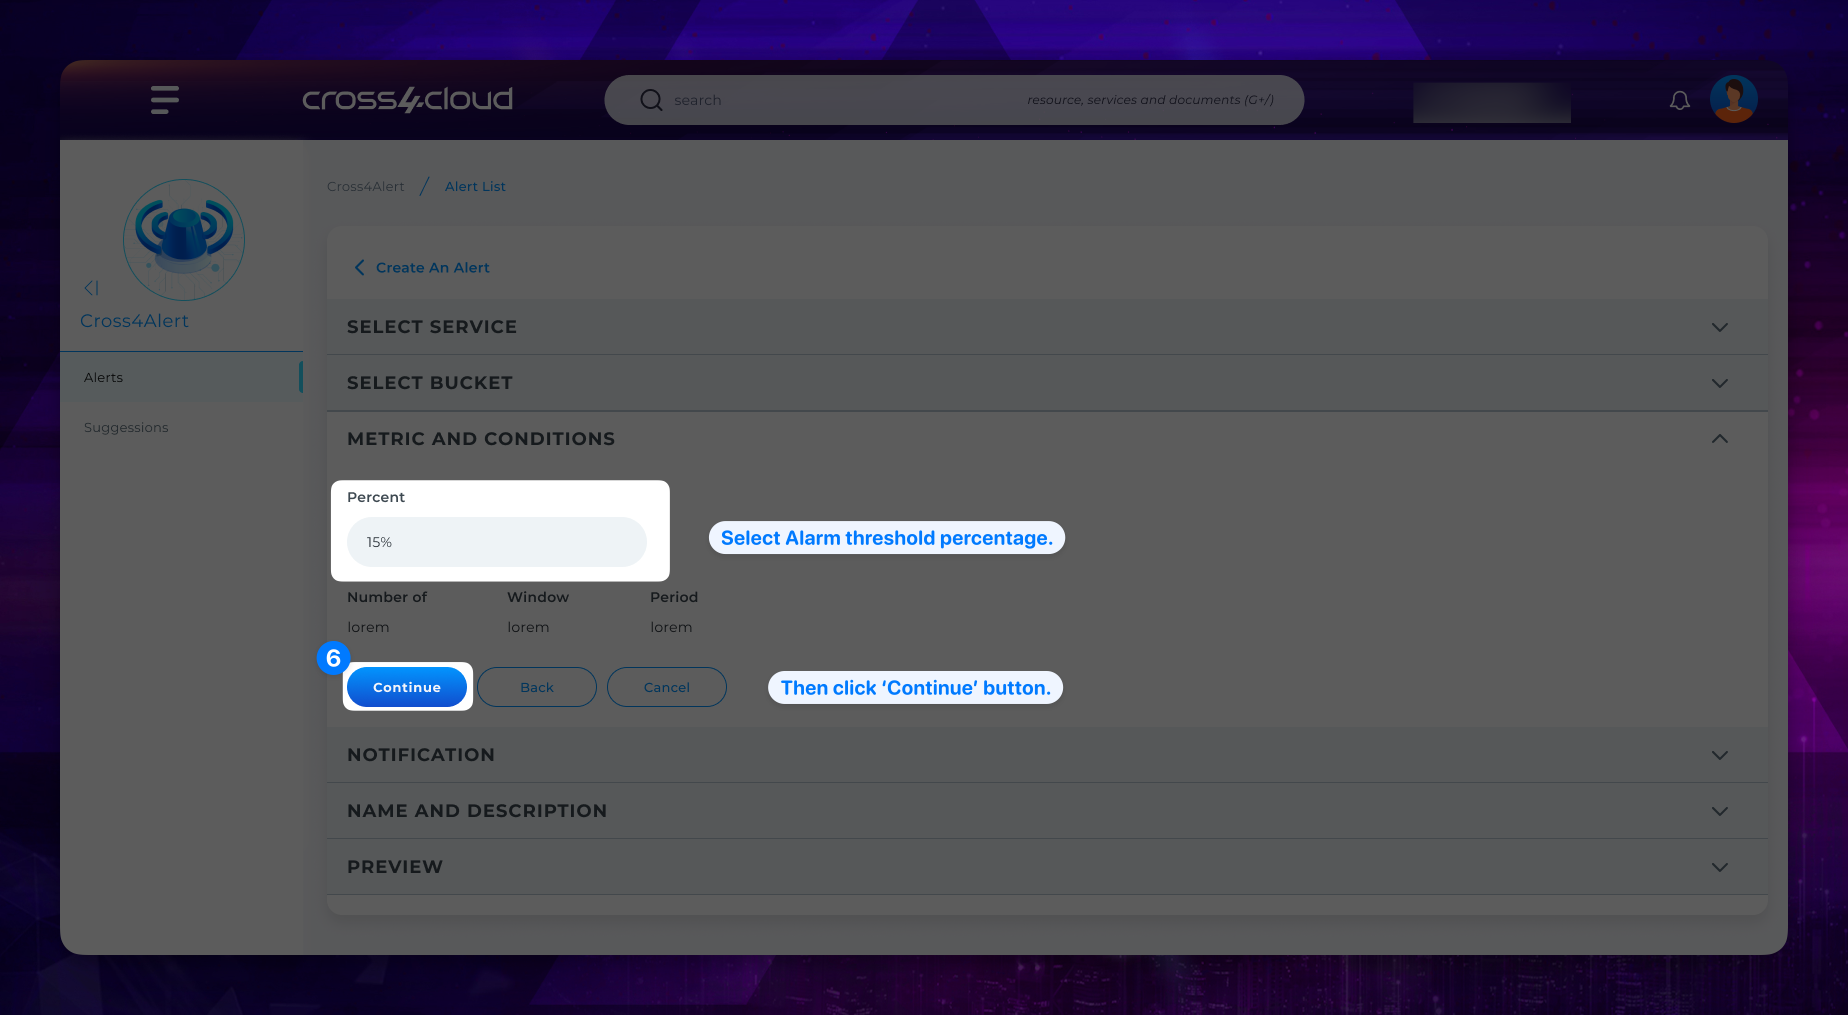
- Select Alarm threshold percentage. This alarm will notify you based on threshold you choose. and click Continue button.
Show the instruction with images
Coming soon!
Coming soon!
Editing Alerts
After creating your alerts, you can edit them to modify the metrics and conditions. To edit an alarm:
- Navigate to the Alerts page.
Show the instruction with images
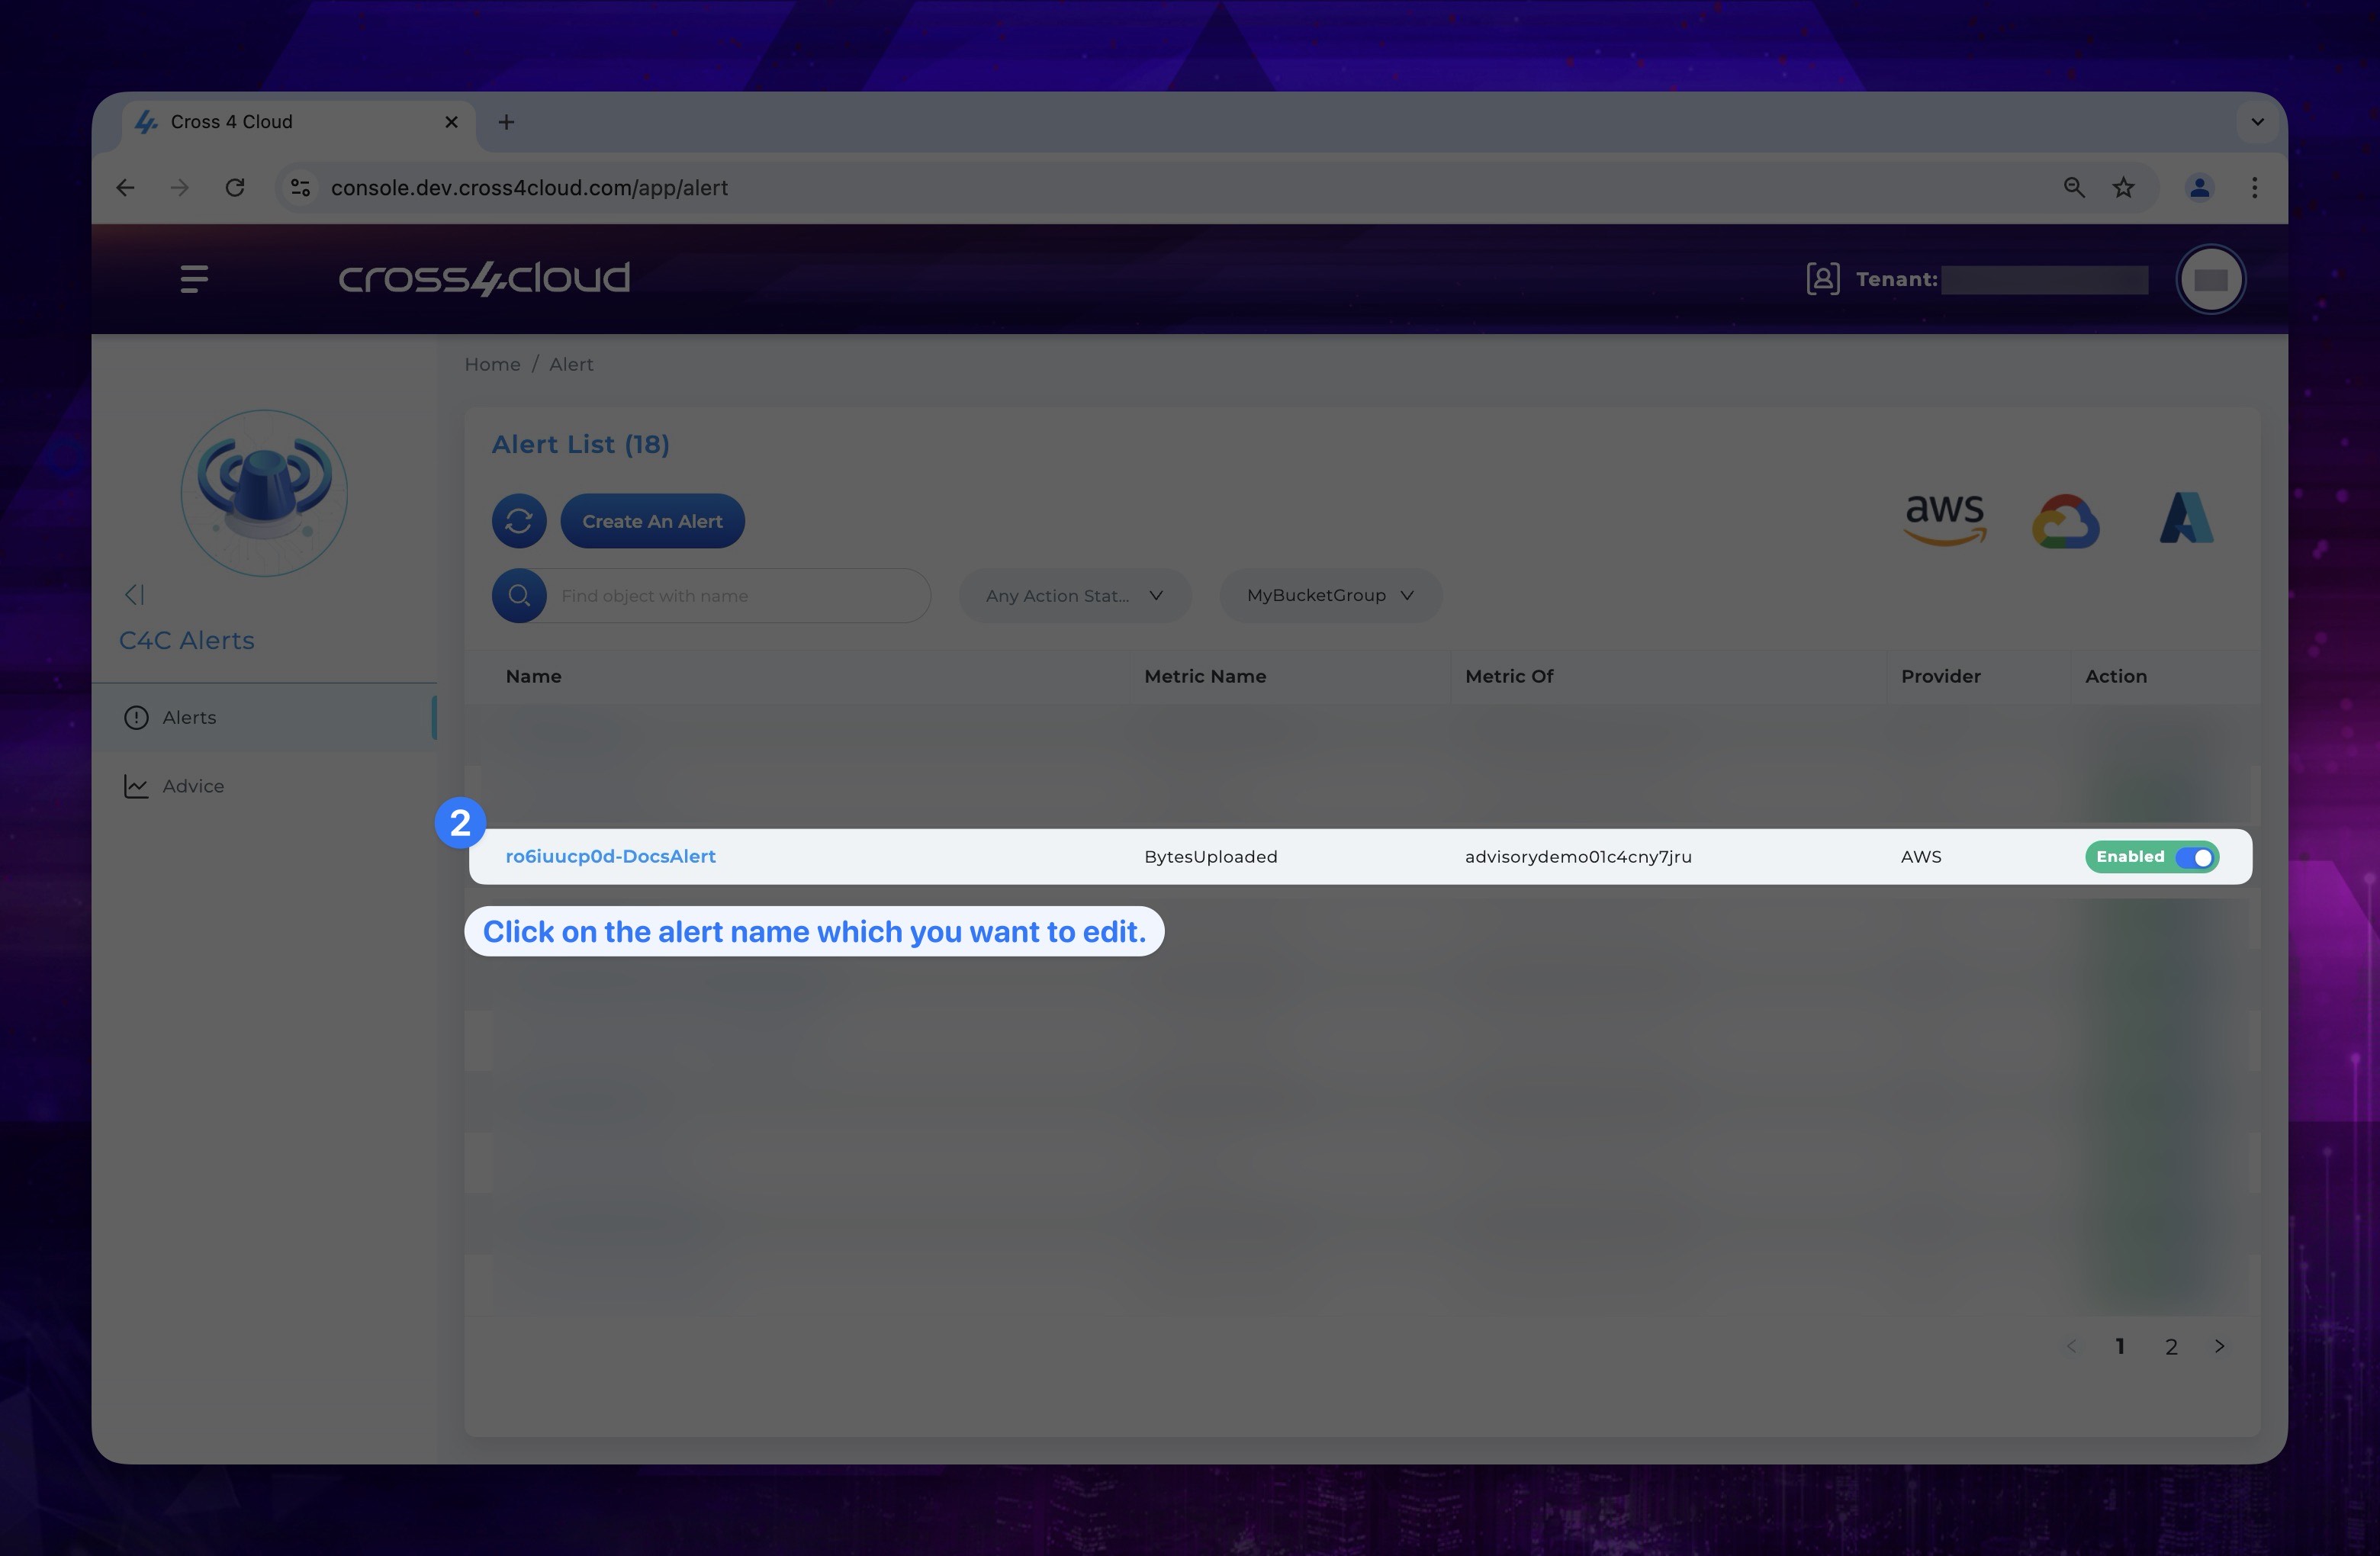
- Find the alert you want to edit and click the name on it.
Show the instruction with images
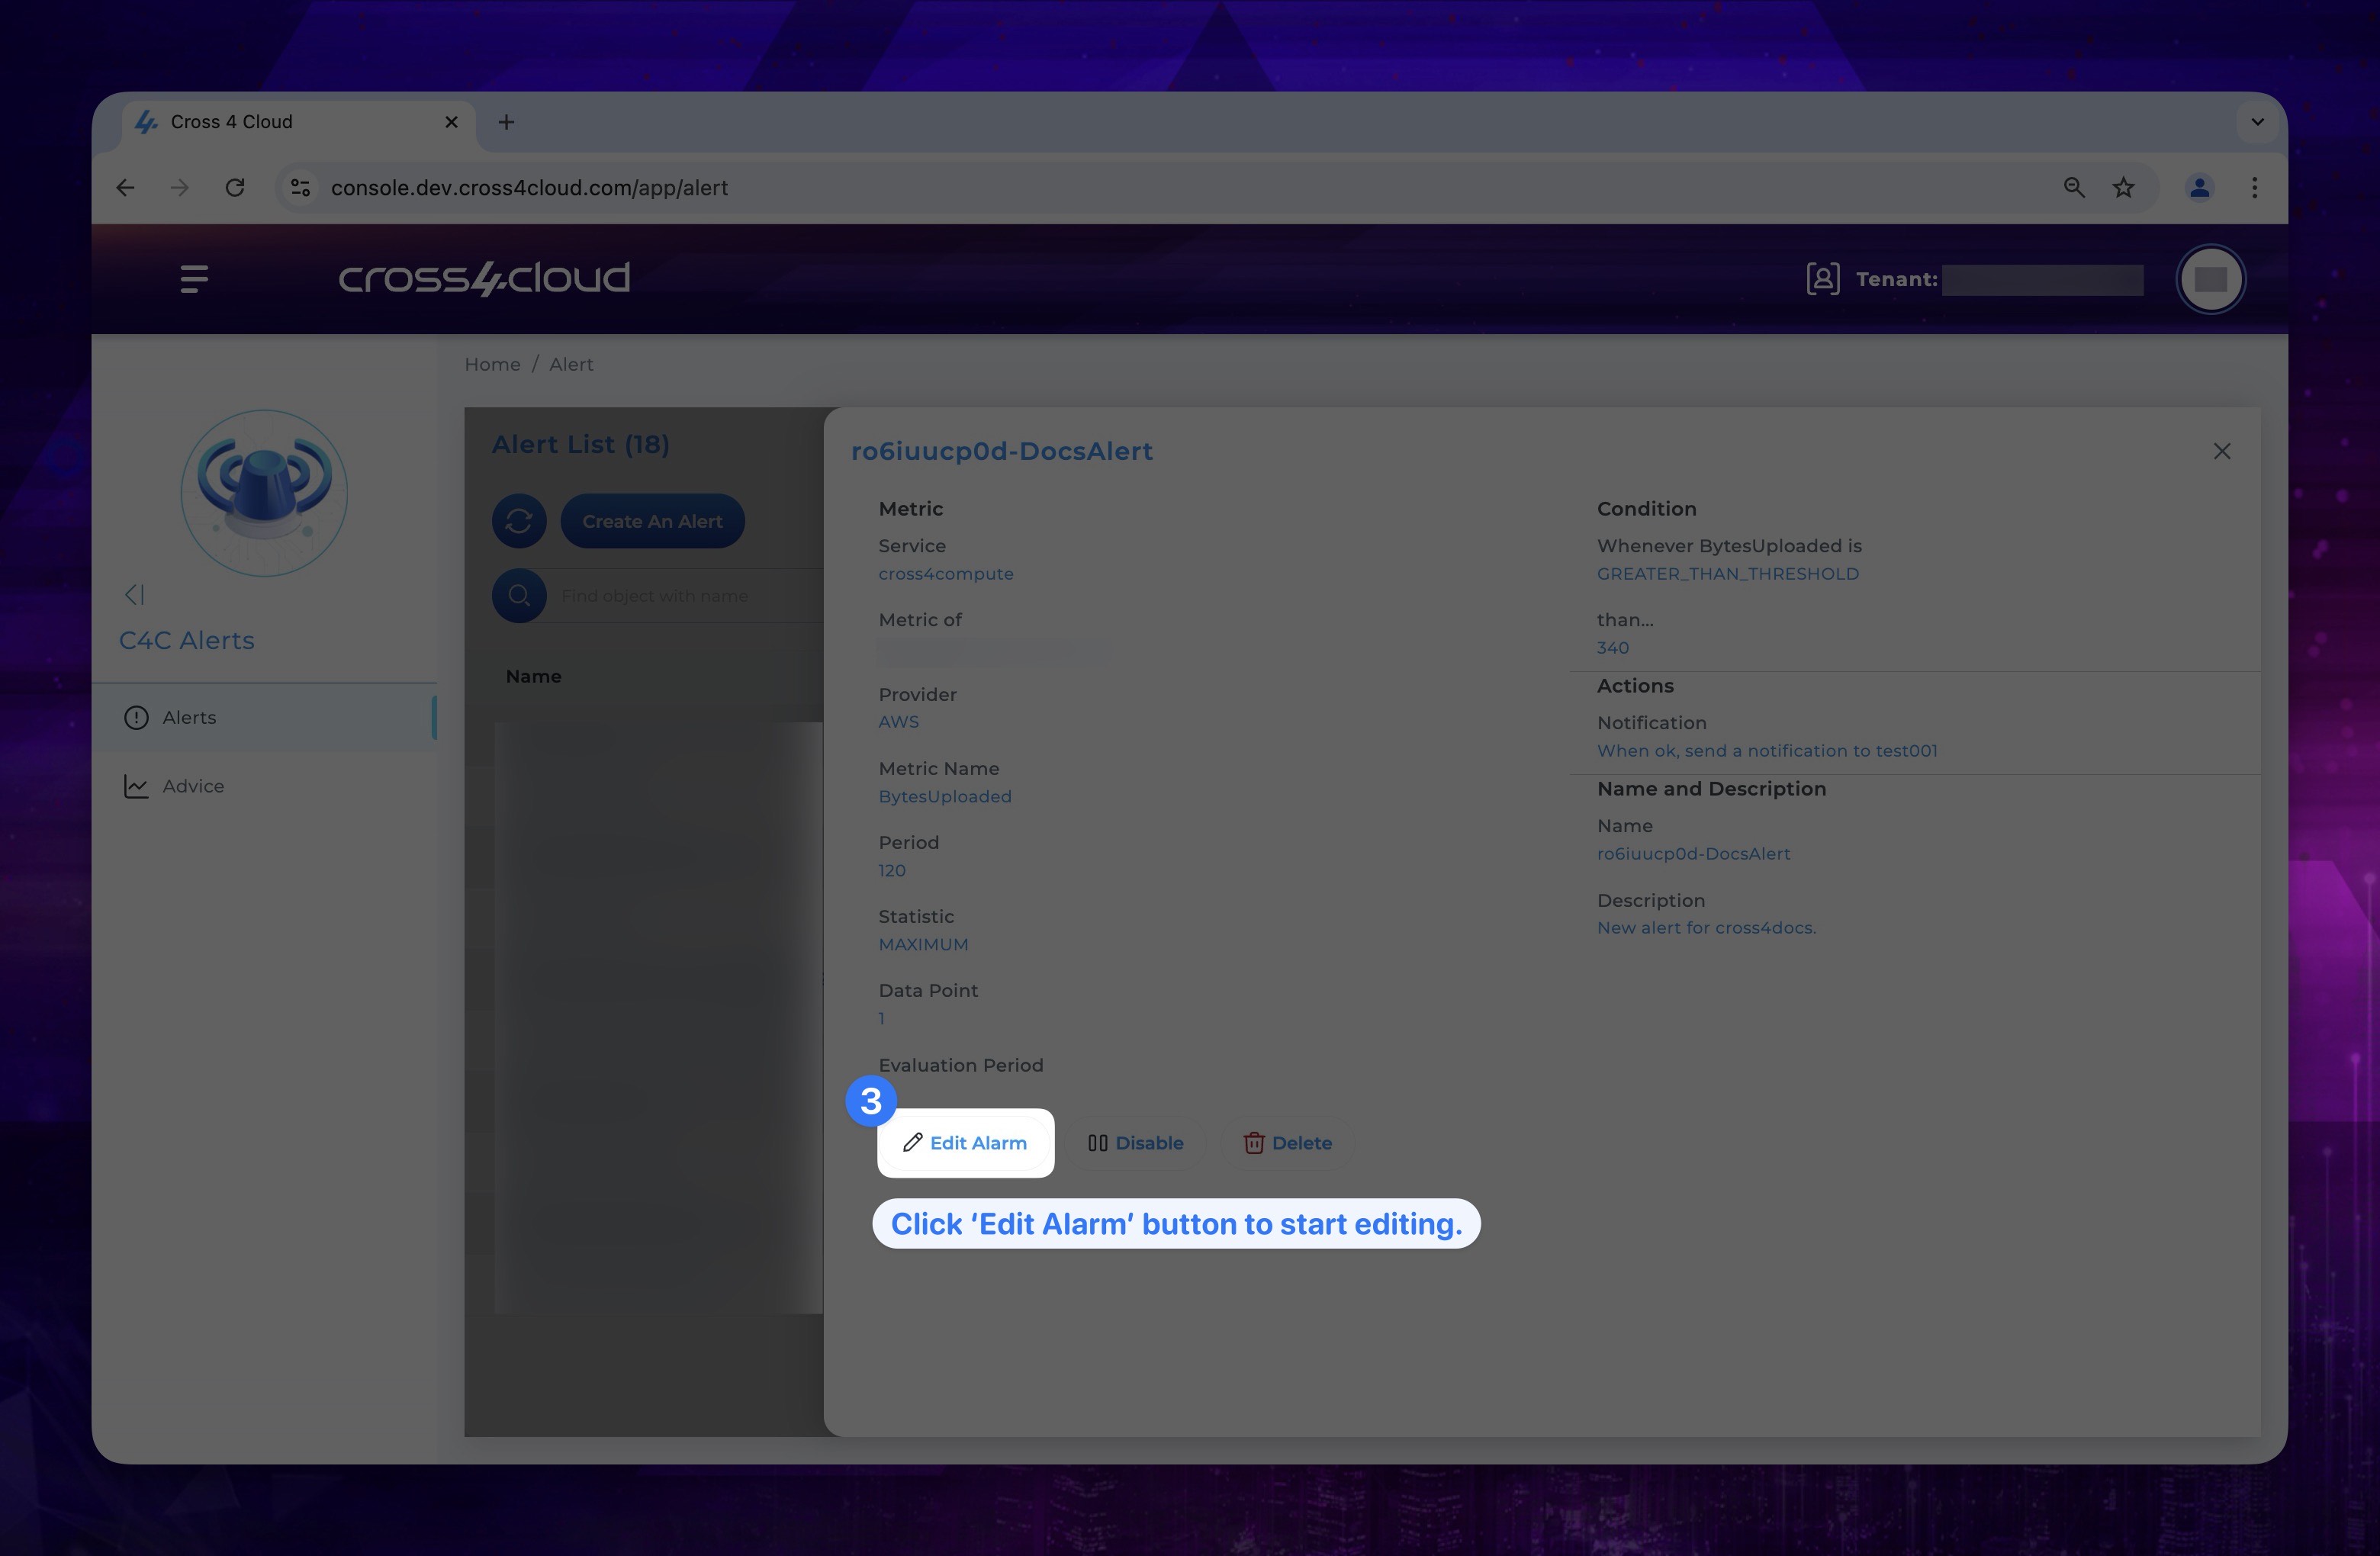
- On the alert details screen, click the Edit Alarm button at the bottom. This will take you to the section where you can modify the metrics and conditions of your alarm.
Show the instruction with images
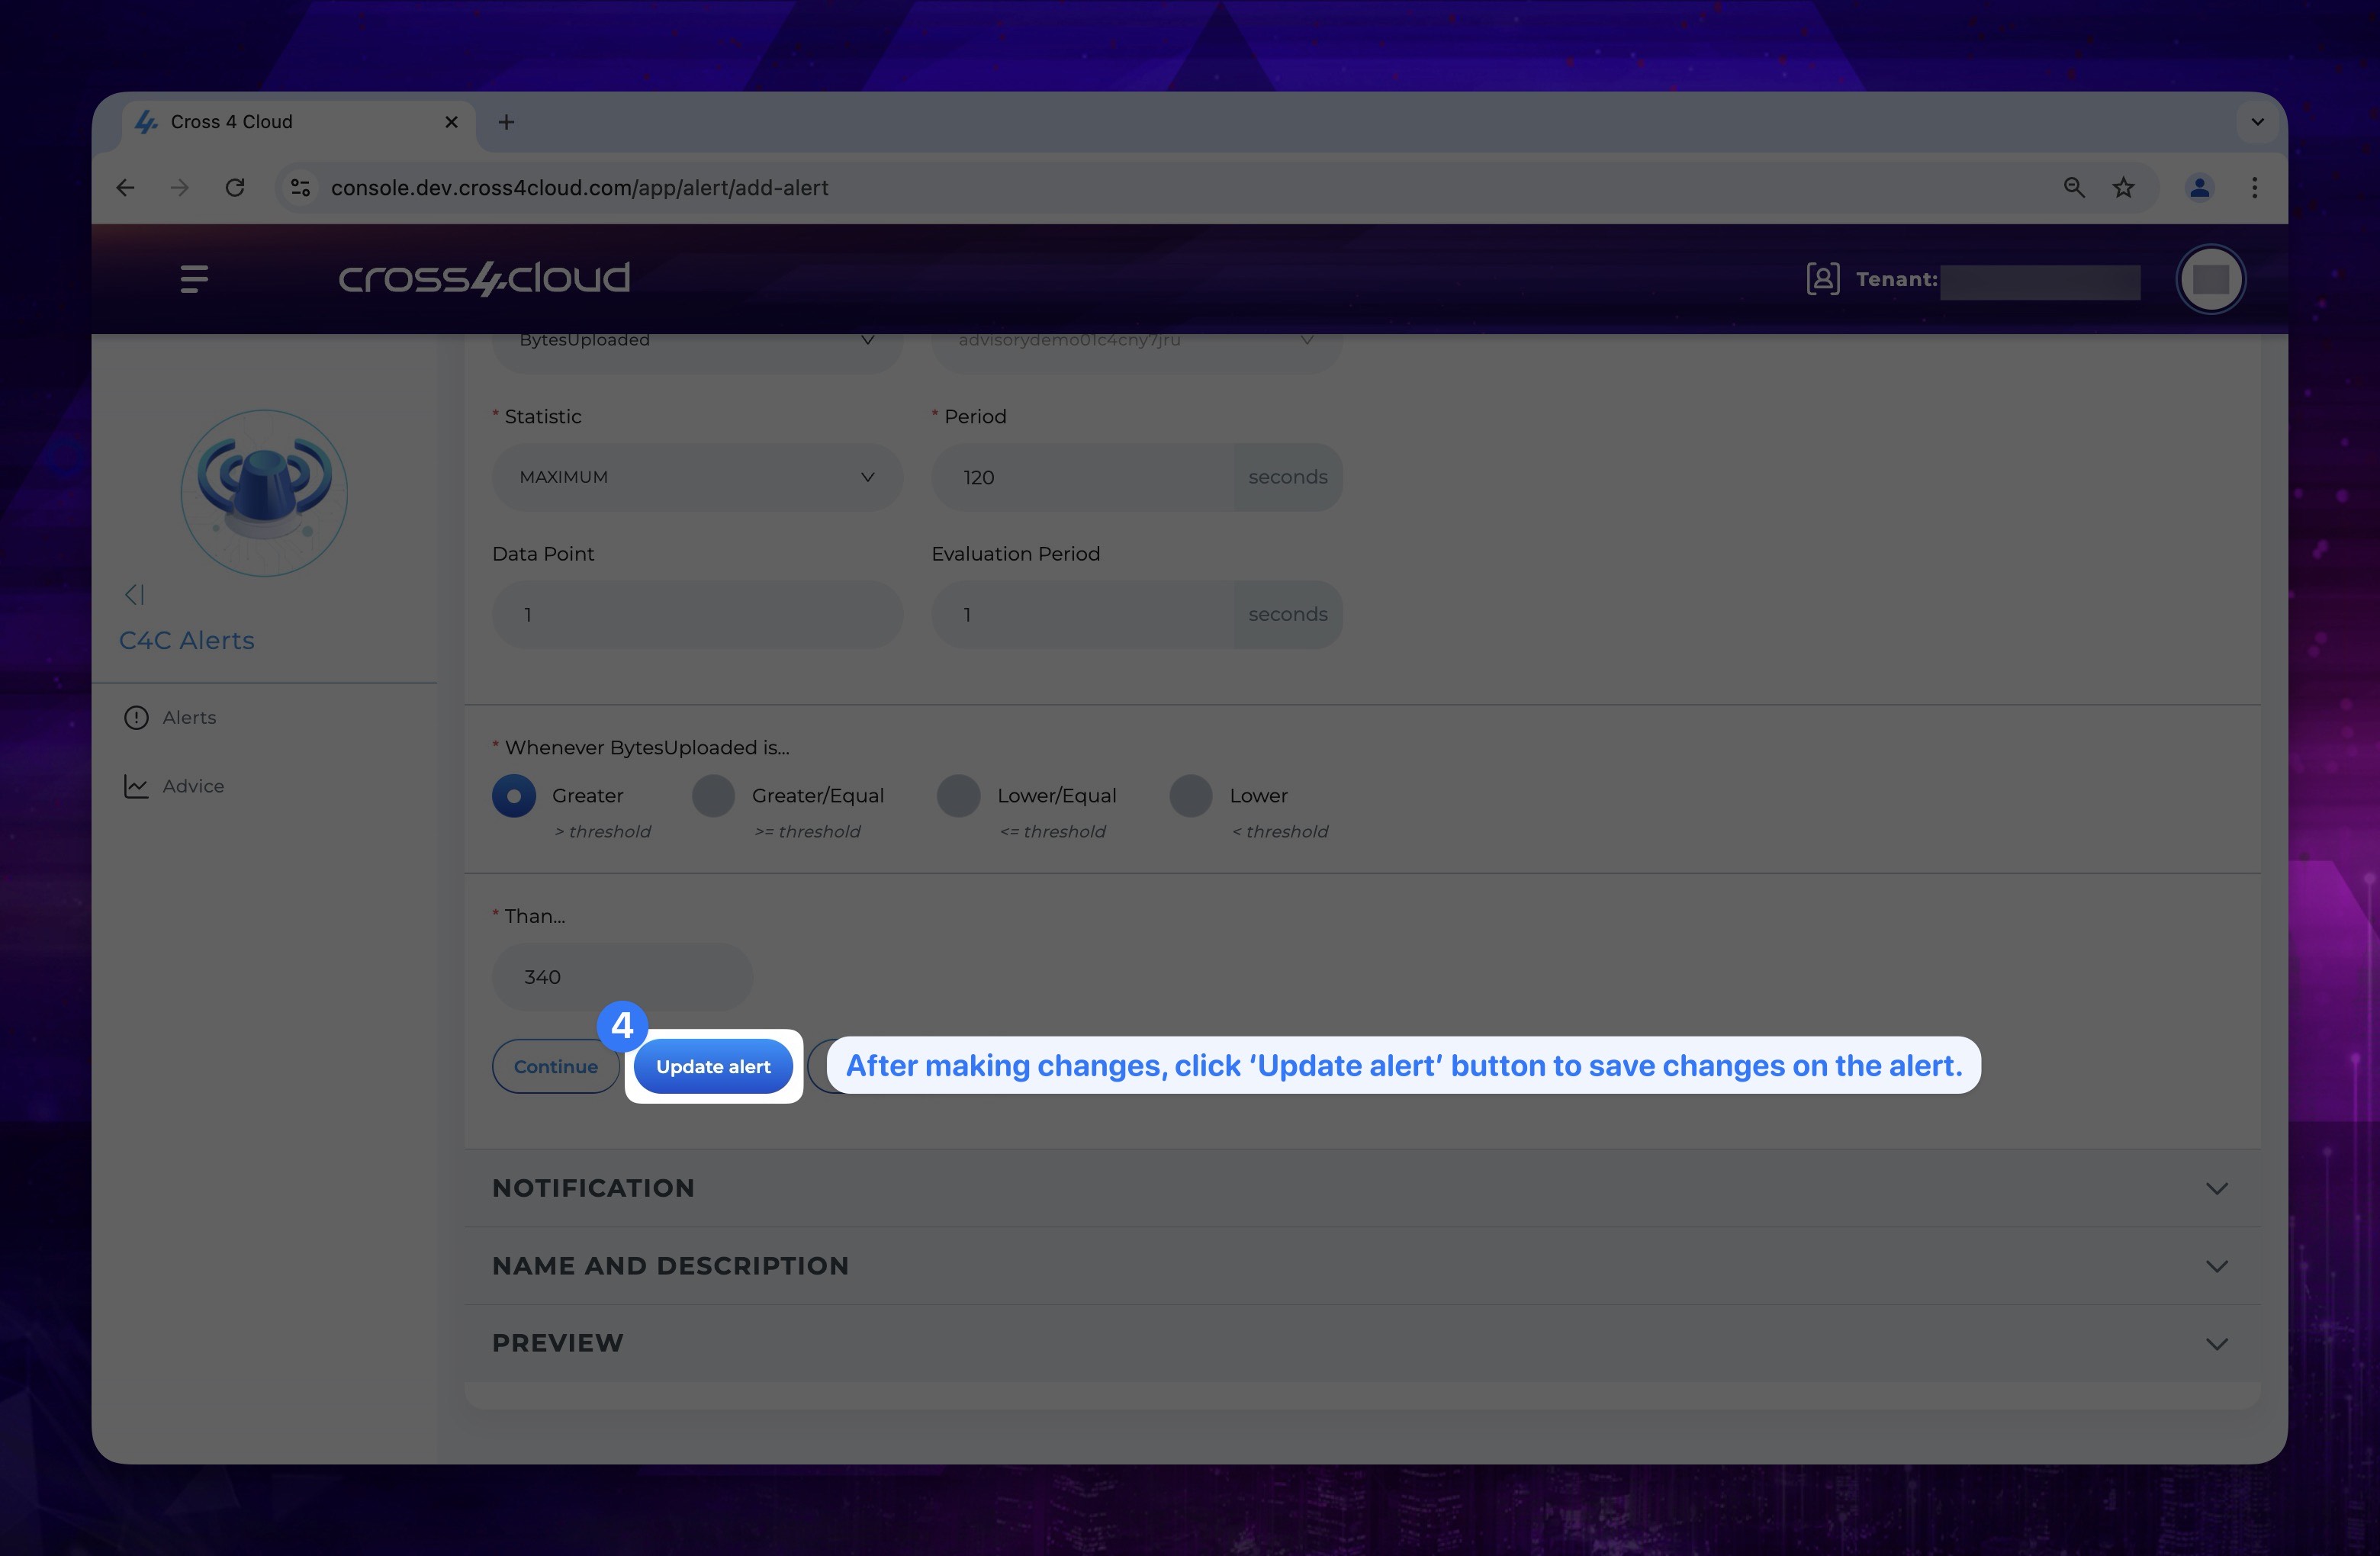
- Make the necessary changes, and click update alert button to save your changes.
Show the instruction with images
You might not be able to edit all the alarm settings. Some settings are fixed and cannot be changed after they are initially configured.
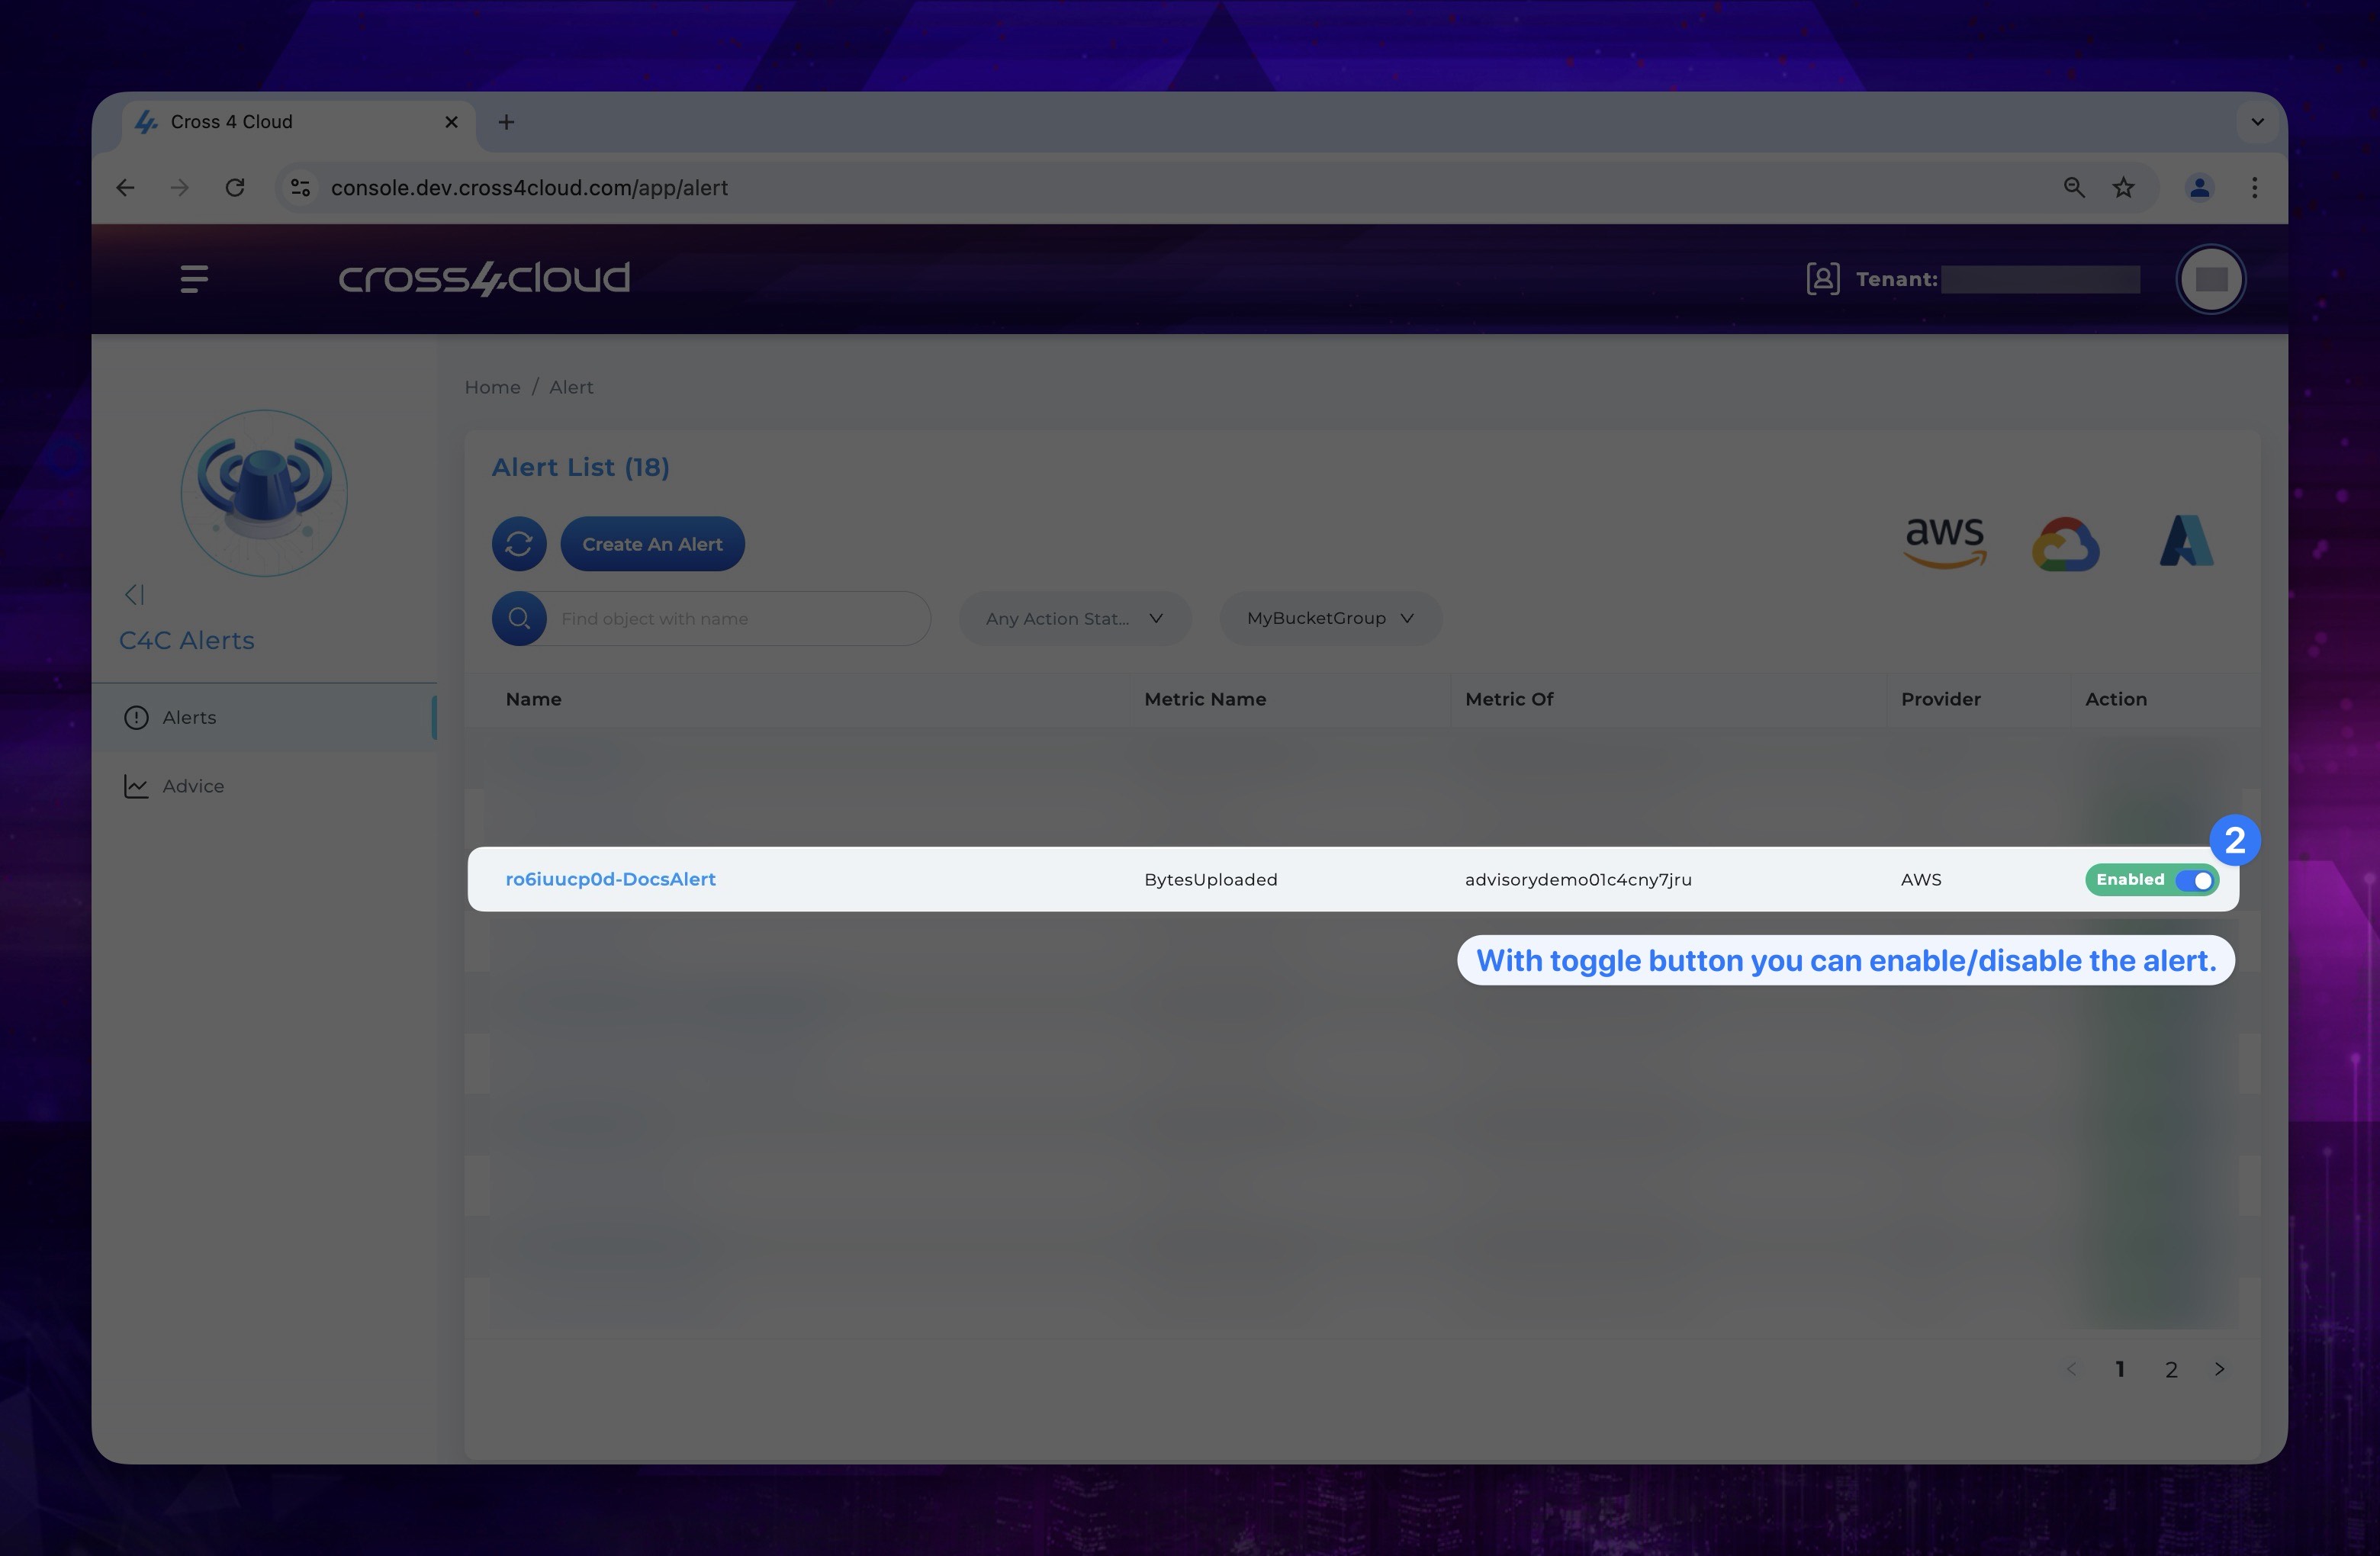
Disable/Enable Alarms
When an alarm's actions are disabled, the alarm actions do not execute when the alarm state changes. For disable to your alarms:
- Navigate to the Alerts page, where you can find a list of your created alerts.
Show the instruction with images
- In the Actions column of the list, you can view the current status of your alarm and use the toggle button to switch your alarm between enabled and disabled states.
Show the instruction with images
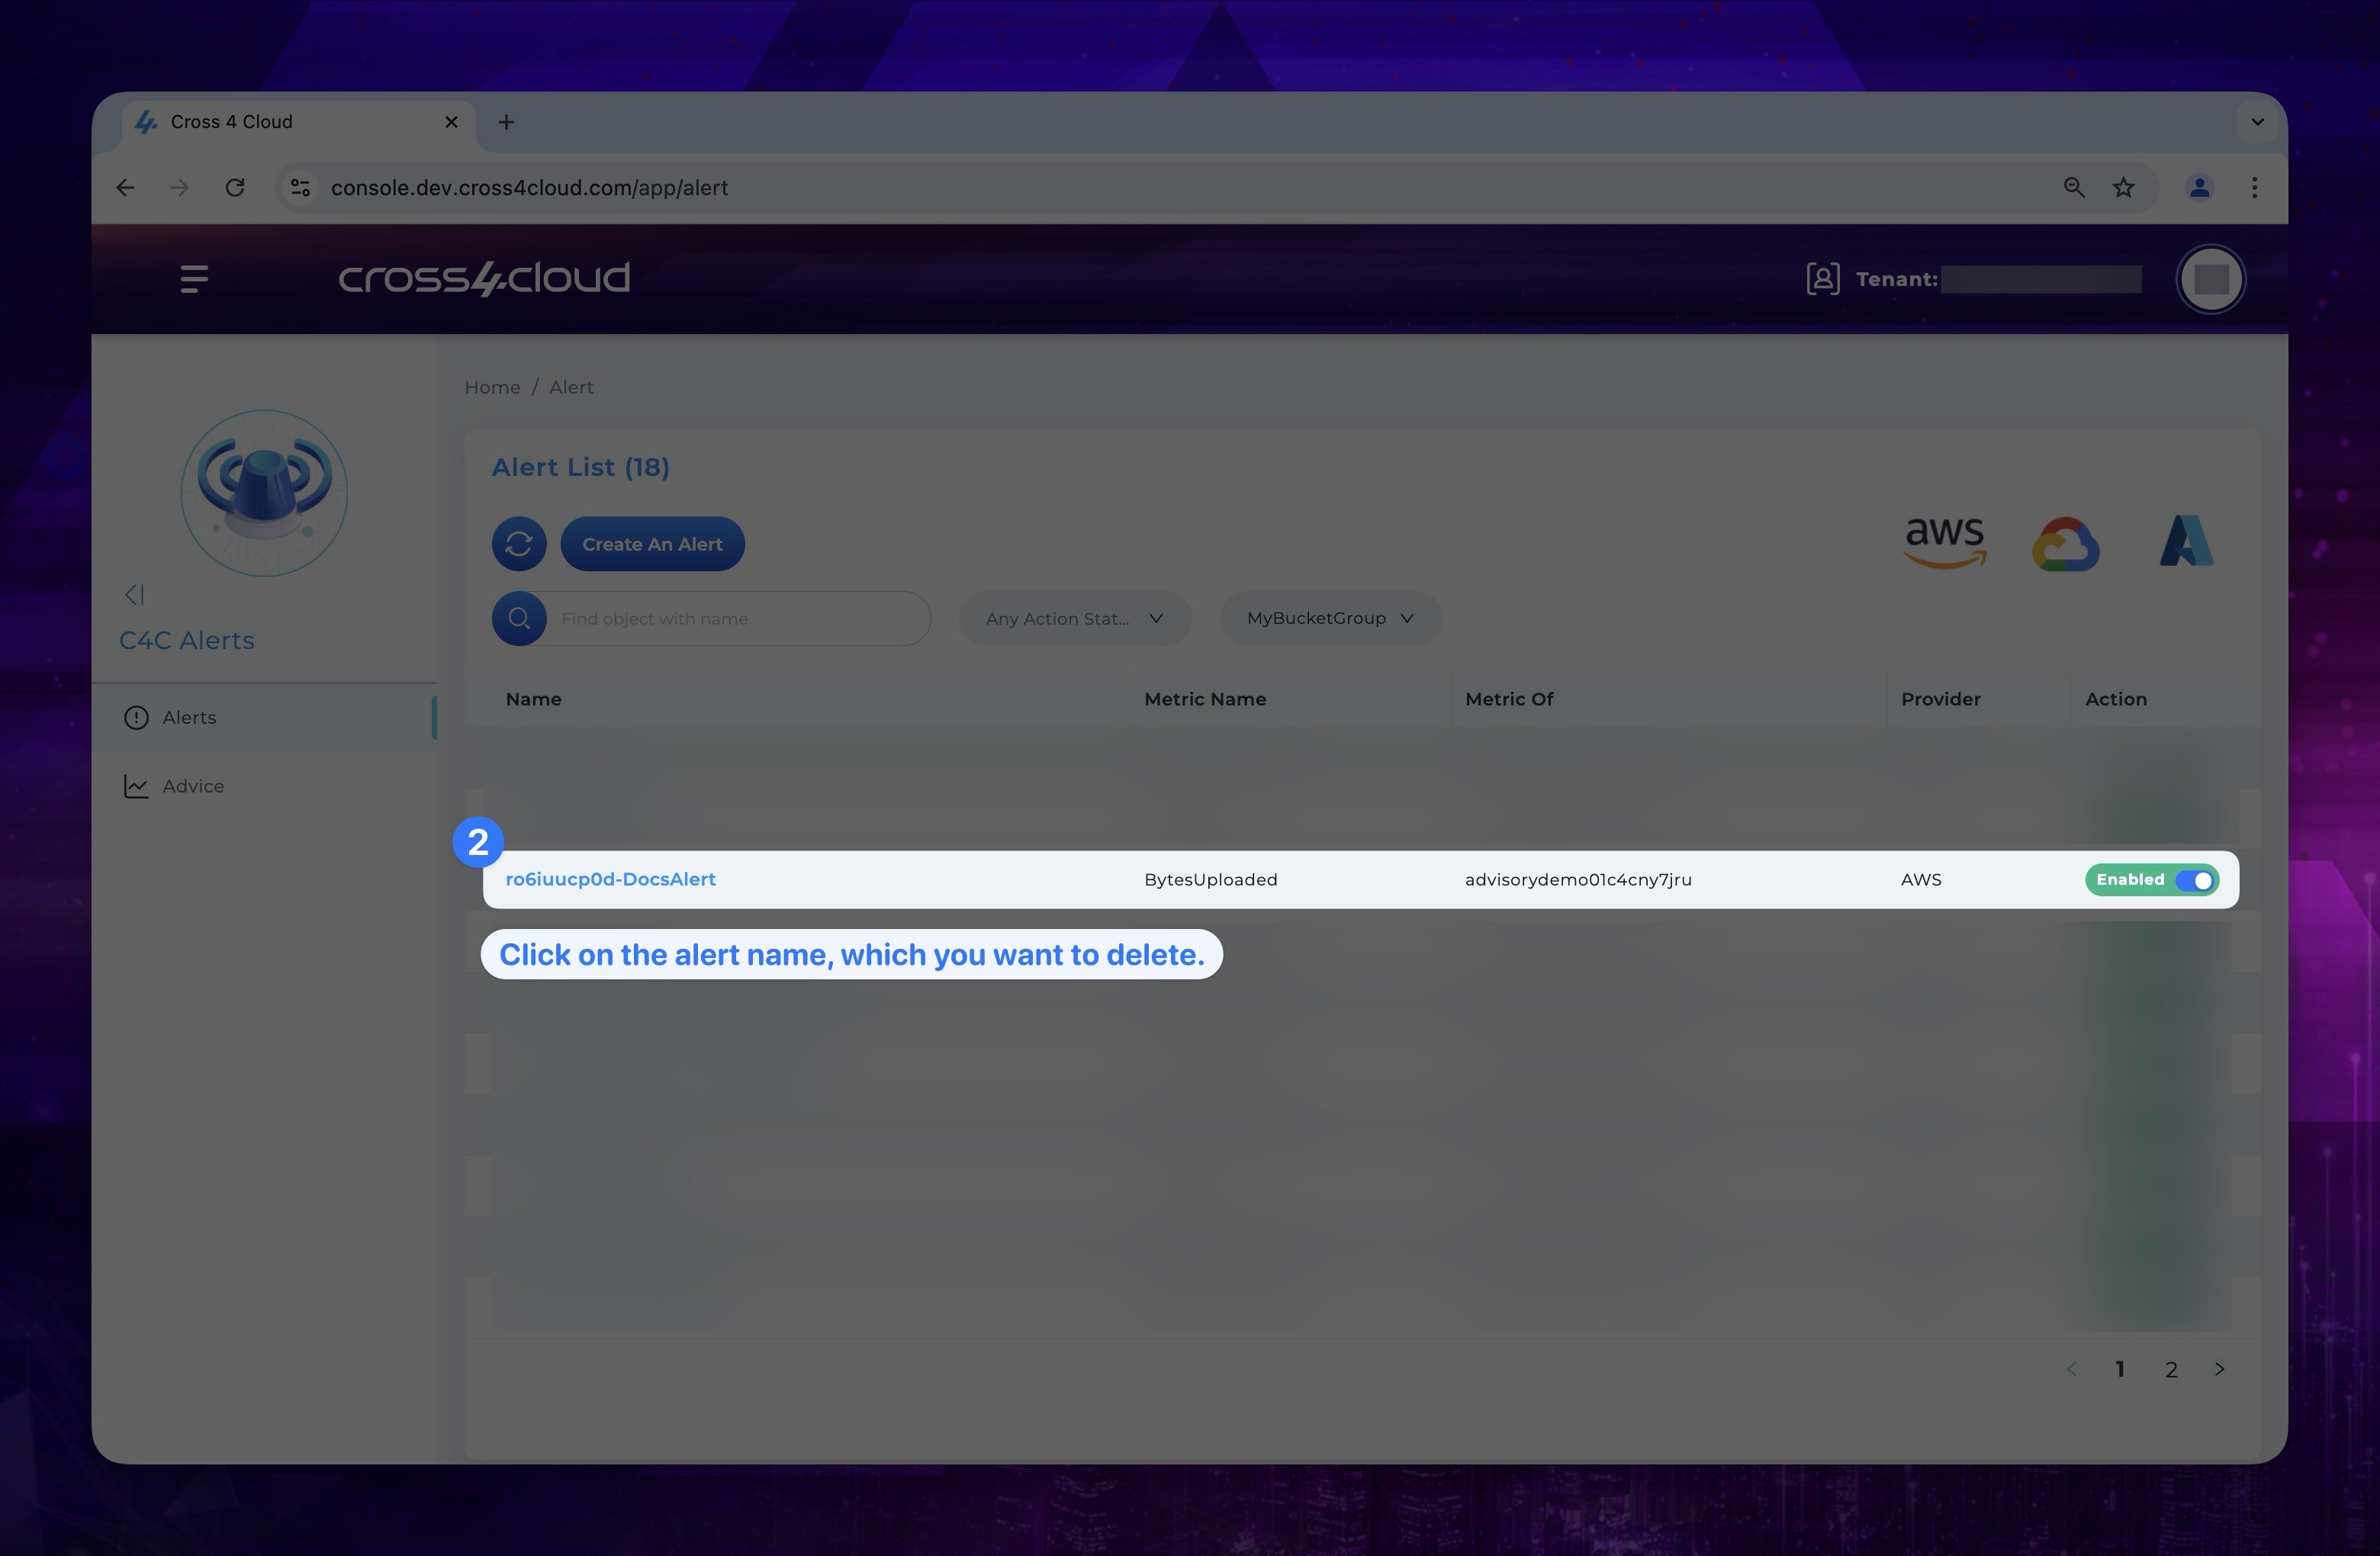
Delete Alarms
For permanently deleting the alarm from your system;
- Navigate to the Alerts page.
Show the instruction with images
- Find the alert you want to delete and click the name on it.
Show the instruction with images
- On the alert details screen, click the Delete button at the bottom.
Show the instruction with images
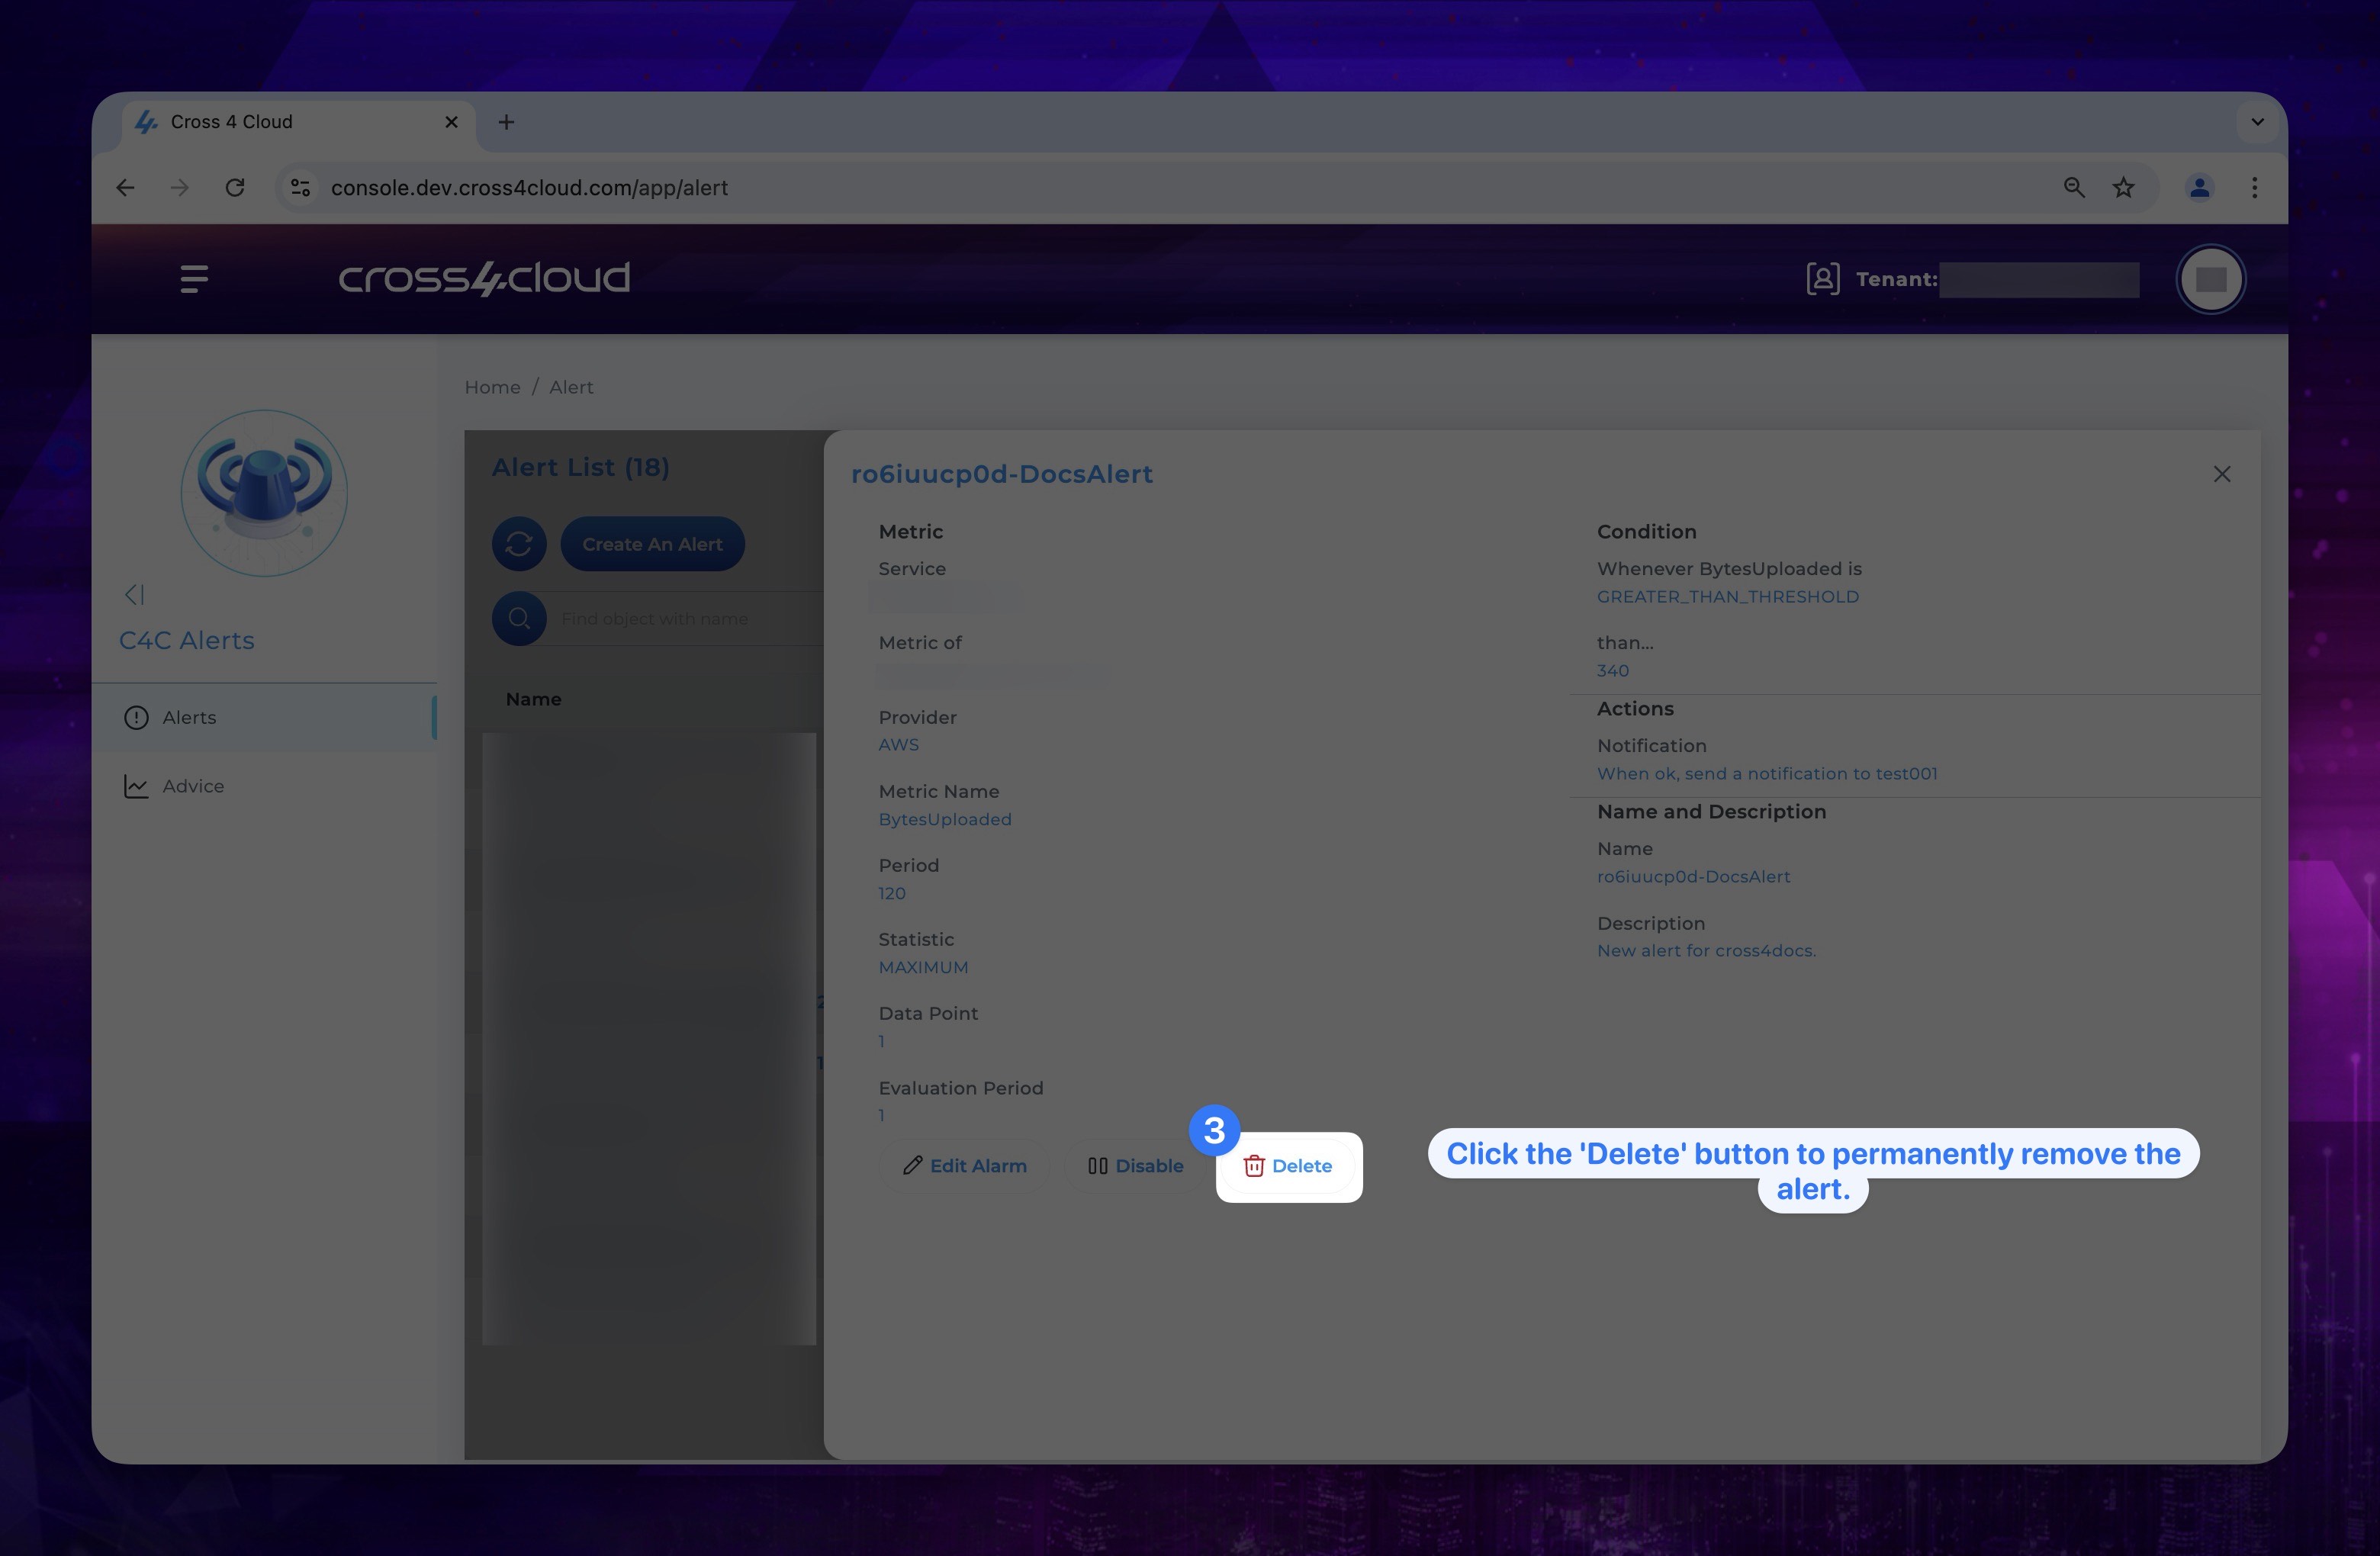
- To permanently delete the alarm, click on the OK button and confirm. Your alarm will be successfully deleted.
Suggestions
Suggestions under Cross4Alert is a feature dedicated to automating cost management and strategic planning consultancy in cloud environments.
It is a comprehensive service designed to optimize cost management and enhance financial operations within cloud environments. It provides robust tools and features aimed at guiding users through effective resource selection, utilization, and cost analysis. It also supports strategic planning by offering insights into business goals, vendor selection strategies, and architectural decisions. Inspired by FinOps principles, Cross4Advice promotes transparency in cost optimization efforts, ensuring organizations can make informed financial decisions aligned with their operational objectives.
Viewing Suggestions
- Go to the Cross4Alert alerts page. To do this, click the menu icon top of the dashboard page and select Alerts.
Show the instruction with images
- Go to Suggestions page. To do this, click the menu icon top of the alert page and select Suggestions.
Show the instruction with images
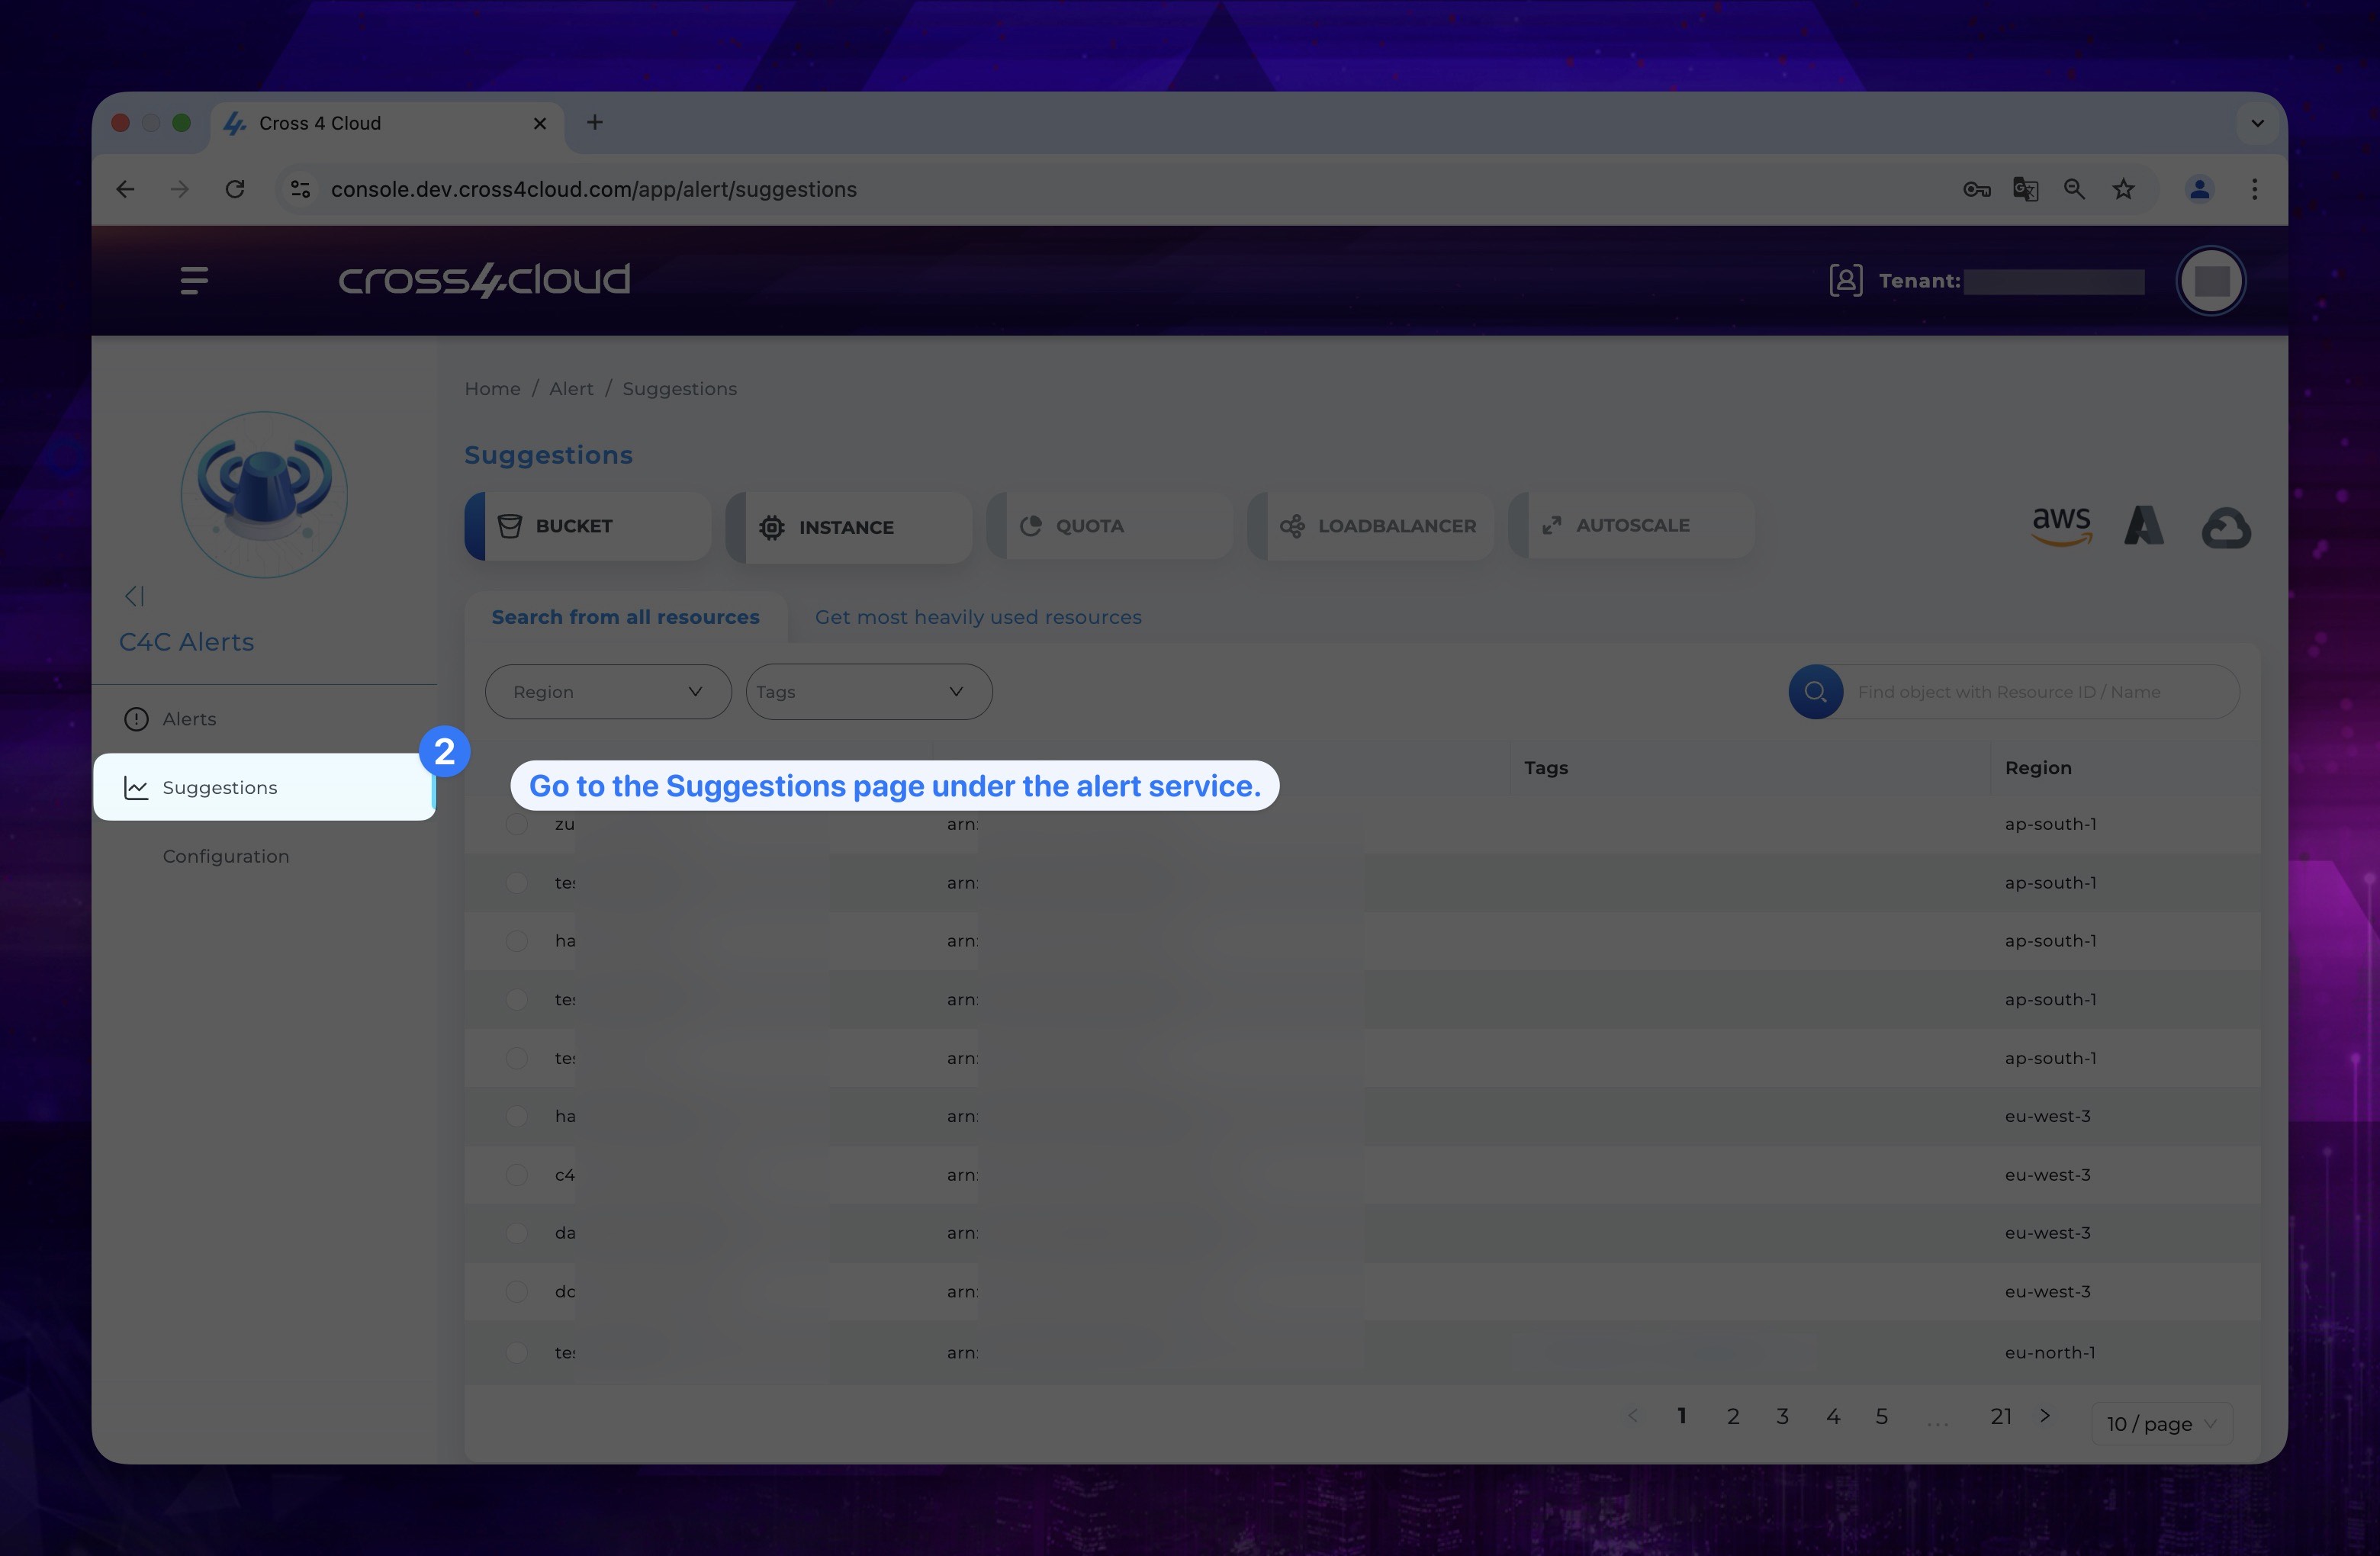
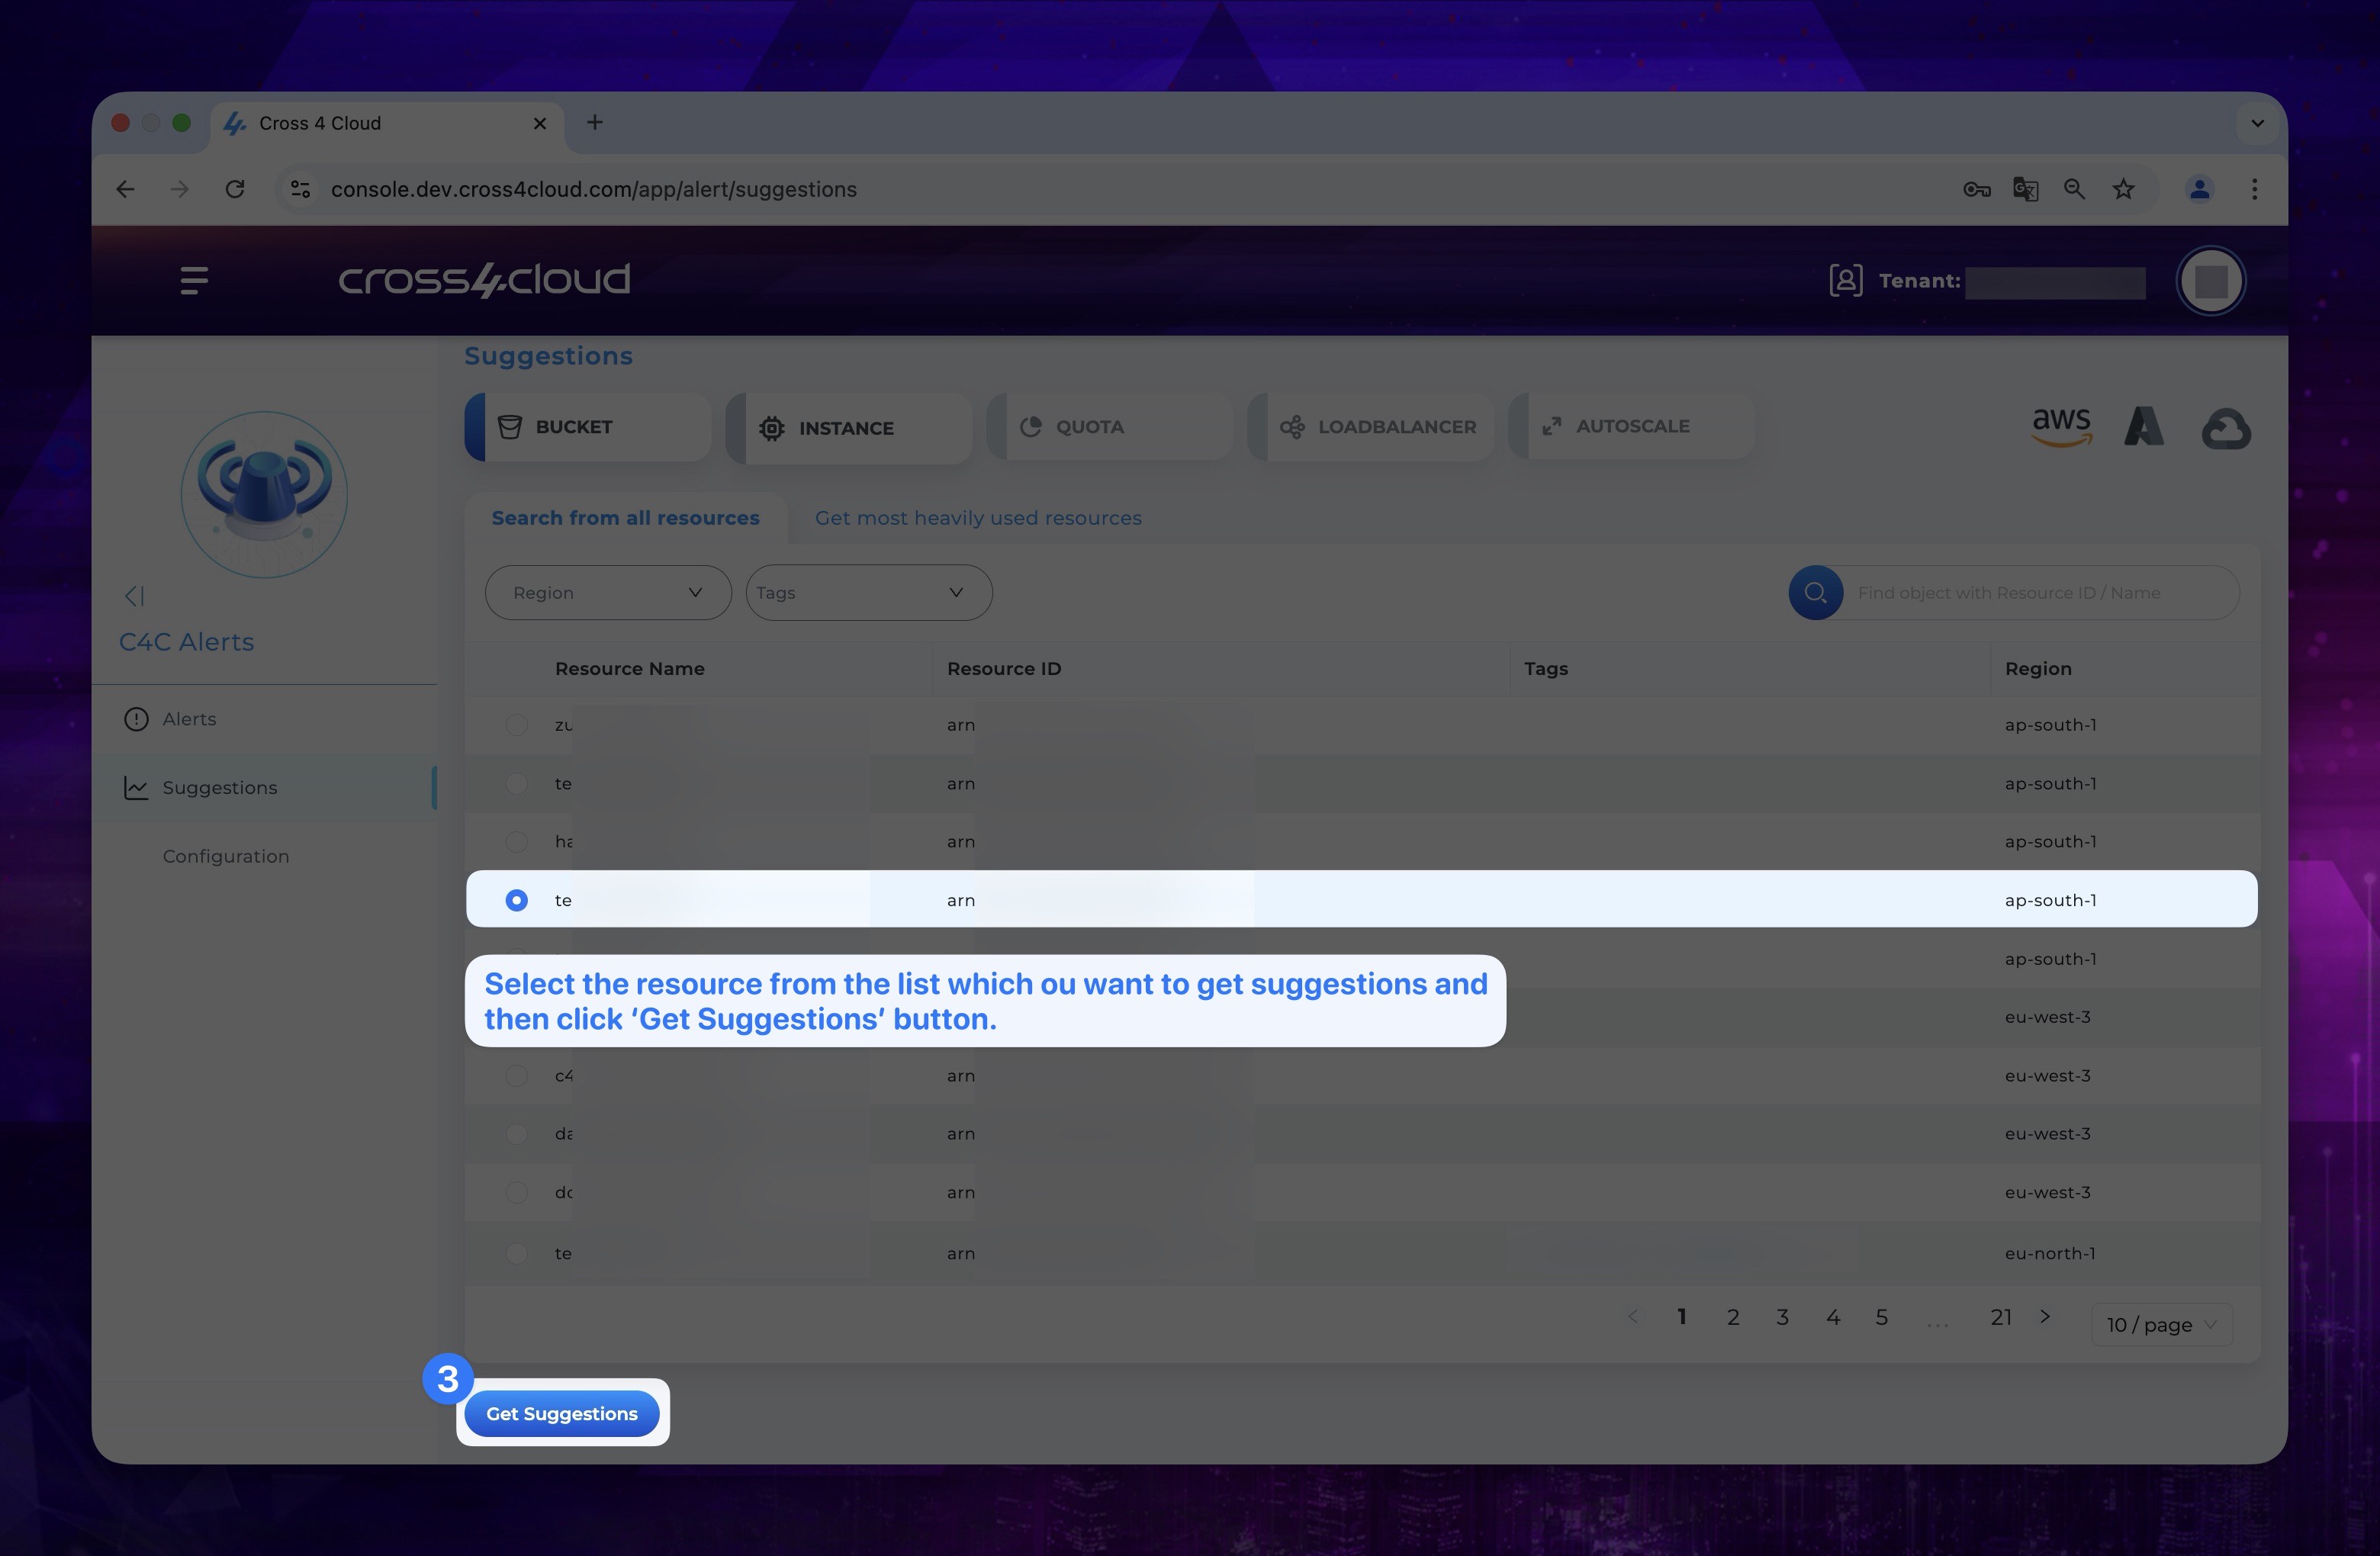
- You can select a service then select a provider so that you can get suggestions about your resources.
- You can choose any resource or most five heavily used ones via selecting either Get most heavily used resources or Search Resource from All List.
After choosing right resource for you Click Get Suggestion button.
Show the instruction with images