GCP Billing Credentials
Billing Account Information Required
To ensure you can fully access and use our product, we require you to provide your GCP billing account information. This step is mandatory for using Cross4Cloud (C4C) or any C4C services related to GCP and should be completed before proceeding with the setup. Completing this step unlocks access to our product and its related features.
- Please follow the instructions below to ensure you can use our services properly.
1. Project Creation
If you do not have any GCP project, please create one first. Otherwise, you can skip this section.
-
Go to GCP Console and log in to your account.
-
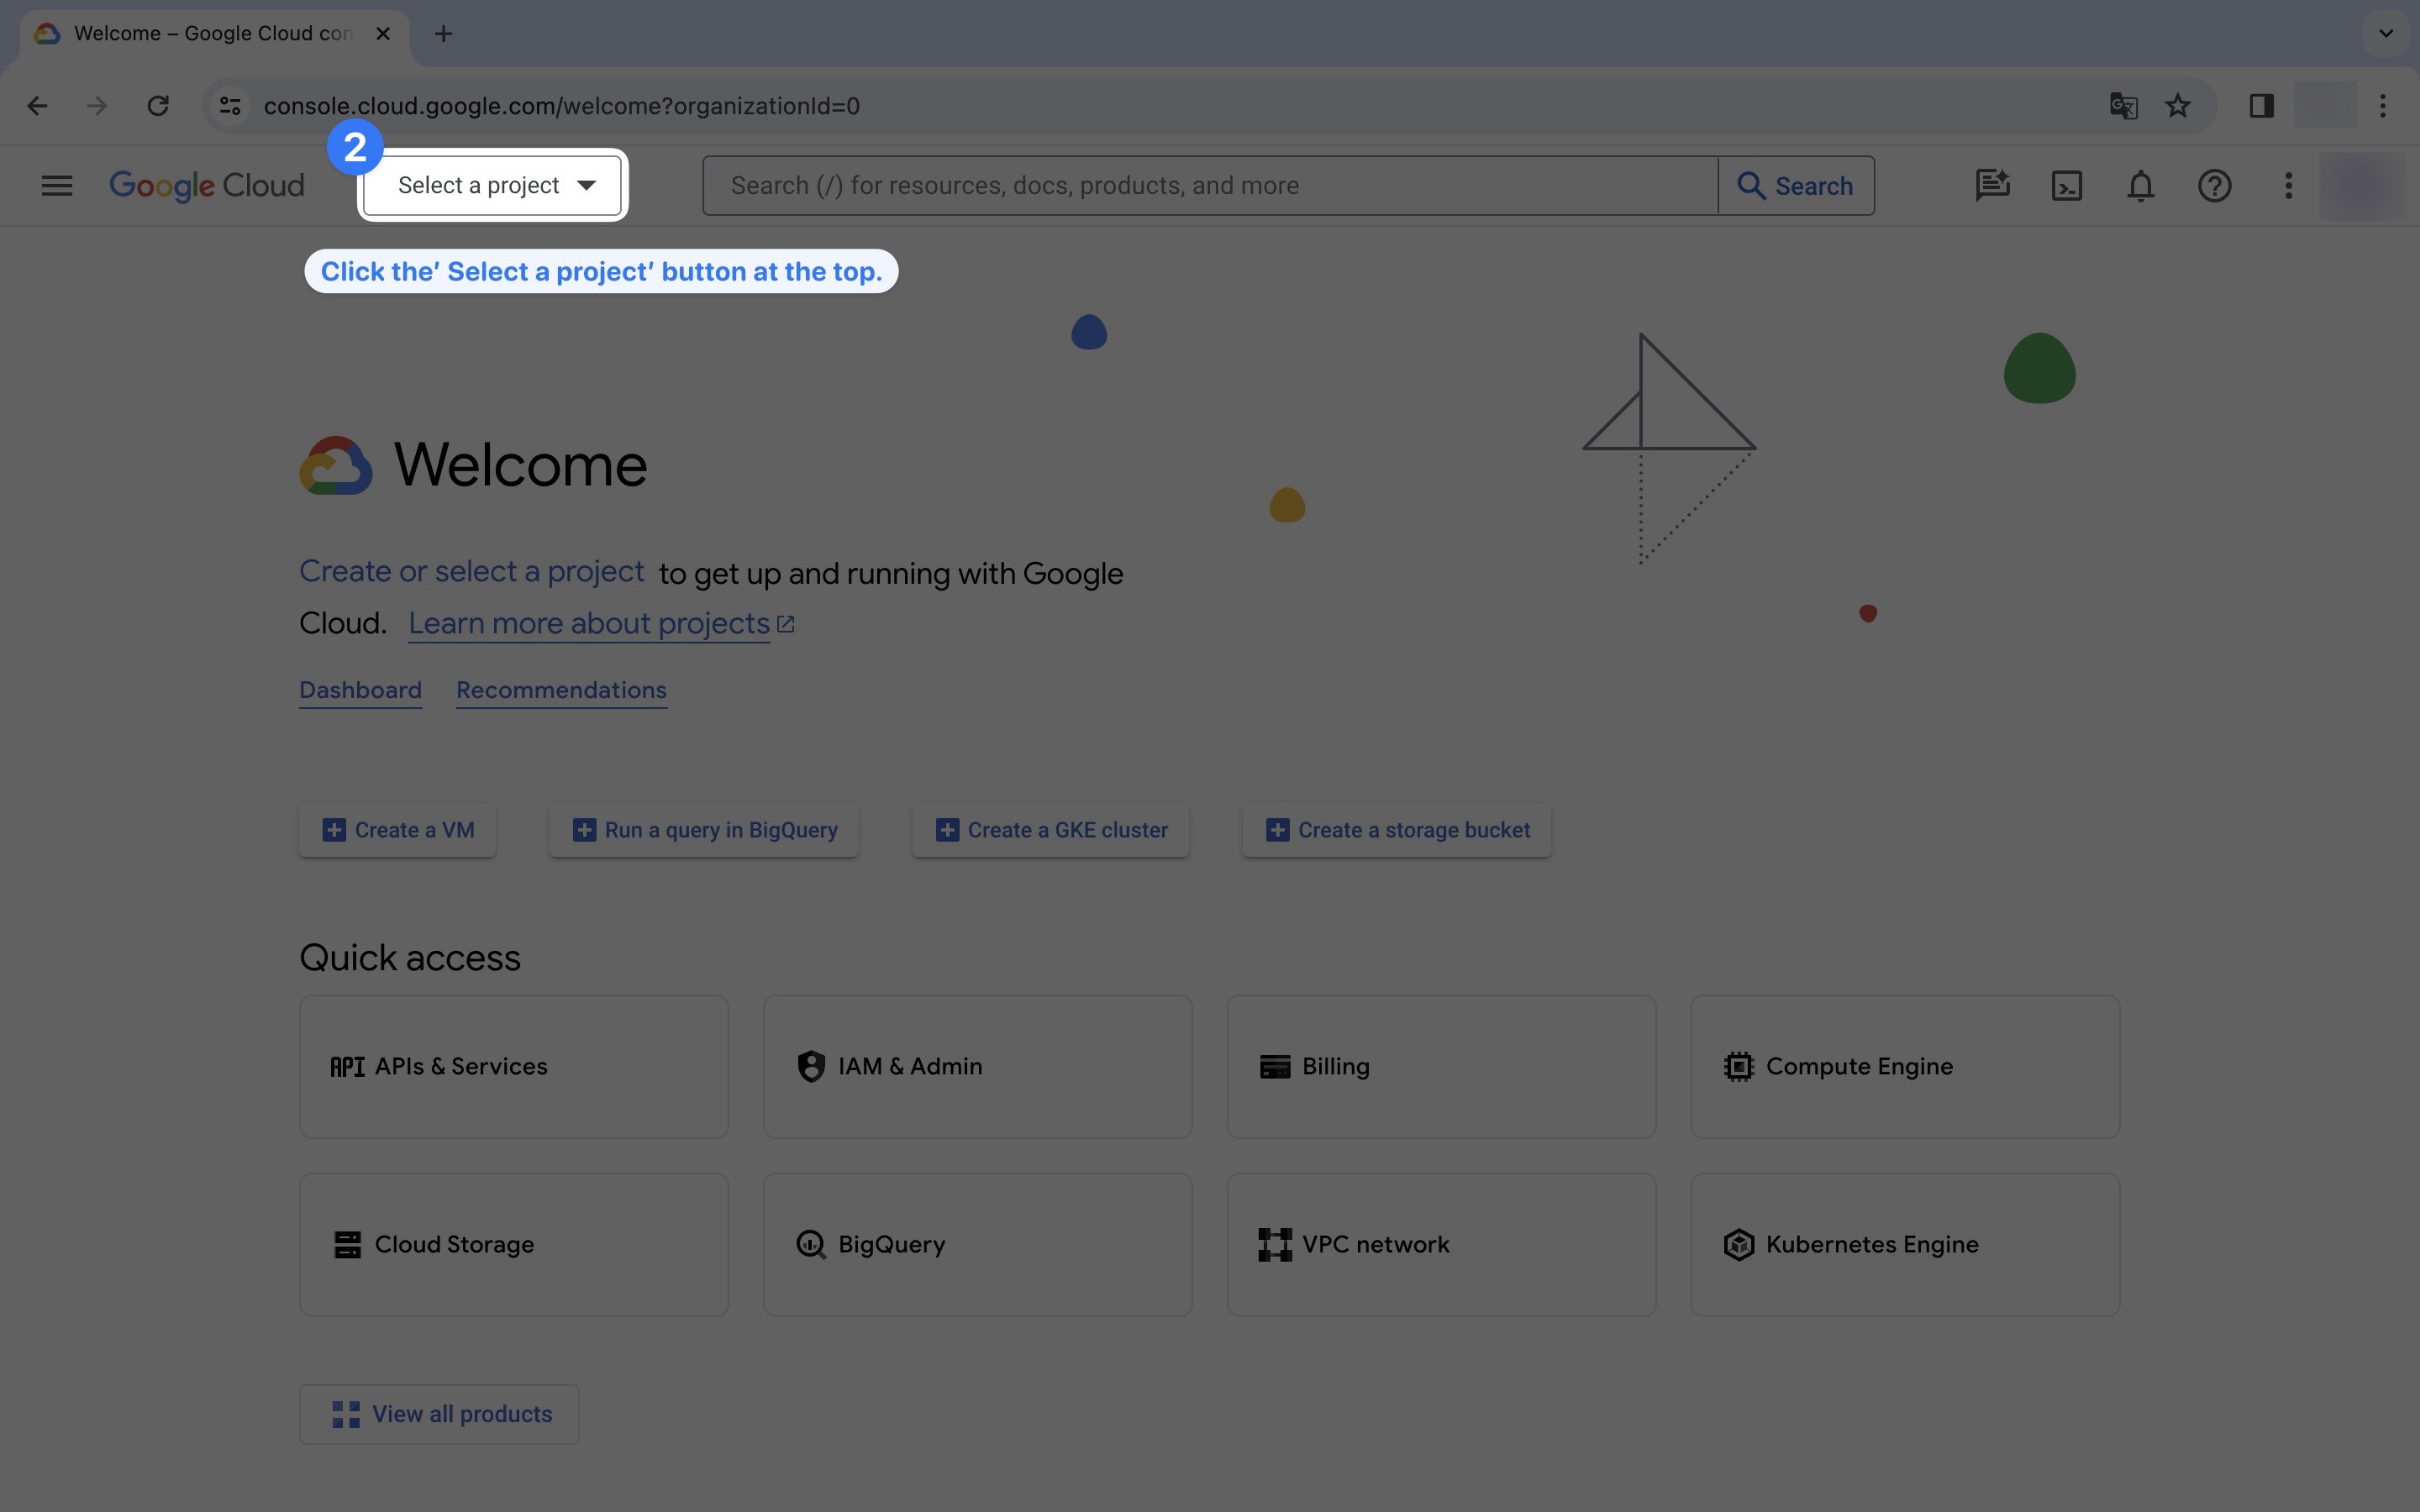
Click the Select Project button top of the page.
Show the instruction with images
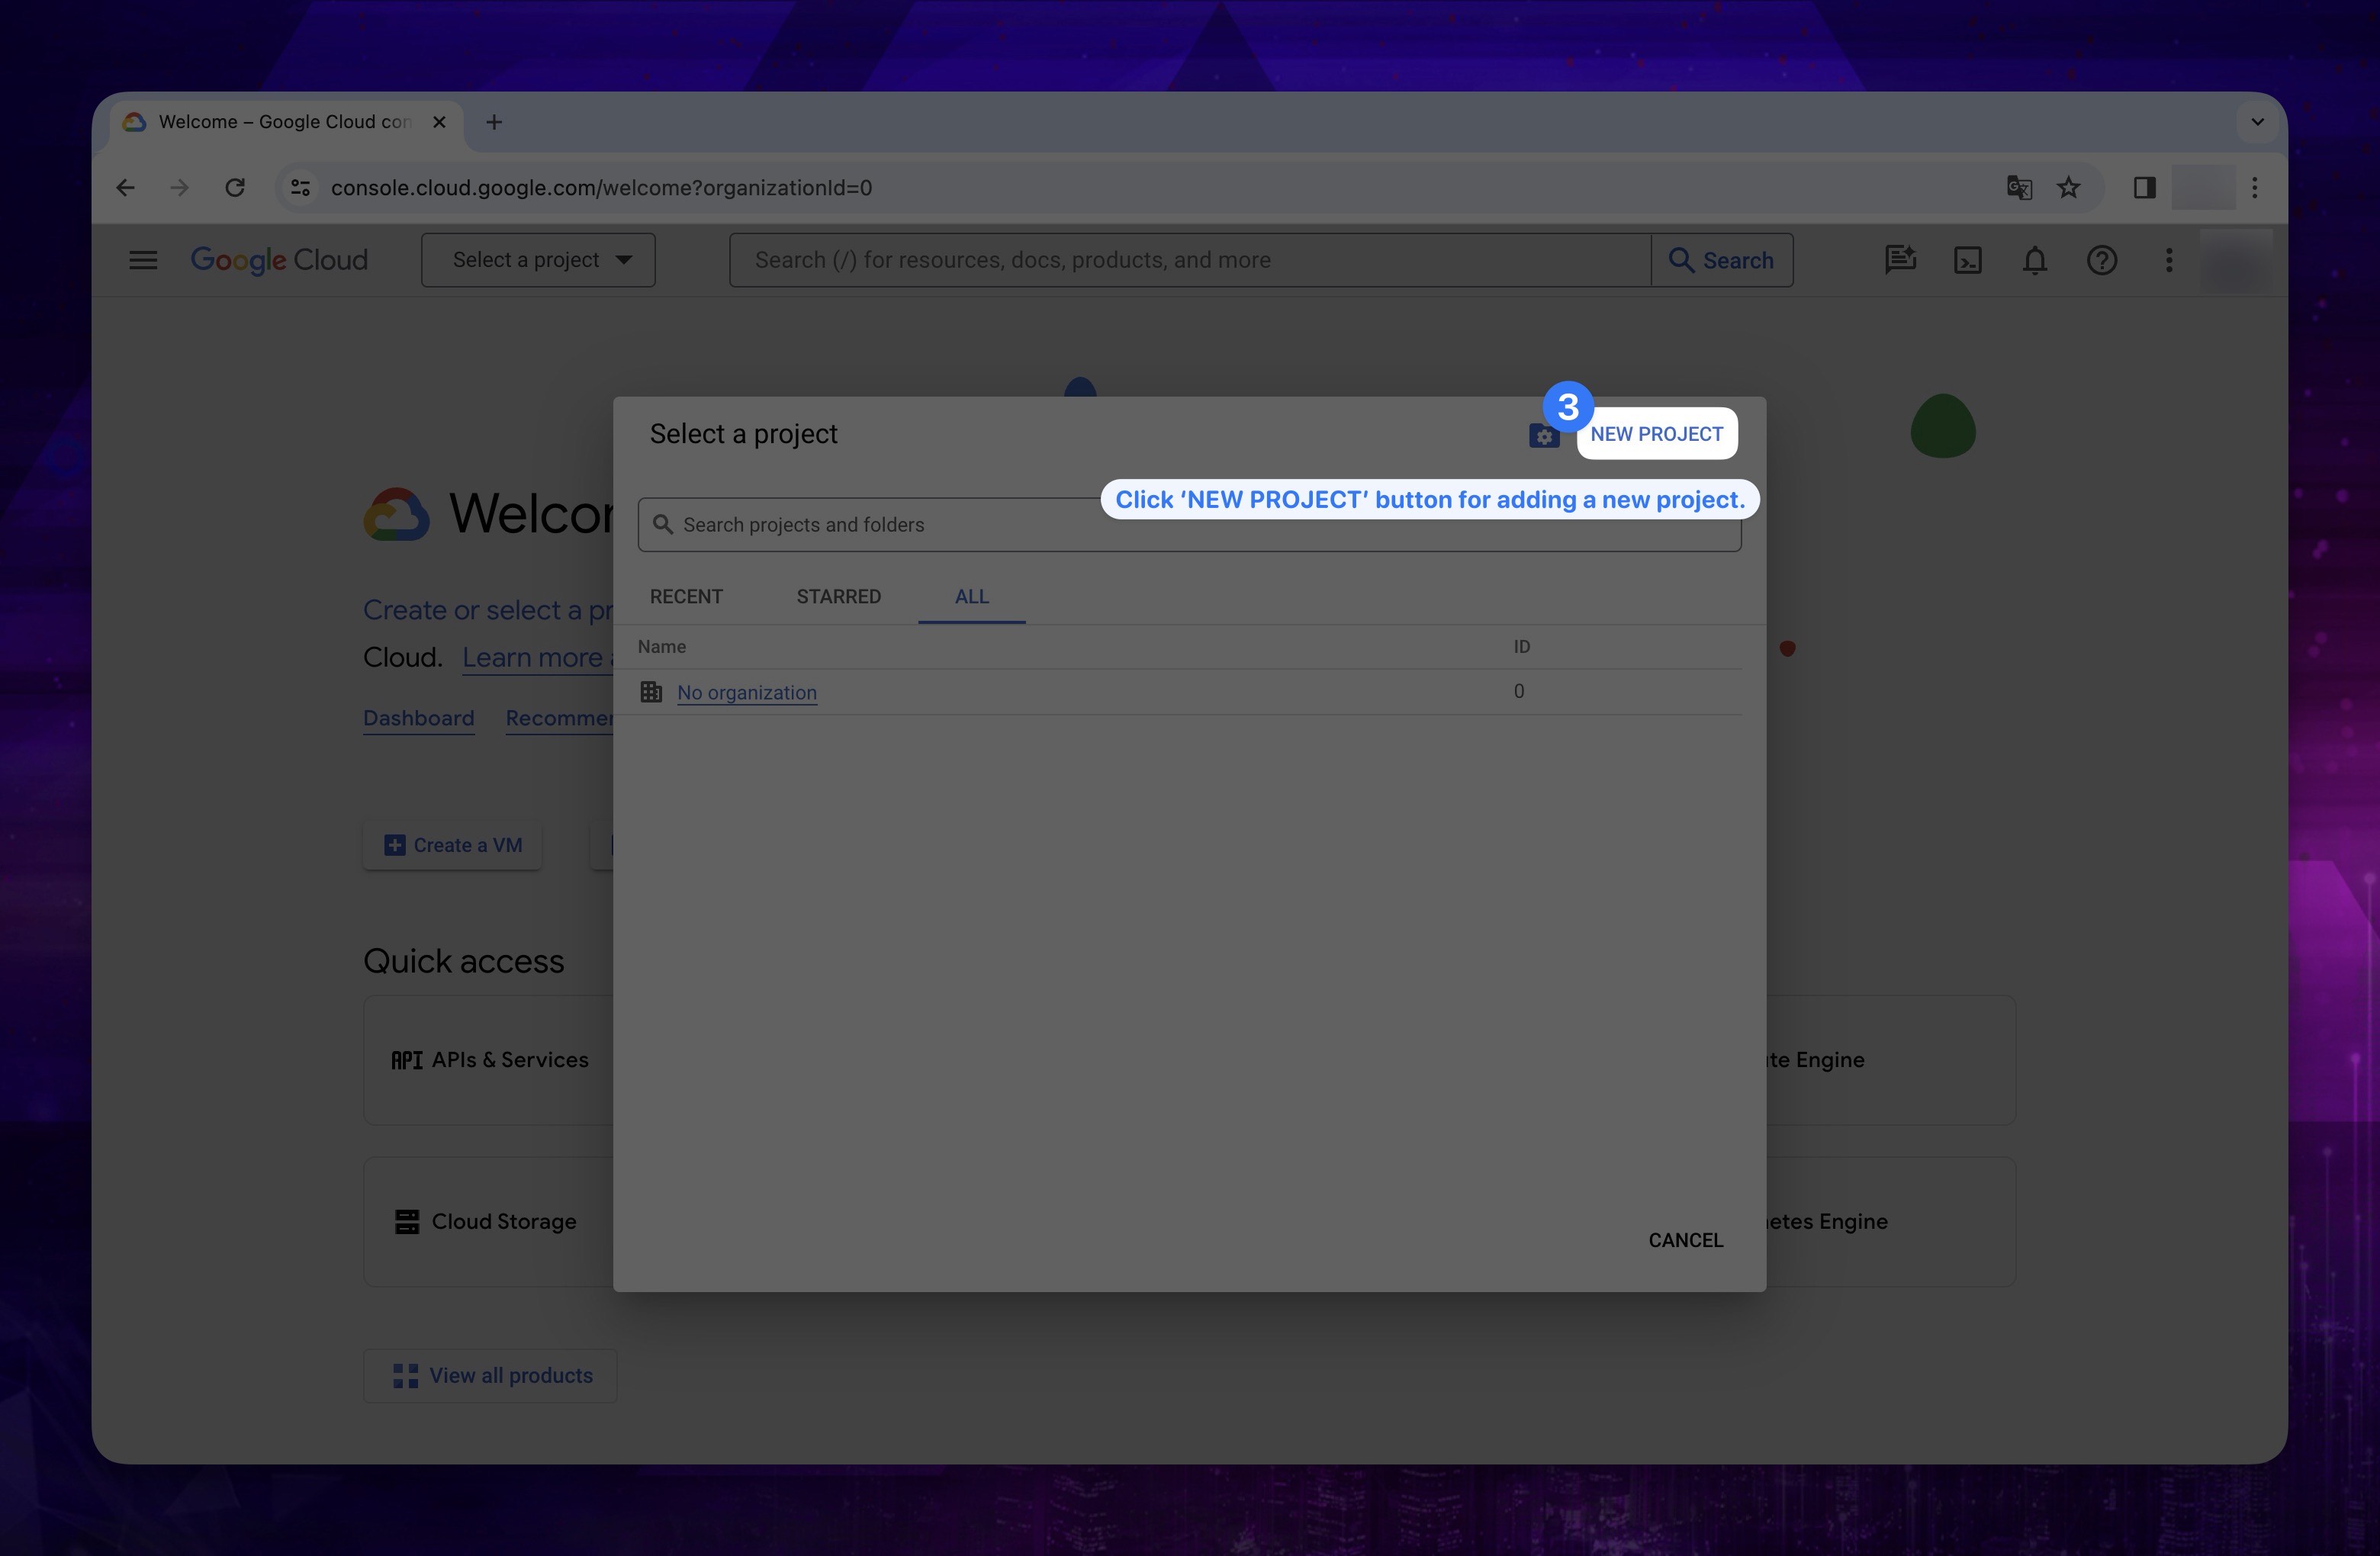
- Click on the New Project button located in the upper-right corner of the opened section.
Show the instruction with images
-
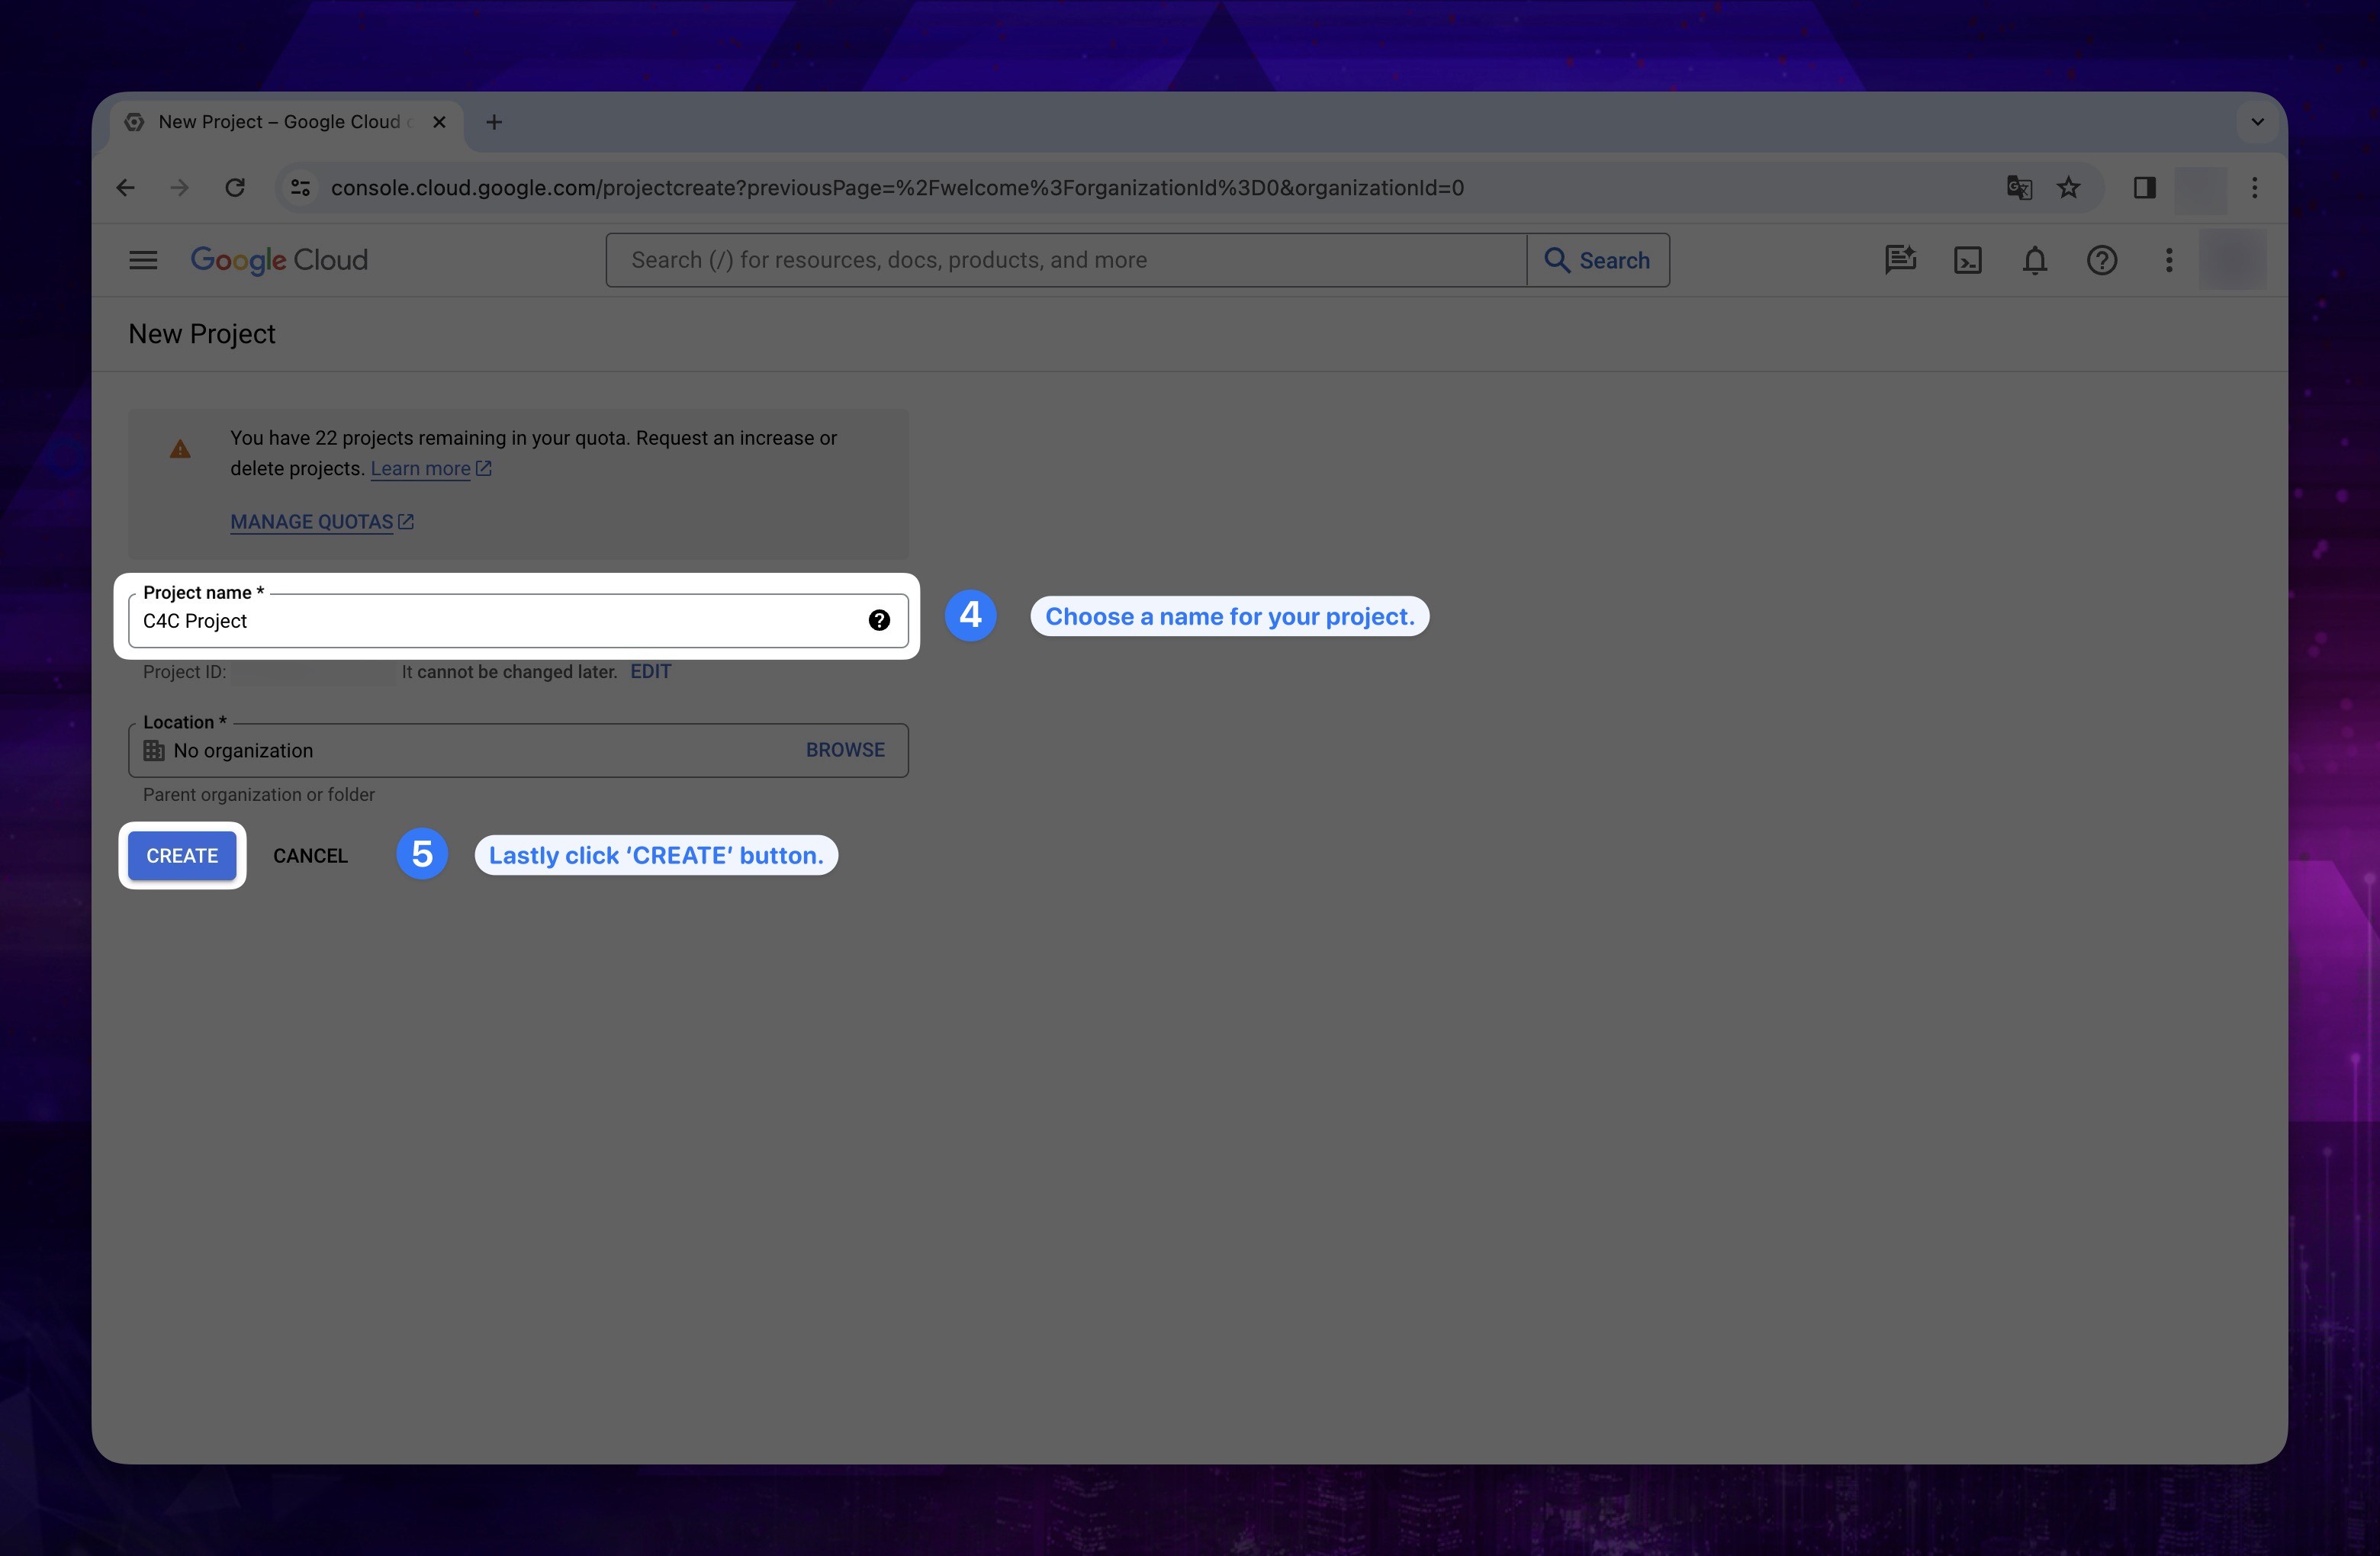
On the next page, you can define the desired Project name for the project.
-
Finally, click the Create button.
Show the instruction with images
2. Enabling APIs
This section, ensures that the necessary APIs are enabled in your GCP account. Check whether these APIs are active in your account.
- Lists of APIs that need to be enabled:
- BigQuery API
- Compute Engine API
- Cloud Resource Manager API
- Identity and Access Management (IAM) API
If the APIs are not active, you can enable them by following the steps below.
-
Go to GCP Console and log in to your account.
-
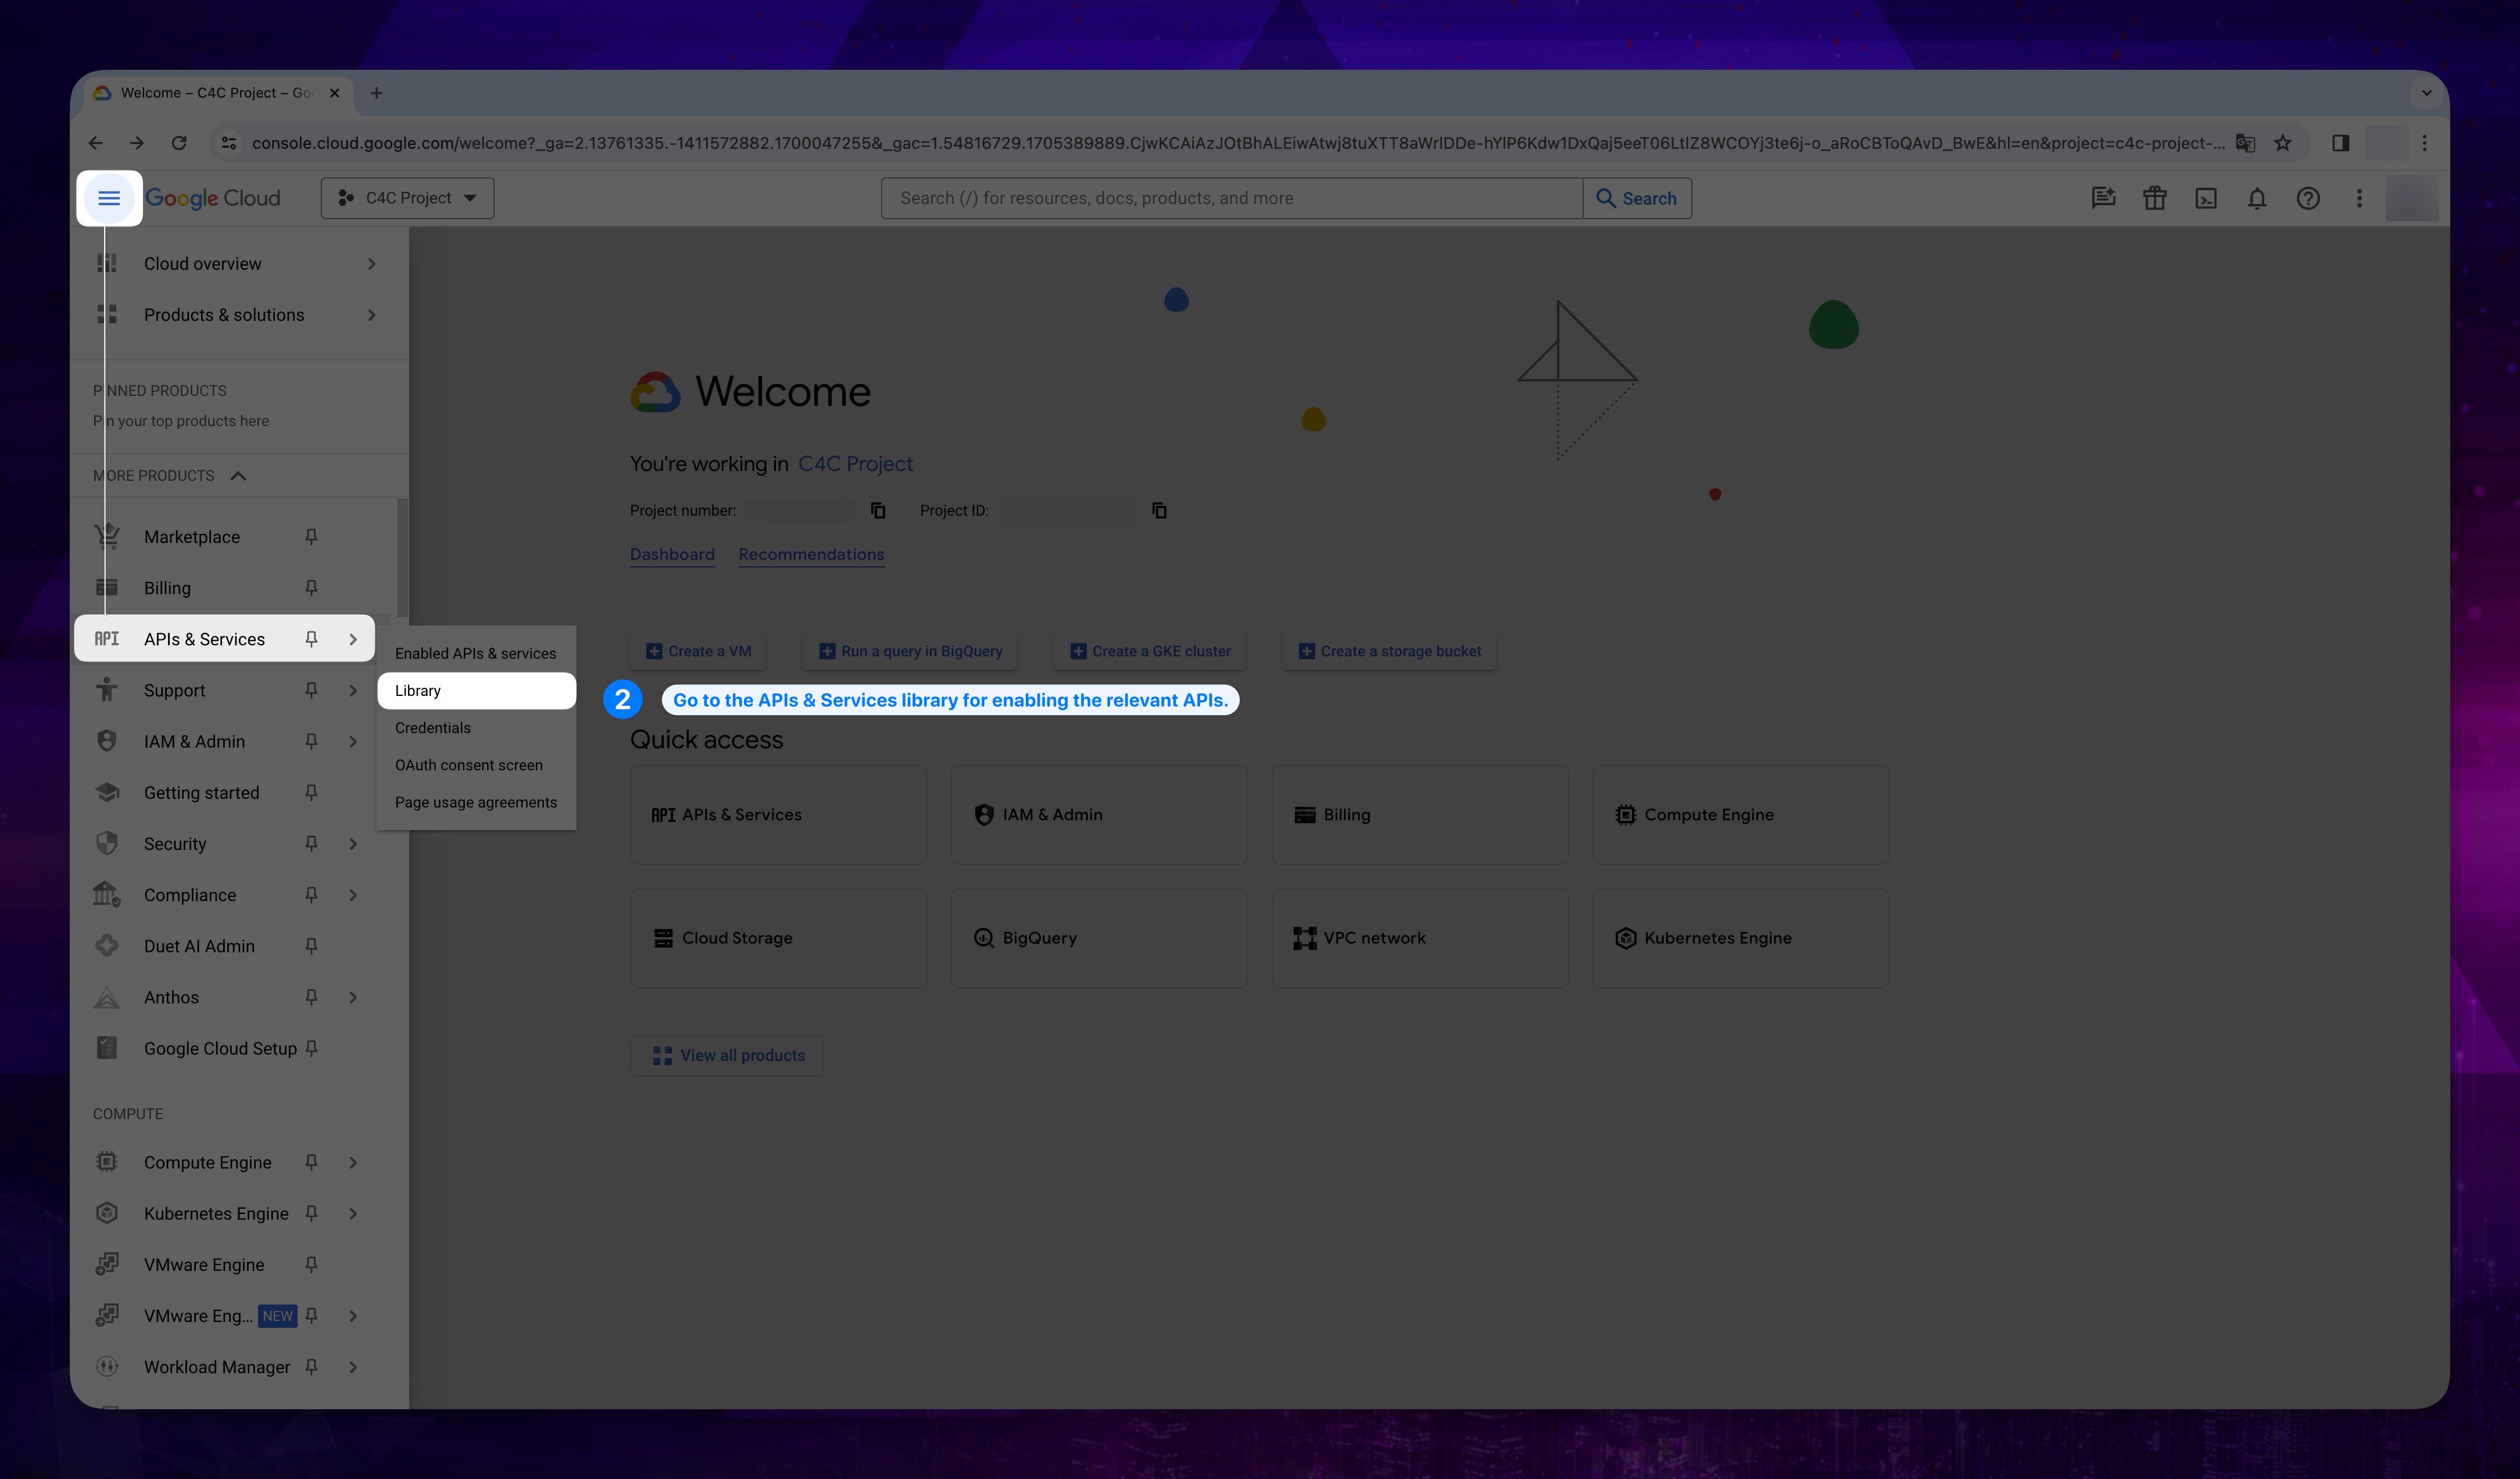
Navigate to the project you will use in our platform. Open the Navigation Menu by clicking on the icon in the top left corner of the page. Hover over APIs and Services in the navigation menu that appears and click on the Library section.
Show the instruction with images
-
Repeat the steps below for all APIs listed in the Enabled APIs List mentioned above.
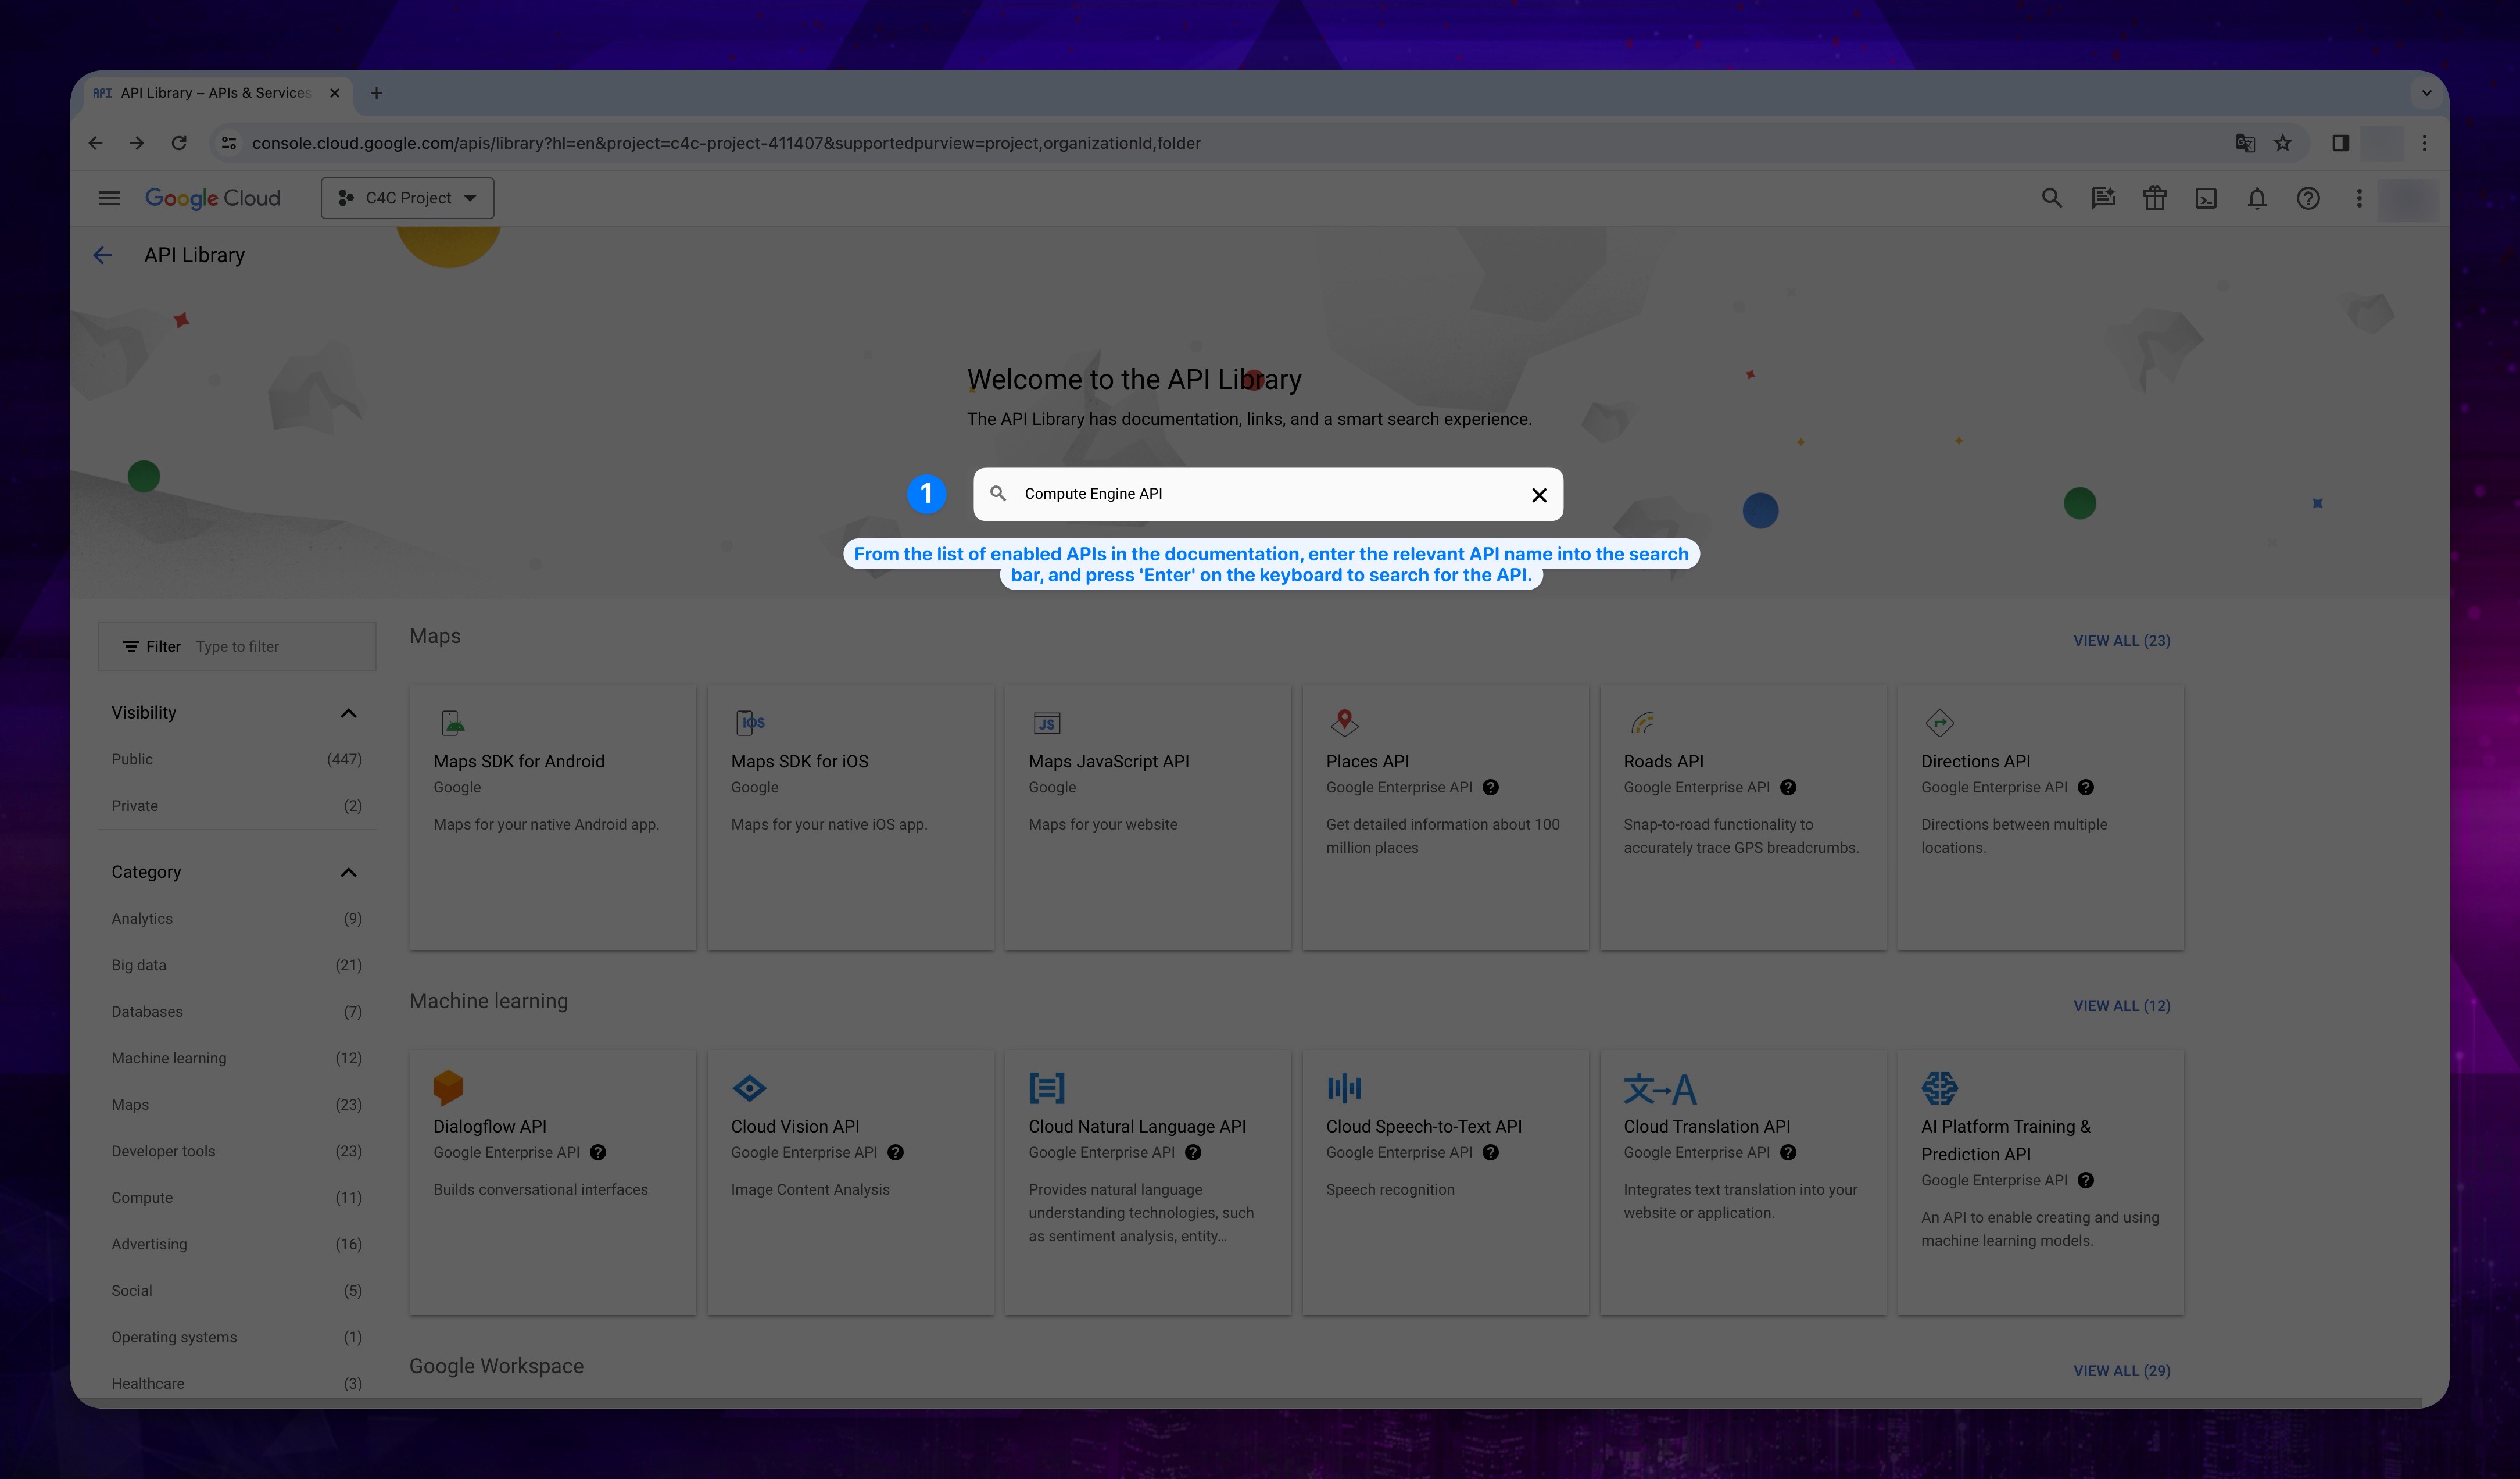
- Type one of the API names mentioned above into the search bar.
Show the instruction with images
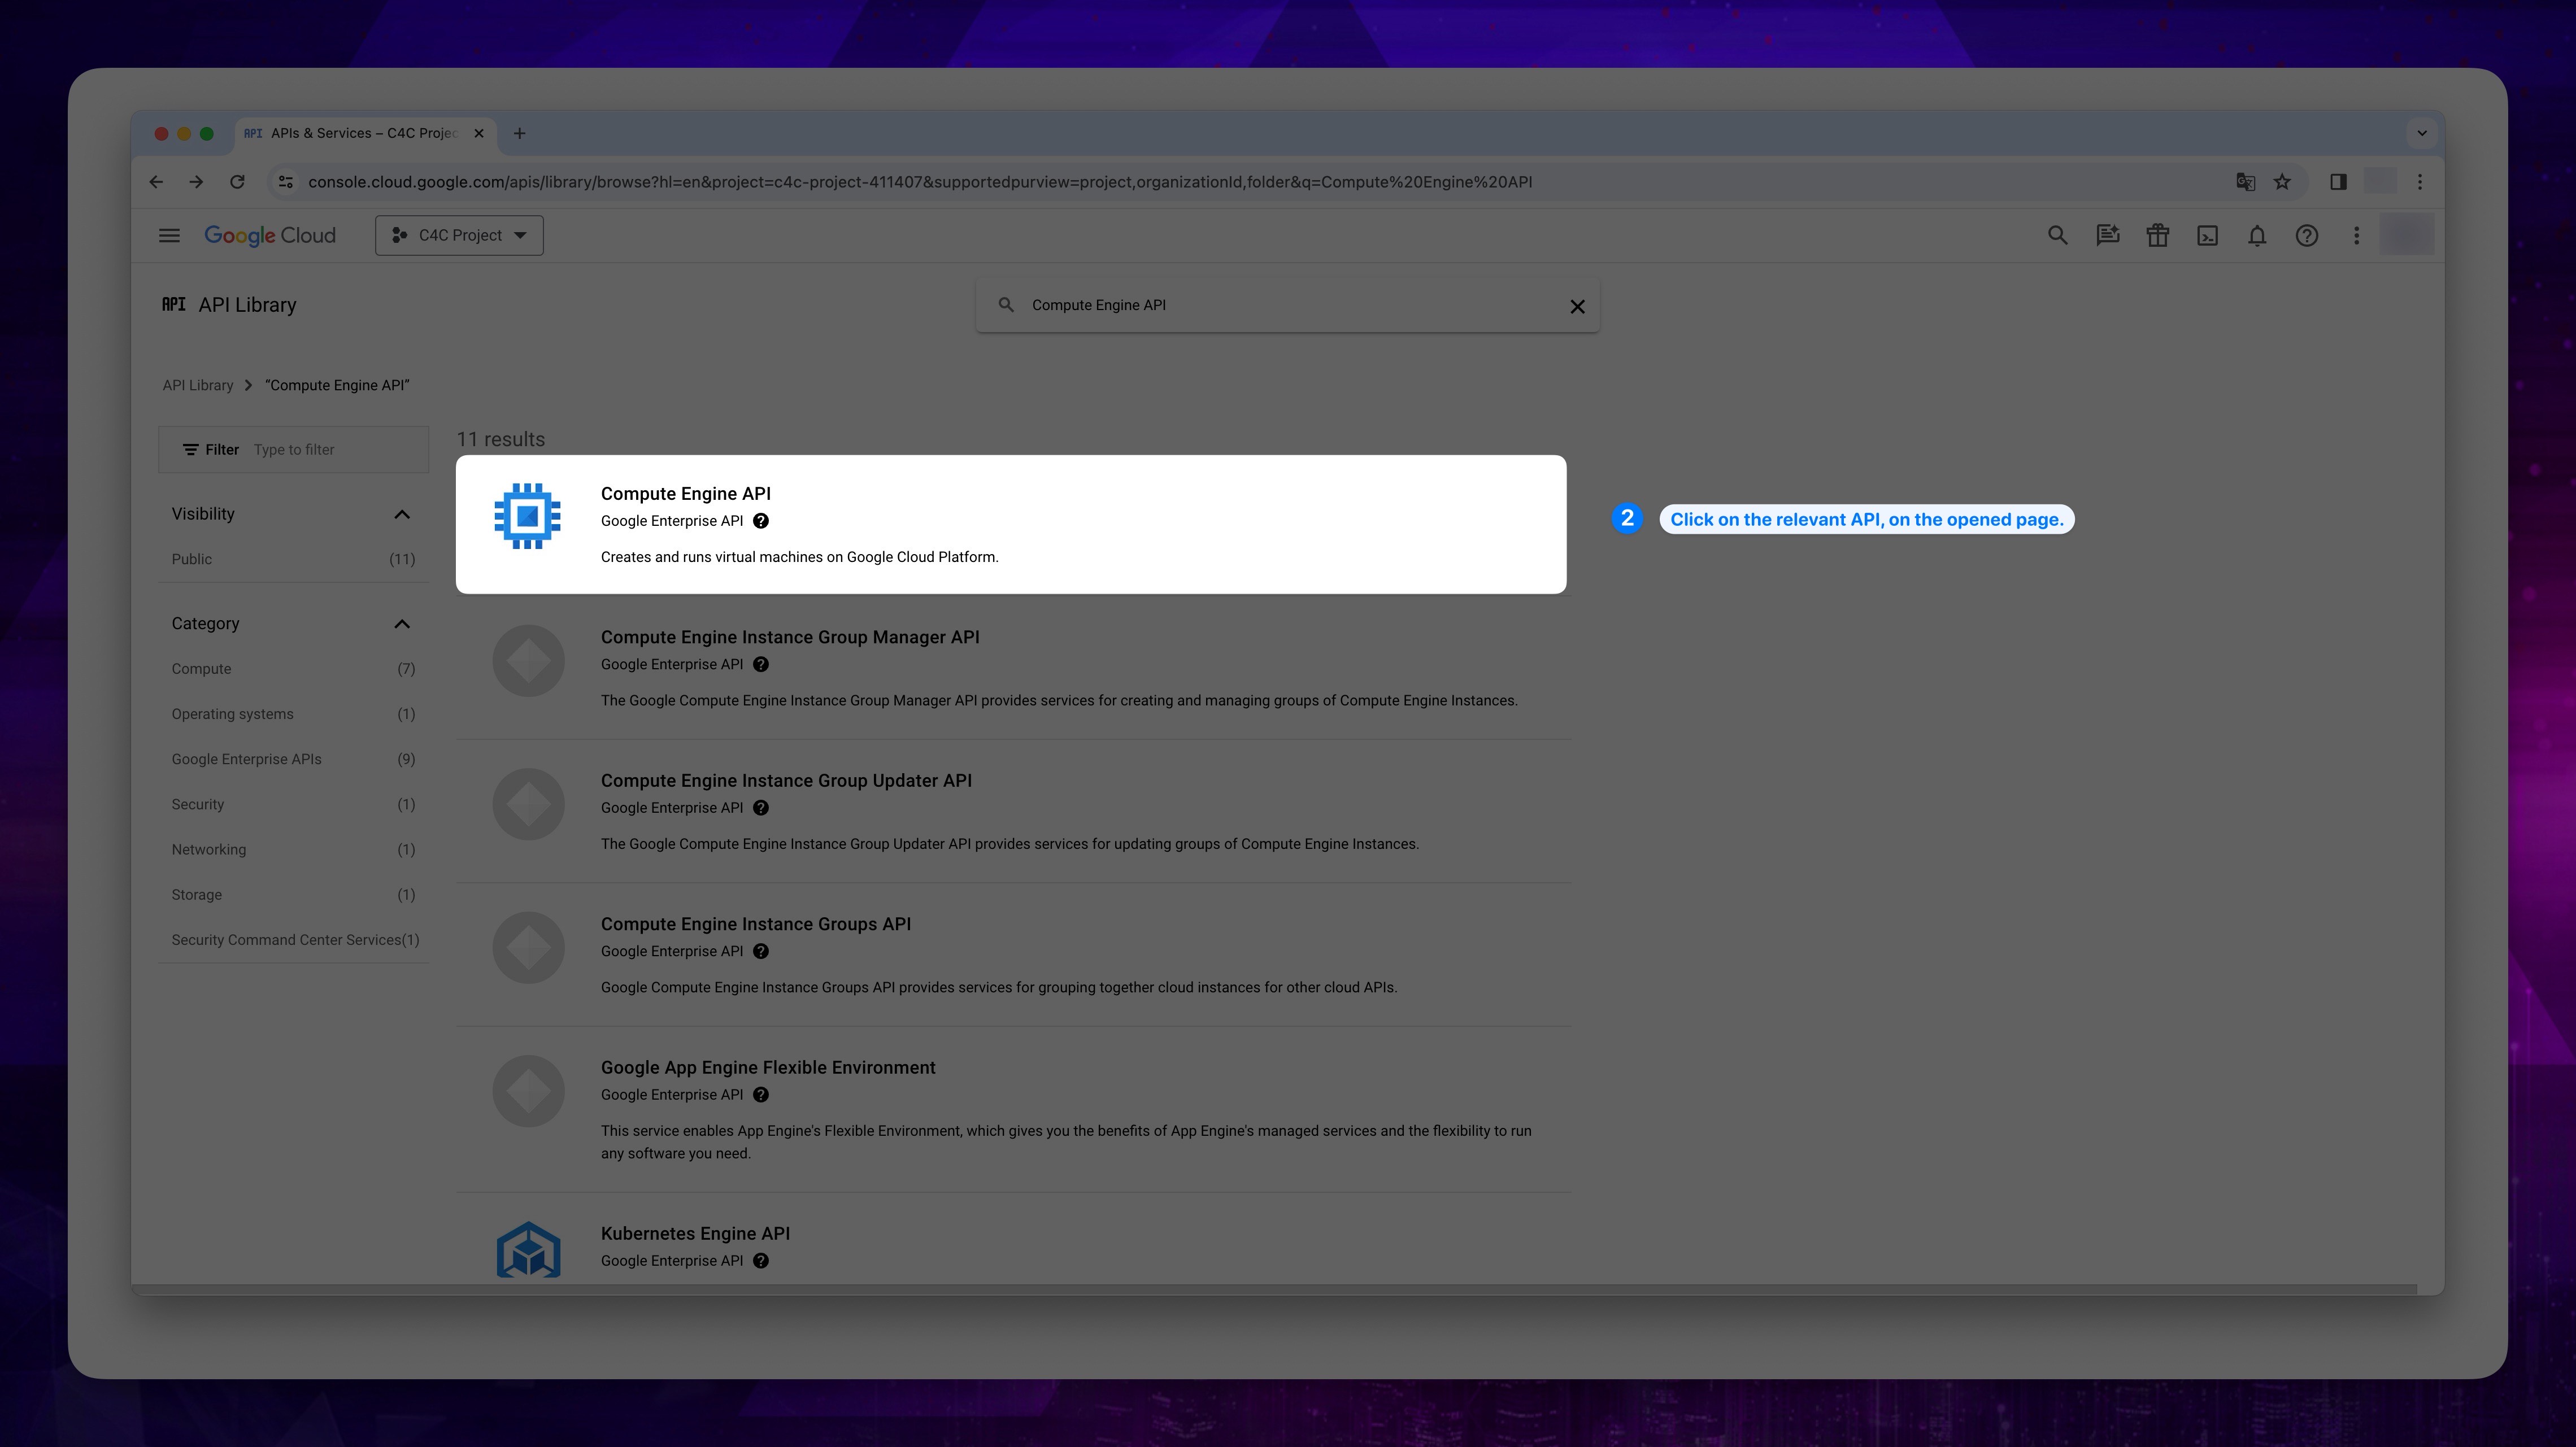
- Locate the relevant API on the opened page and click on it.
Show the instruction with images
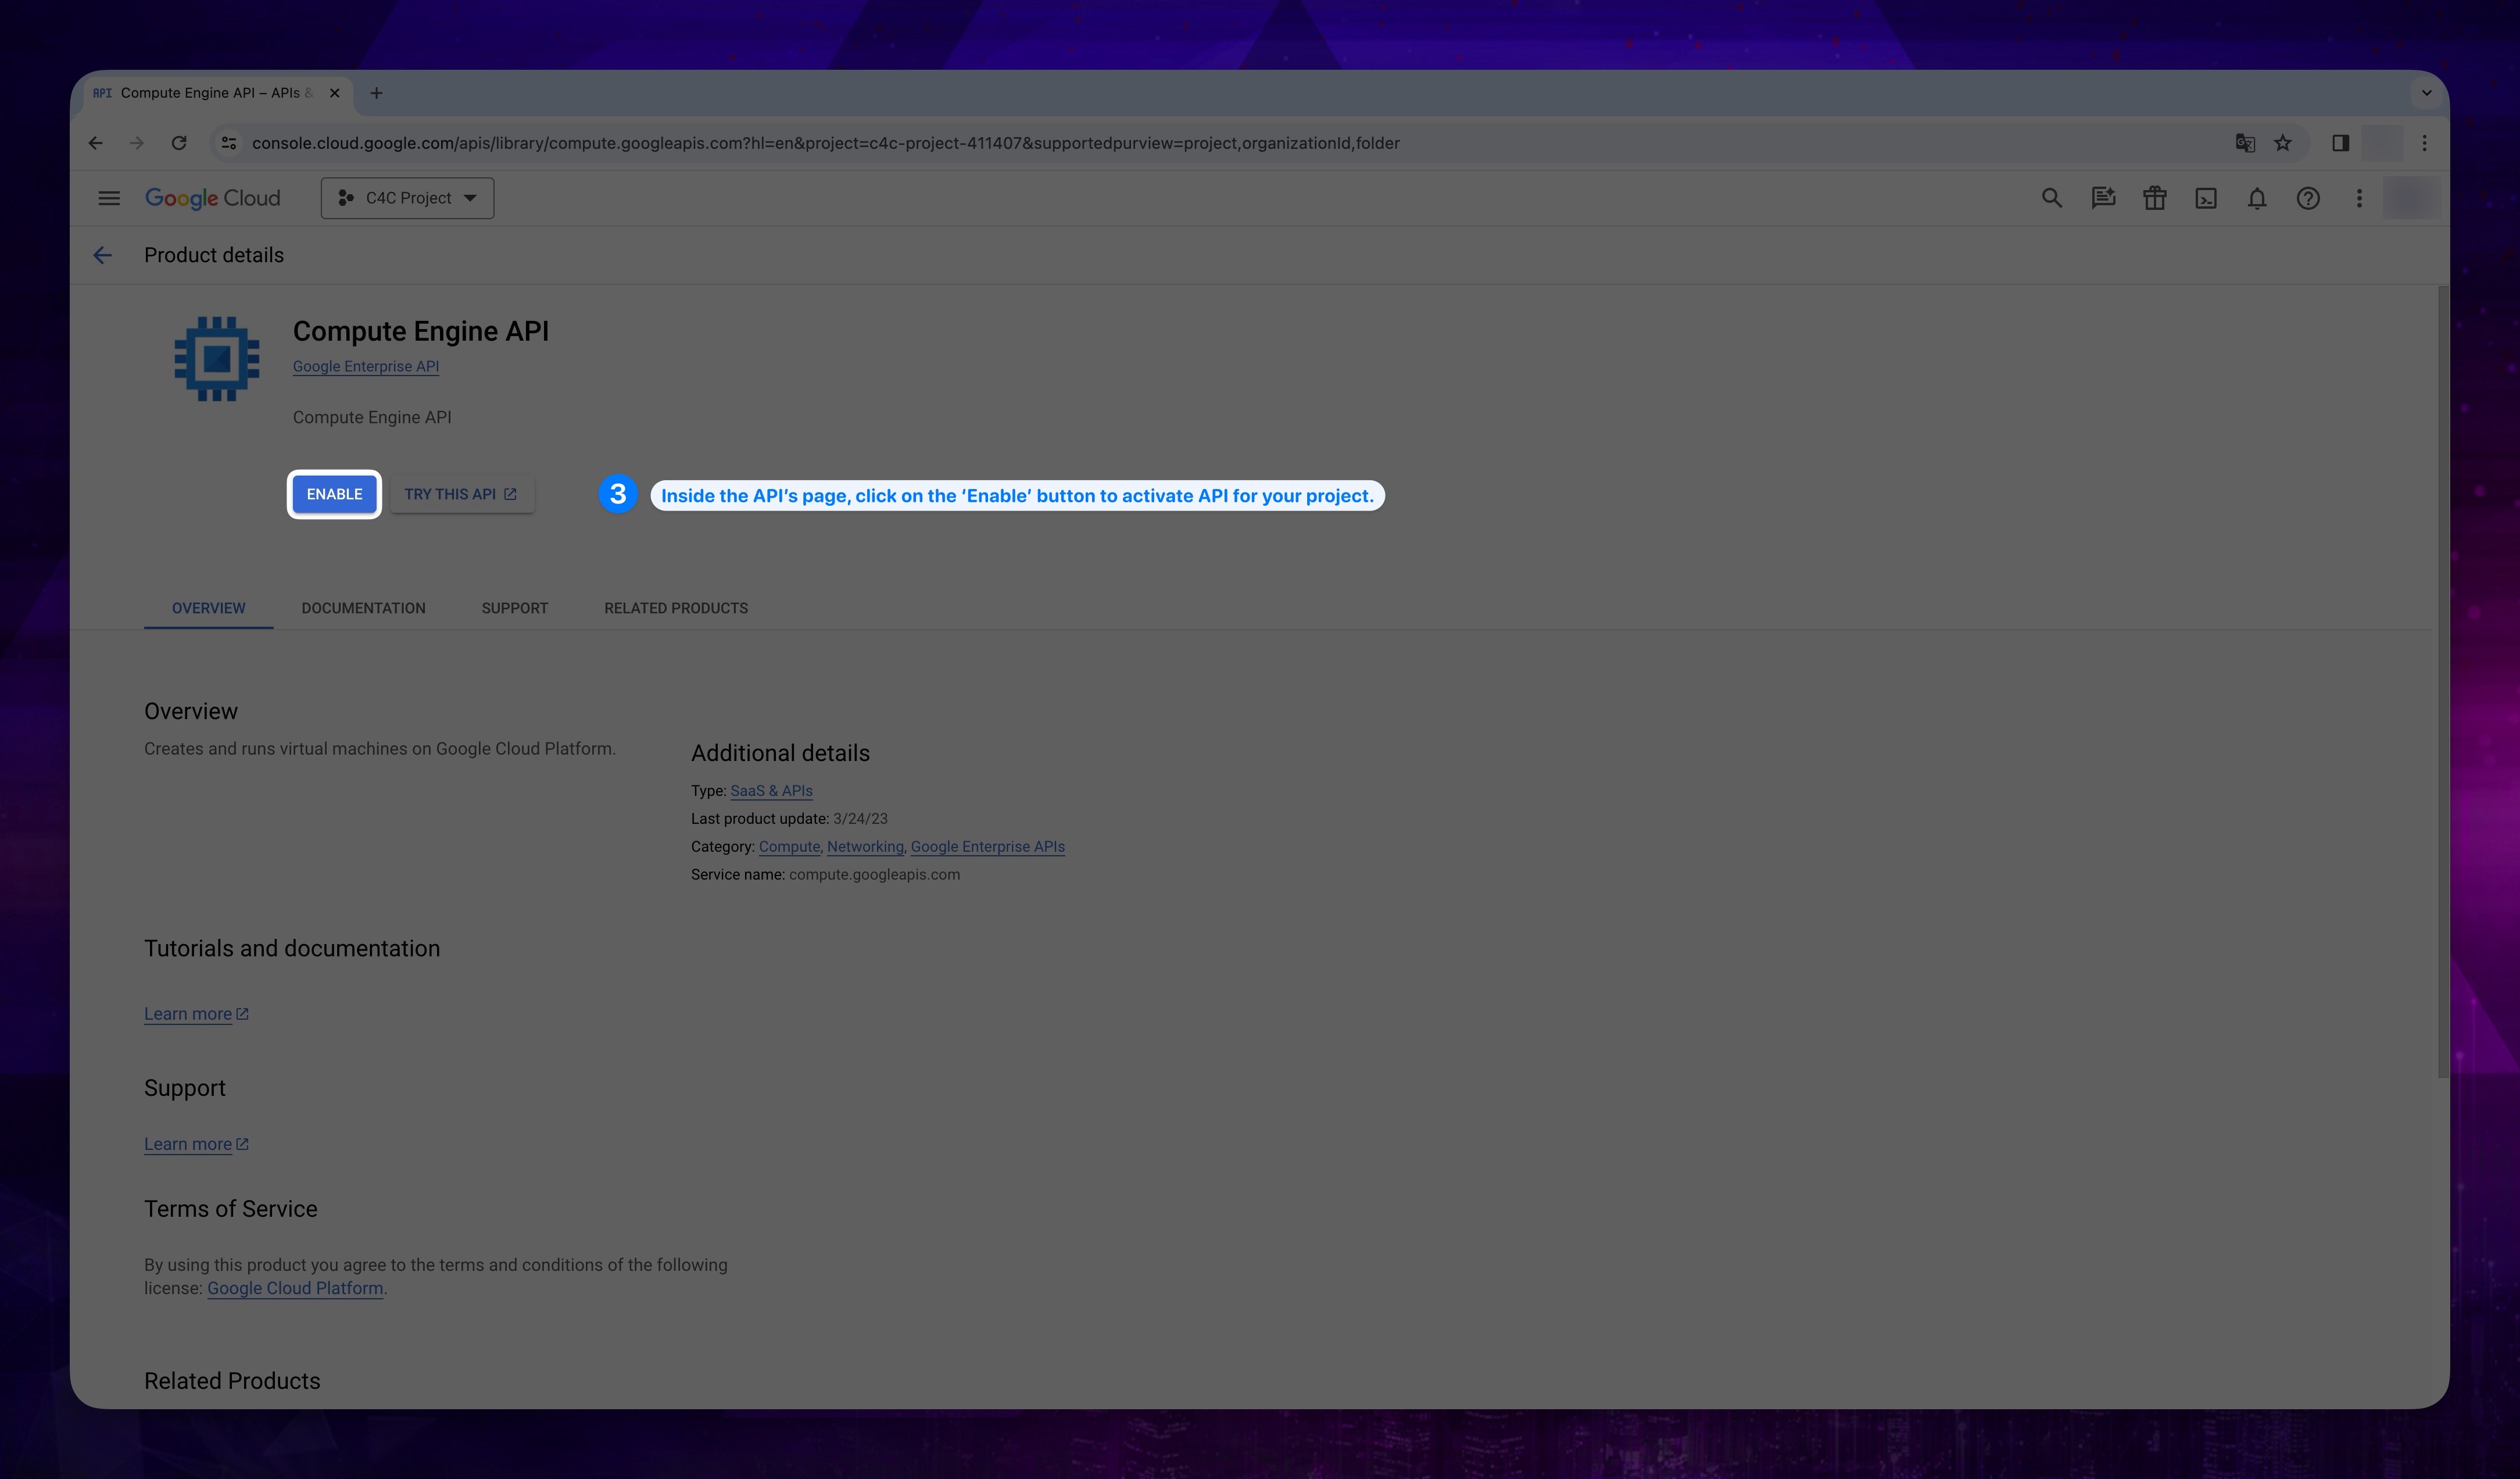
- After reaching the API's page, click on the Enable button to activate the required API.
Show the instruction with images
Compute Engine API and Certificate Manager API requires a project with a billing account and for that configuration you must be an administrator of any billing accounts. You can create a new billing account or contact with your administrator to enable billing for you.
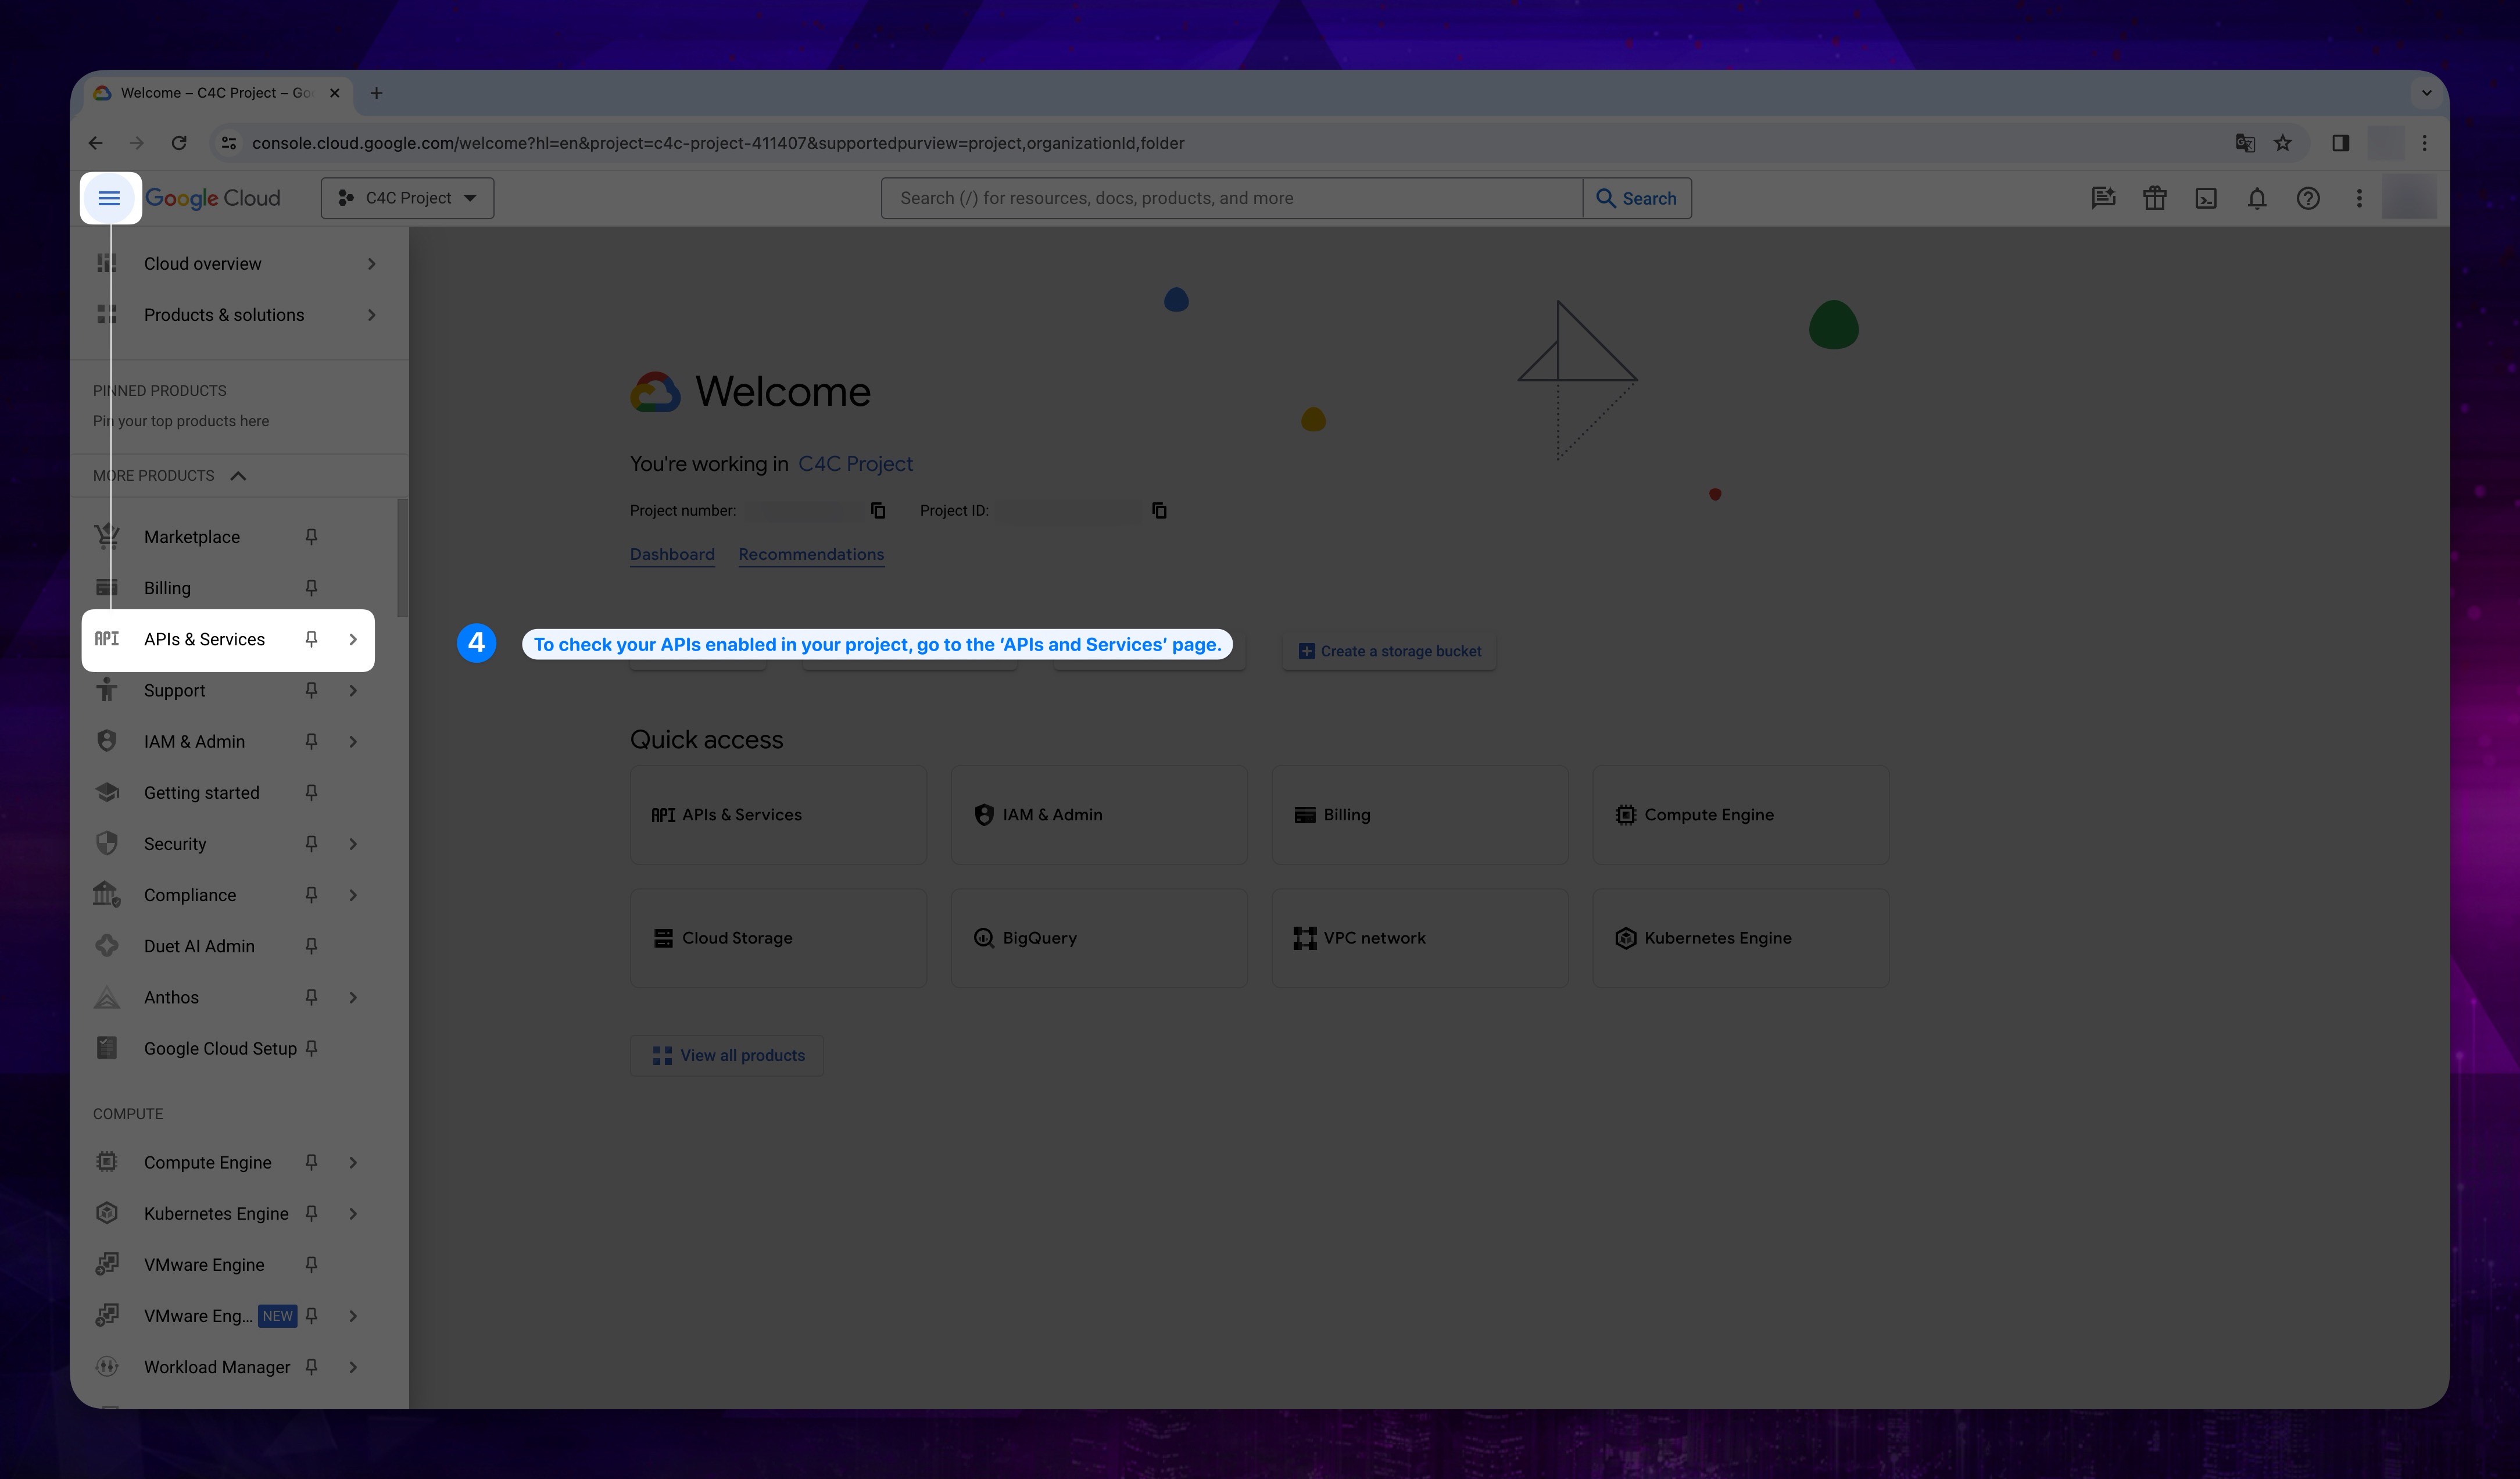
- To check if the necessary APIs are enable in our project, click on the APIs & Services section in the navigation menu.
Show the instruction with images
- On the opened page, scroll down to see the list of enabled APIs.
Show the instruction with images
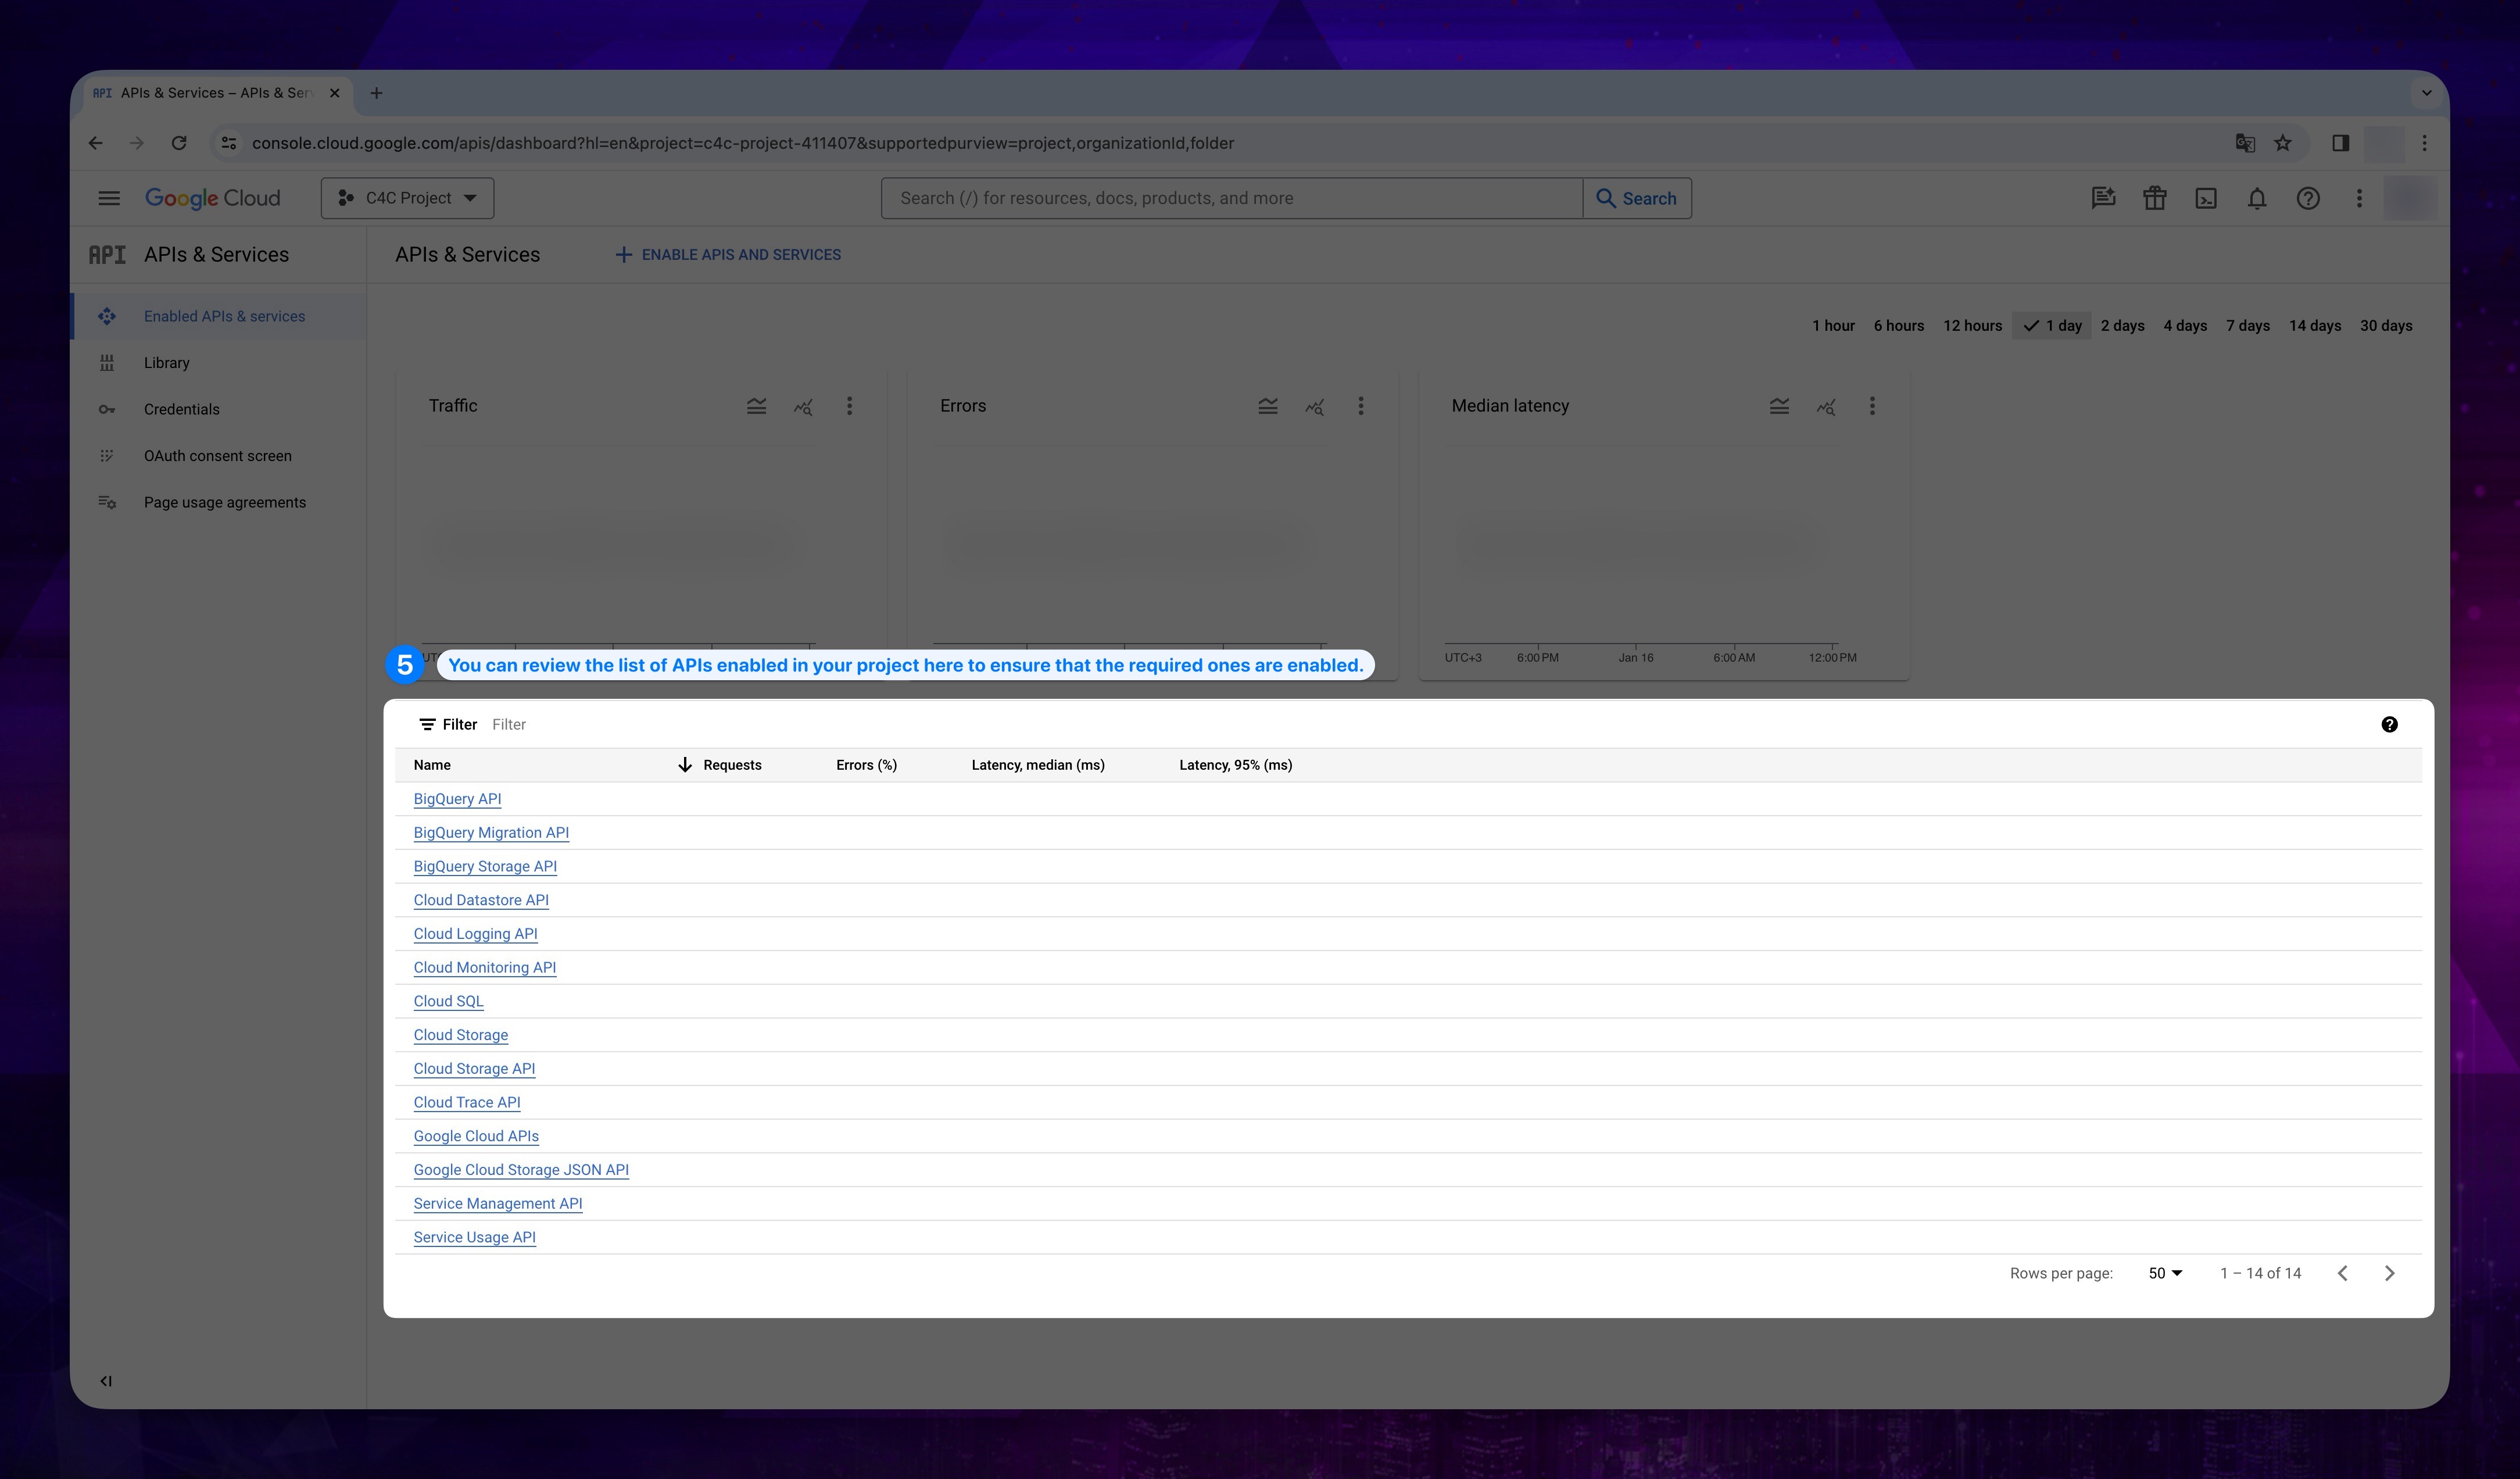
After ensuring that the required APIs are enabled in our project, you can proceed with the next steps.
3. C4C Custom Role Creation
- Go to GCP Console and log in to your account.
Firstly, we need to create a role with the necessary permissions for our product to have the required authorizations.
You can do this in one of two ways: Manual, gcloud CLI and Full Access.
The Manual method provides you with the entire permission list, and you need to add them one by one from the list.
The gcloud CLI method offers a code block and a file containing all the required permissions. Running this code block in gcluoud CLI automatically creates a role.
You can proceed by selecting your preference.
- Manuel
- gcloud CLI
If you wish to proceed with this method, please follow the steps below.
-
Click the MENU icon on the very left side.
-
Click on Iam & Admin section, and select Roles from the opened menu.
Show the instruction with images
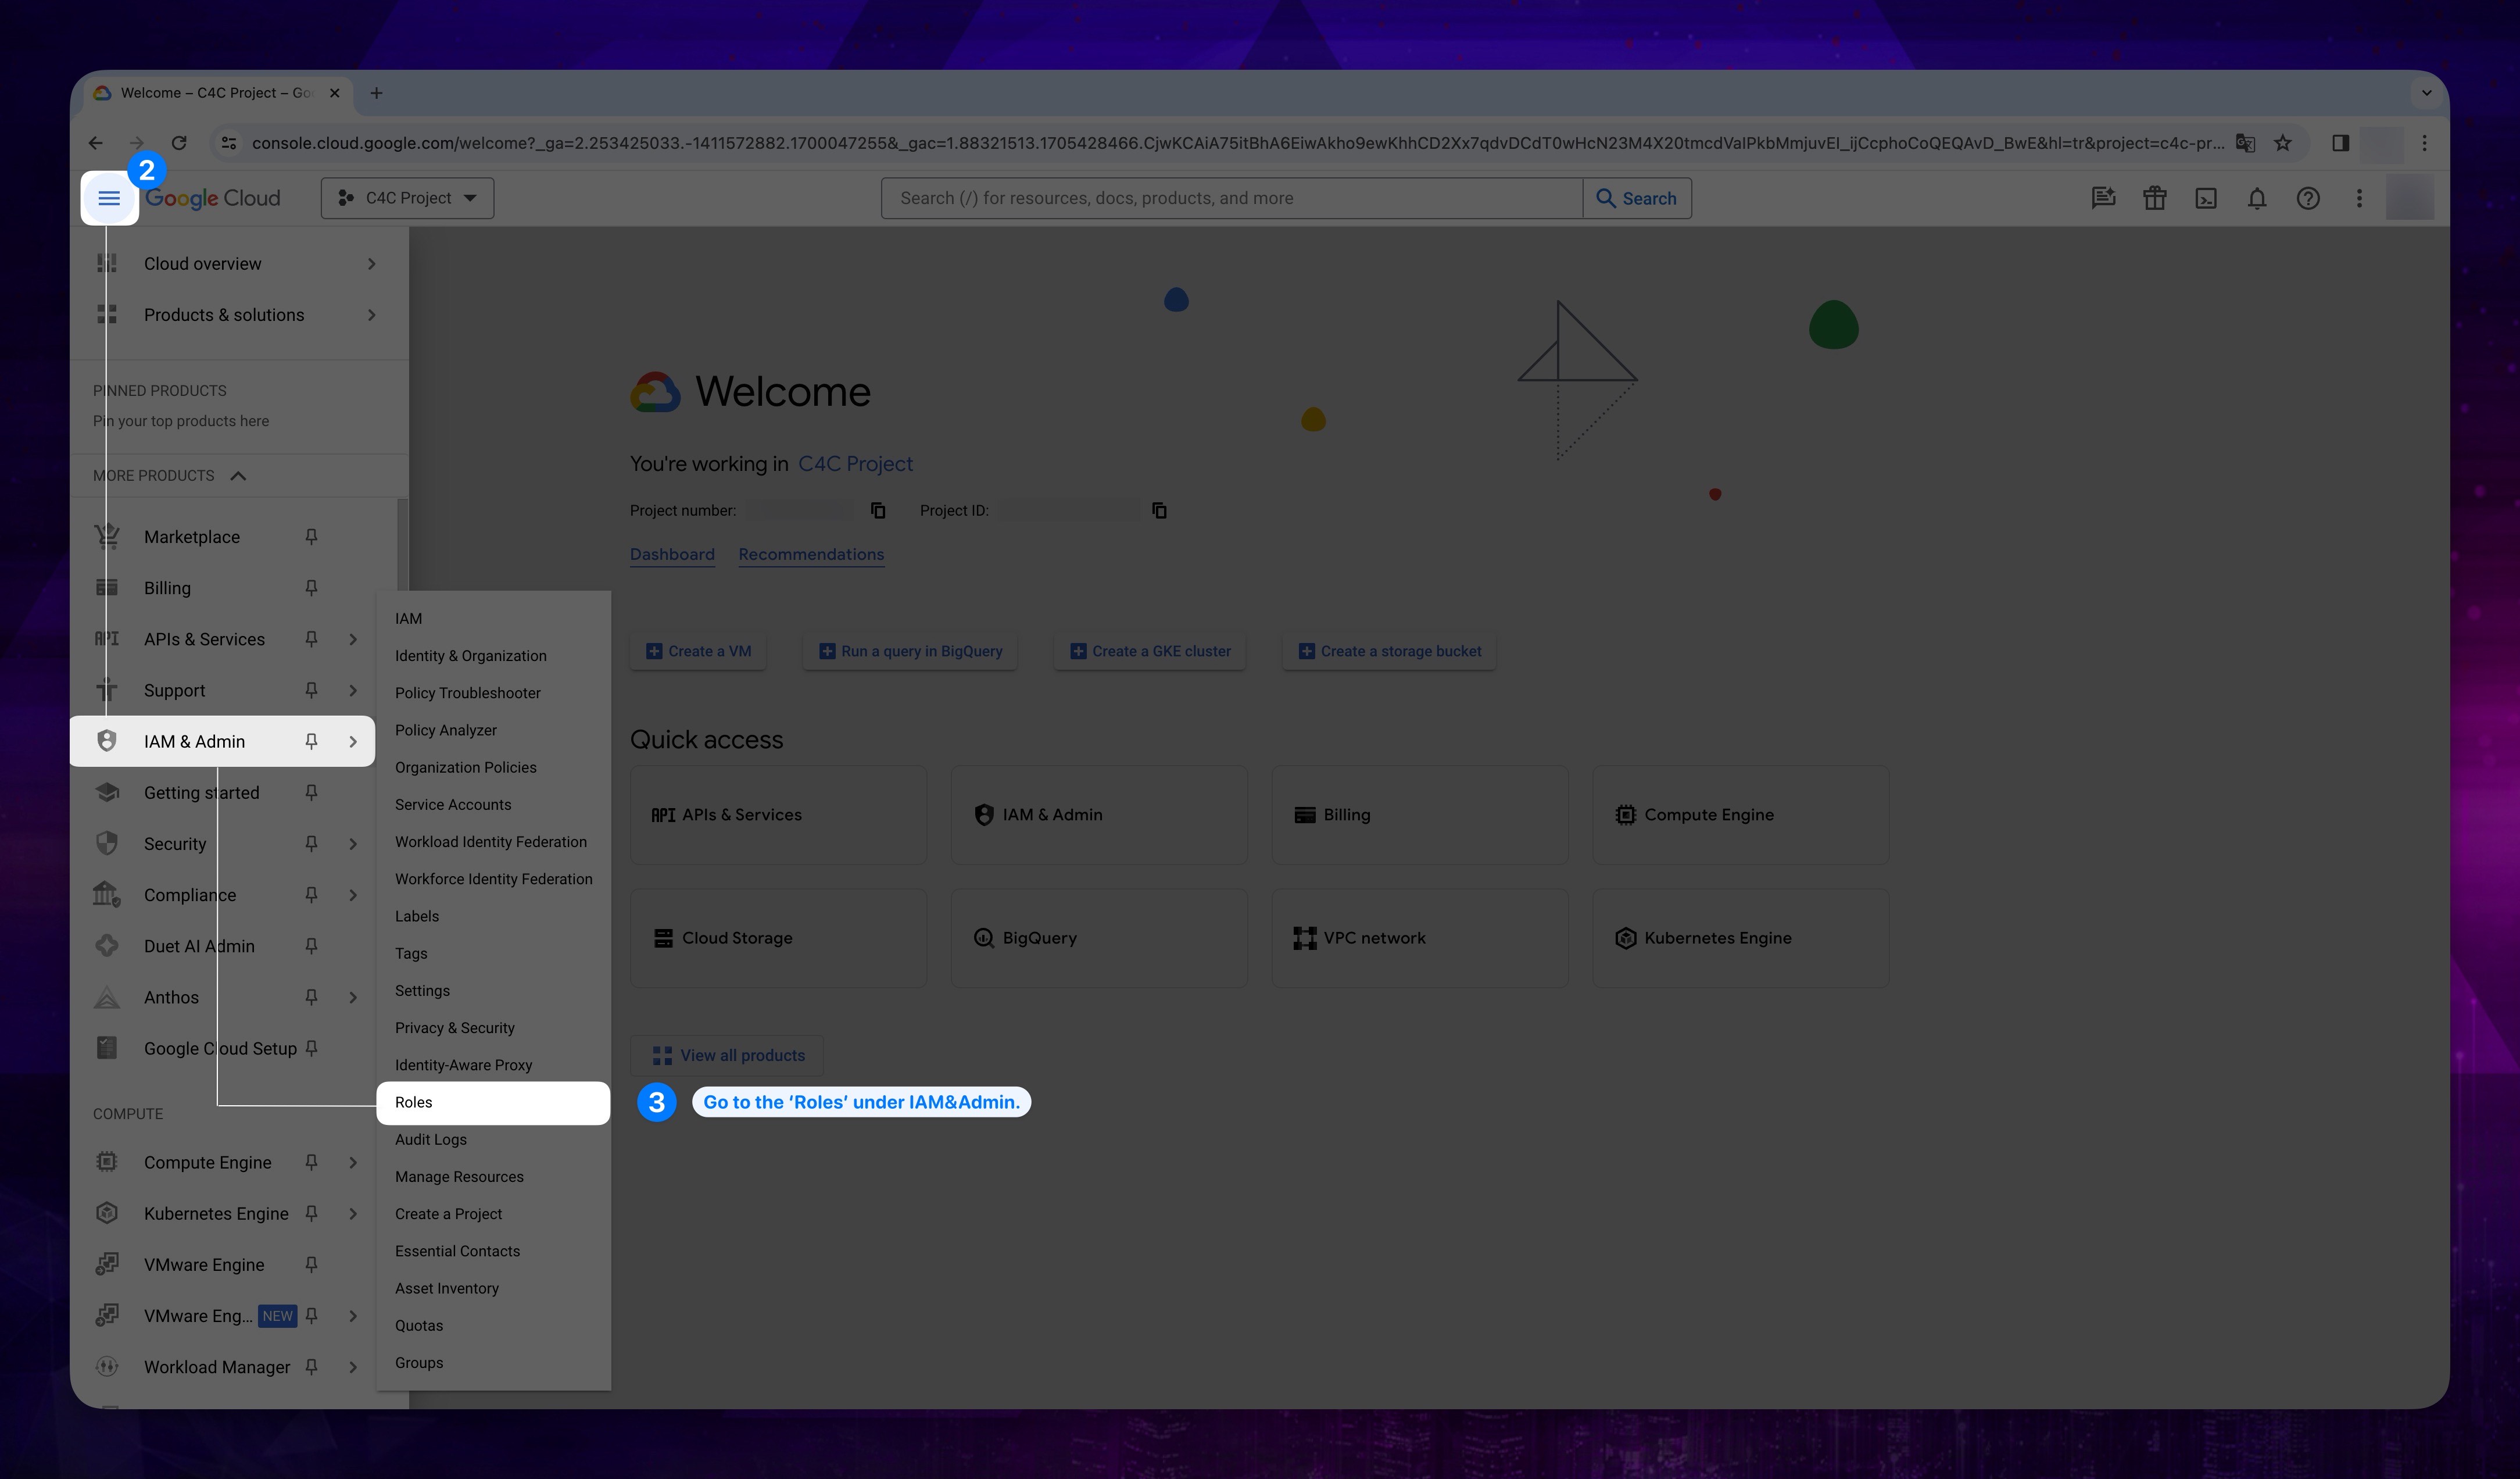
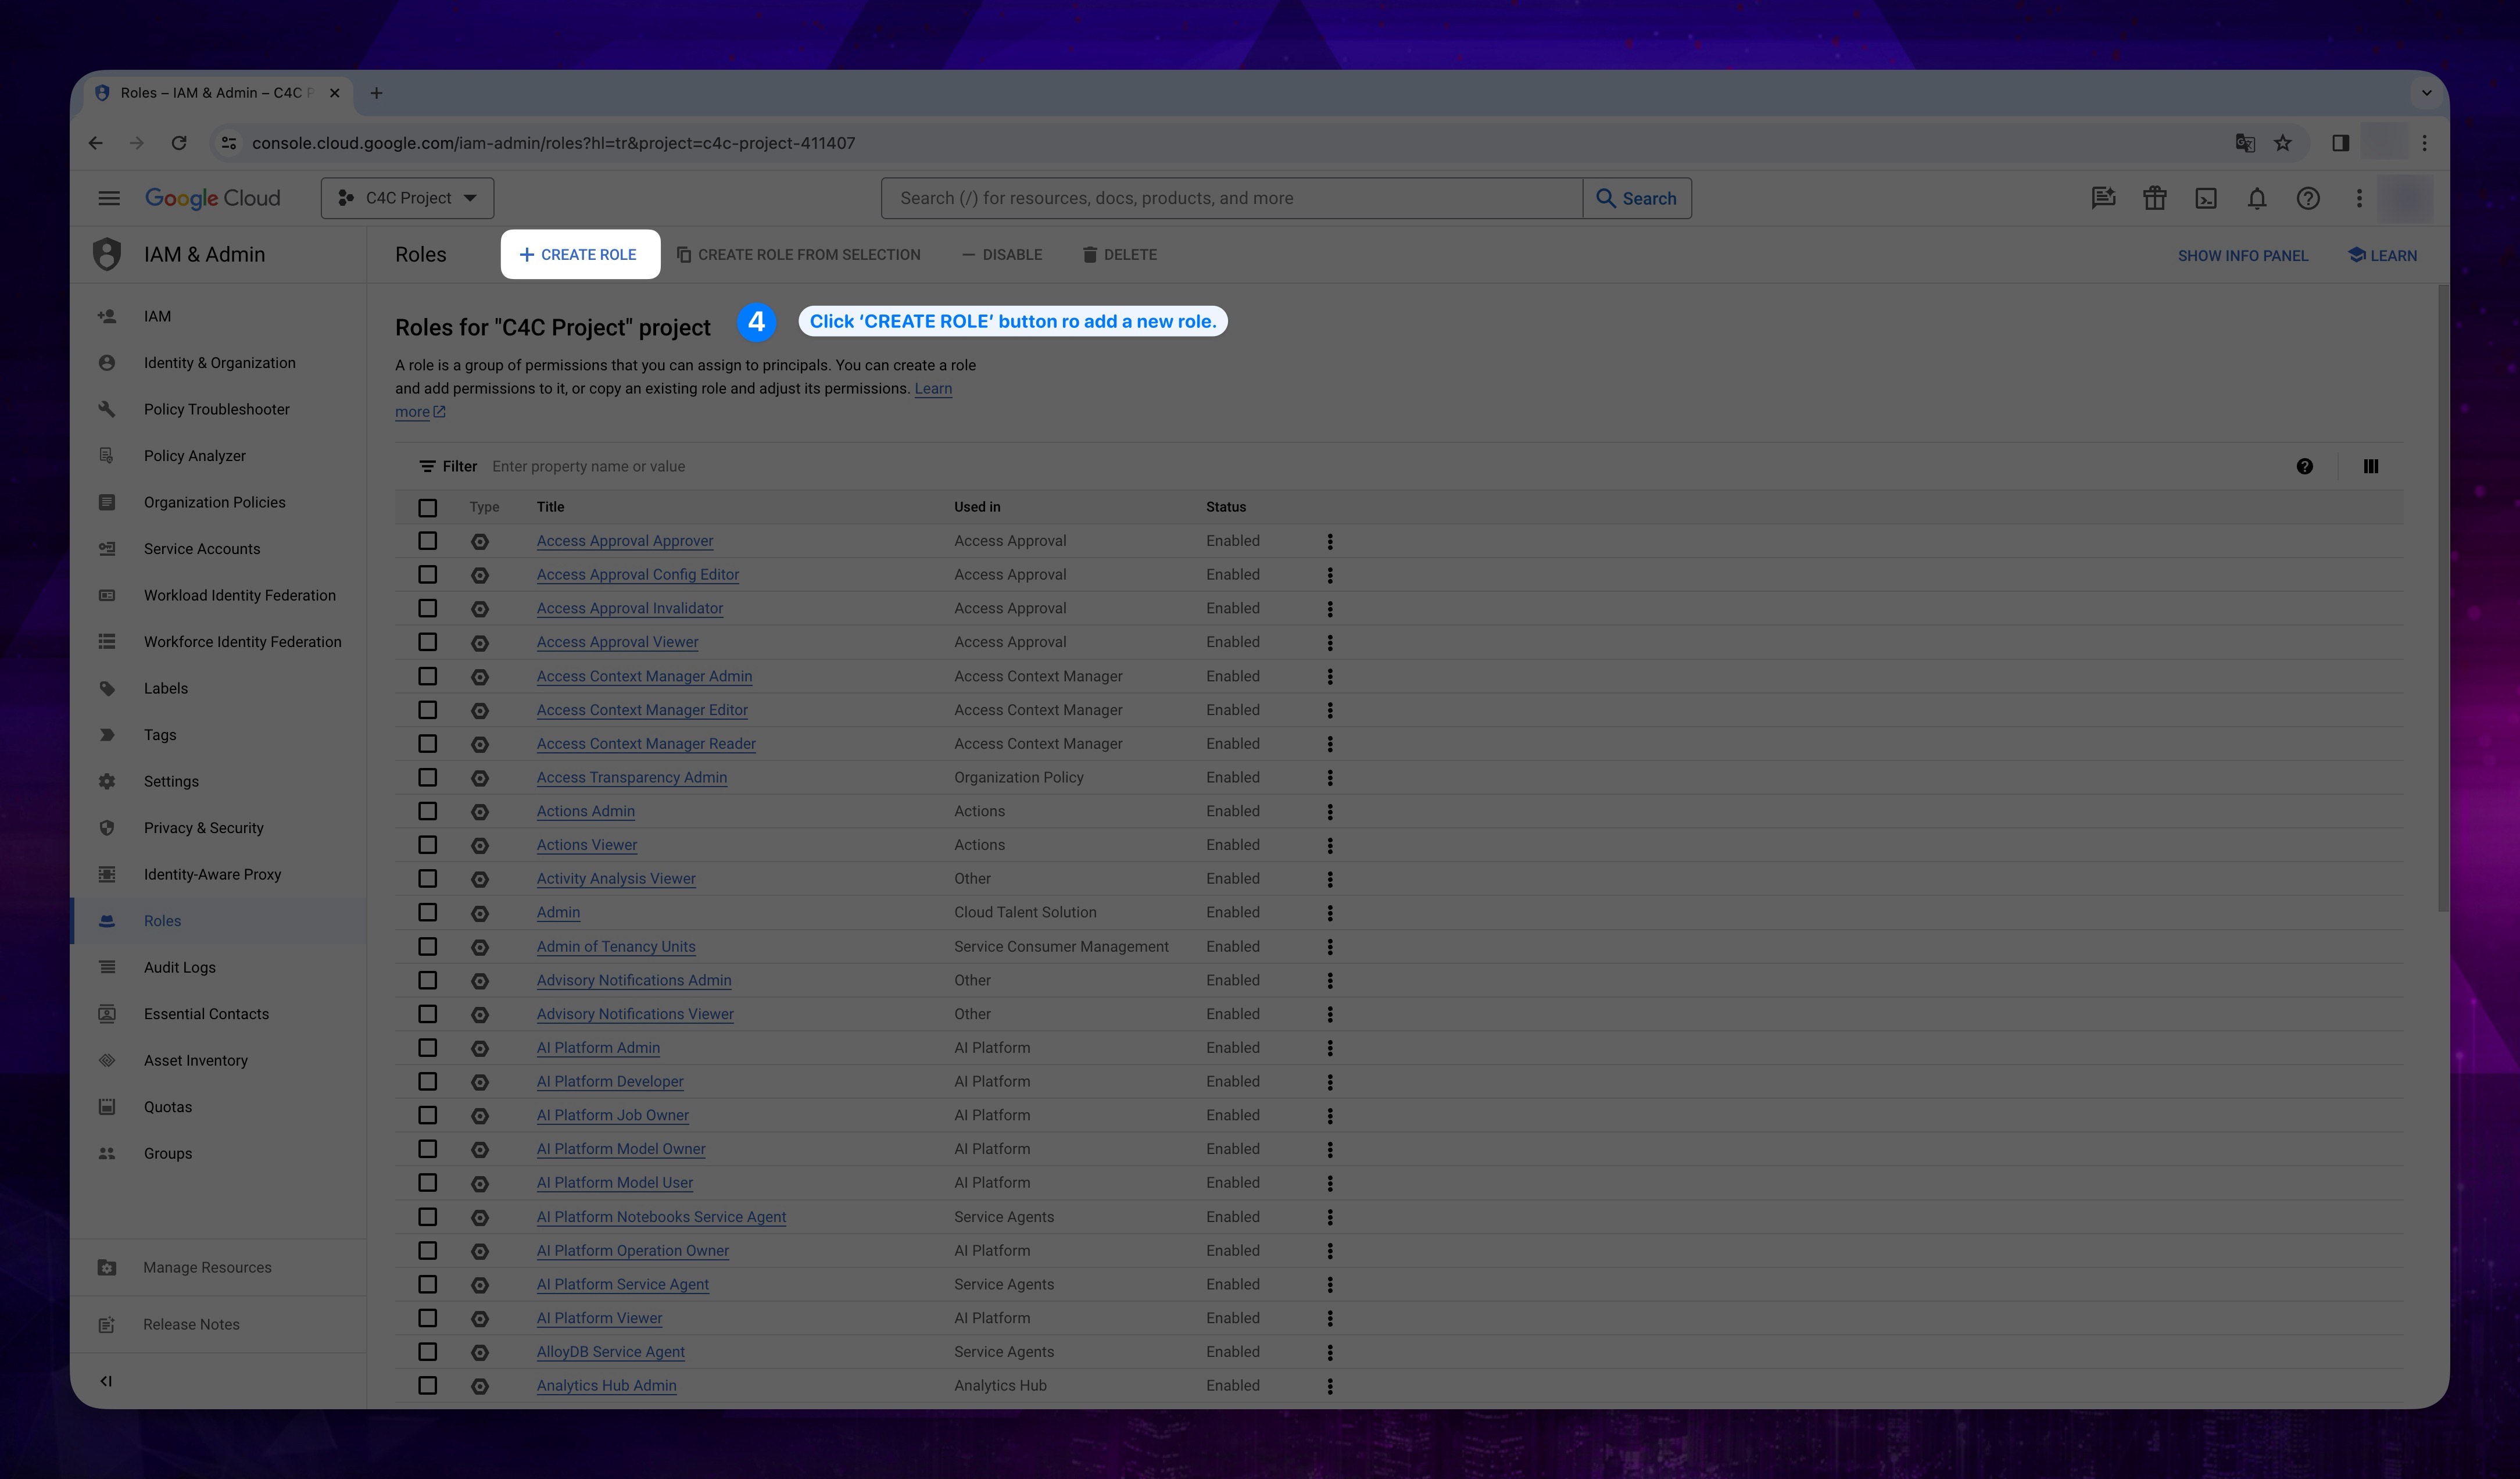
- Then click CREATE ROLE button on the top.
Show the instruction with images
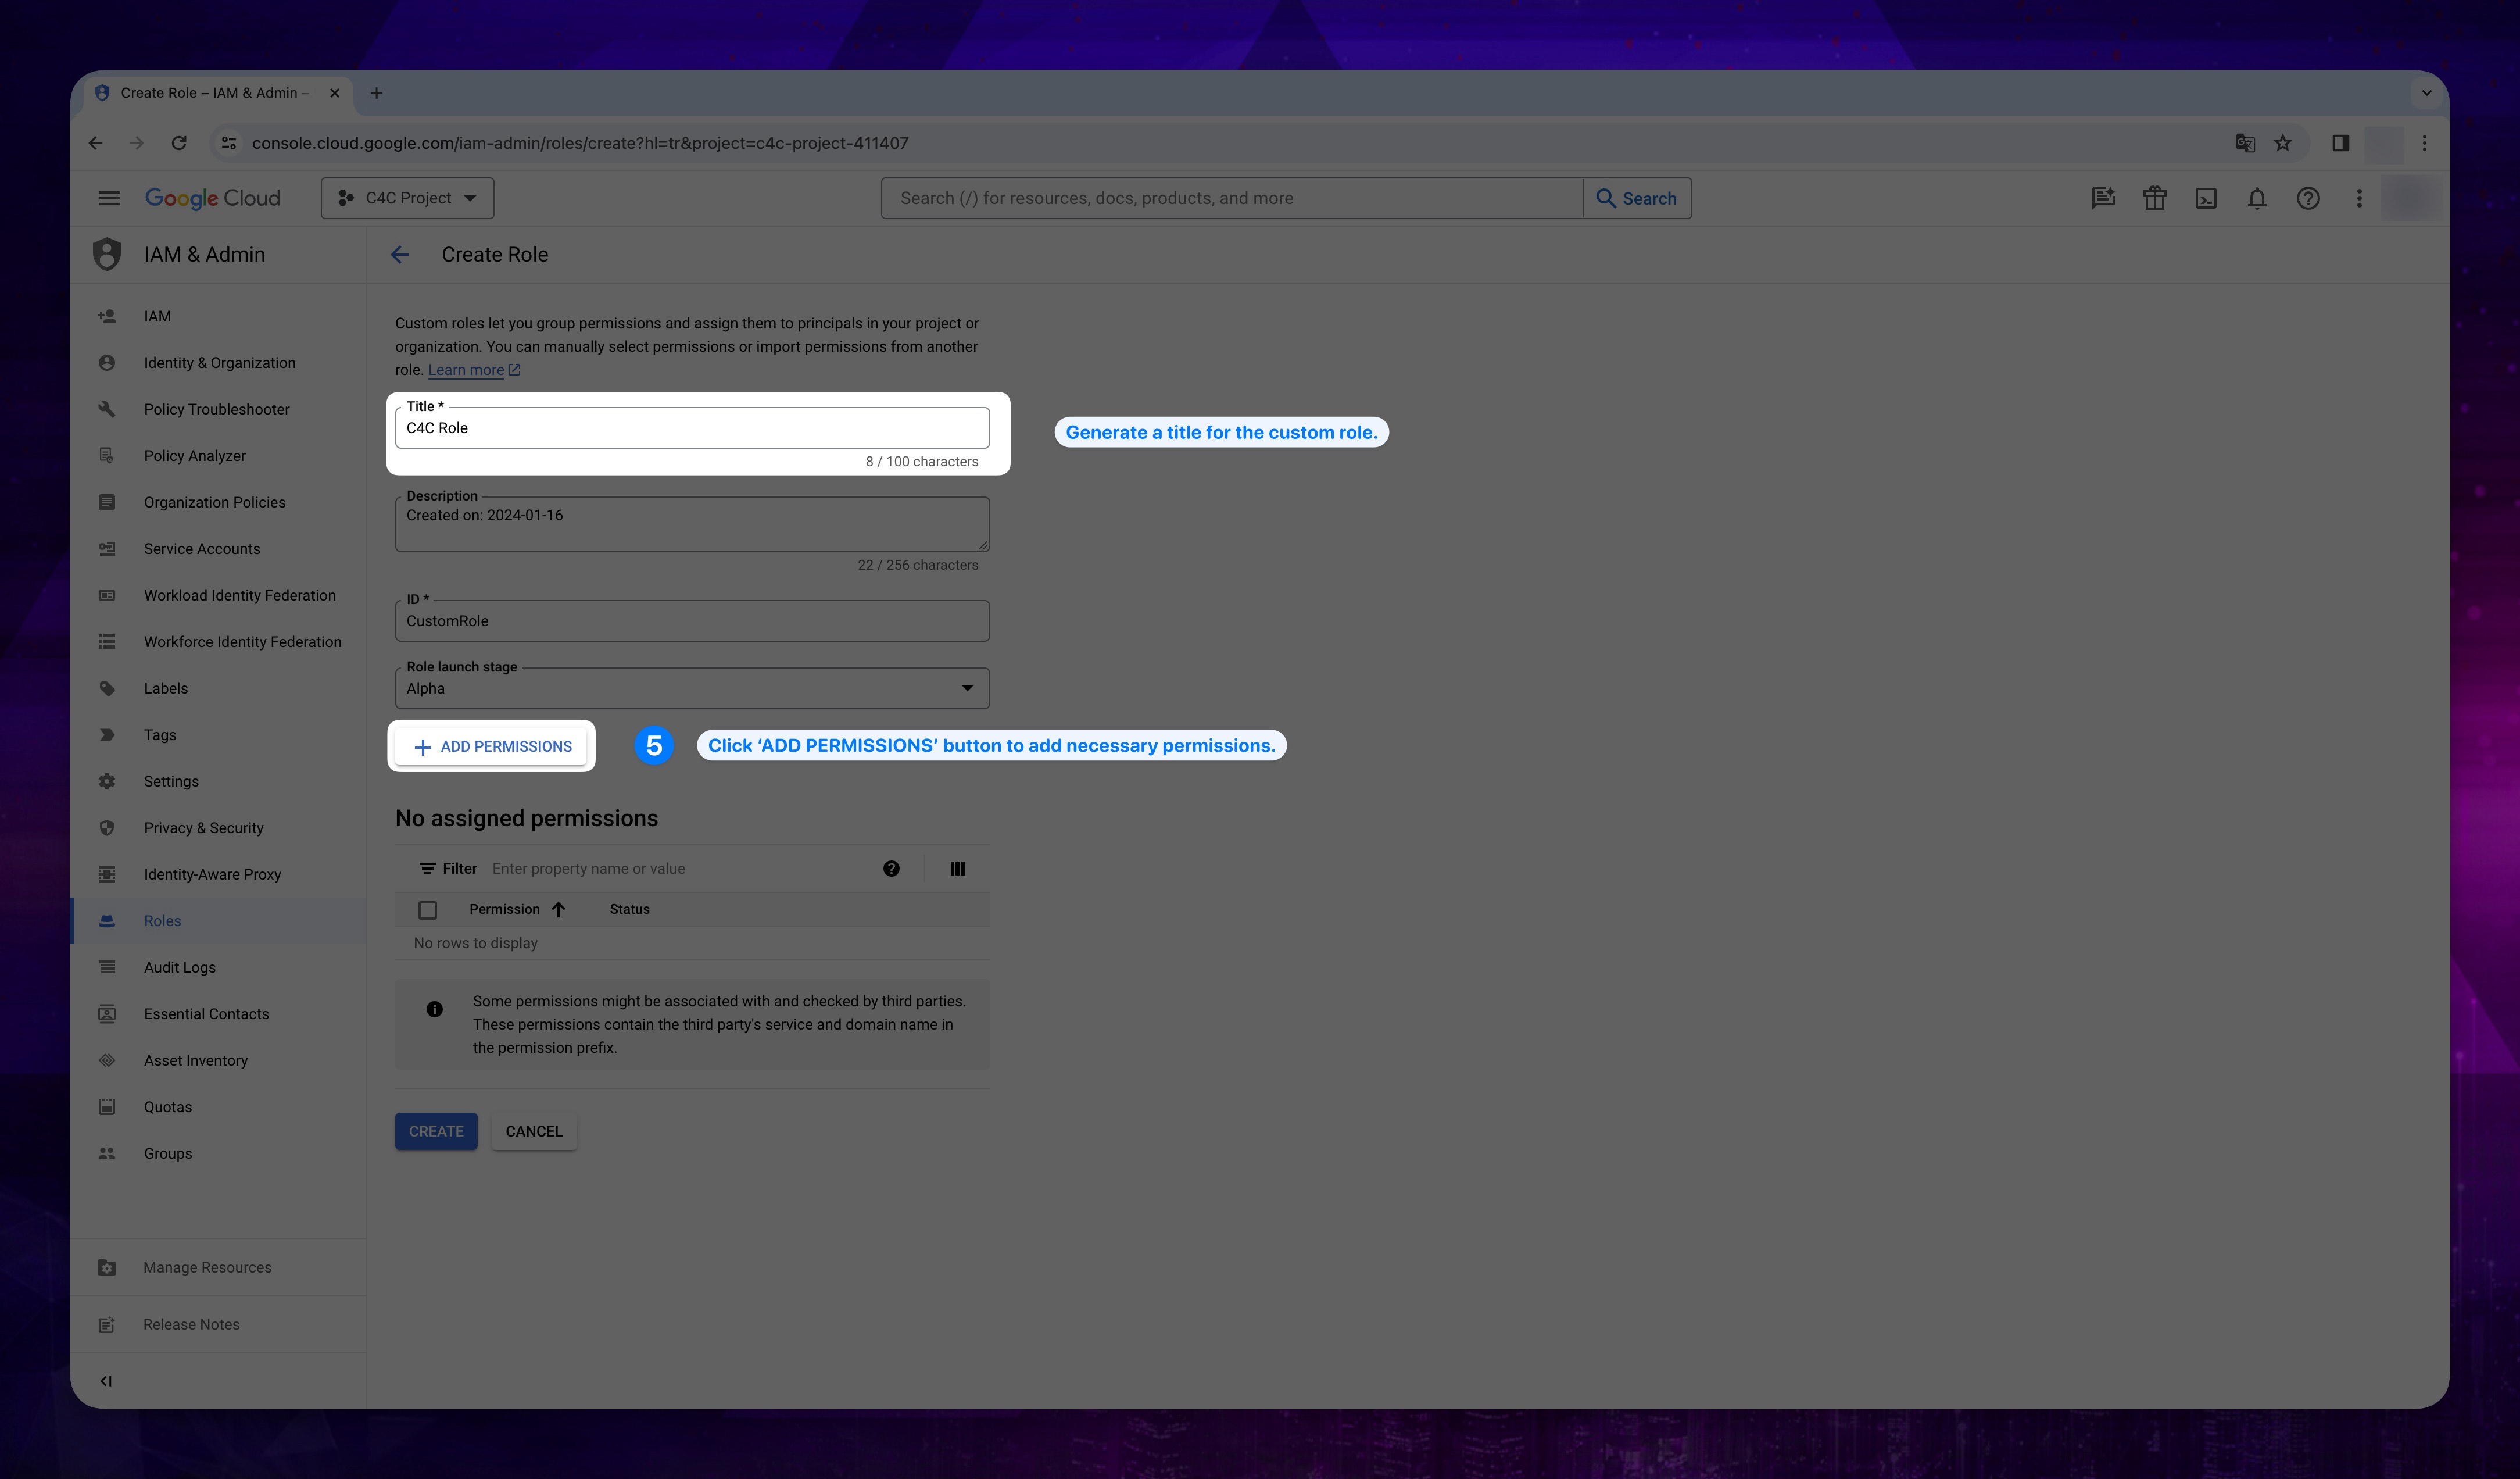
- Enter your Title, then Click ADD PERMISSIONS button on the bottom.
Show the instruction with images
-
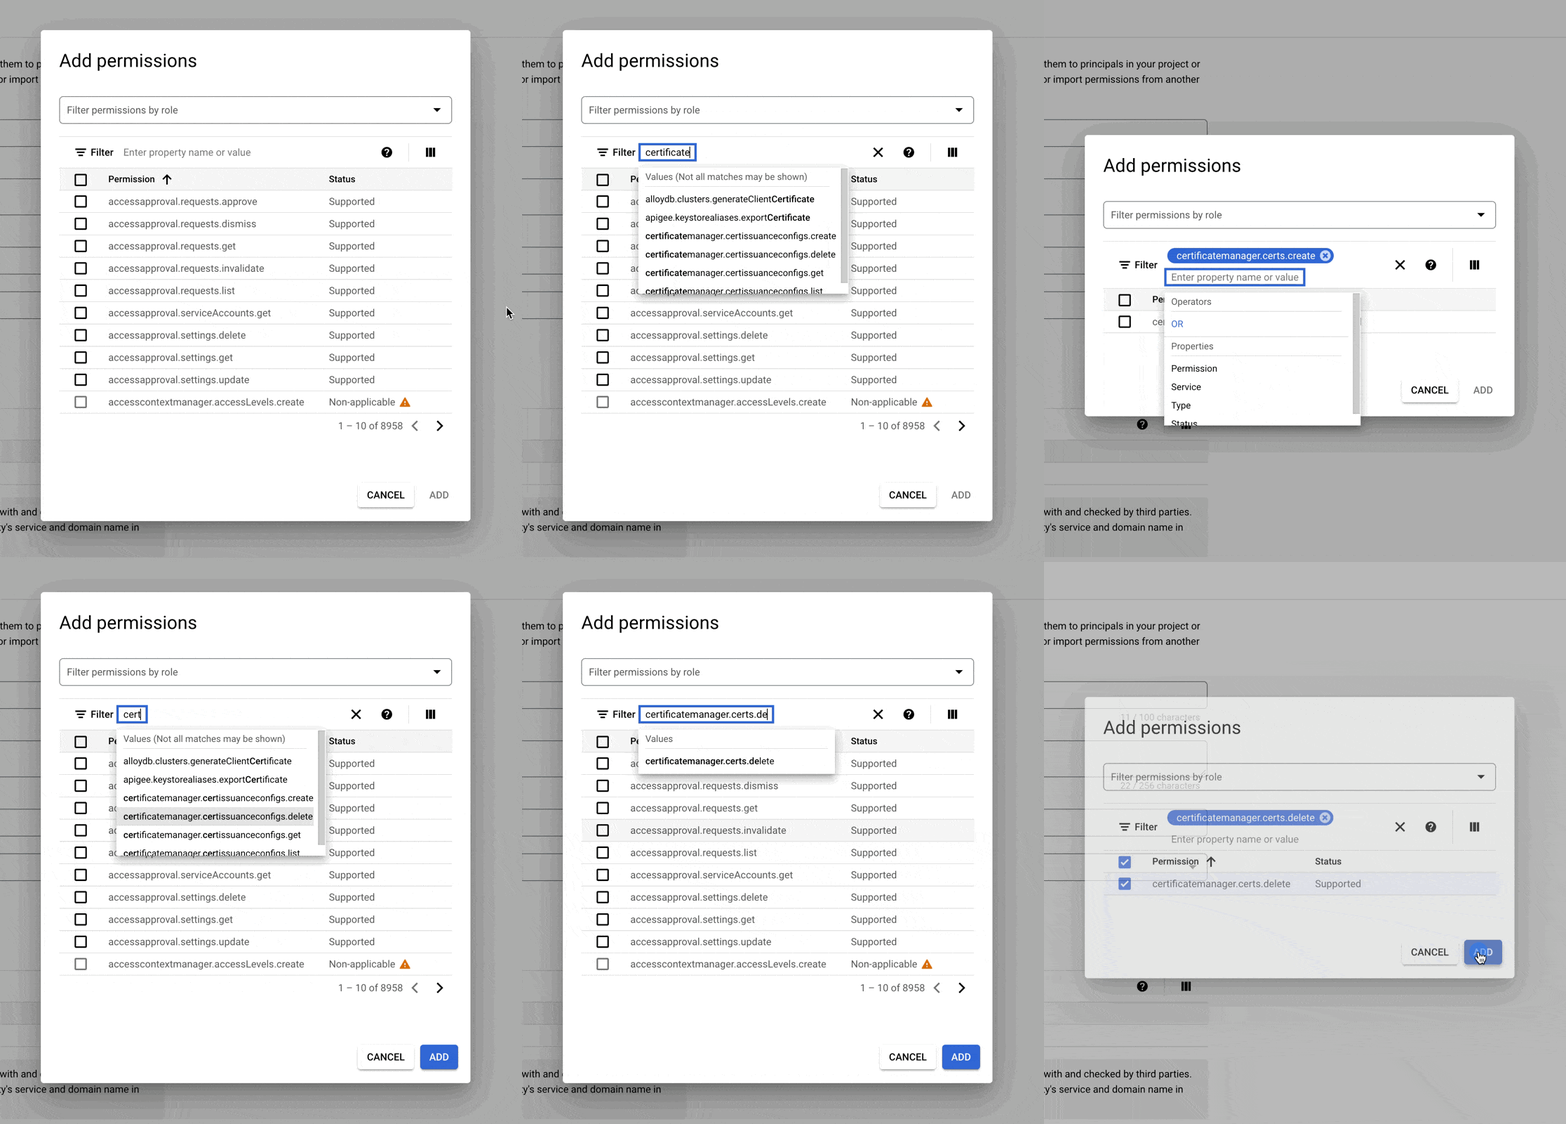
After ensuring that the following items are selected from the opened permissions list, click the Add button.
Show the required permission names.
- compute.regions.list
- iam.roles.get
- resourcemanager.projects.getIamPolicy
- bigquery.datasets.get
- bigquery.tables.export
- bigquery.tables.get
- bigquery.tables.getData
- bigquery.jobs.create
Show the instruction with images
-
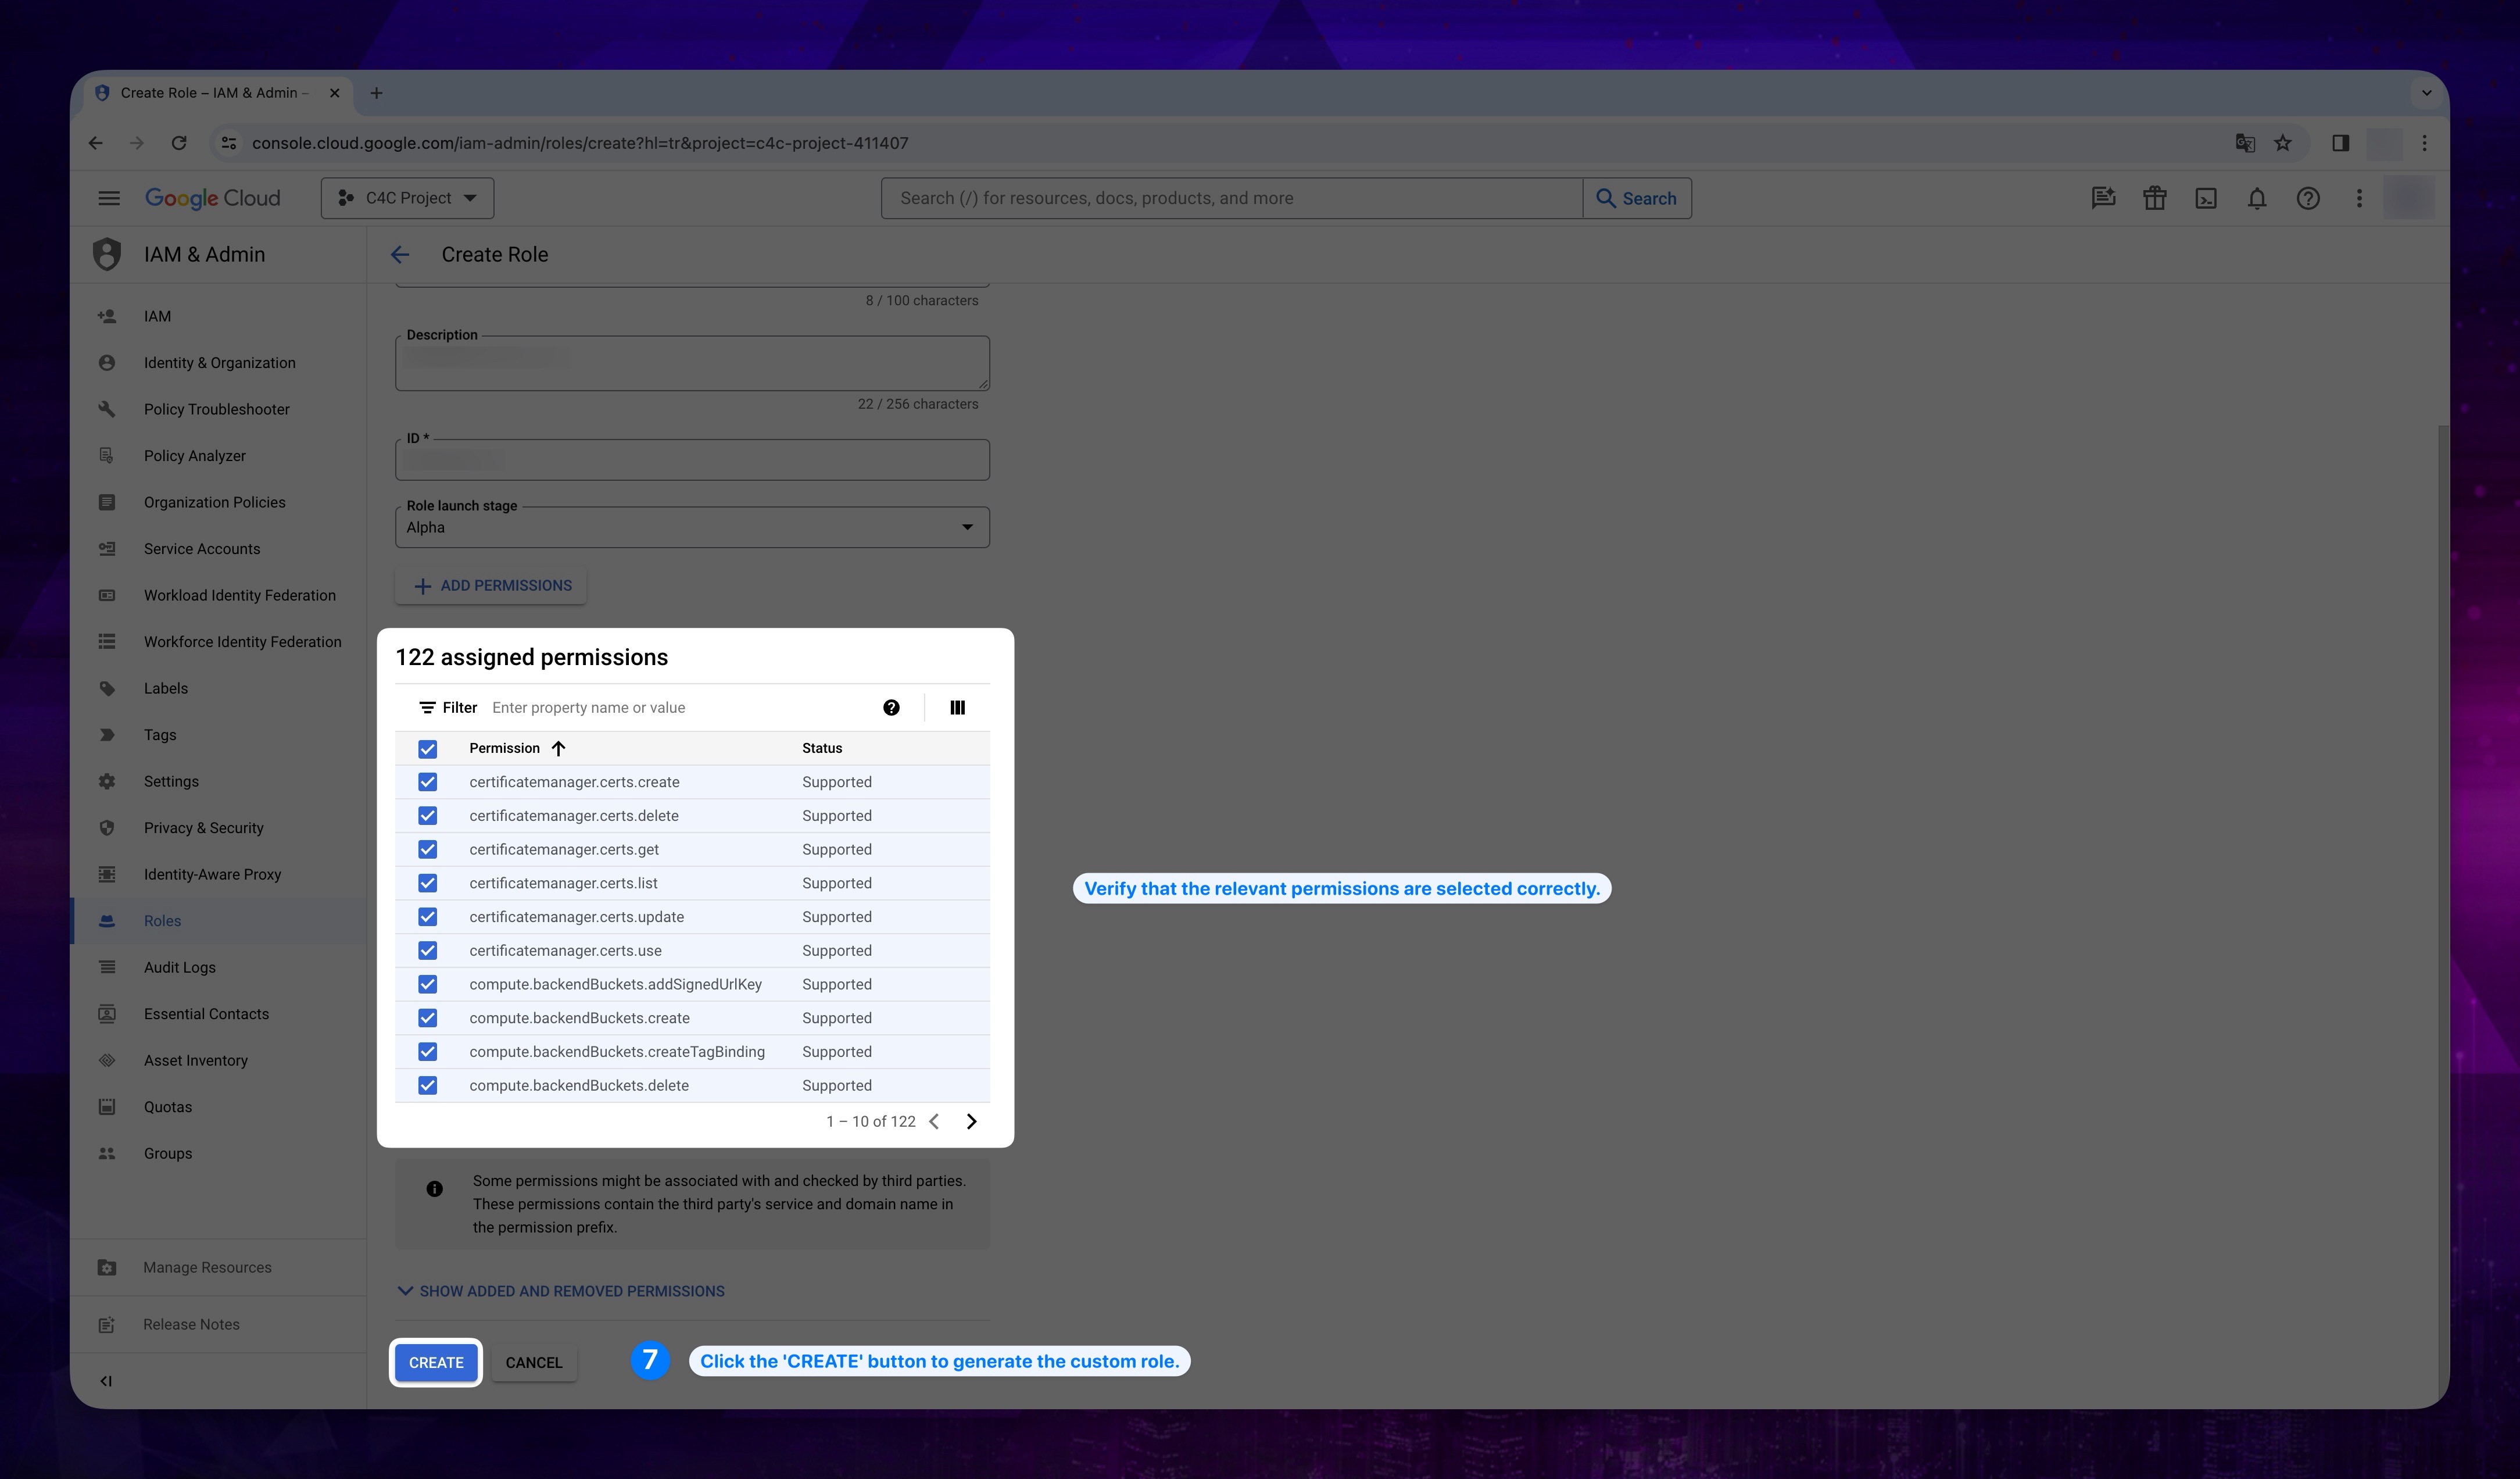
After confirming that all the permissions in the table have been added, click the Create button located at the bottom of the page.
warningPlease be sure, all required permission are selected.
Show the instruction with images
If you wish to proceed with this method, please follow the steps below.
-
At first, you need to install the gcloud CLI. Please follow the steps outlined in the documentation.
-
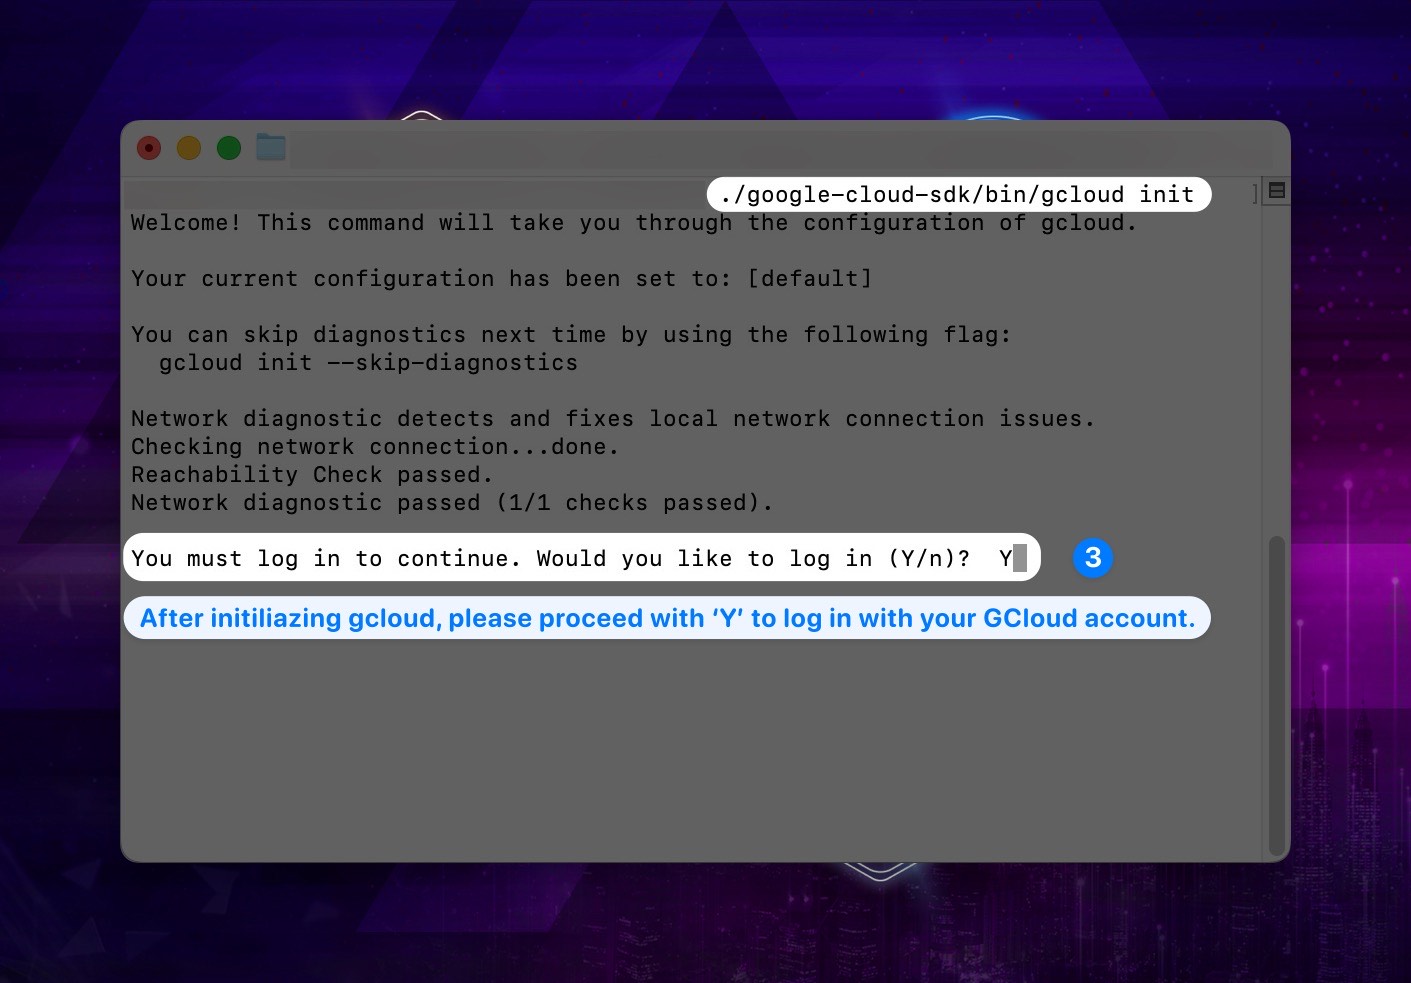
After initializing gcloud, the terminal will prompt you to log in to your GCP account. Please contine with 'Y'.
Show the instruction with images
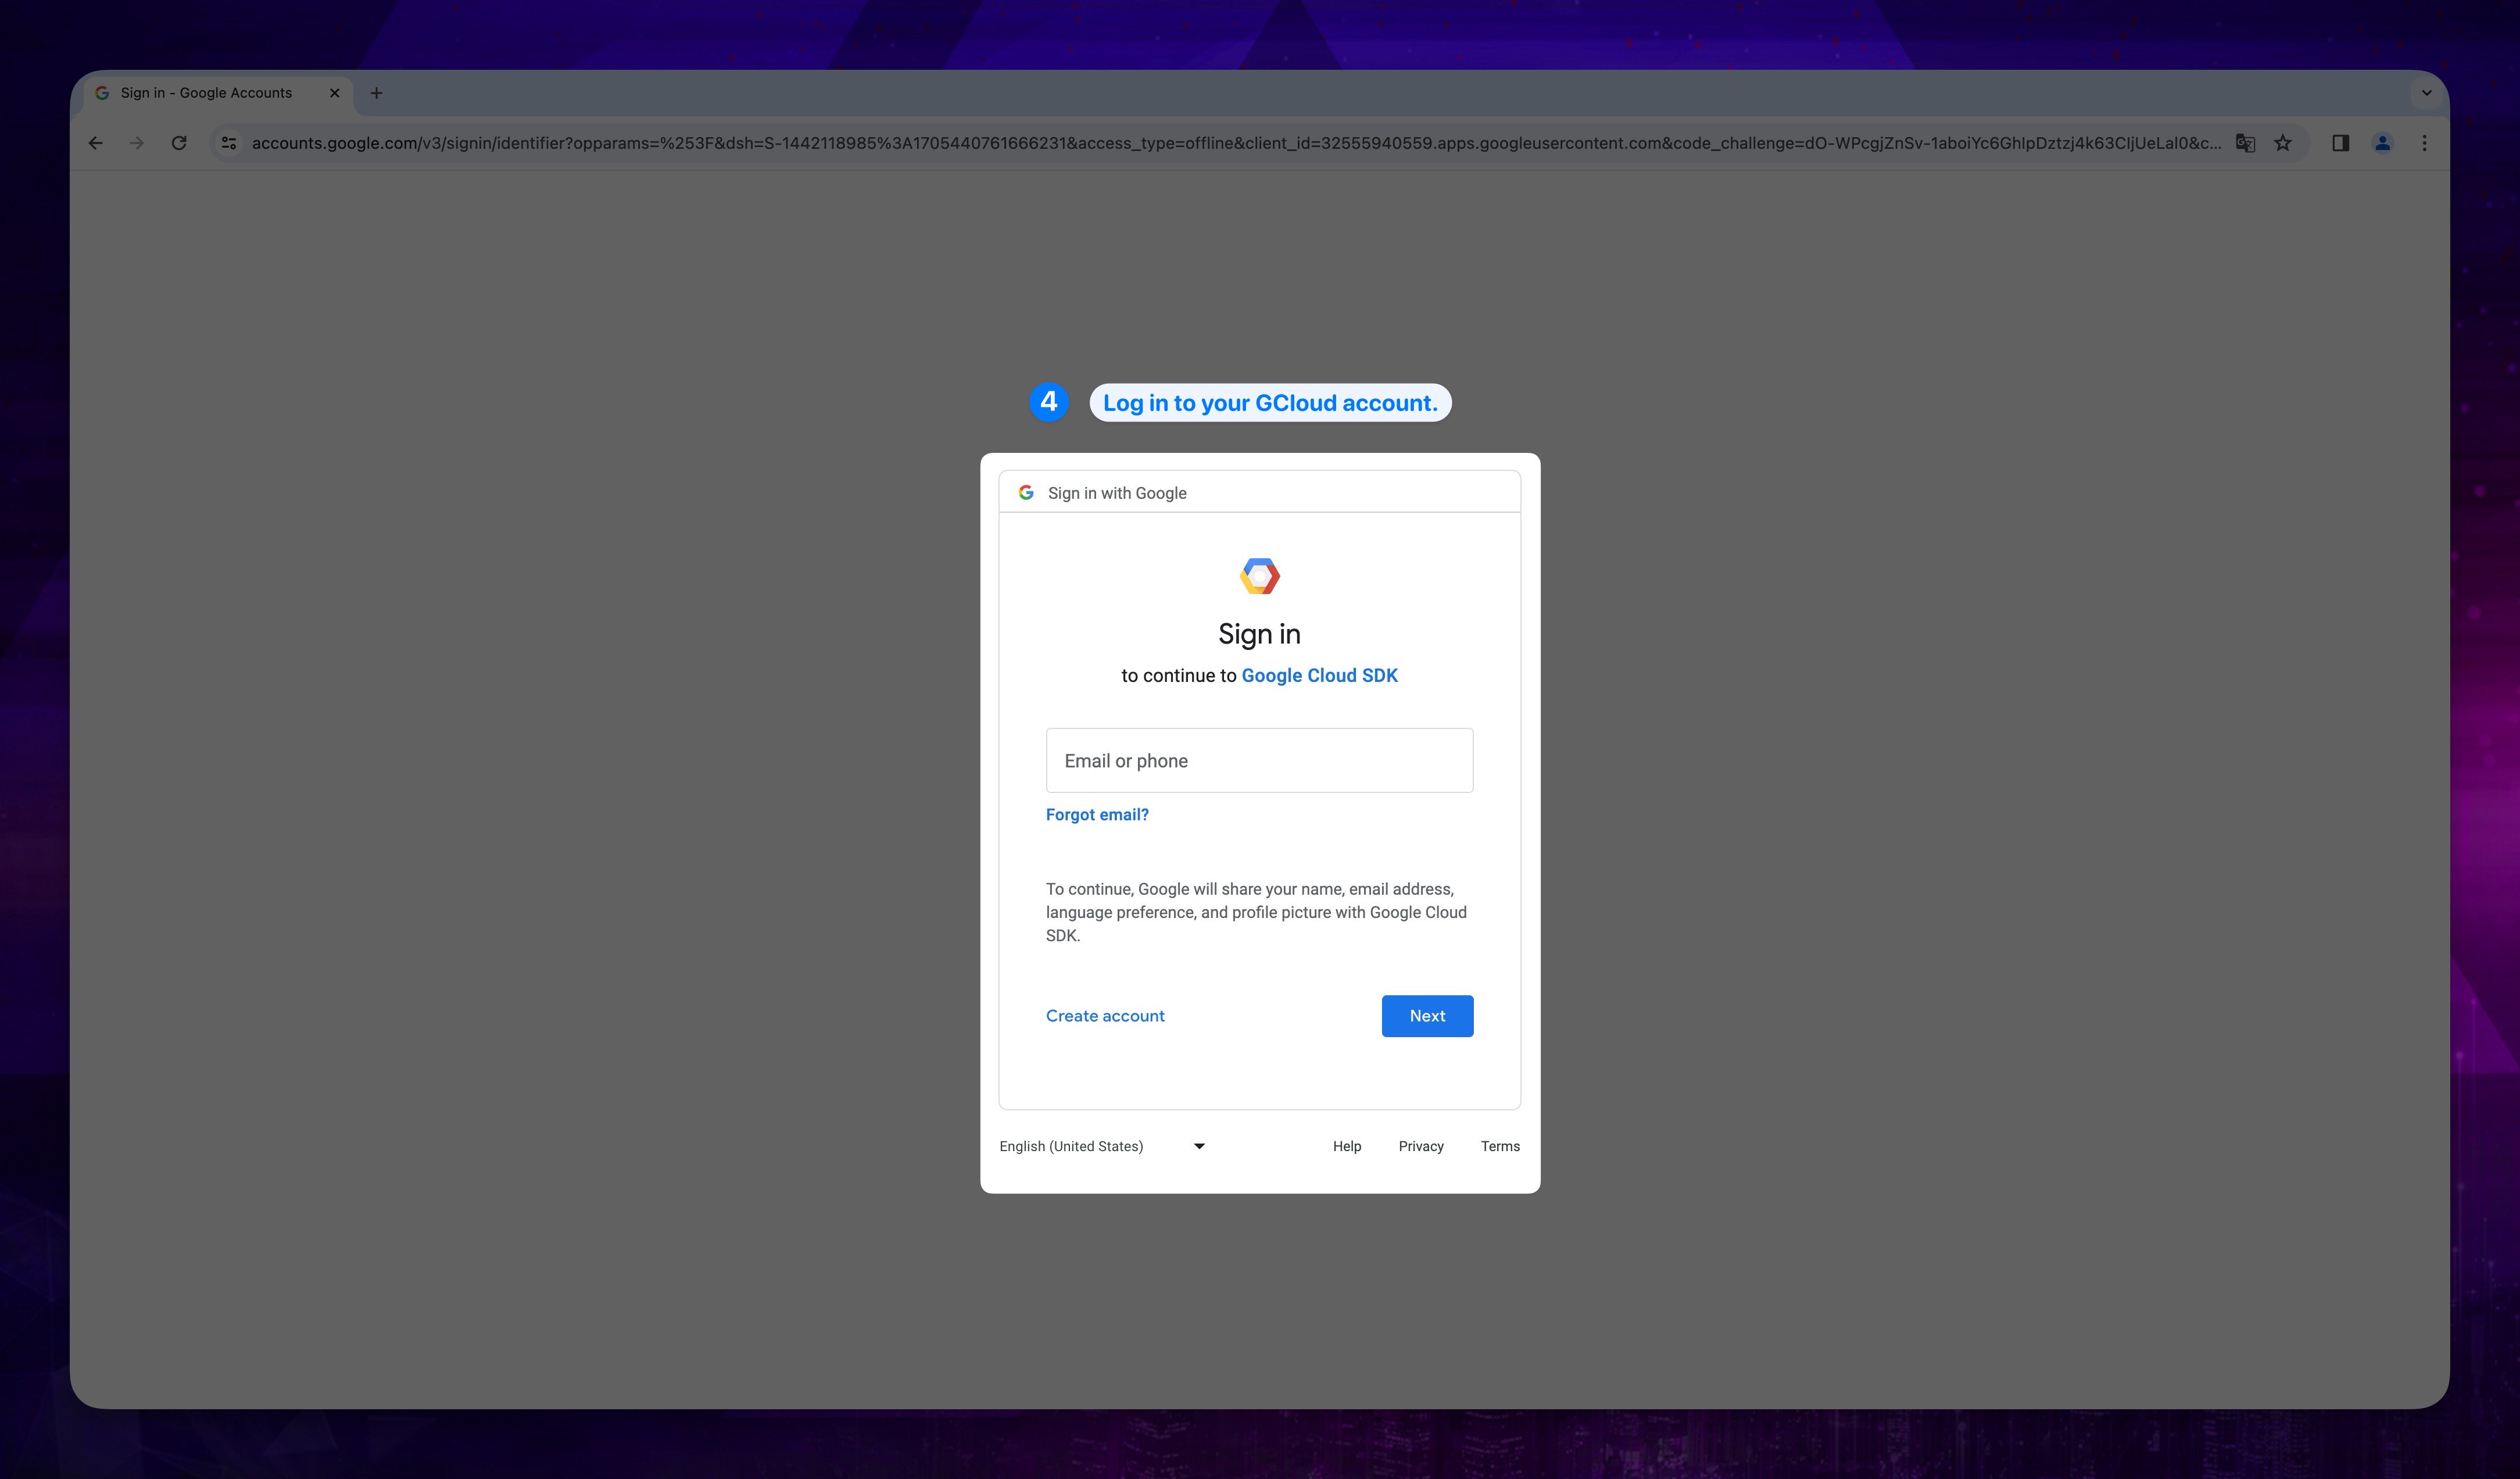
- After entering 'Y' in the terminal, the gcloud login page will automatically open in your browser. Please log in to your account.
Show the instruction with images
If the initialization process does not prompt you to log in to your GCP account, please run the following command in the terminal:
gcloud auth login
- Then go back to terminal, it will prompt you to select your Google Cloud project. Locate your project from the list and enter its numeric or text value in the terminal. Now we are in our project. (Please do not close your teminal.)
To facilitate your access to our service, we have created a file containing the necessary permissions. Before proceeding to the next step, please download this file.
In some cases, the file may not download directly. To avoid this issue:
- Right-click on the this file link.
- Select Save link as... from the context menu.
- Choose a location where you can easily access the file for further steps.
This ensures the file is saved properly for later use.
After downloading the file, it is recommended to rename and abbreviate the file name.
Show the instruction with images
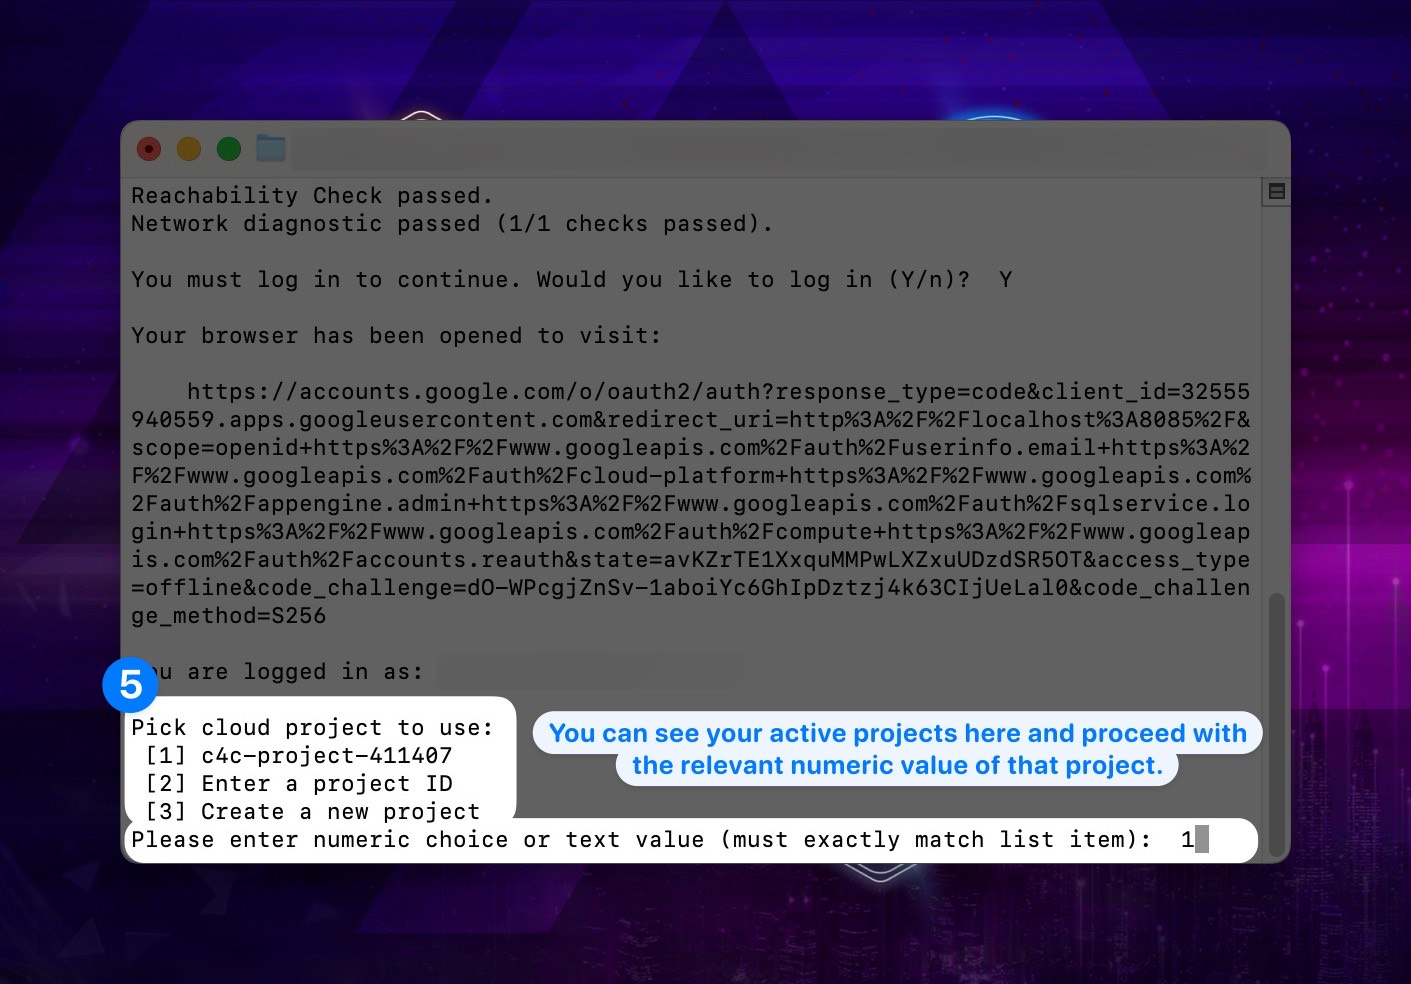
- Customize the code below according to your own project and run the code in the terminal.
gcloud iam roles create C4CRoleBillingAccount --project=PROJECT_ID --file=YAML_FILE_PATH
PROJECT_ID, is the ID of your project. To find your Google Cloud Platform (GCP) Project ID, you can follow the steps below:
- Sign in to the Google Cloud Console.
- In the top left corner, click on the project name located at the top of the page. If you haven't created a project yet, click the Select a project button to create a new project or choose an existing one.
- You can view your existing projects and project IDs in the panel that opens.
YAML_FILE_PATH is the path to the location of your YAML file that you downloaded early step.
Show the instruction with images
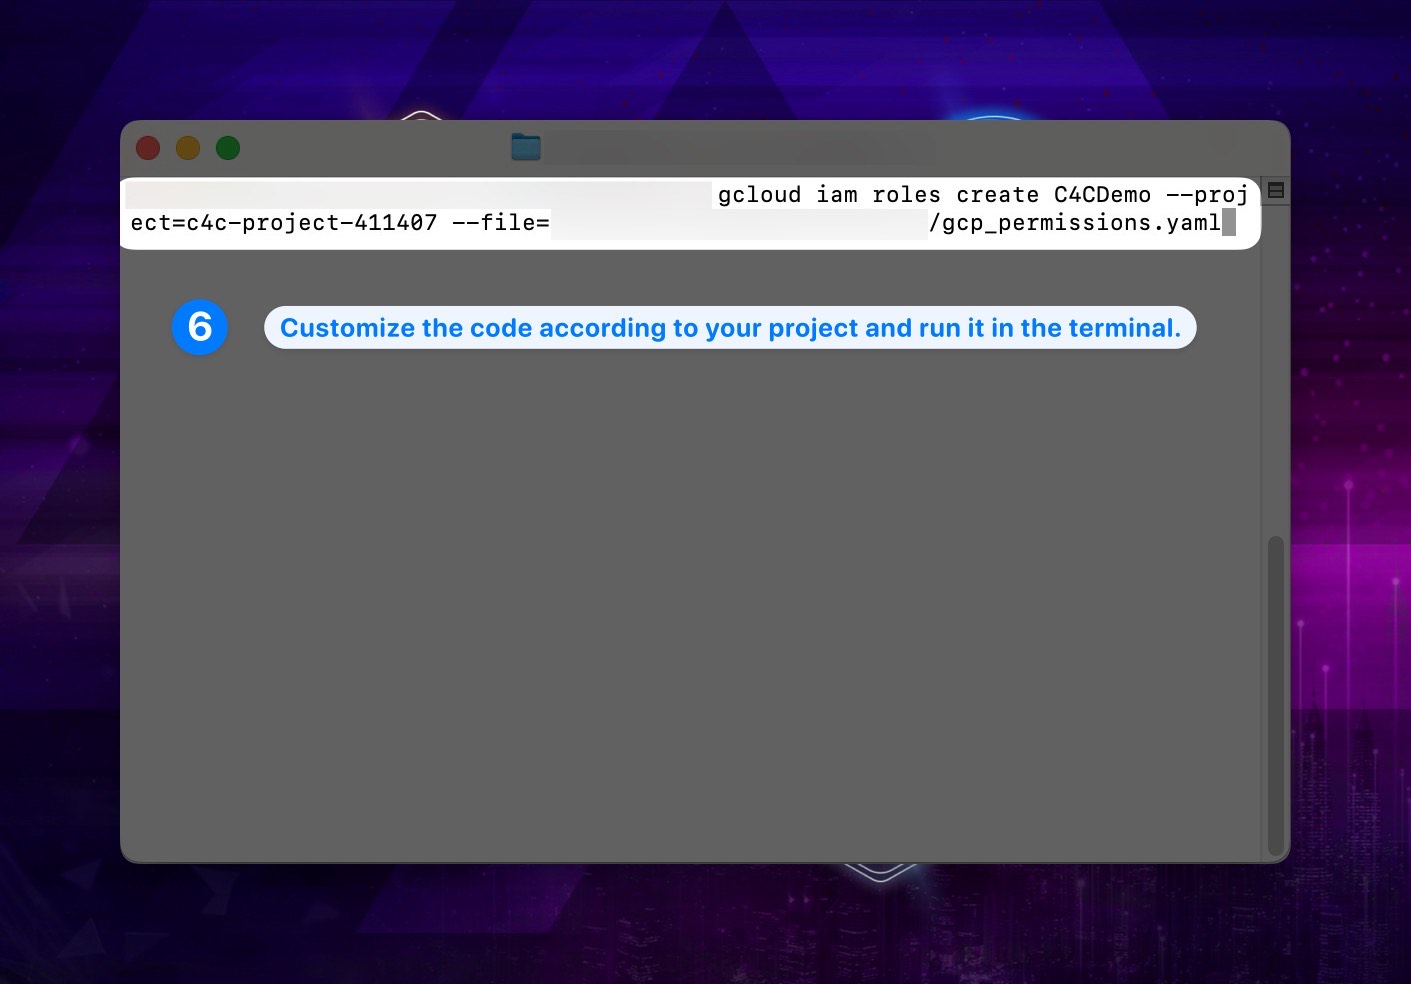
- After running this code in the terminal, it will ask for confirmation due to some permissions being in the testing stage. Please confirm by entering 'Y' into the terminal.
Show the instruction with images
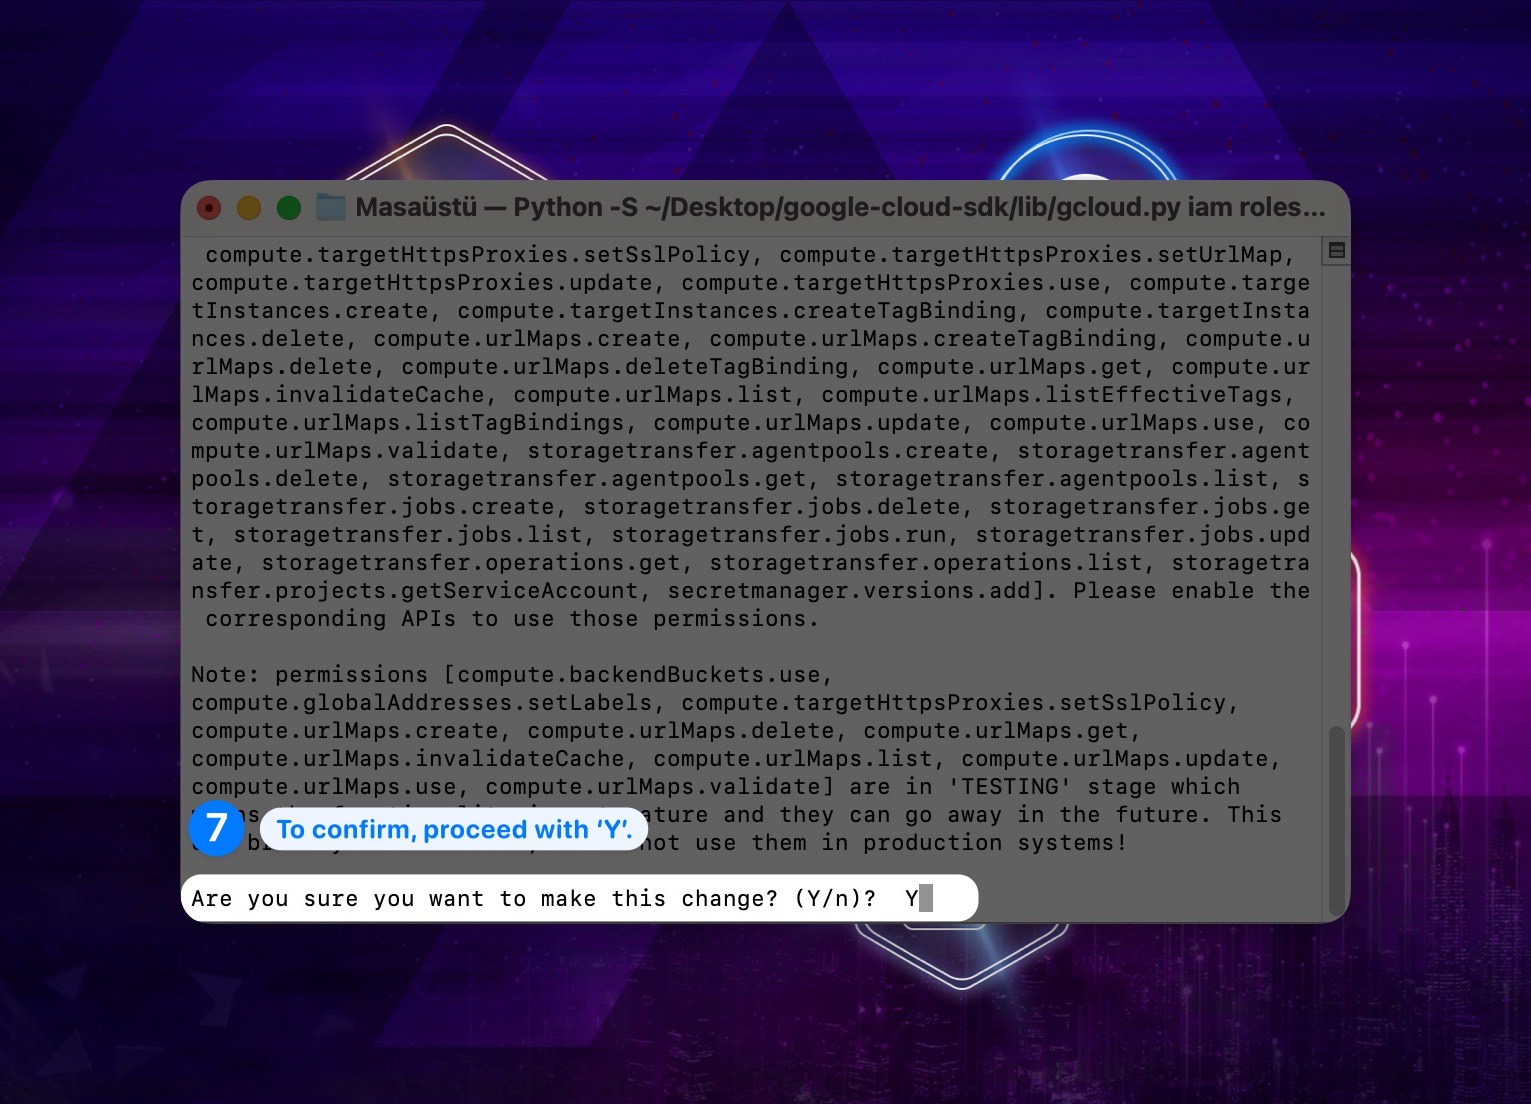
After these steps, you should have successfully created the role with the necessary permissions.
4. Service Account Creation
We have created a role with the necessary permissions; now, we need to create an account to which we will assign this role.
- Go to GCP Console and log in to your account.
- Go to Service accounts from the left menu, under IAM & Admin.
Show the instruction with images
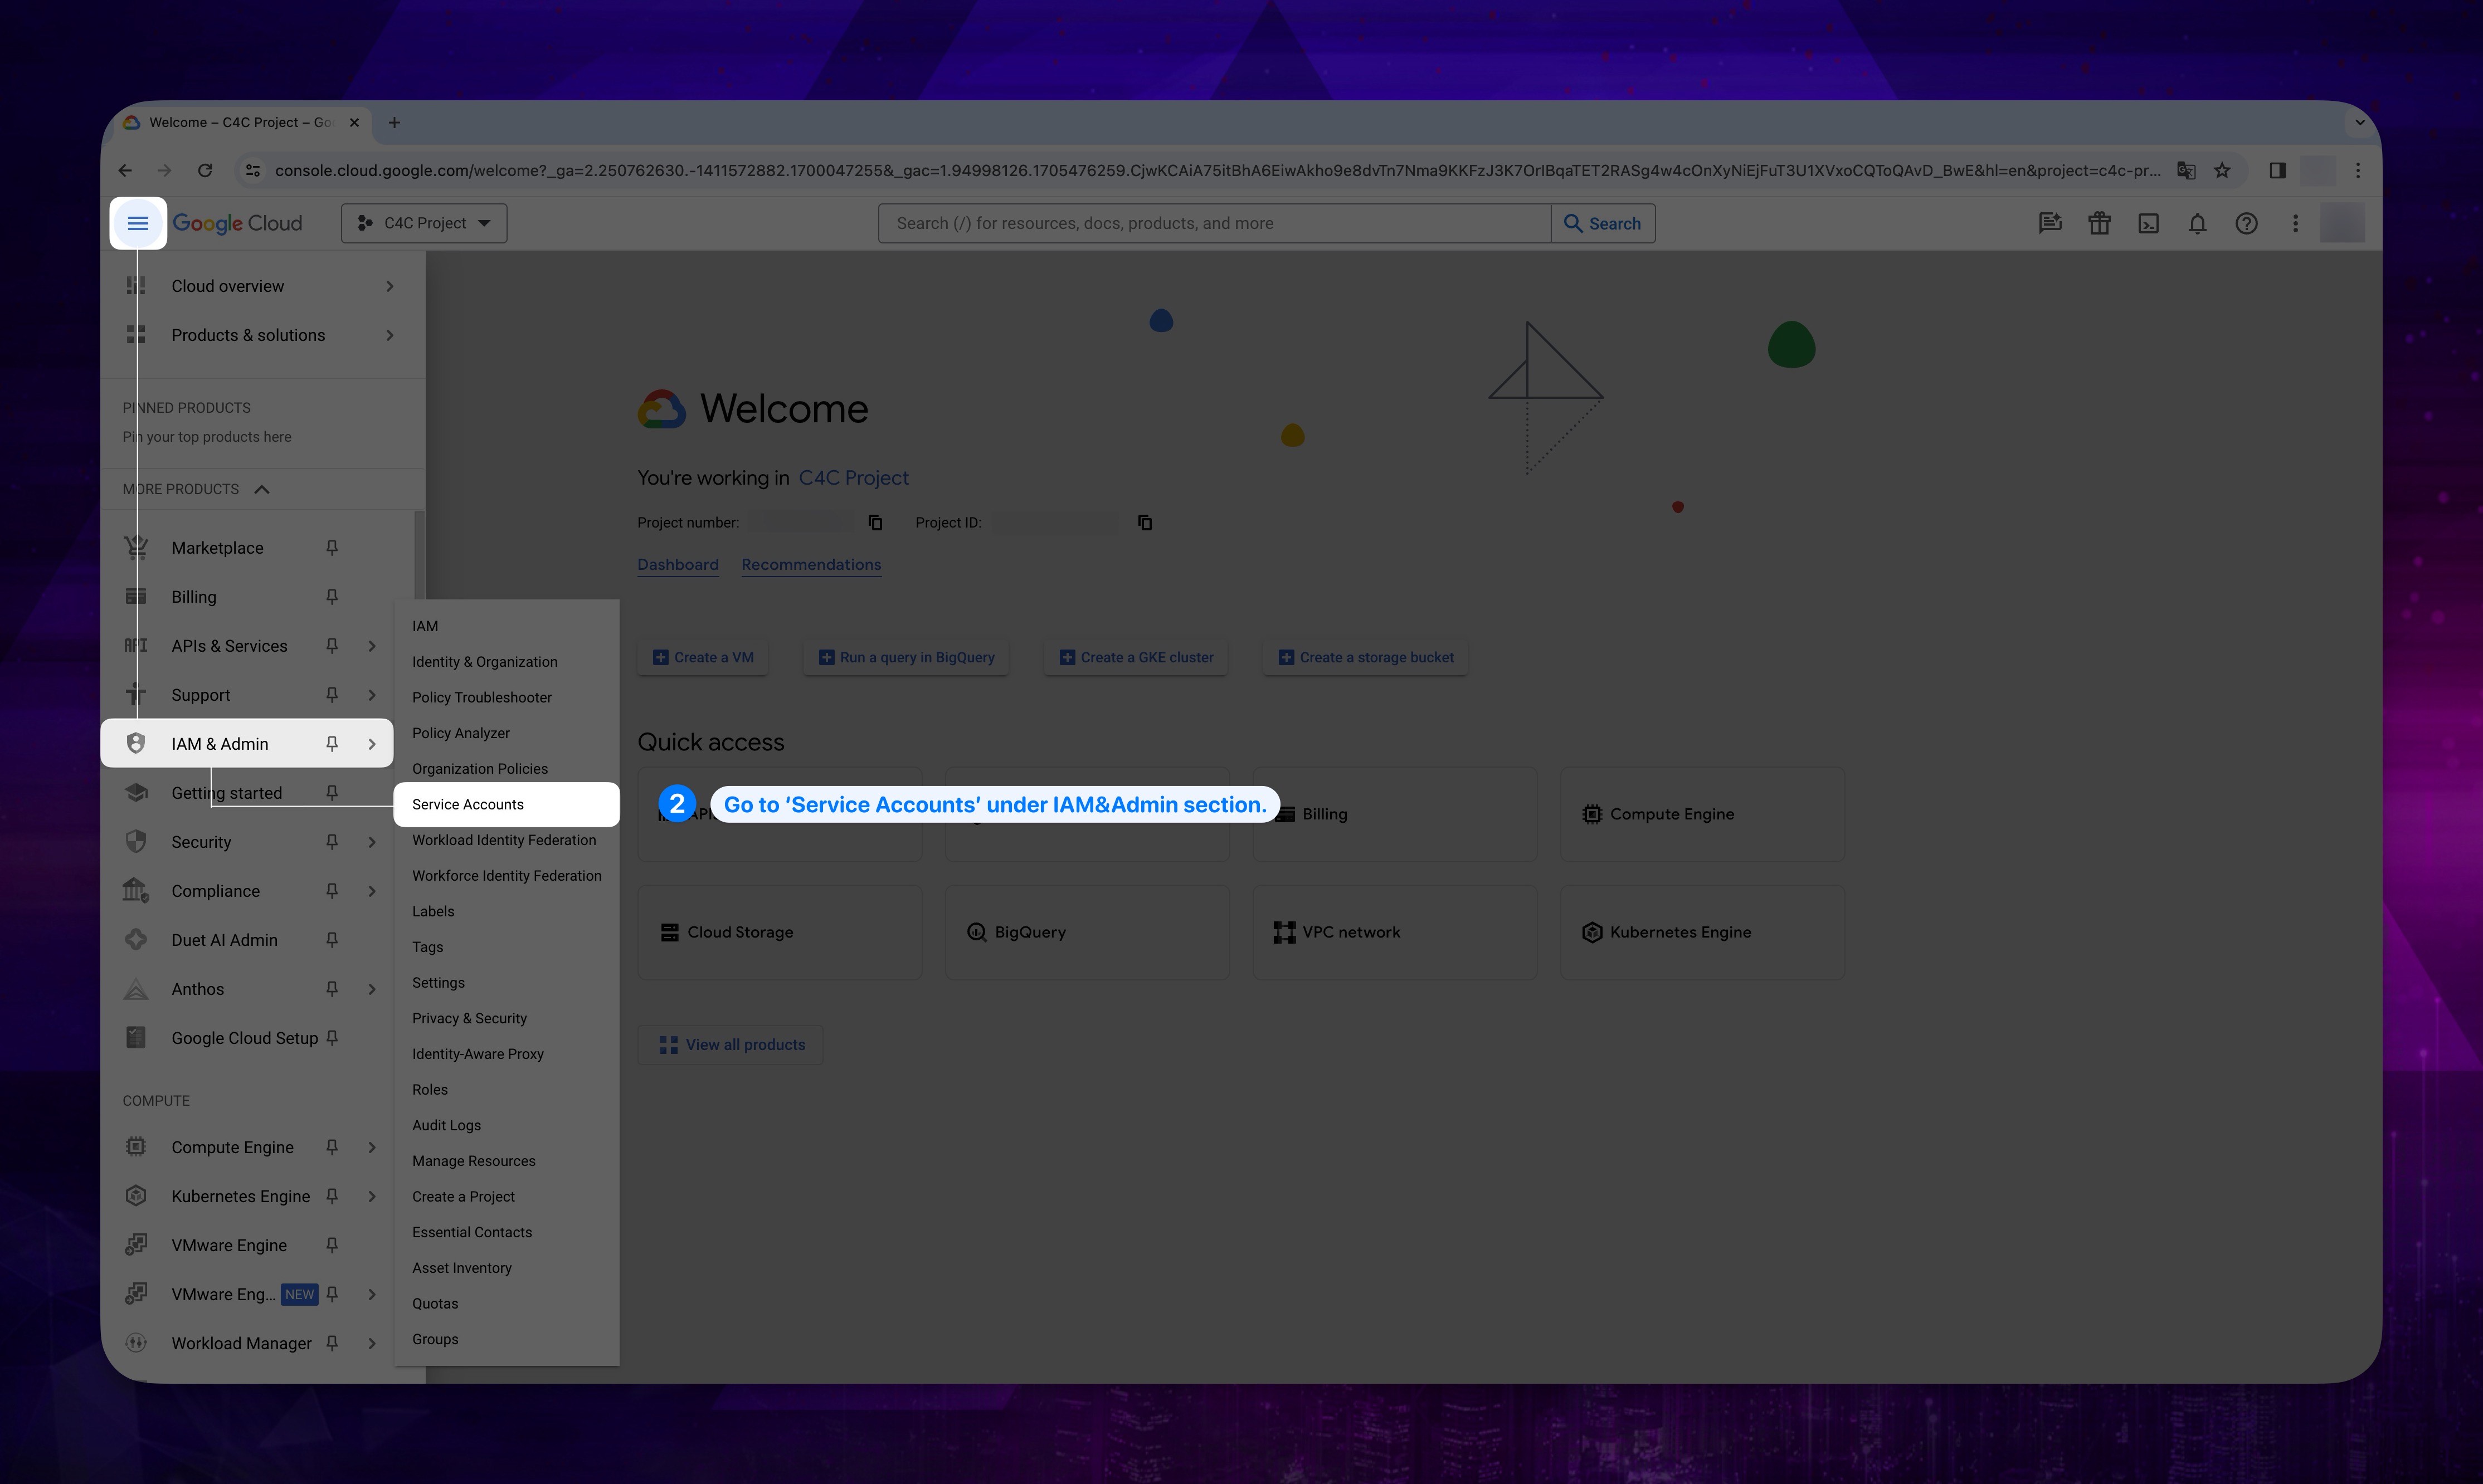
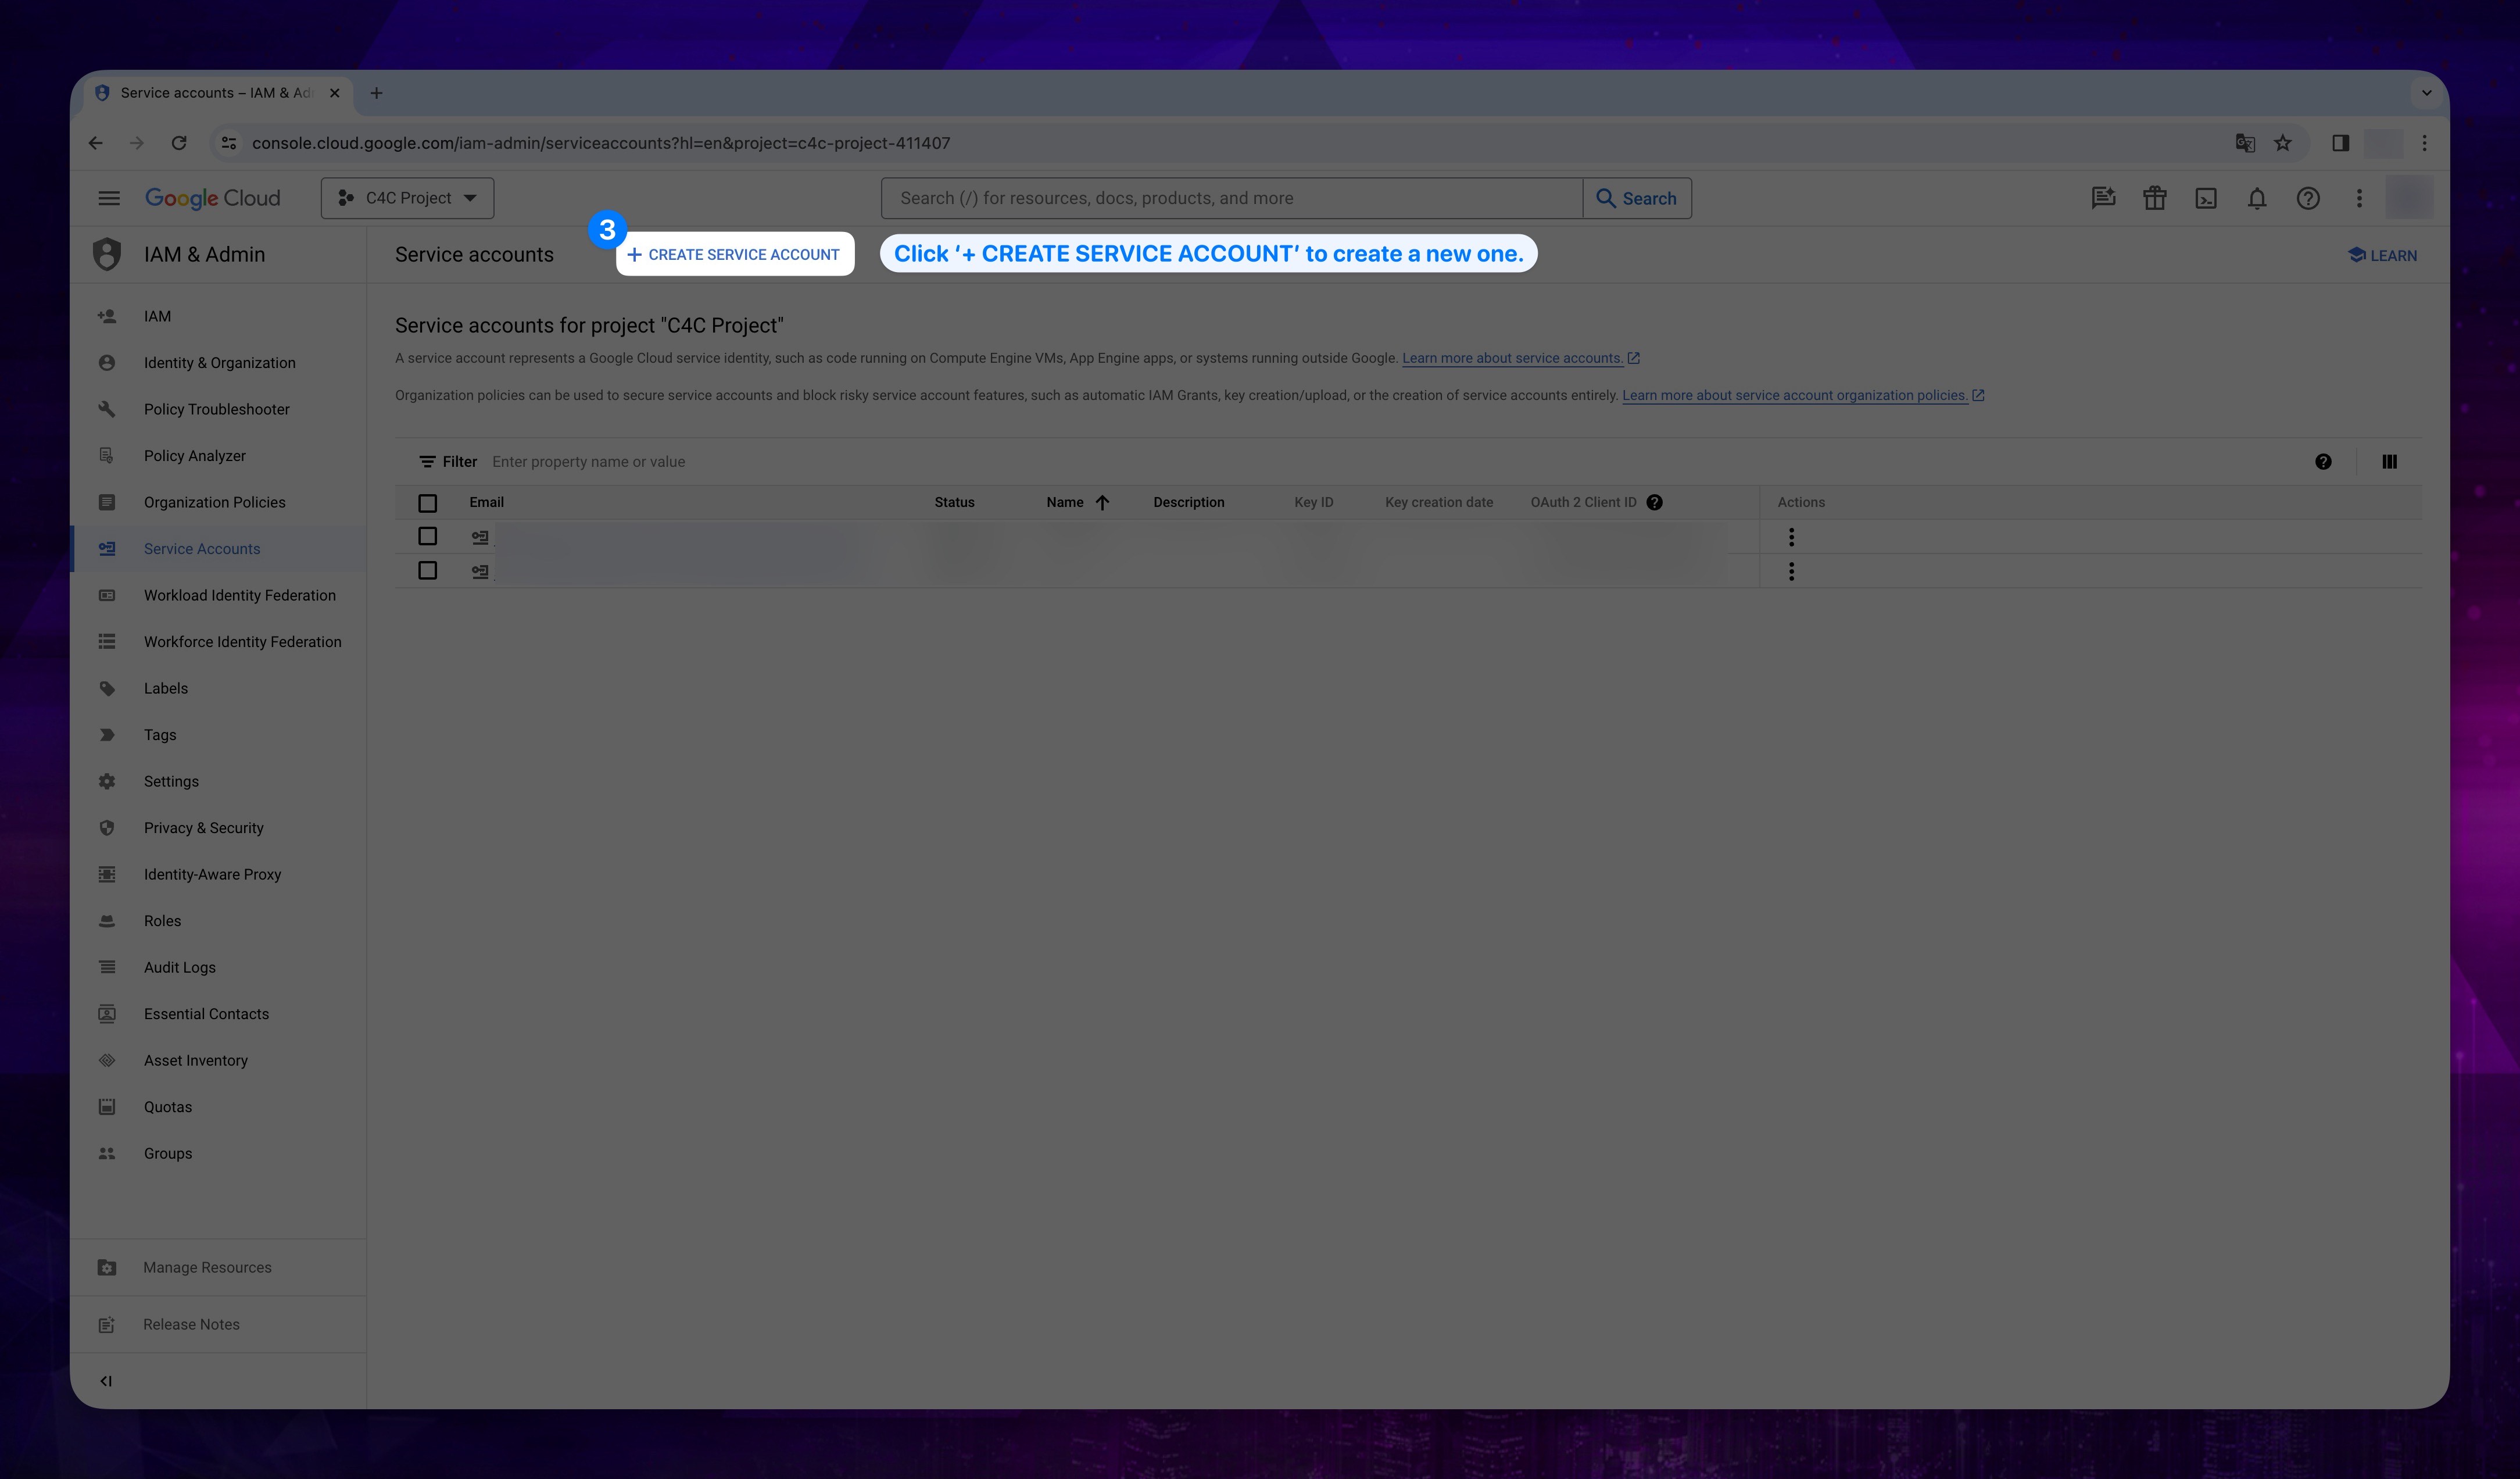
- Click CREATE SERVICE ACCOUNT button on the top.
Show the instruction with images
- Enter your Service account name, and it will generate a service account ID. After that click CREATE AND CONTINUE.
Show the instruction with images
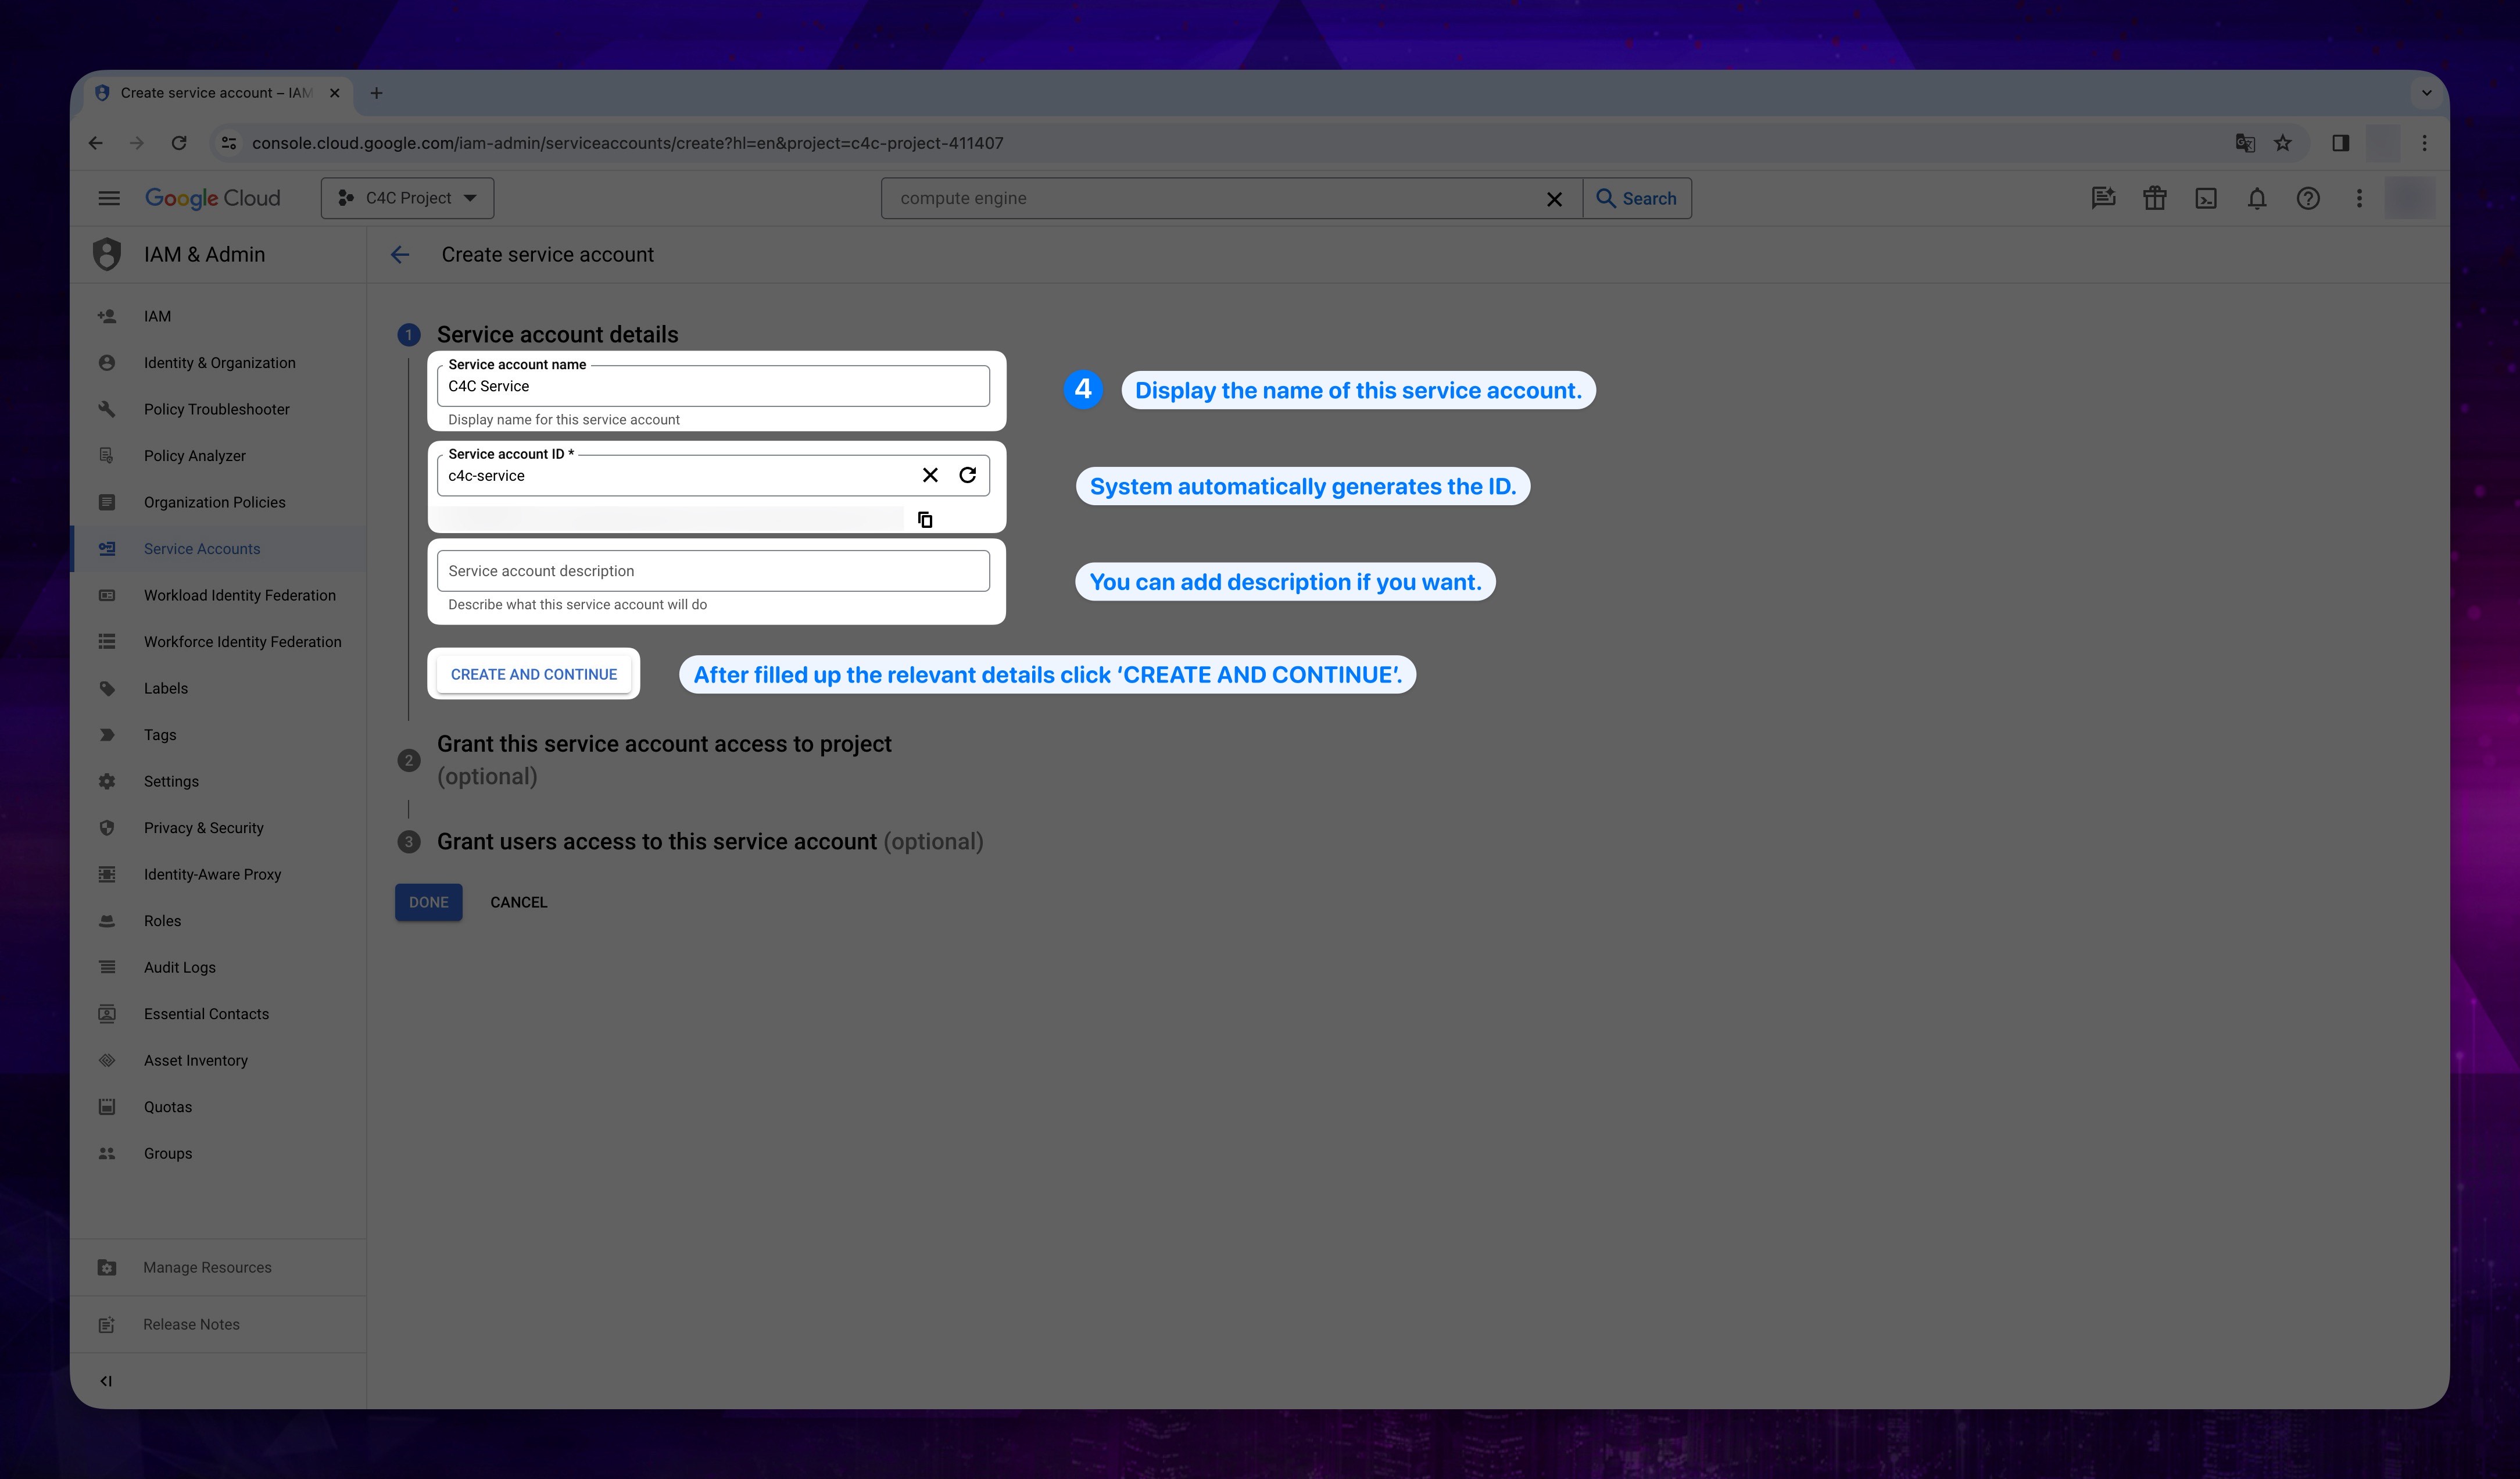
You can enter a description under Service account description to better identify the created account.
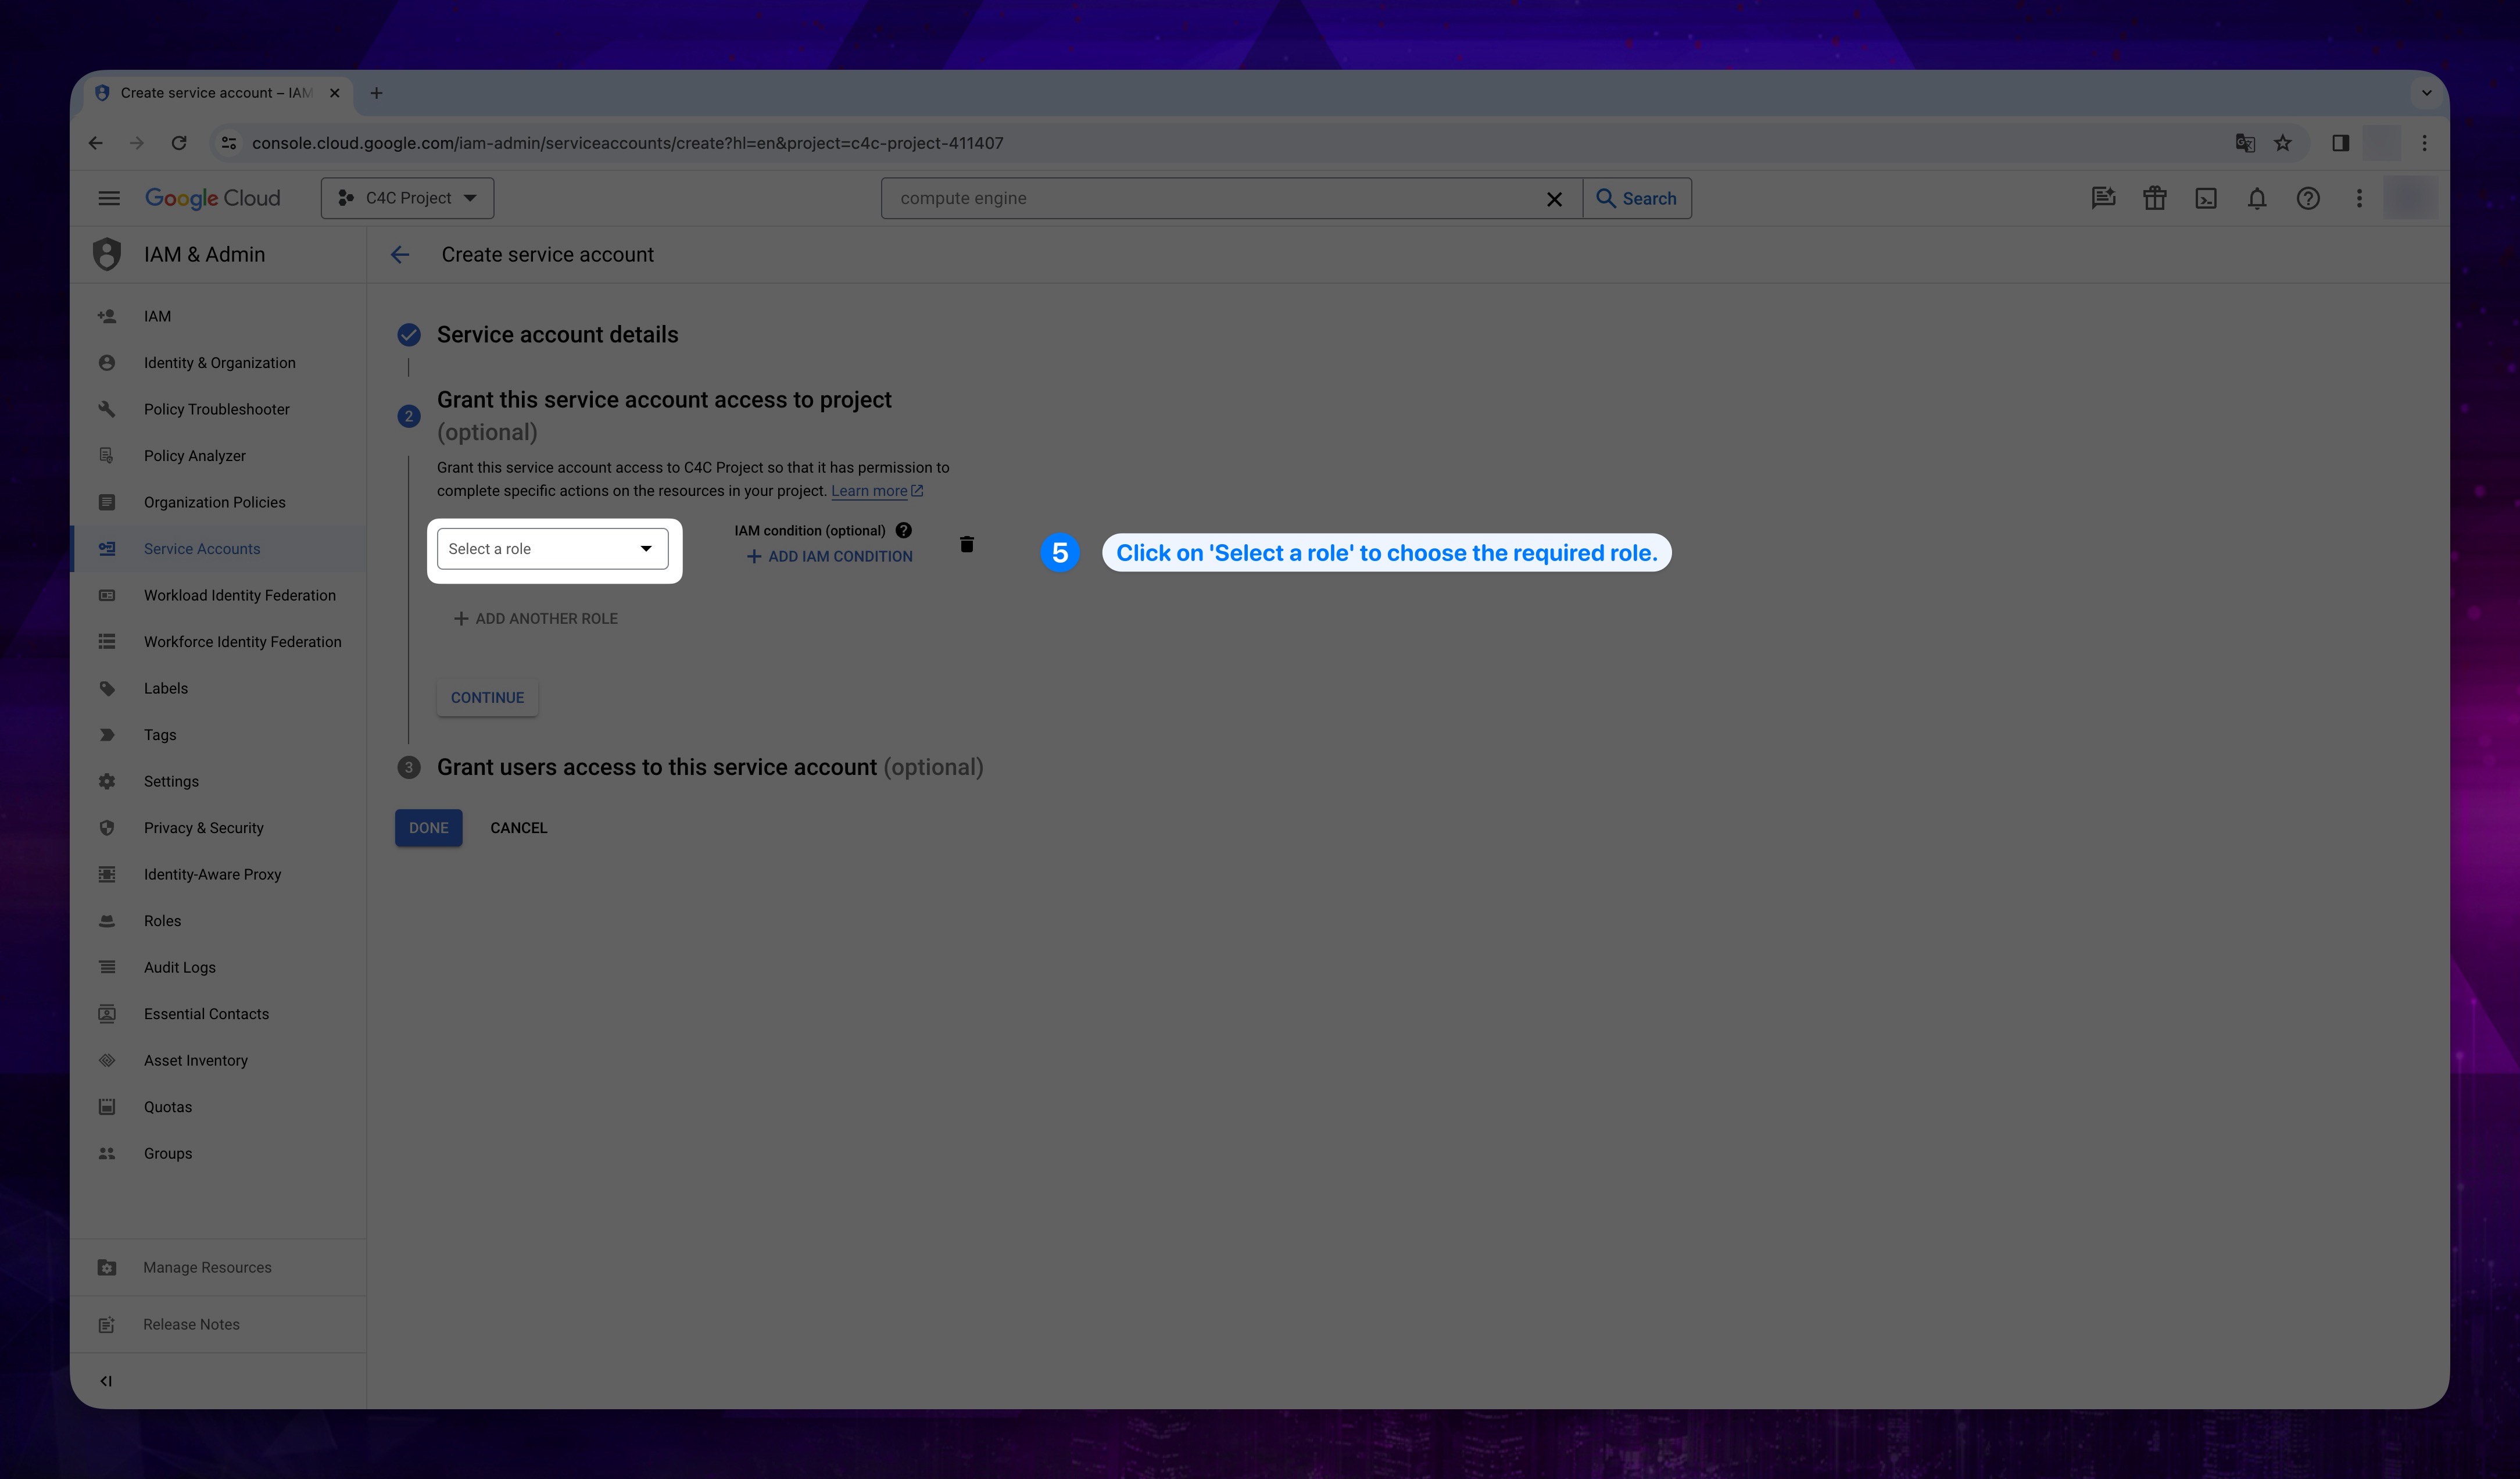
- In the second opened stage, click on Select a role and proceed according to the method you chose when creating the role:
- Manuel
- gcloudCLI
- If you chose to continue with Manuel method for creating the role, you should choose the role you created with the title you assign it under the Custom section.
- If you chose to continue with gcloud CLI method for creating the role, you should choose C4C Custom Role Billing Account under the Custom section.
Show the instruction with images
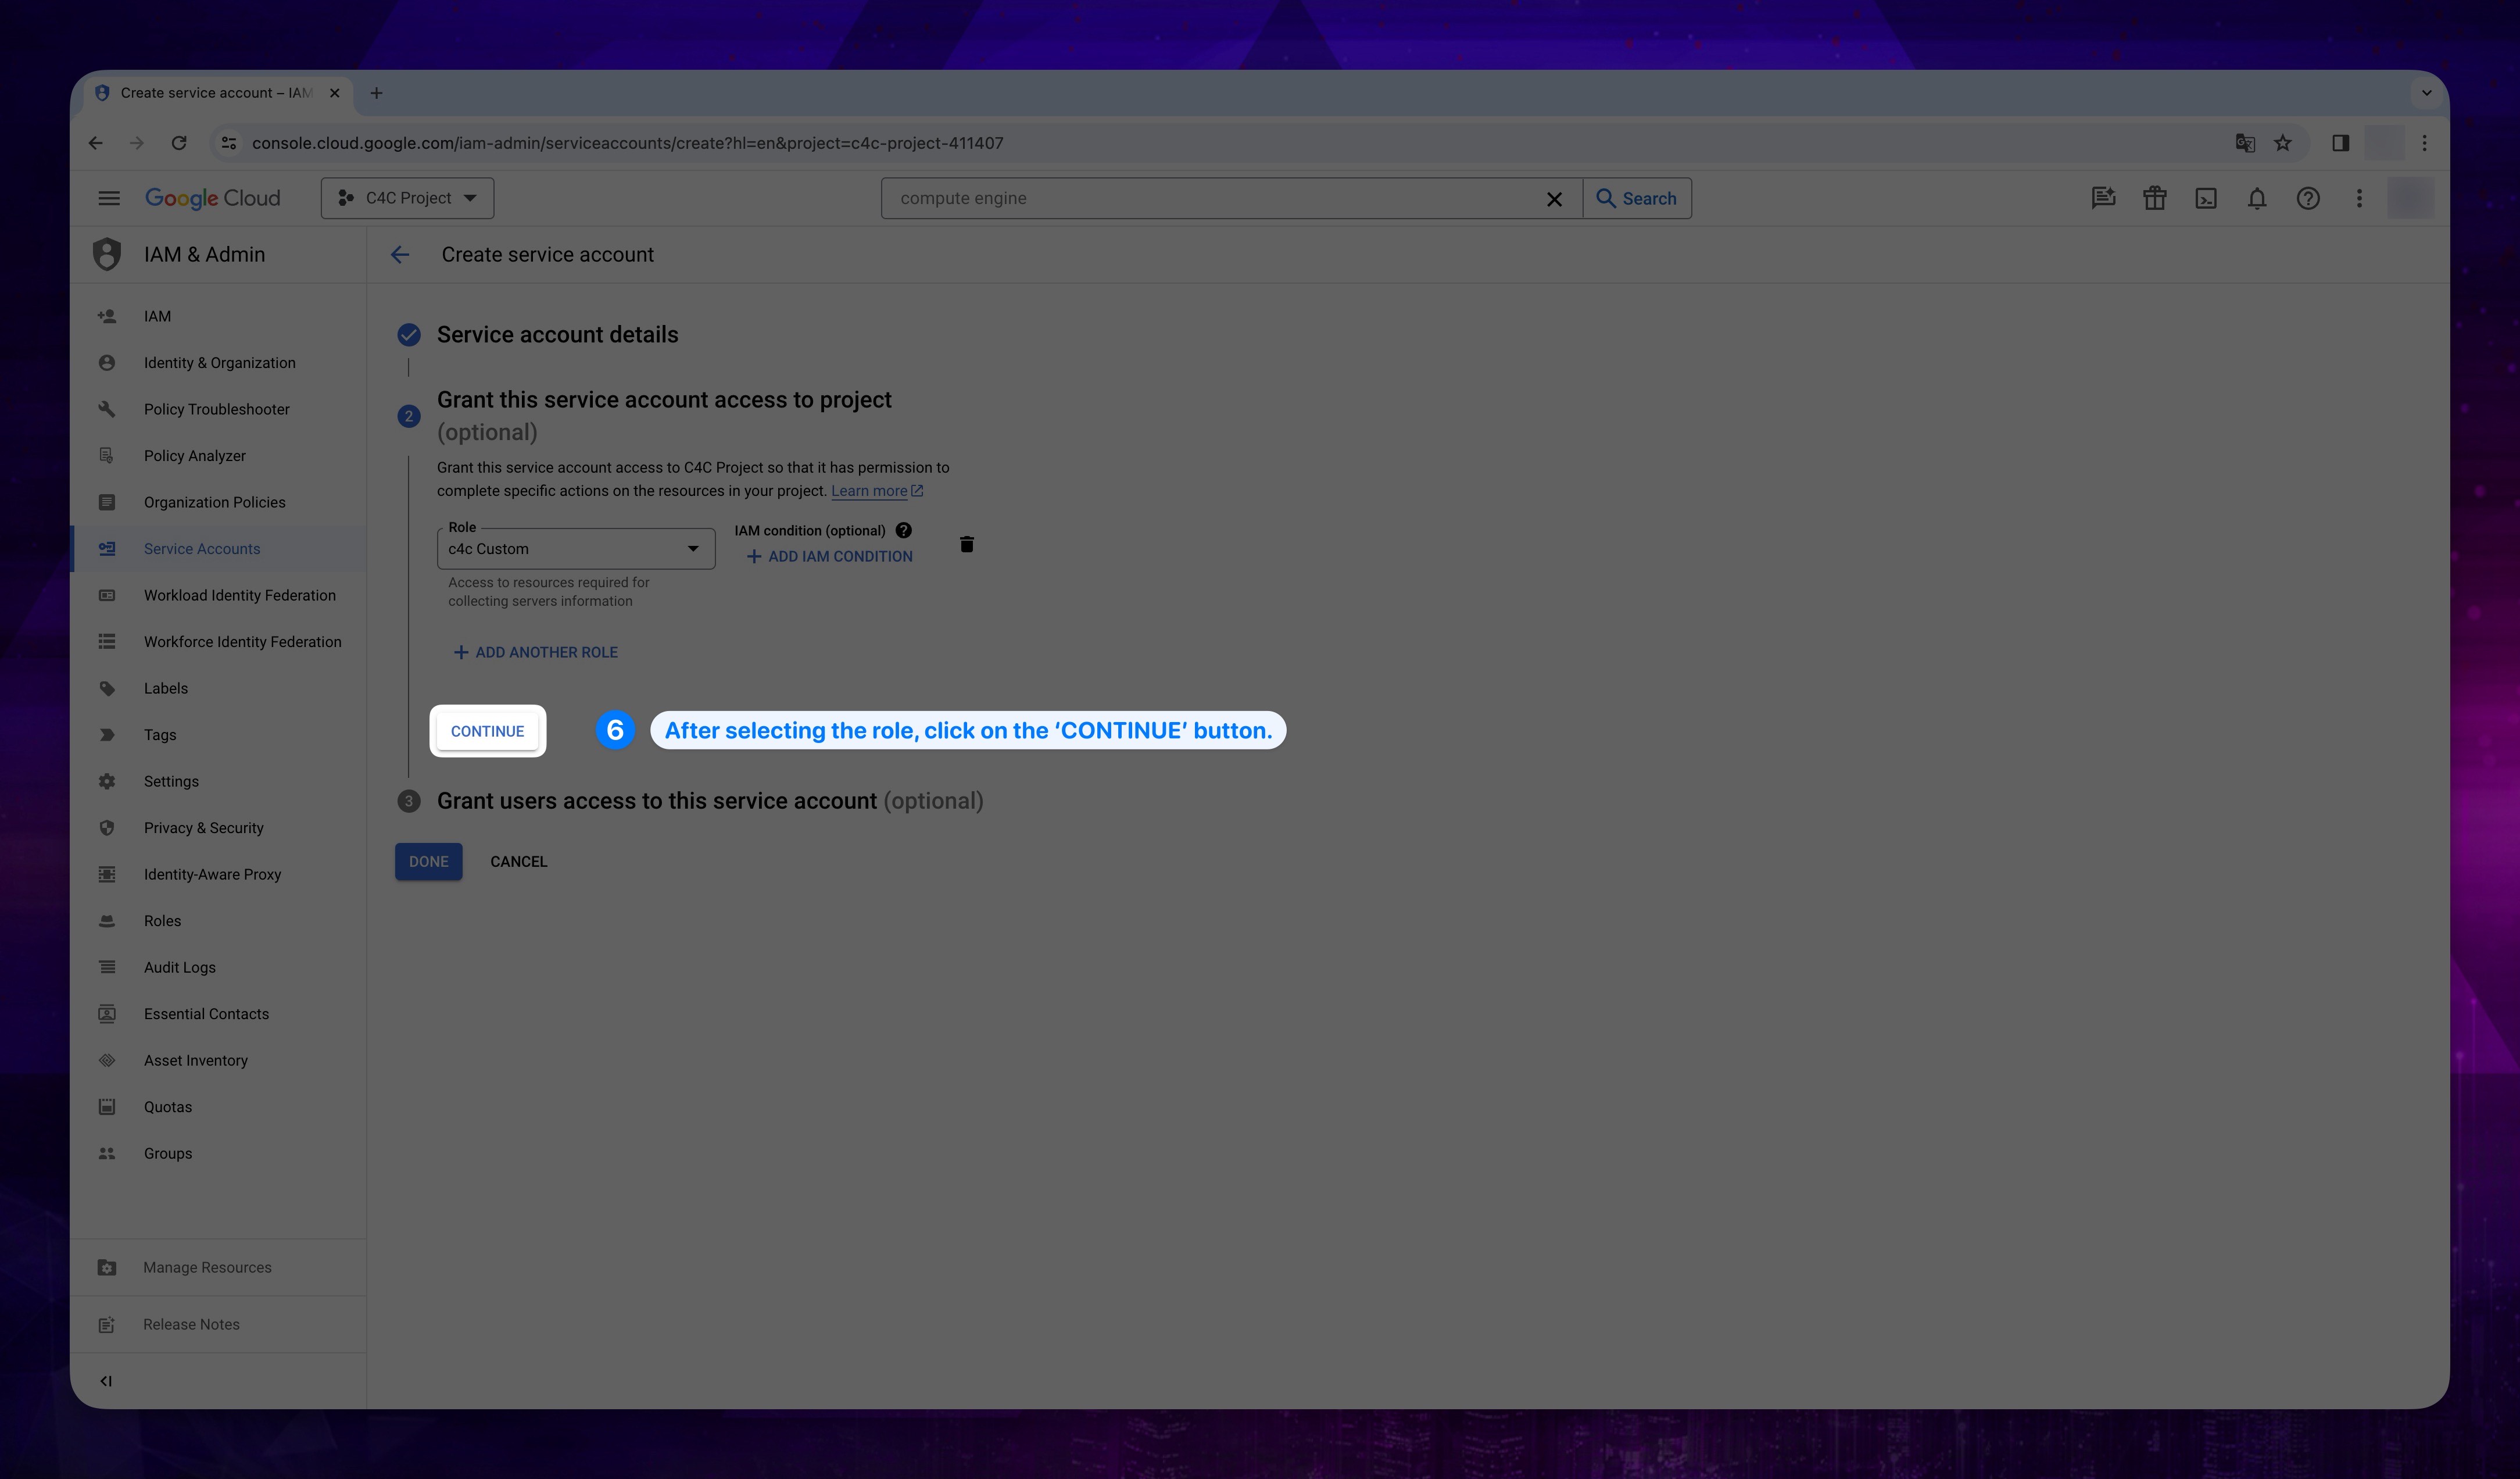
- After selecting the relevant roles, click on the CONTINUE button.
Show the instruction with images
-
Lastly, click DONE.
tipAfter clicking the Done button, you should find yourself back in the Service Accounts page. However, if you are not, click on the Service Accounts section again from the menu on the left.
Show the instruction with images
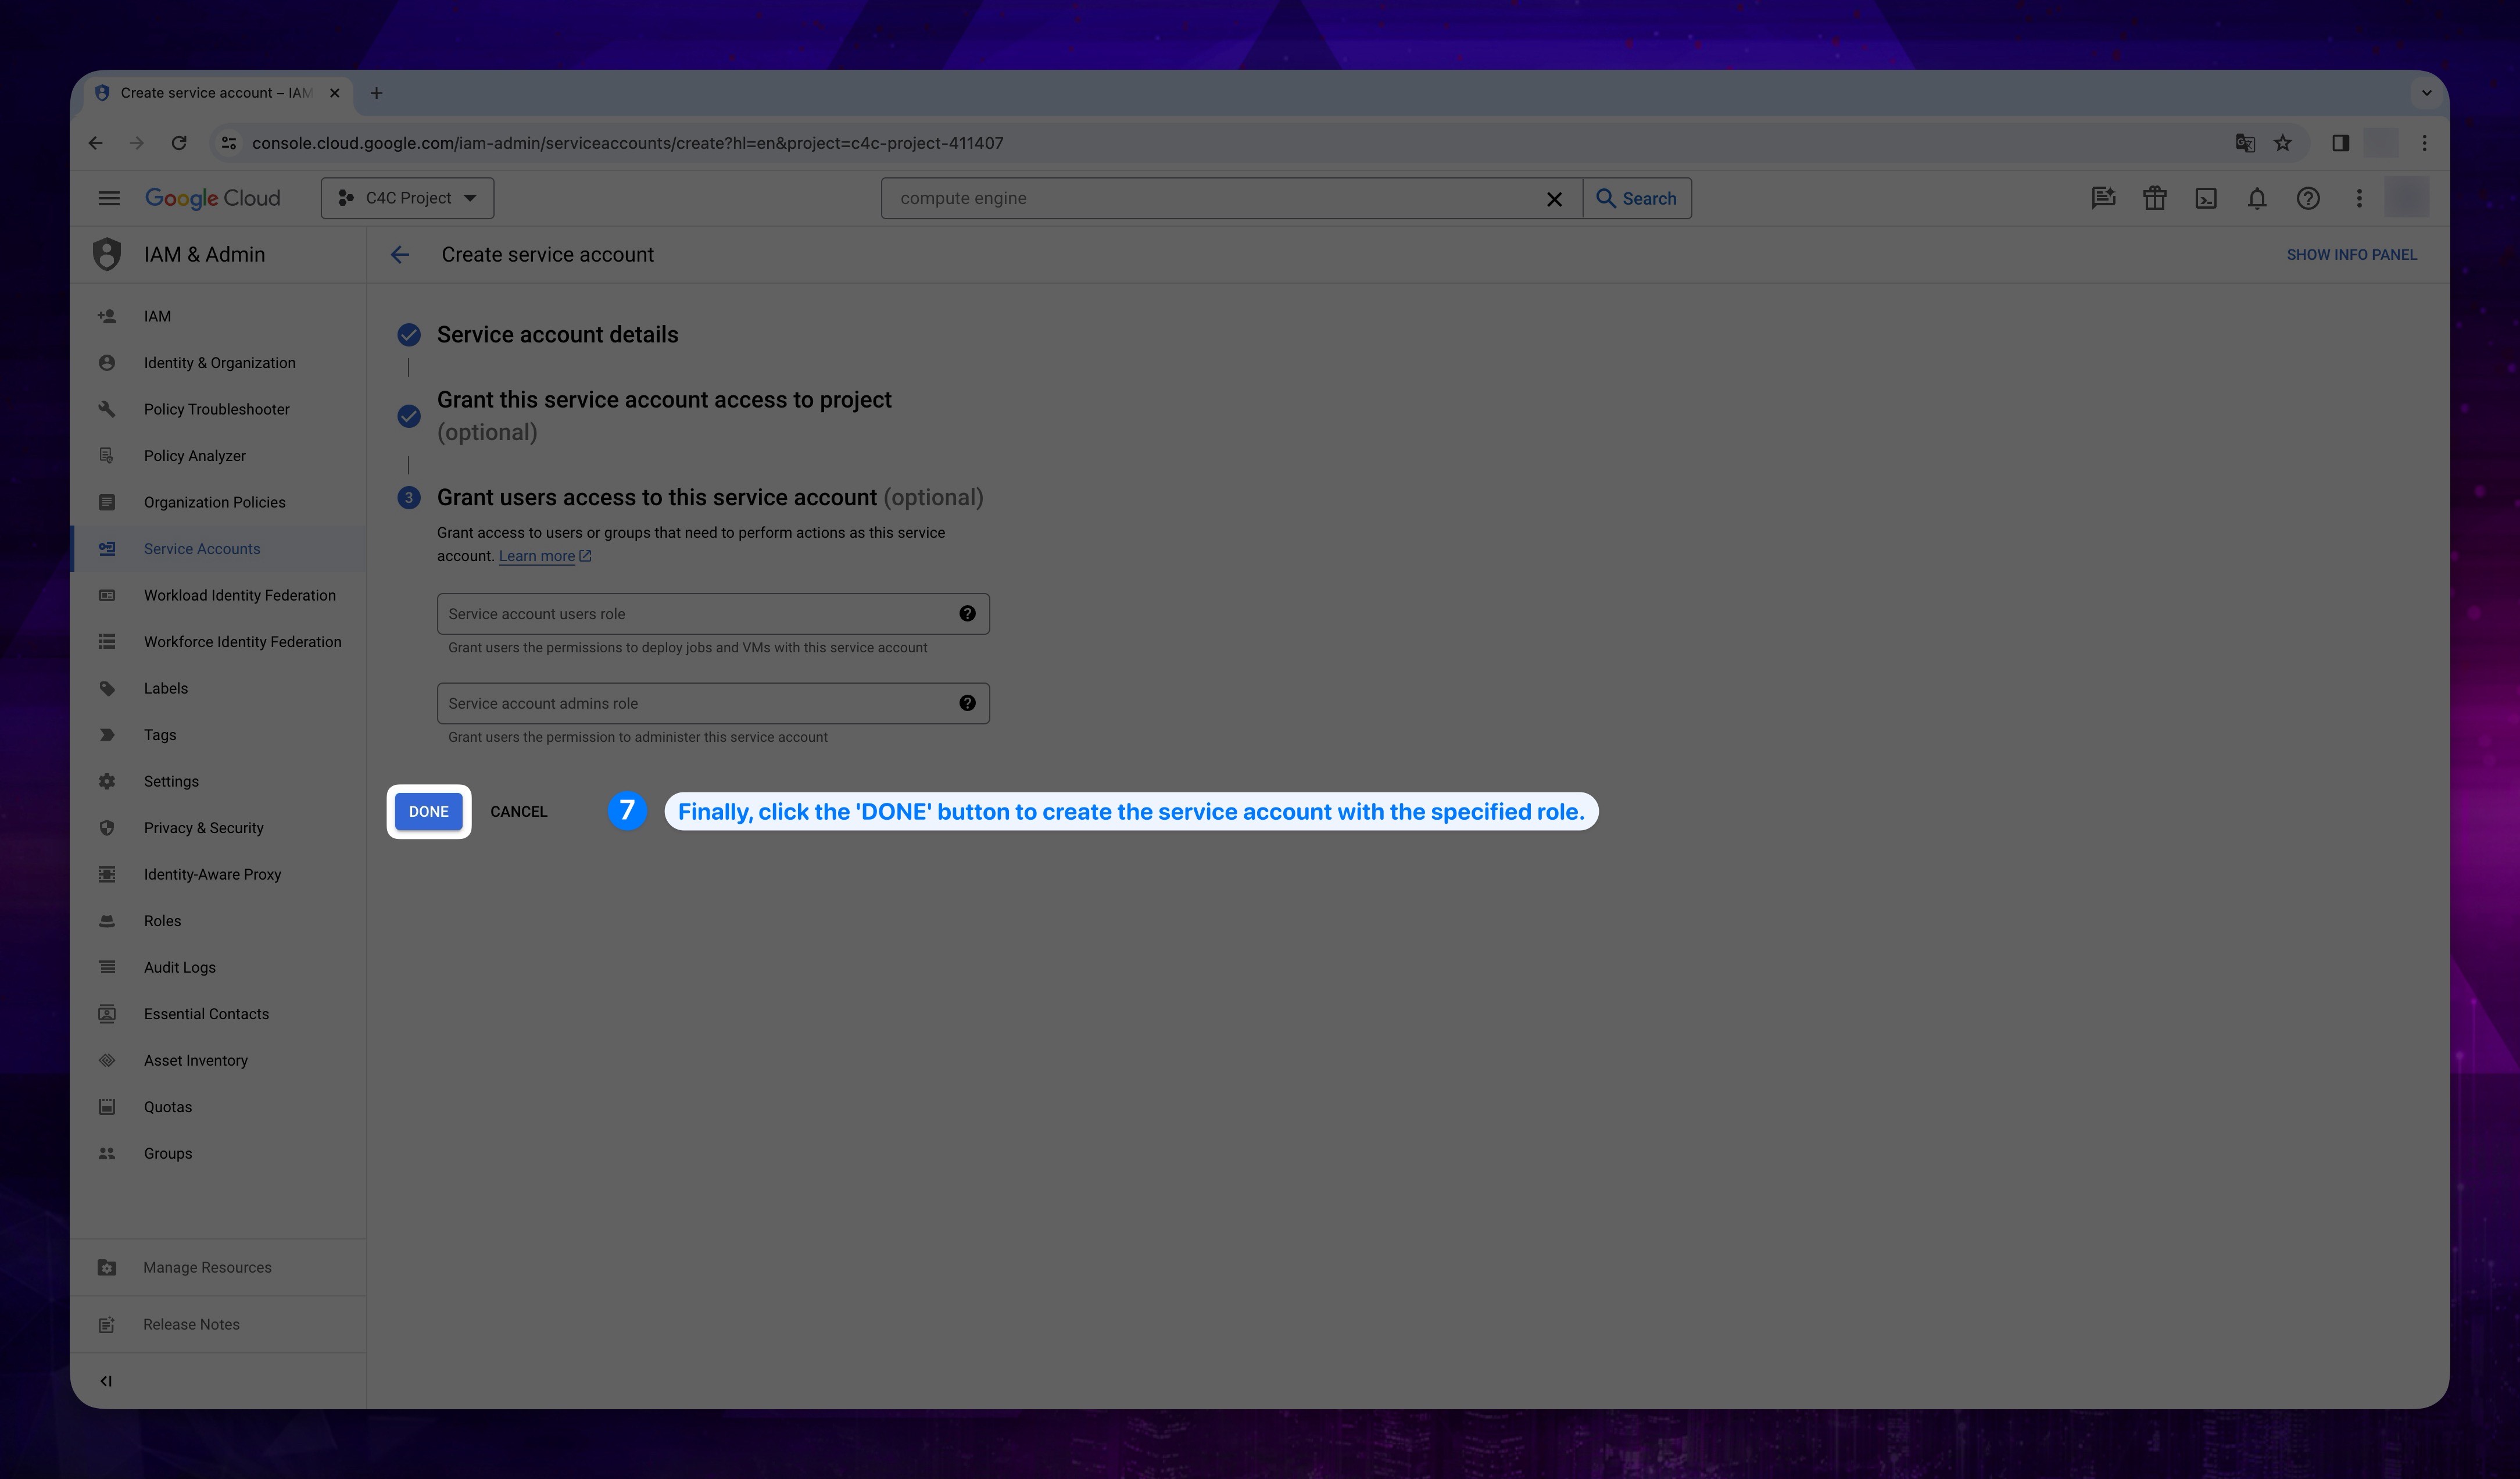
Check from the list whether your service account has been created or not.
4. Obtaining Key
In this section, we will create the key file that we need in our platform.
-
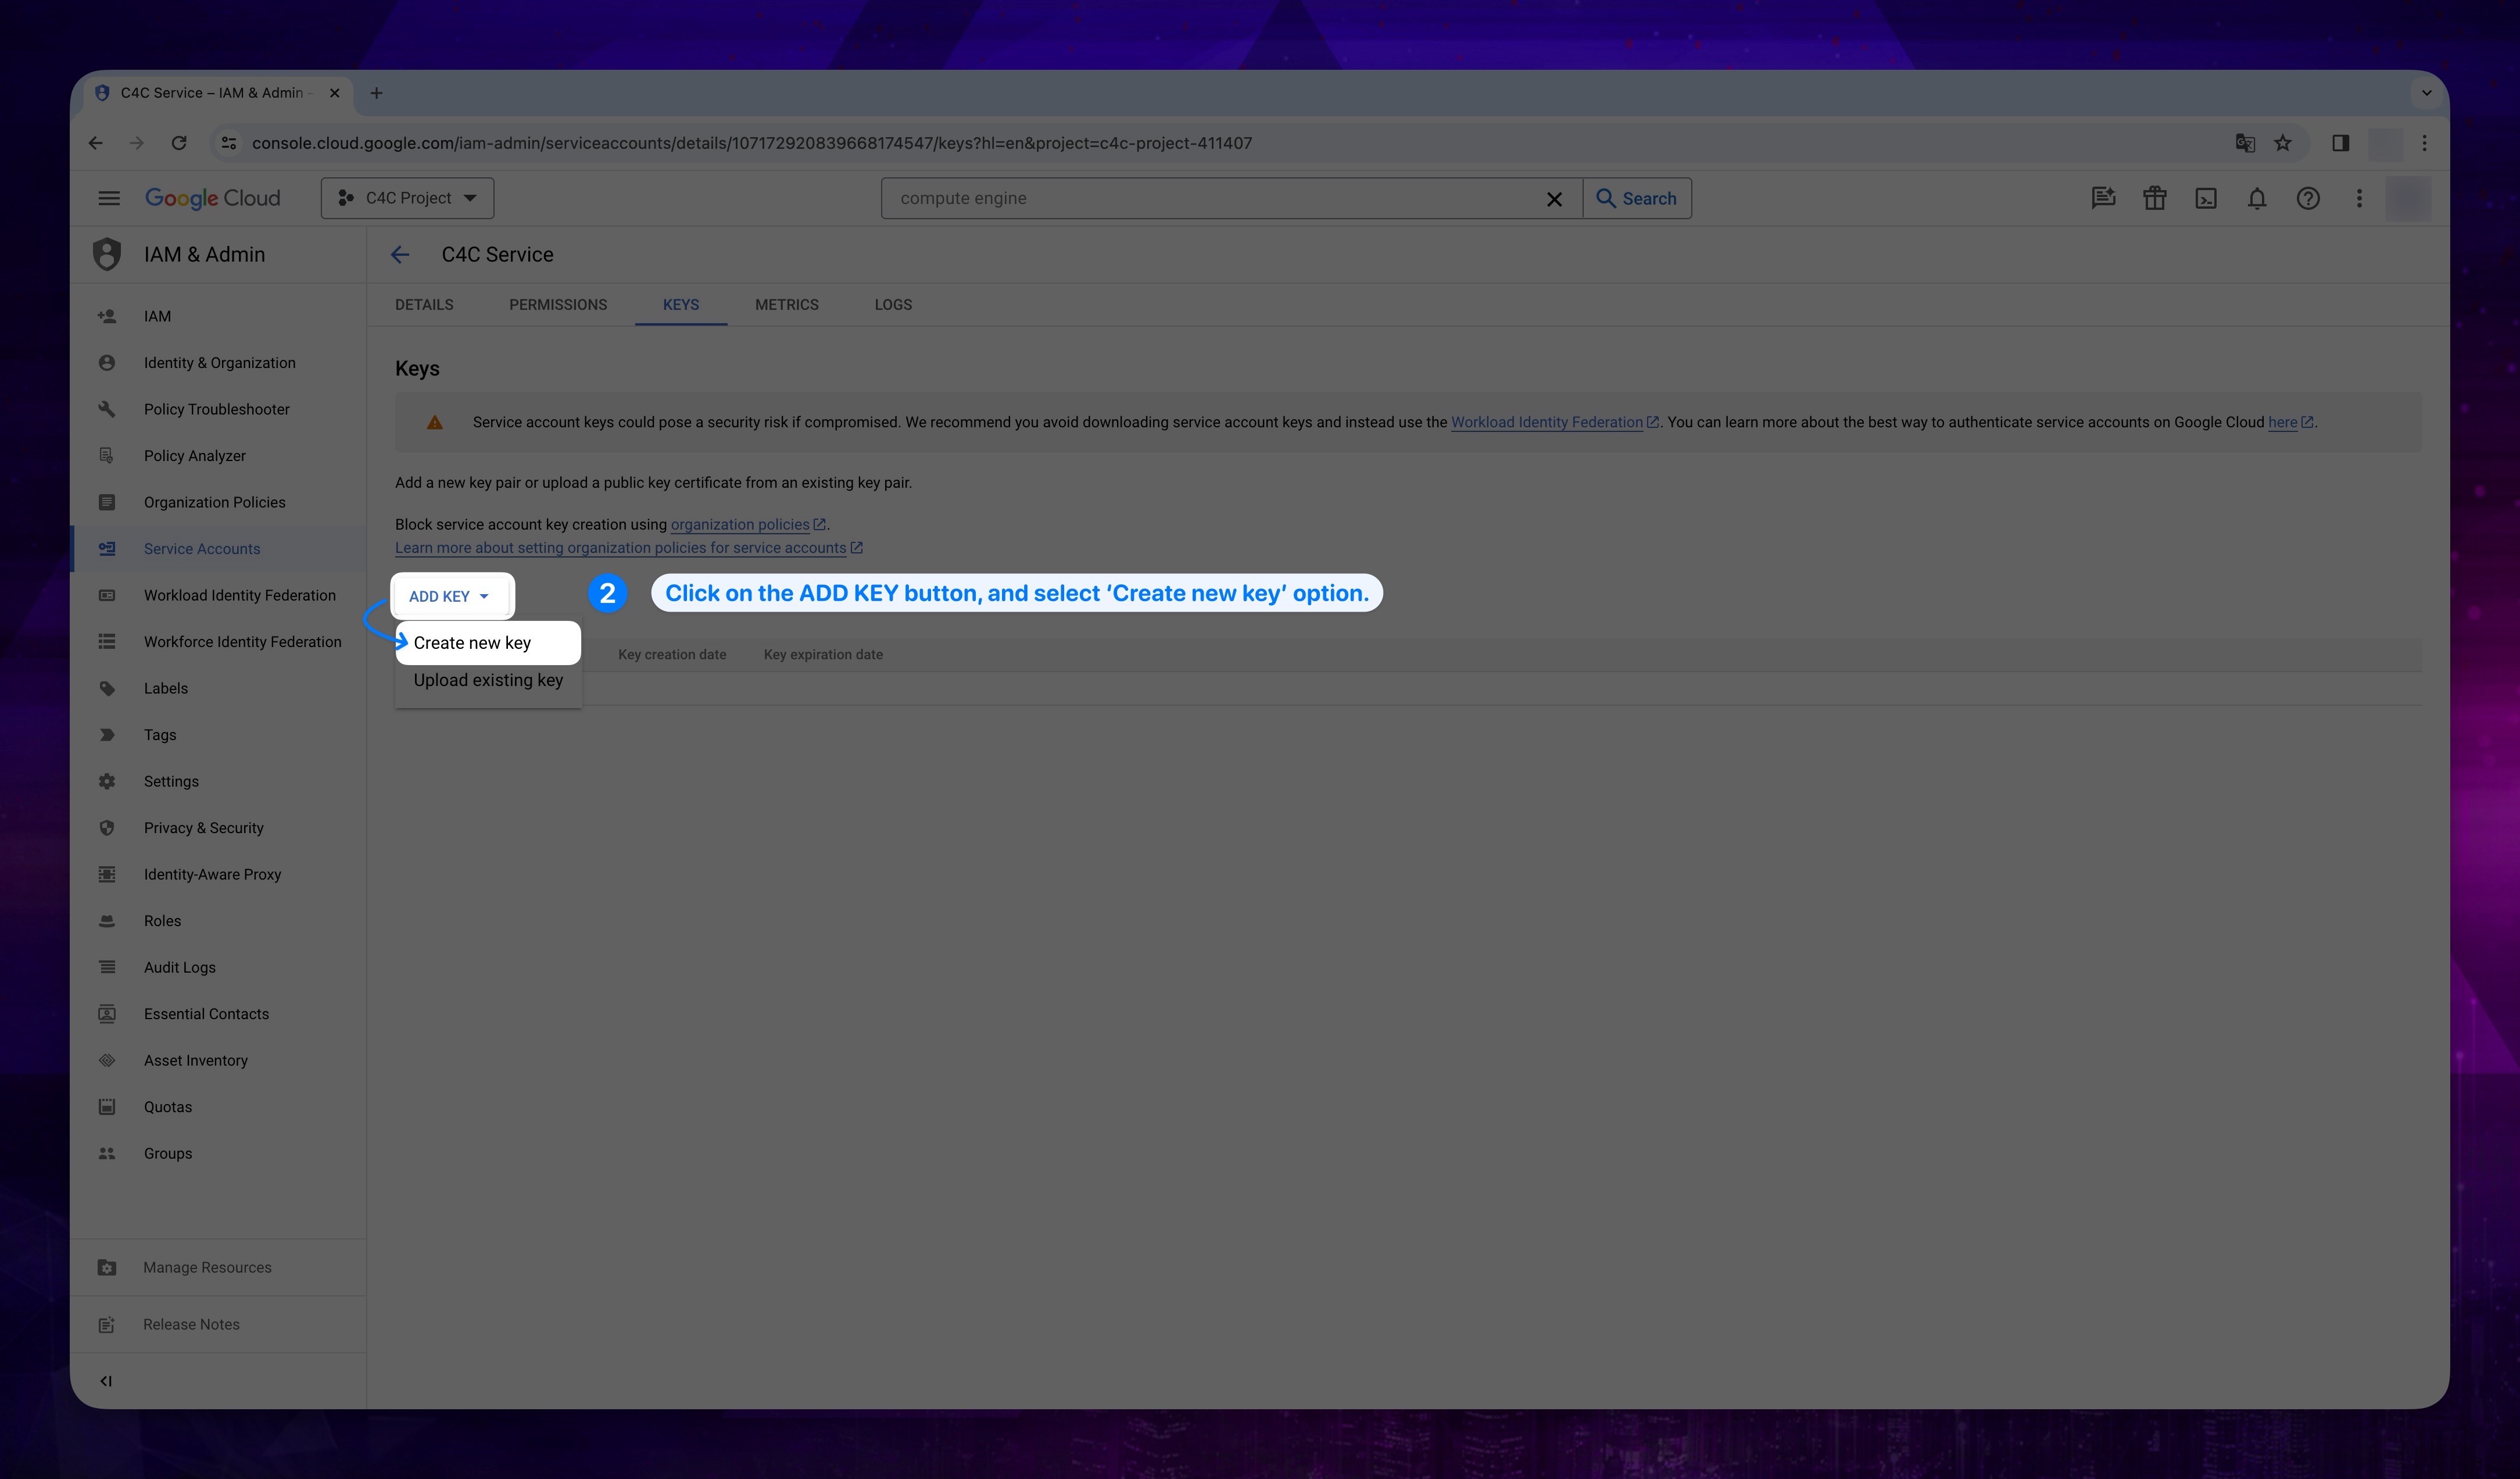
Locate the user we created on the Service Accounts page. Navigate to the Actions tab for the respective user, and click on the Three dots(...) button and select Manage keys.
-
Click on the ADD KEY button on the opened page, and select Create new key.
Show the instruction with images
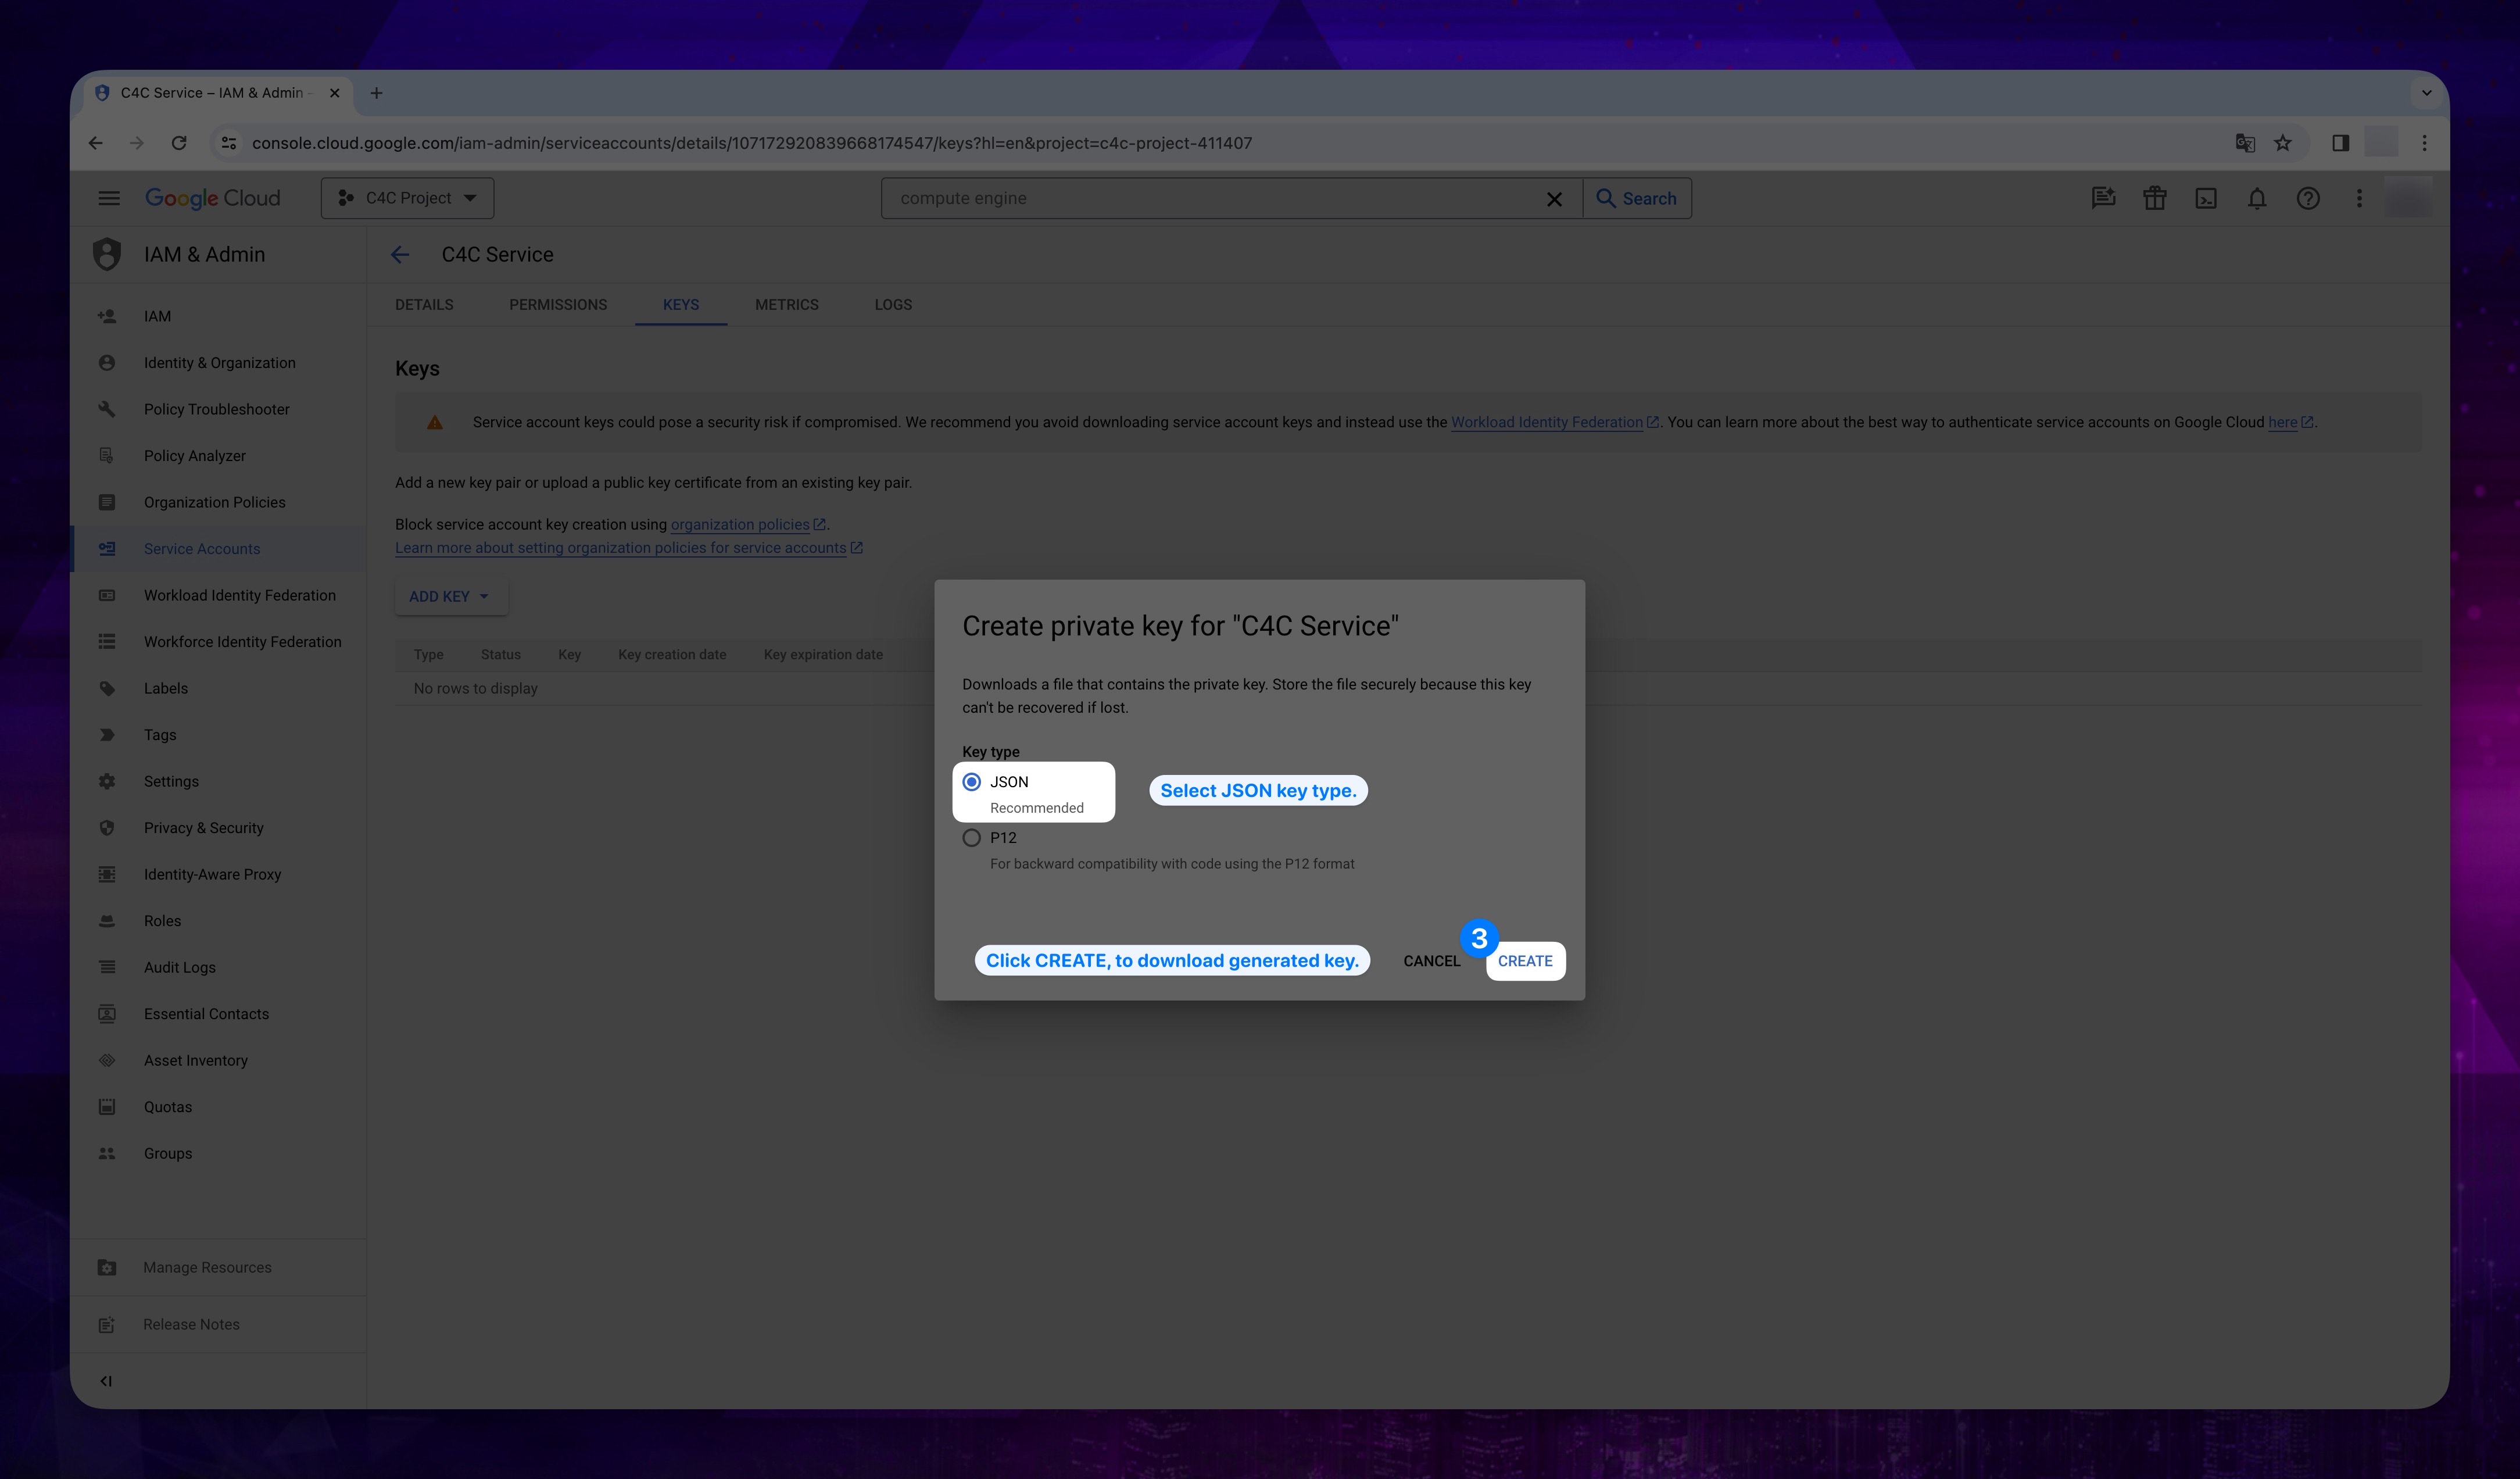
- When creating credentials, please note that our system currently only accepts credentials in JSON format, so make sure to select the JSON key type. After that, click CREATE, and the generated key will be downloaded to your computer.
Show the instruction with images
Do not forget to check your downloads. Make sure you keep the downloaded credential file in a reachable field.
5. Check Billing Account Permissions
First of all your account should have access to the Billing Account. For provide or check that you can follow the below steps.
-
Log in to the Google Cloud Console.
-
Navigate to the Billing section. This might be labeled as Billing or Billing & Cost Management in the left-hand menu, depending on your setup.
Show the instruction with images
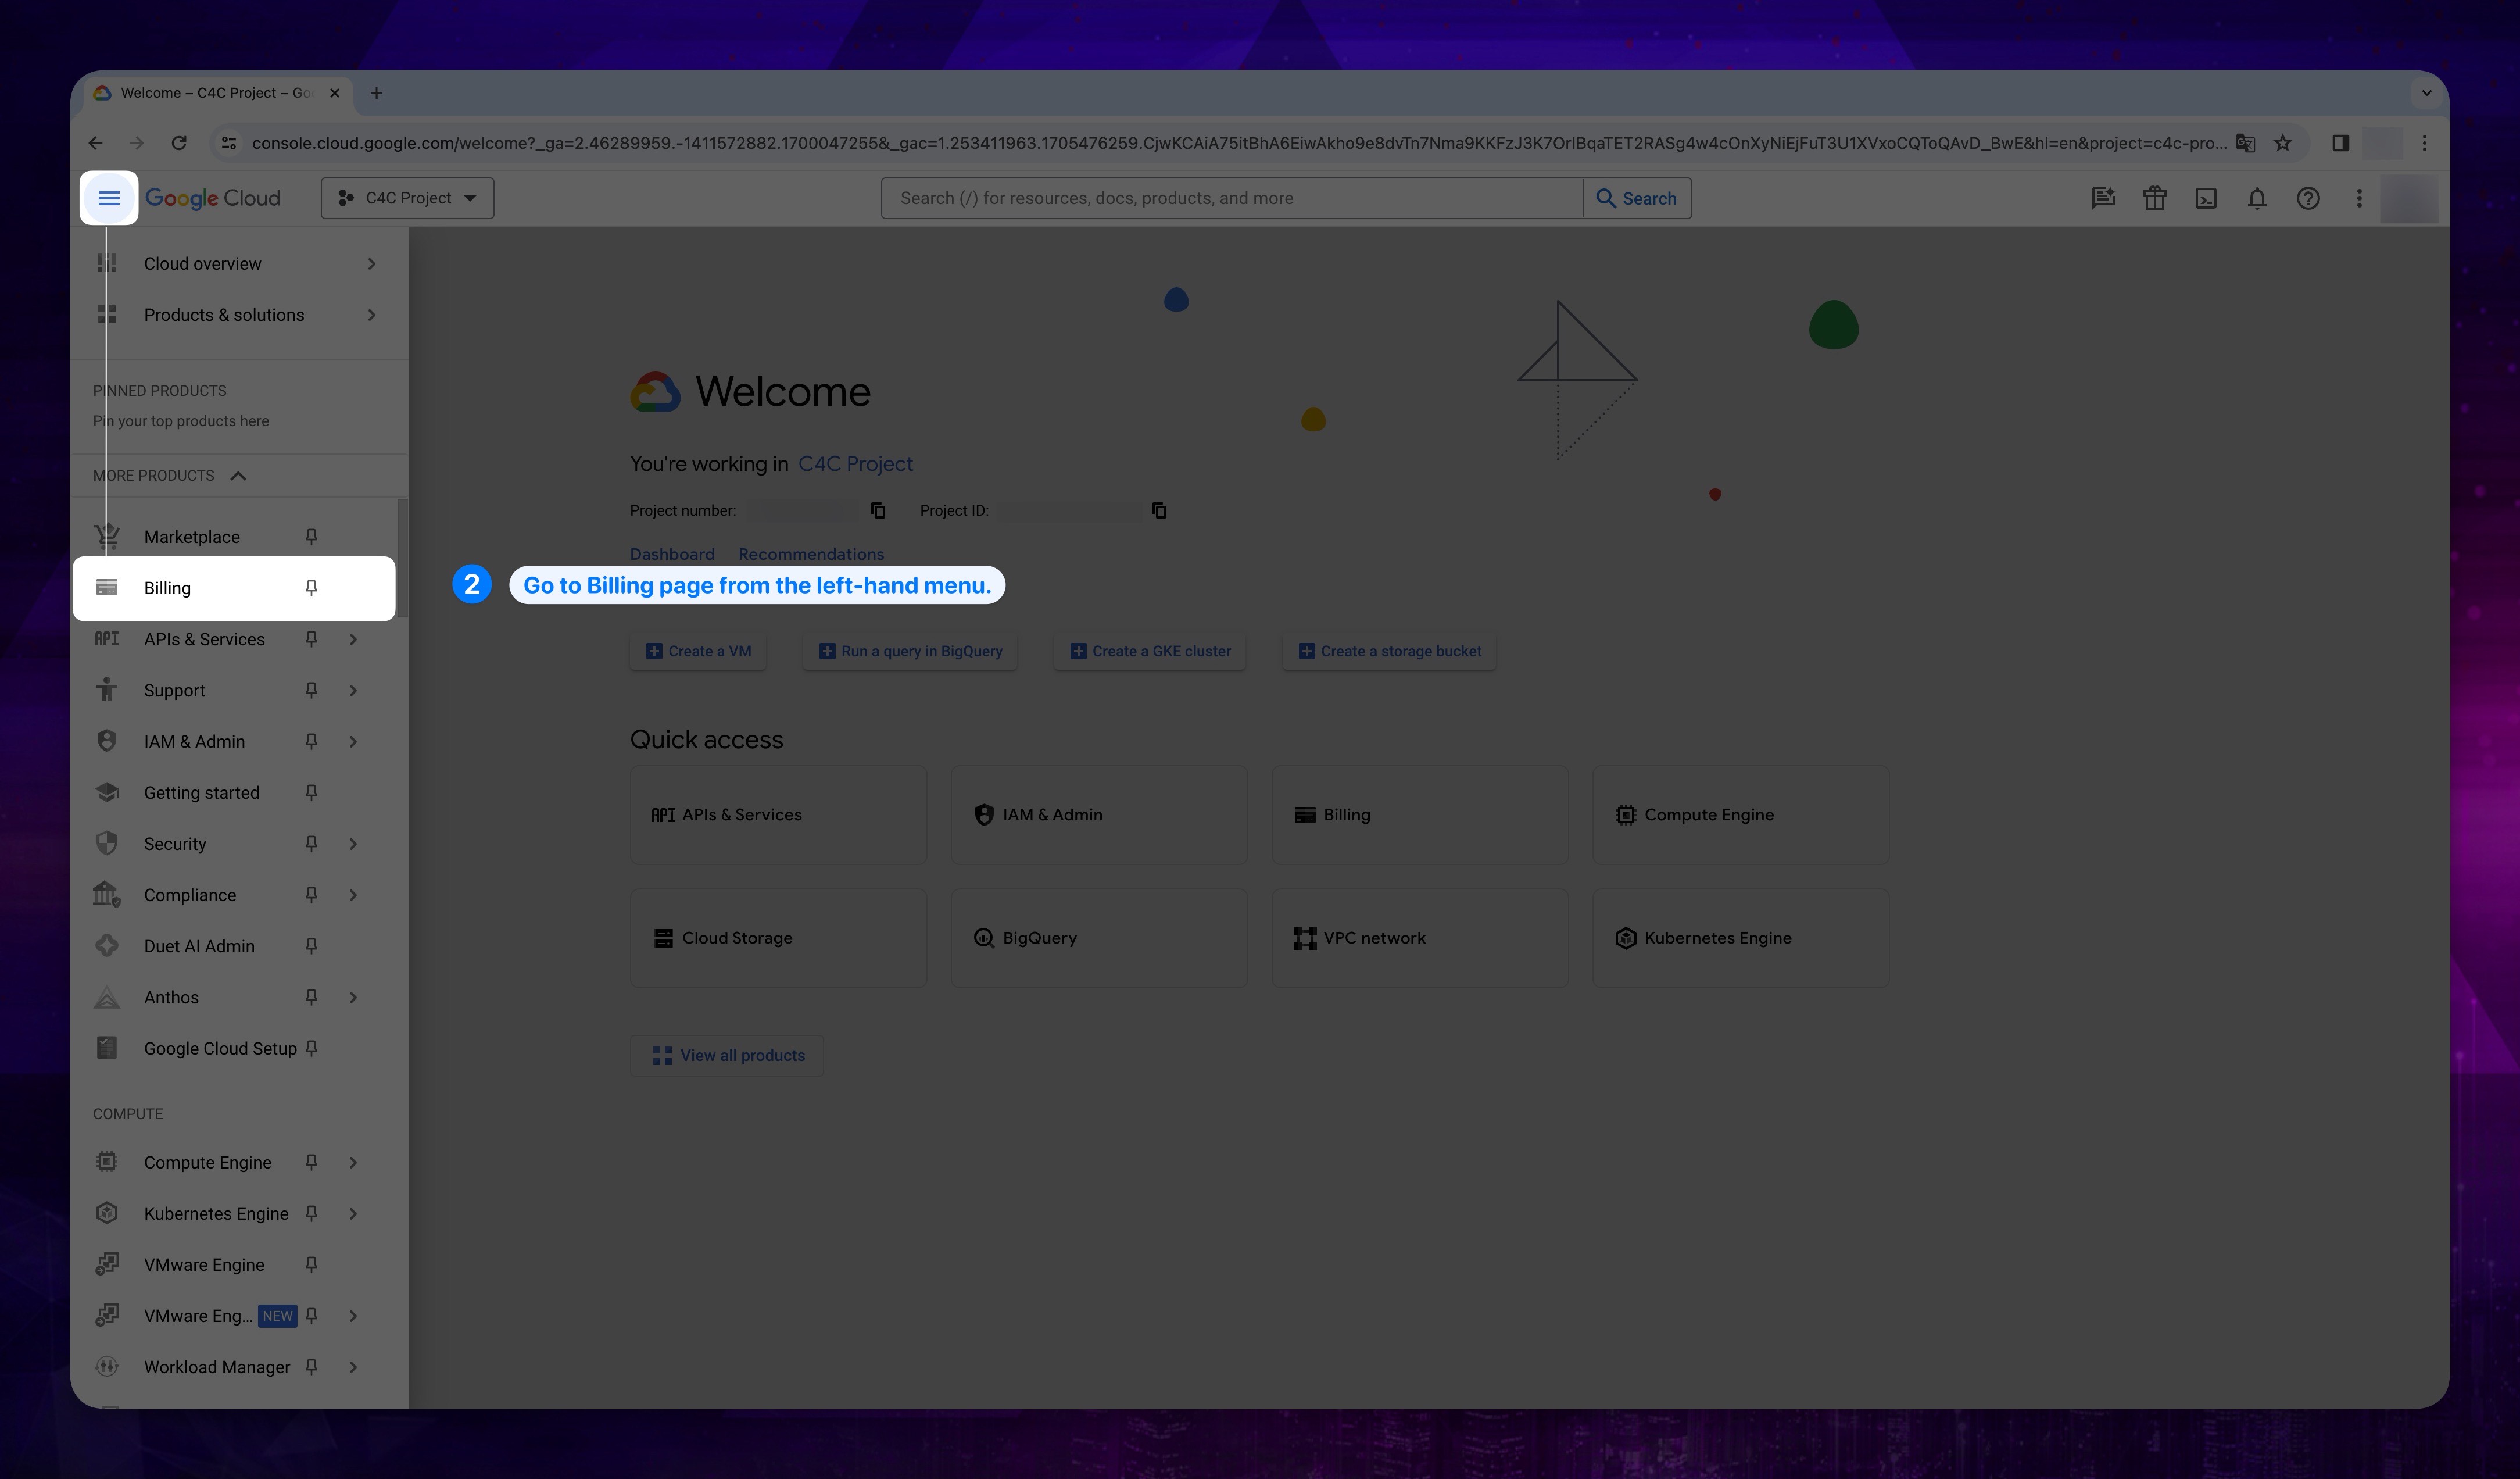
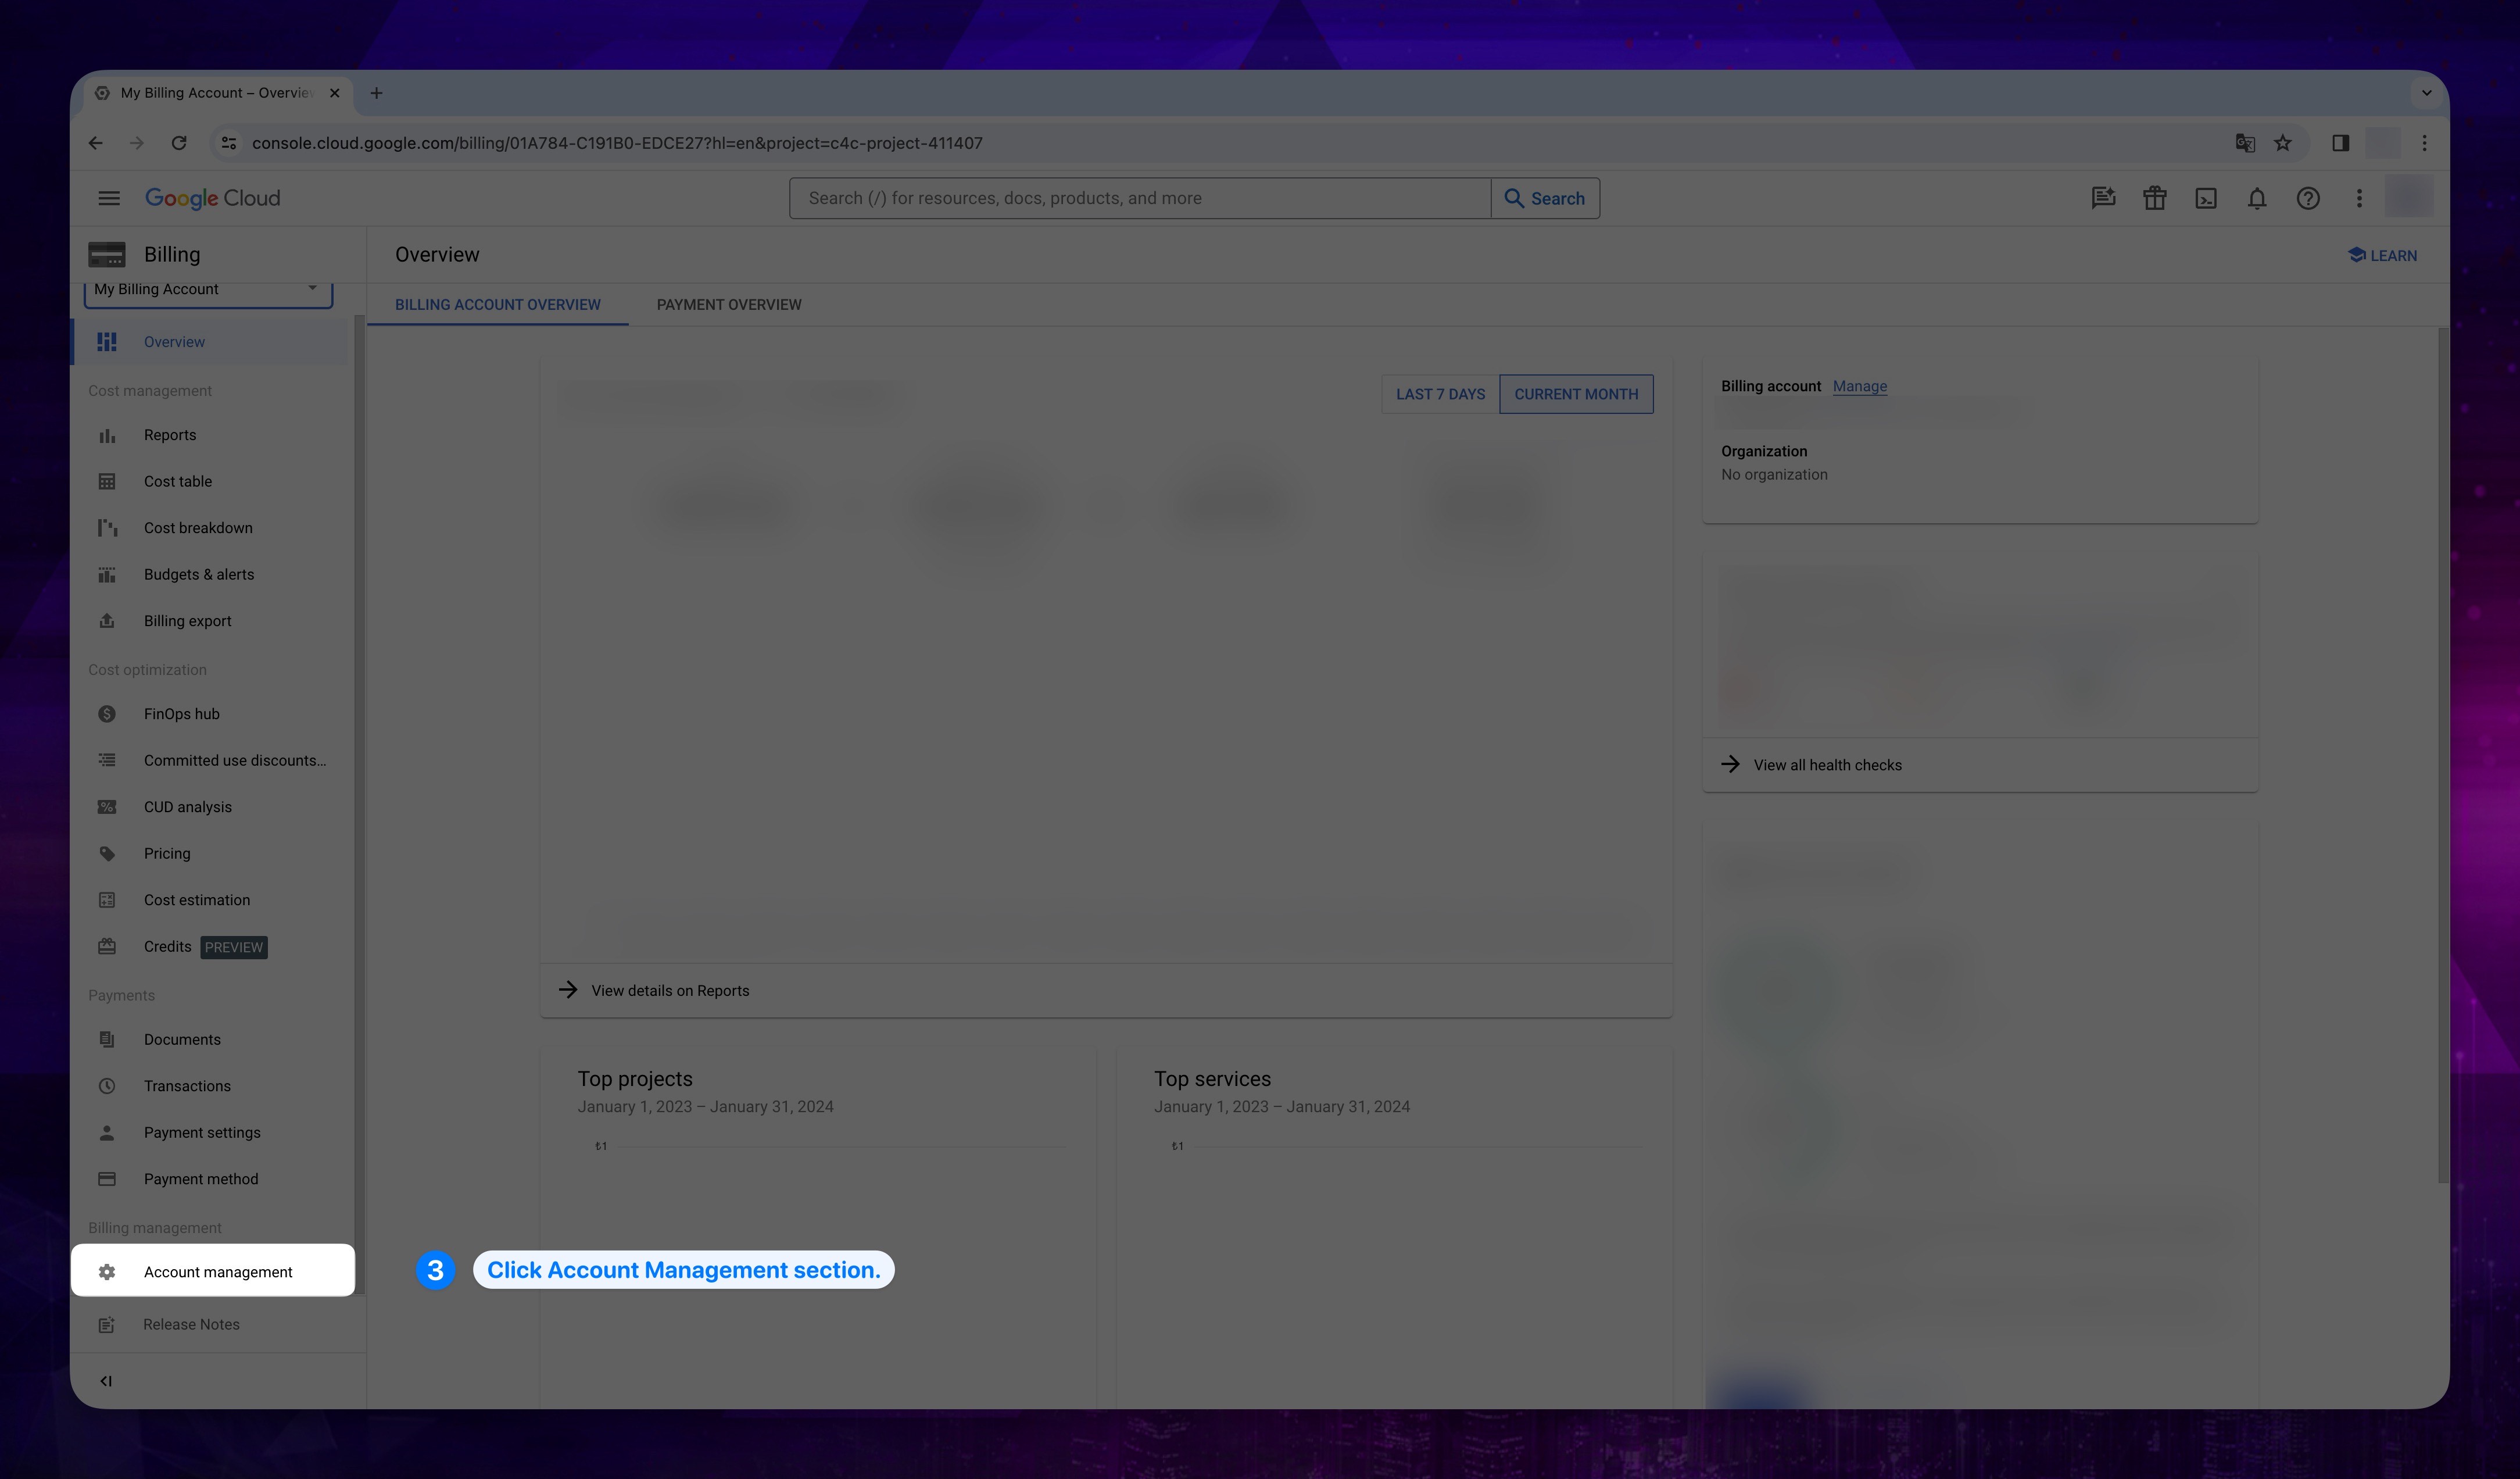
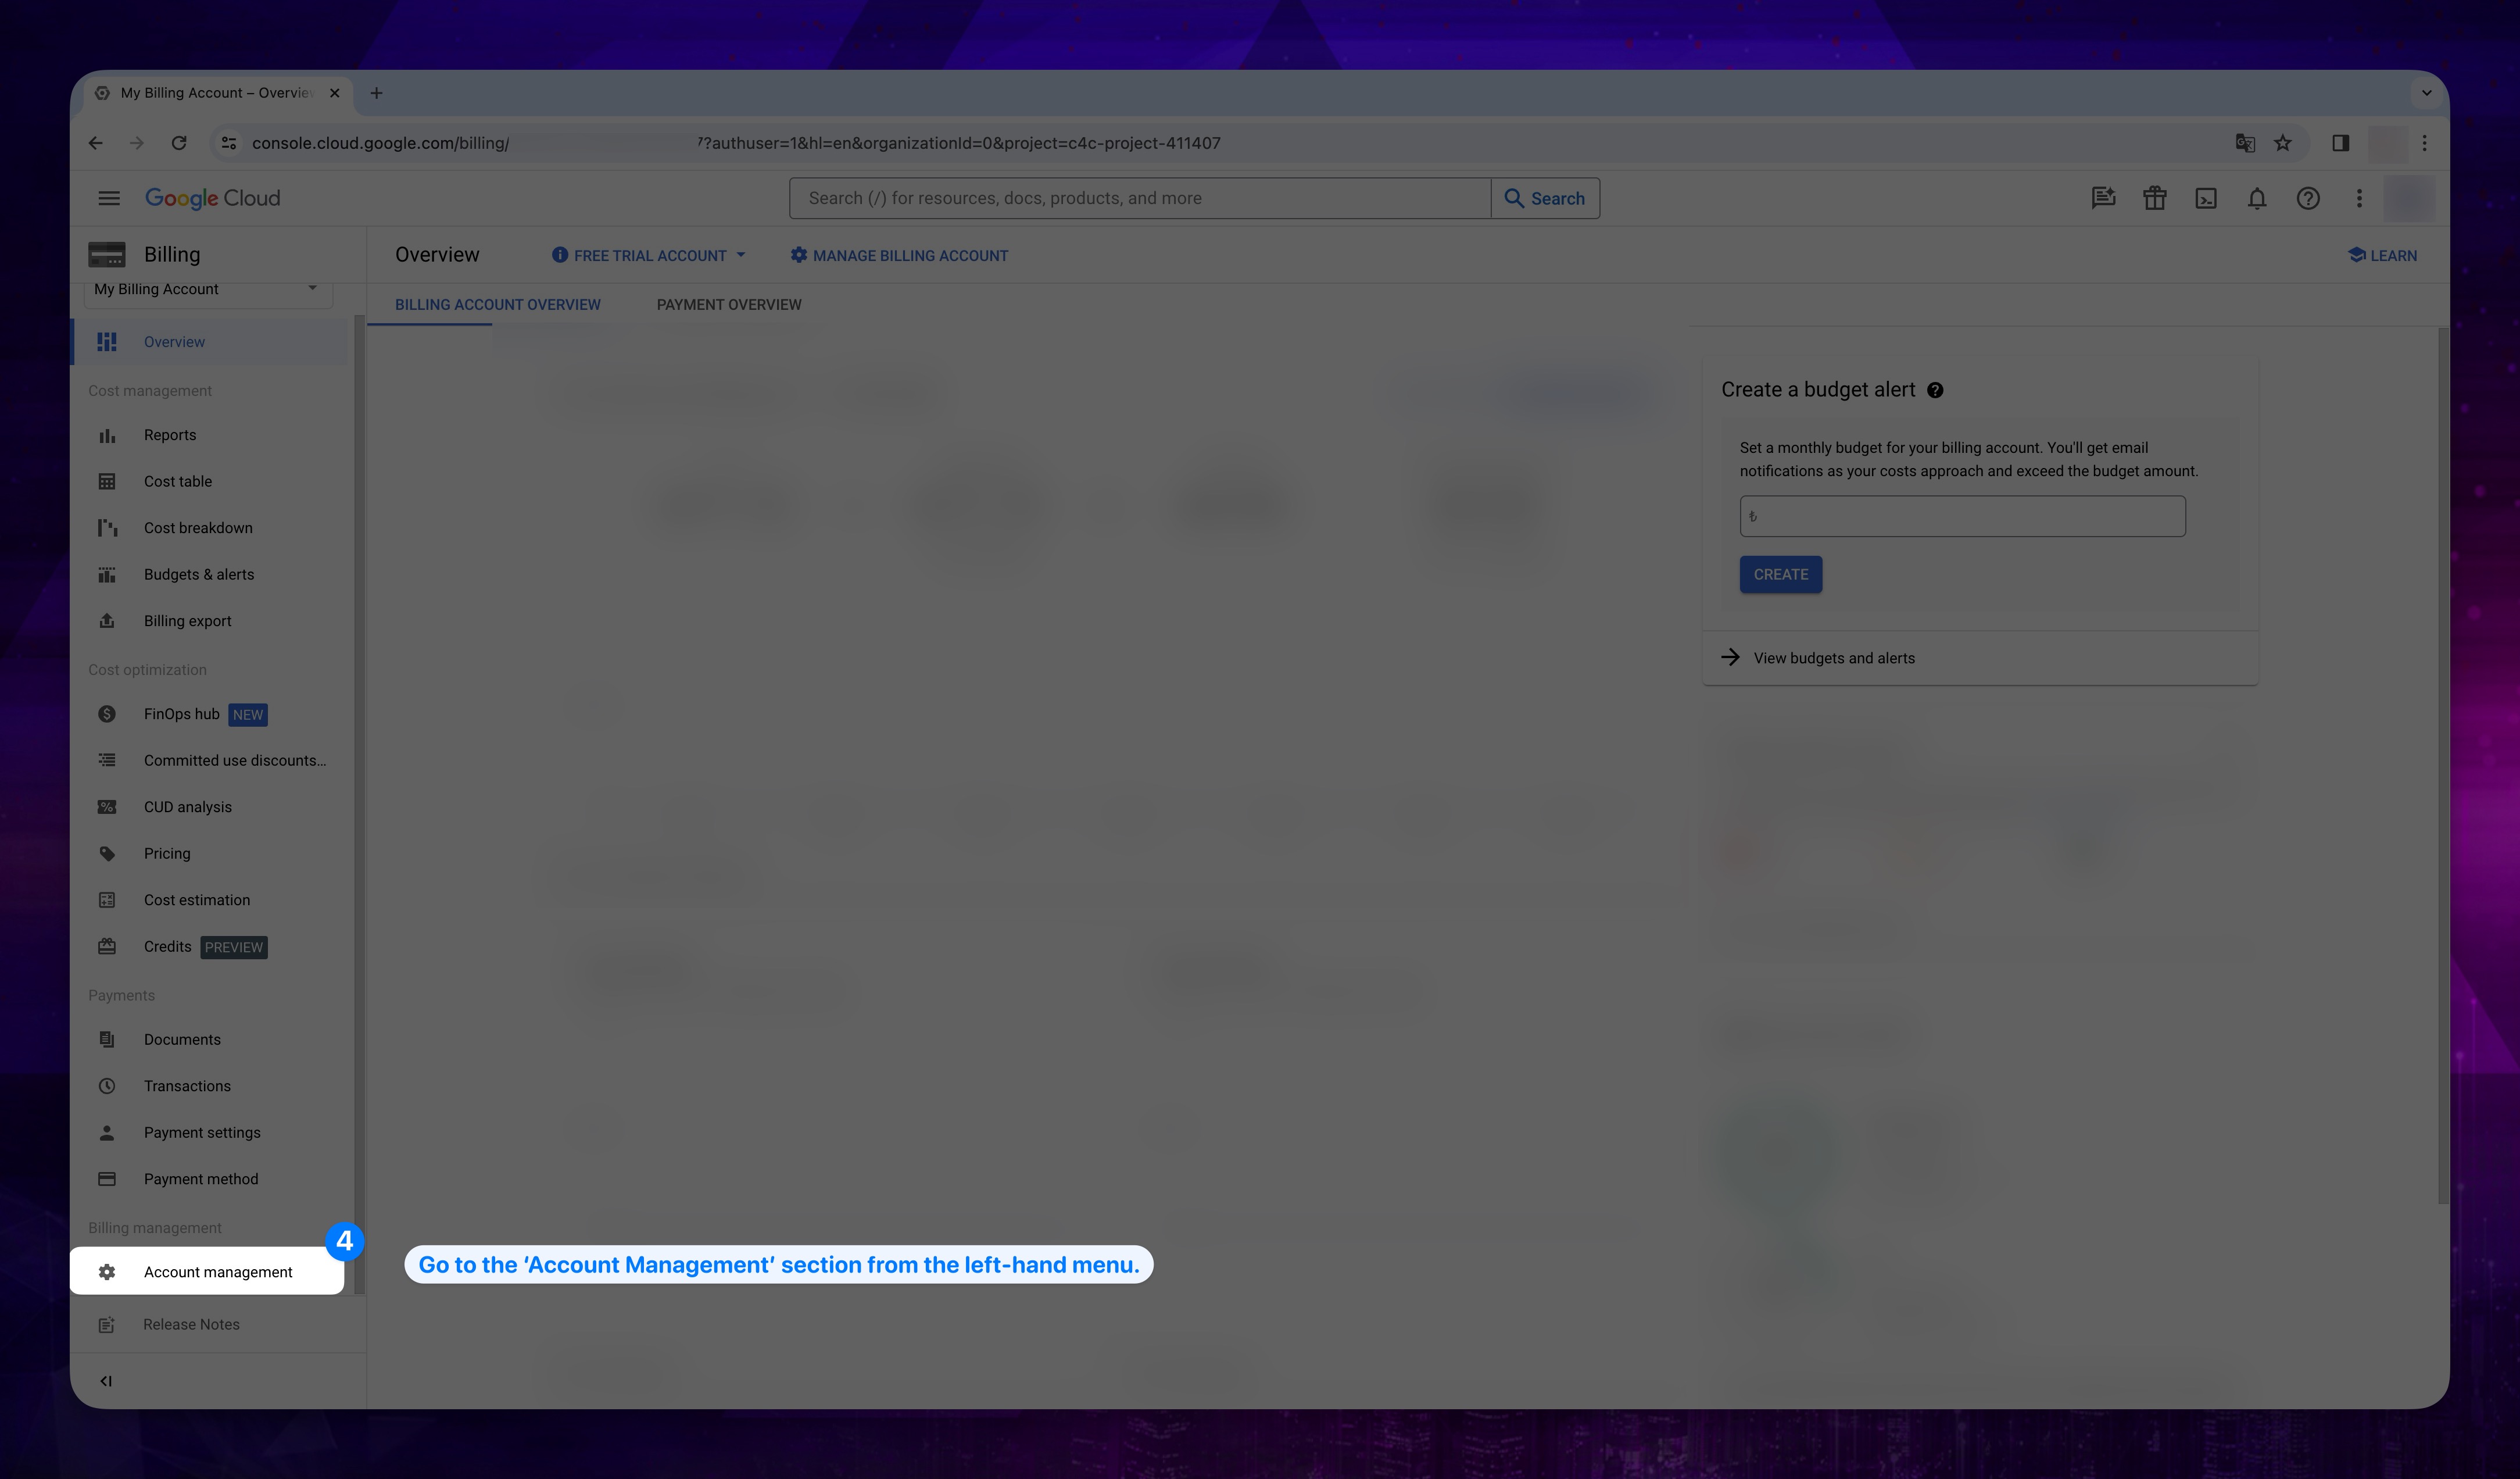
- Once in the Billing section, on the left-handed menu click Account Management section.
Show the instruction with images
- Check if your account has the Billing Account Costs Manager or a higher privilege role assigned under the Roles/Principals section on the right side of the opened panel.
Show the instruction with images
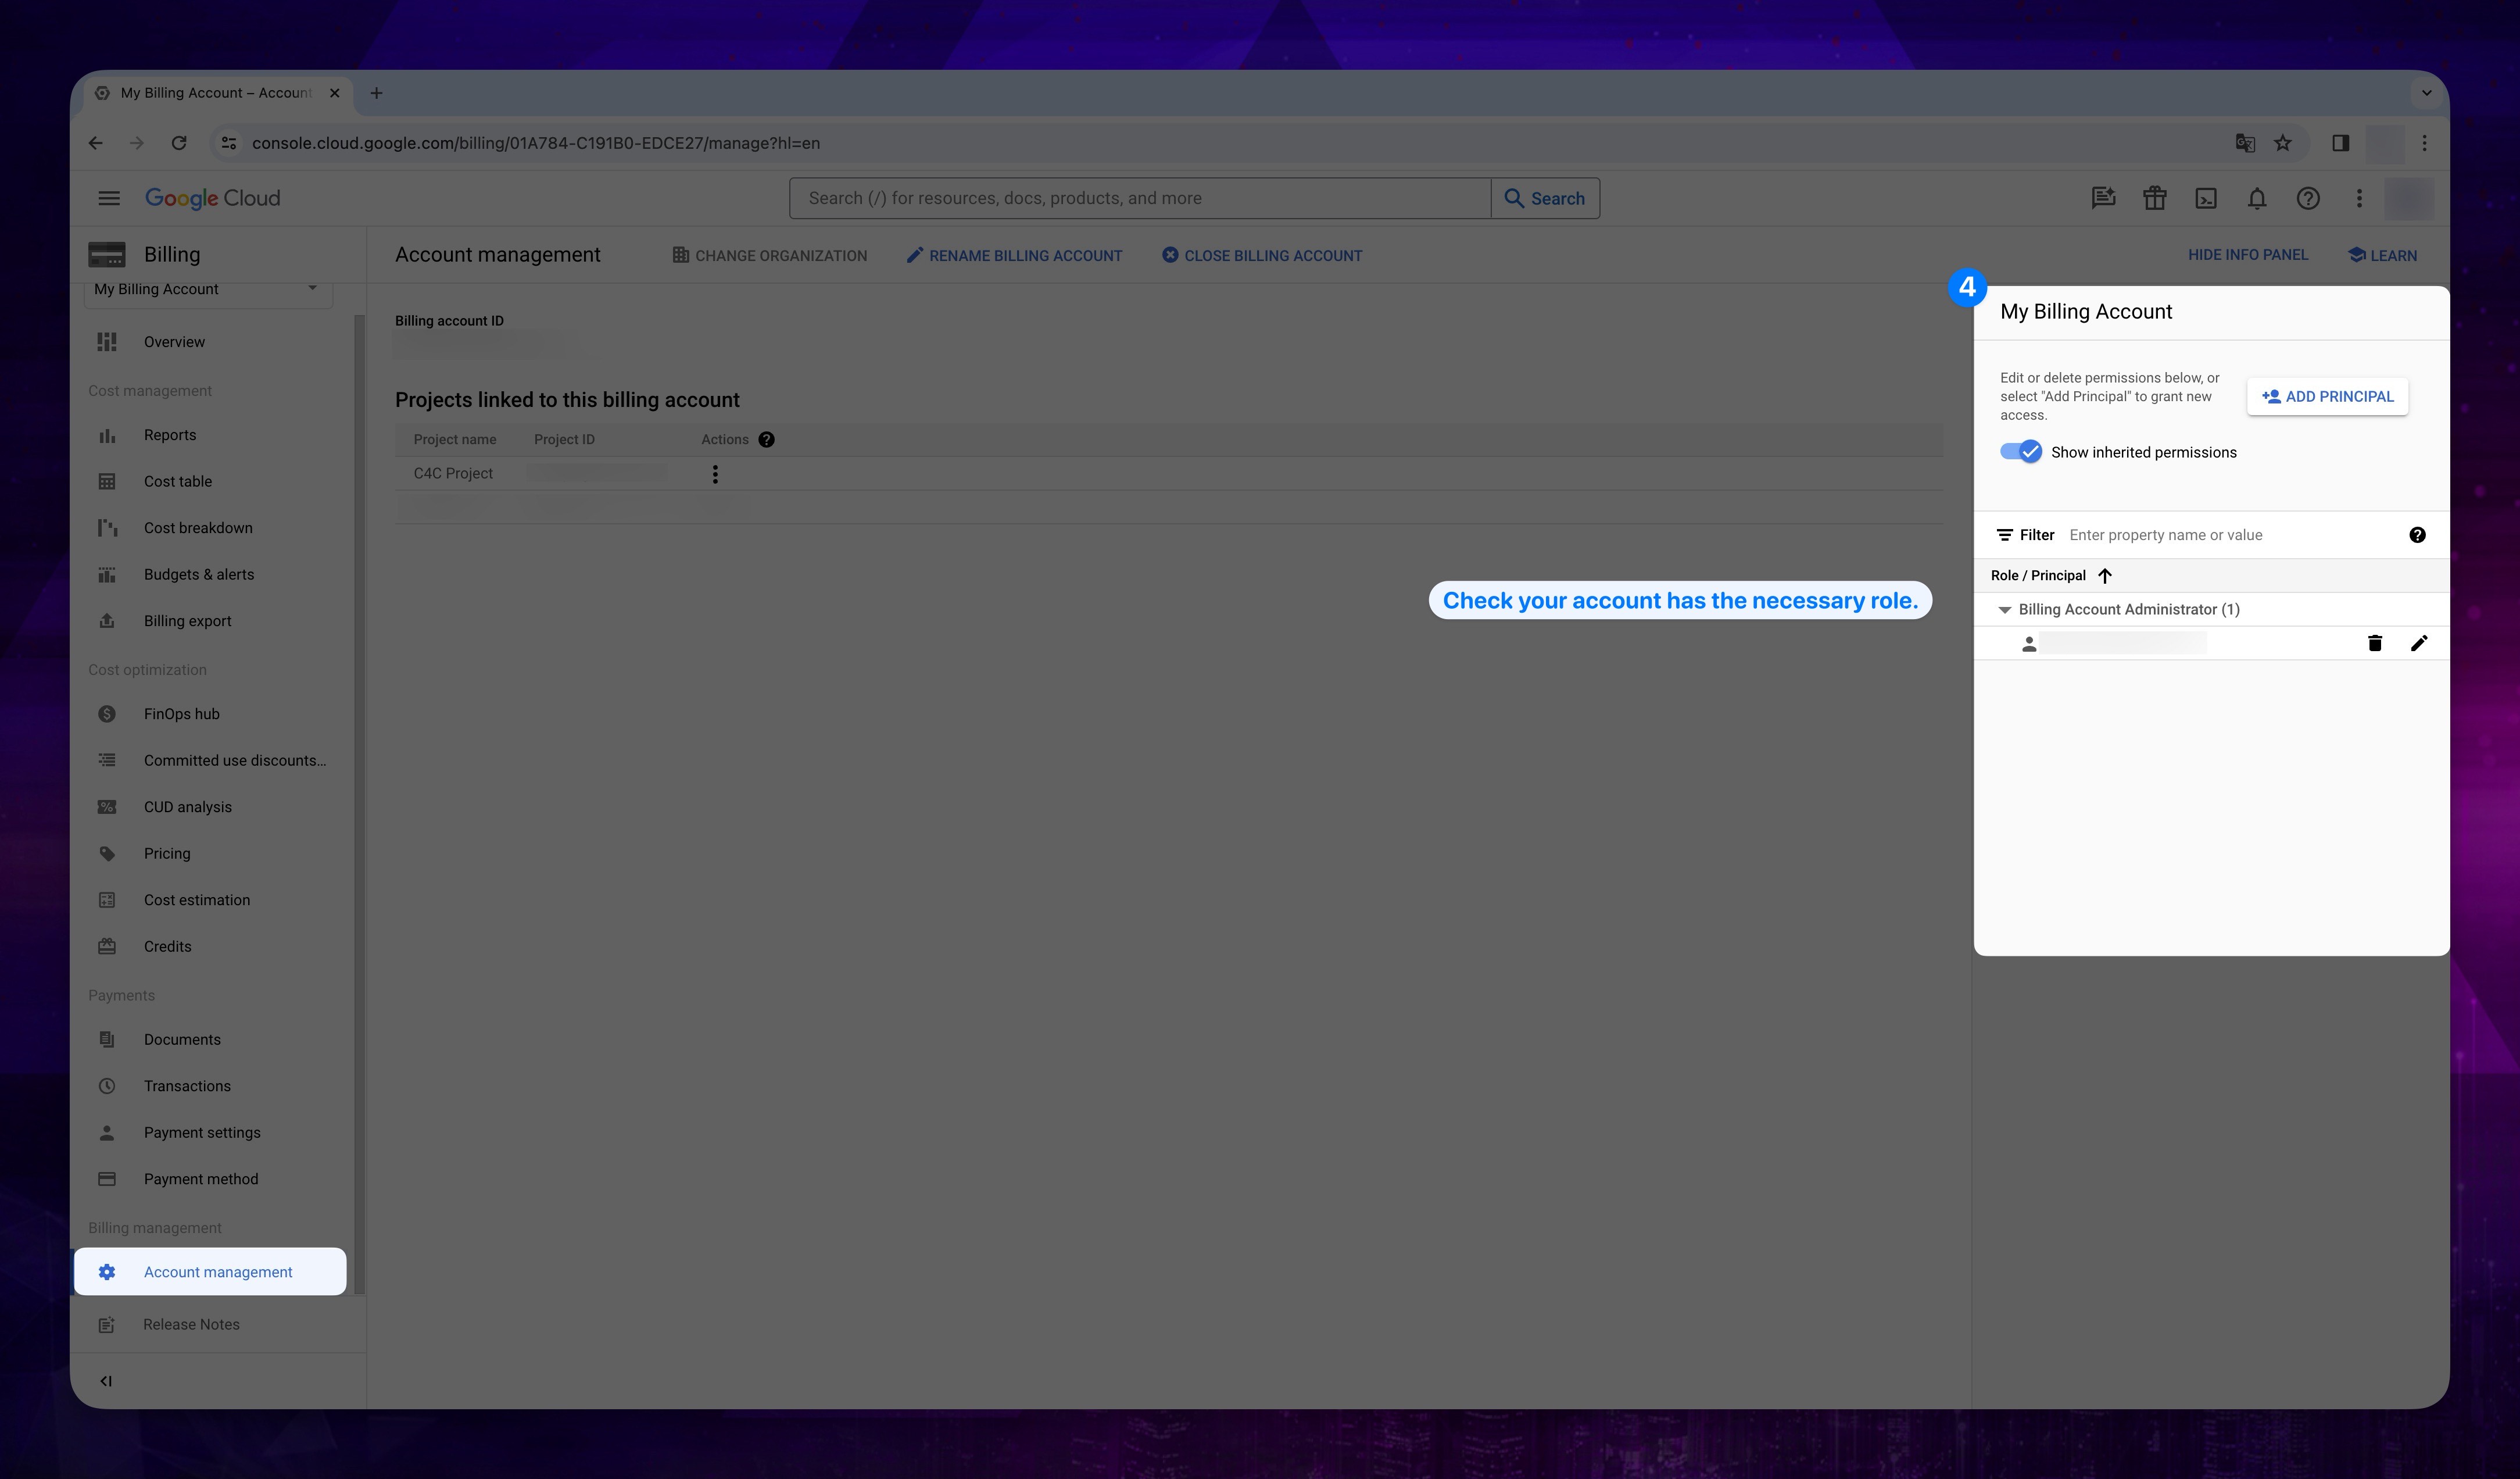
If you do not have this role or a higher privilege, please request your Billing Account Administrator to assign this role to your account.
If you can't see the panel, you might have hidden it. Please check by clicking the HIDE/SHOW INFO PANEL button in the upper right corner.
Once you are sure that you have the relevant role, you can proceed to the next steps.
6. Usage Cost Configuration
For effective cost measurements and to provide our users with more precise and personalized services, Cross4Cloud analyzes the usage of GCP Provider. One of the key data sources for these analyses is GCP BigQuery. To perform these measurements, we request our users to grant access to a dataset within their GCP accounts. If they don't have a pre-existing dataset, we ask them to create a new one.
For billing export, there are two possible scenarios. If you have previously exported your billing details, you may already have a dataset created. Alternatively, if you haven't performed this process before, you might not have a dataset. Please carefully follow the guide, considering these two scenarios, as the steps will vary. Take this into account as you proceed through the documentation.
Existing Dataset for Billing Export
While entering your credentials on the onboarding screen, if you already have an existing dataset that you want to use, you can follow the steps below to find the required credentials, such as Name of the dataset and your Billing Account ID.
1. Getting Dataset Name
-
Open your browser and go to the Google Cloud Console.
-
Go to the search bar and search for Billing Export and click on it.
Show the instruction with images
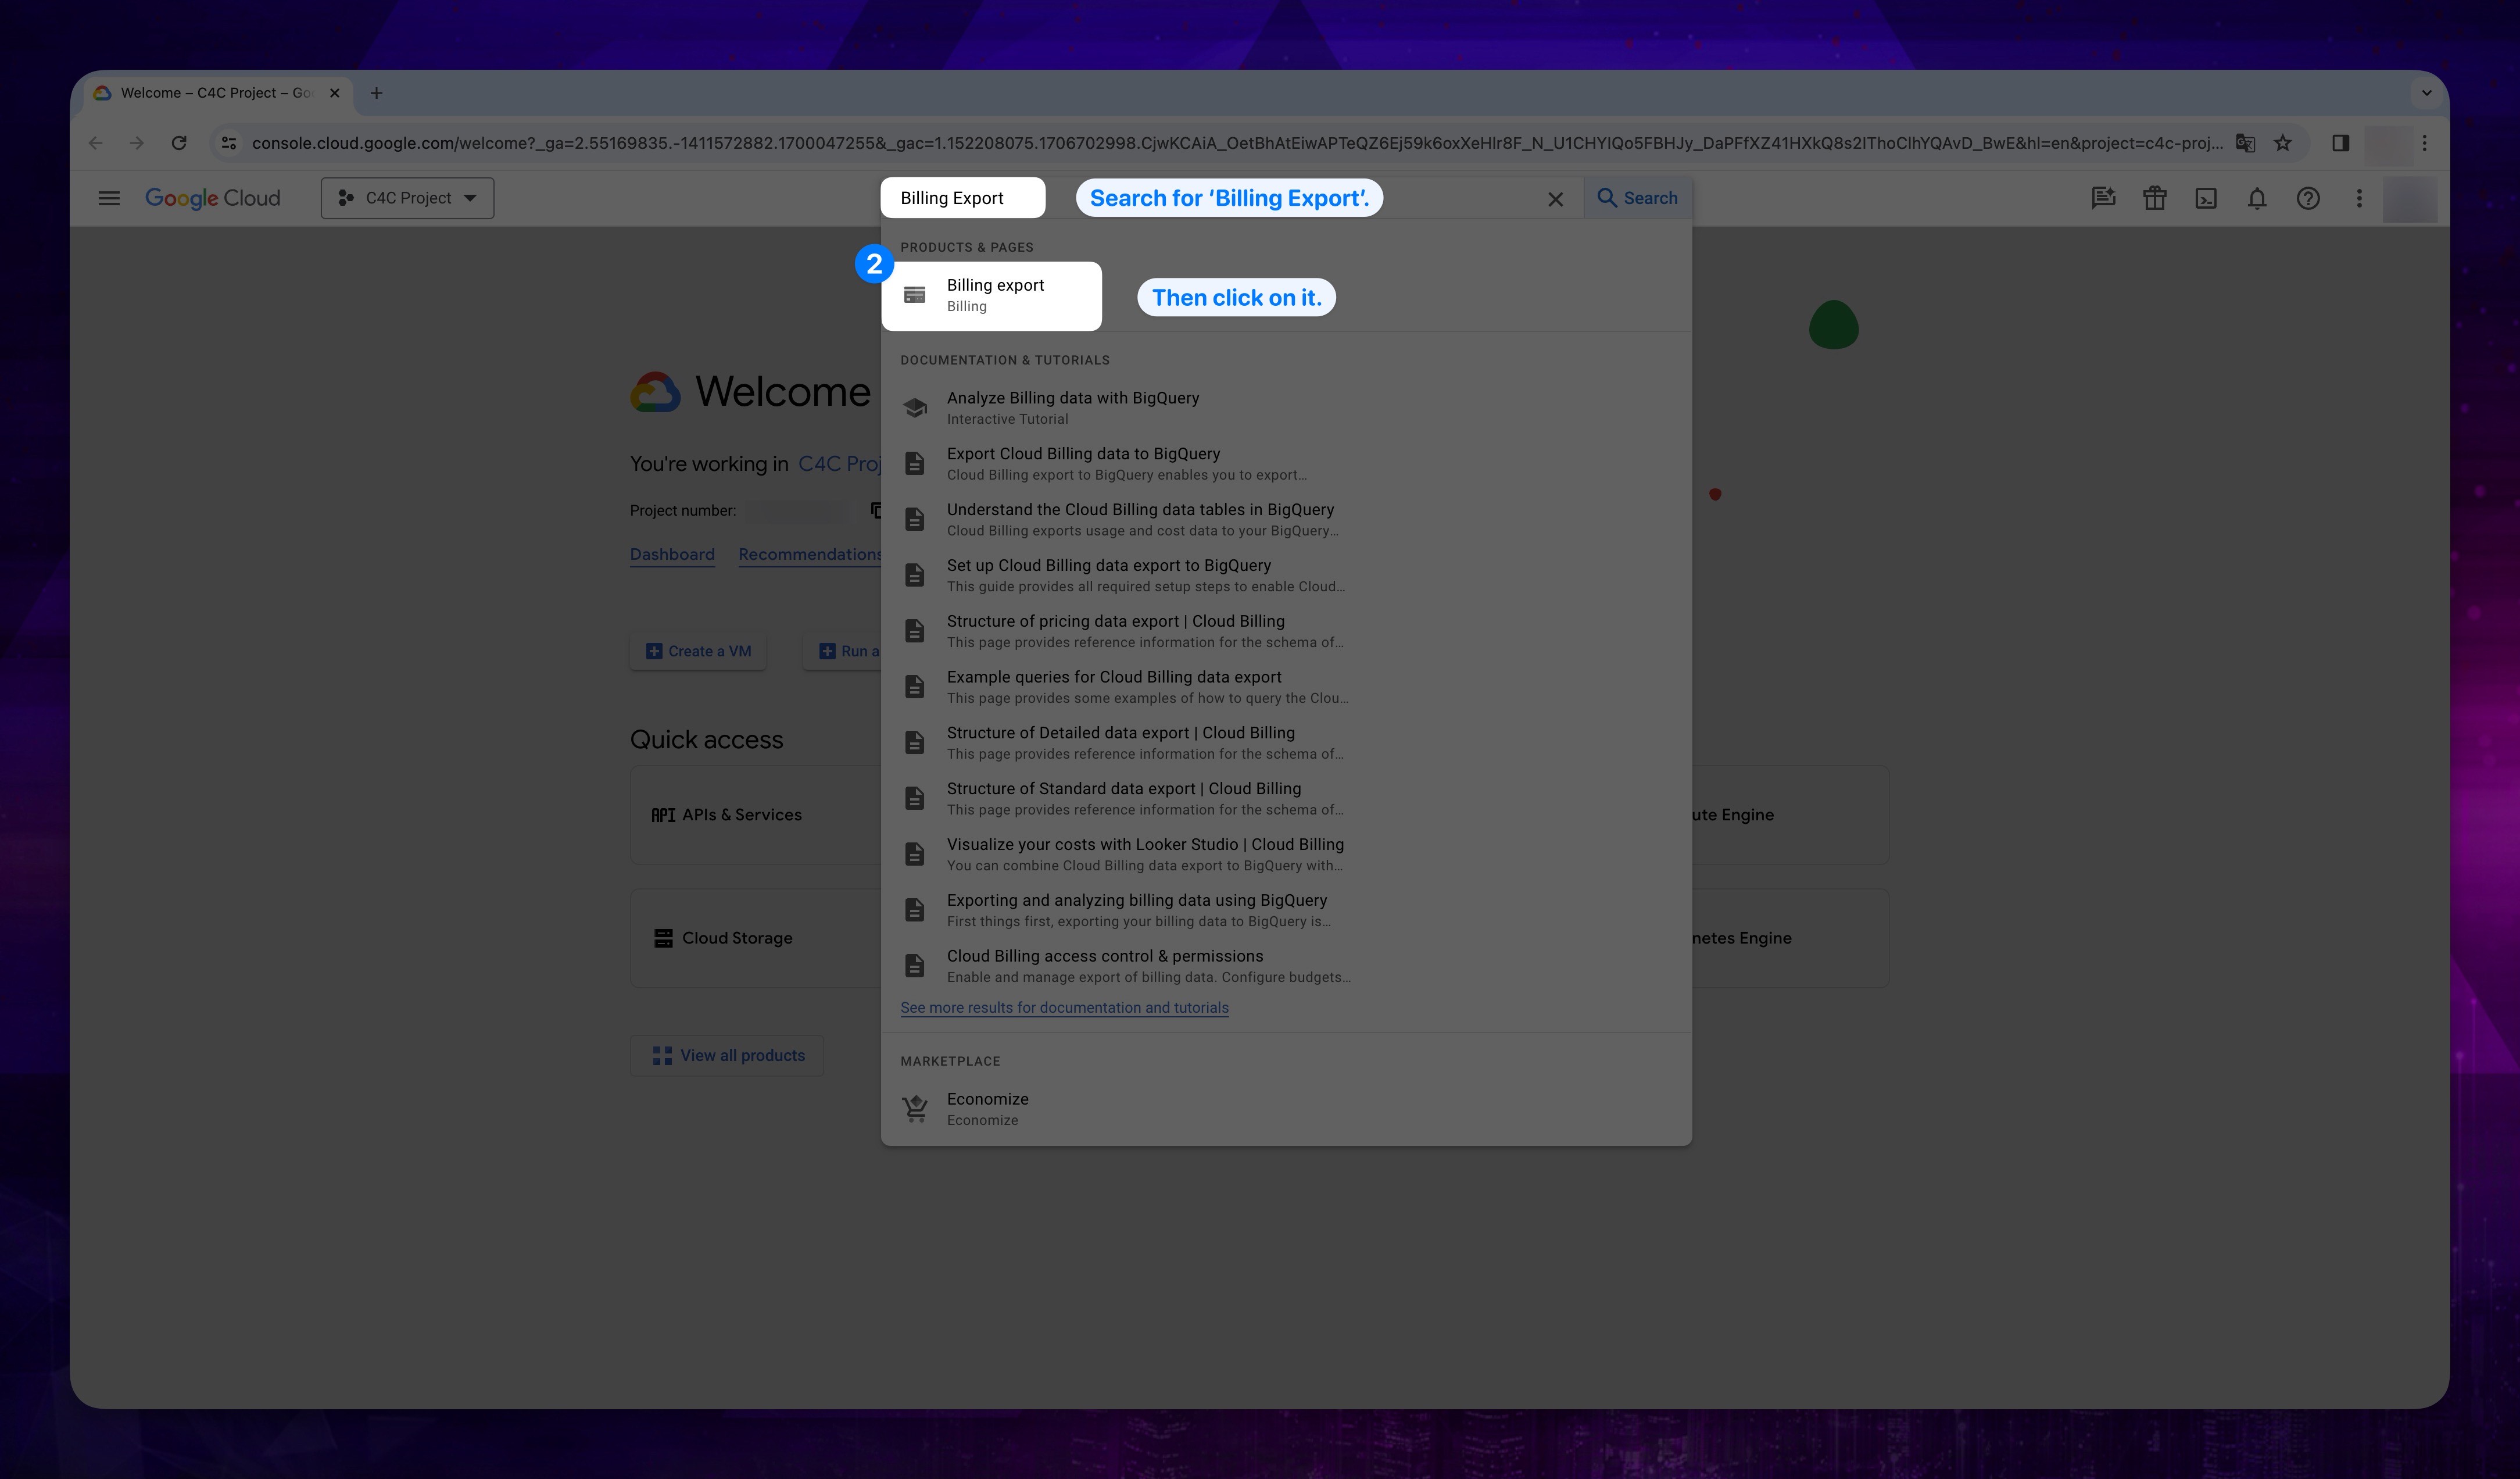
- Choose the Billing account for which your selected project connected. The Billing export page opens for the selected billing account.
On this page, you should have configured billing exports that allow you to transfer your GCP billing data to the BigQuery data warehouse.
- In the Billing export page, you will see options for Detailed Usage and Standard Usage exports. Each option will display the configured BigQuery Dataset Name under the respective export type. Note down the dataset names for both Detailed Usage and Standard Usage as shown in the interface.
Show the instruction with images
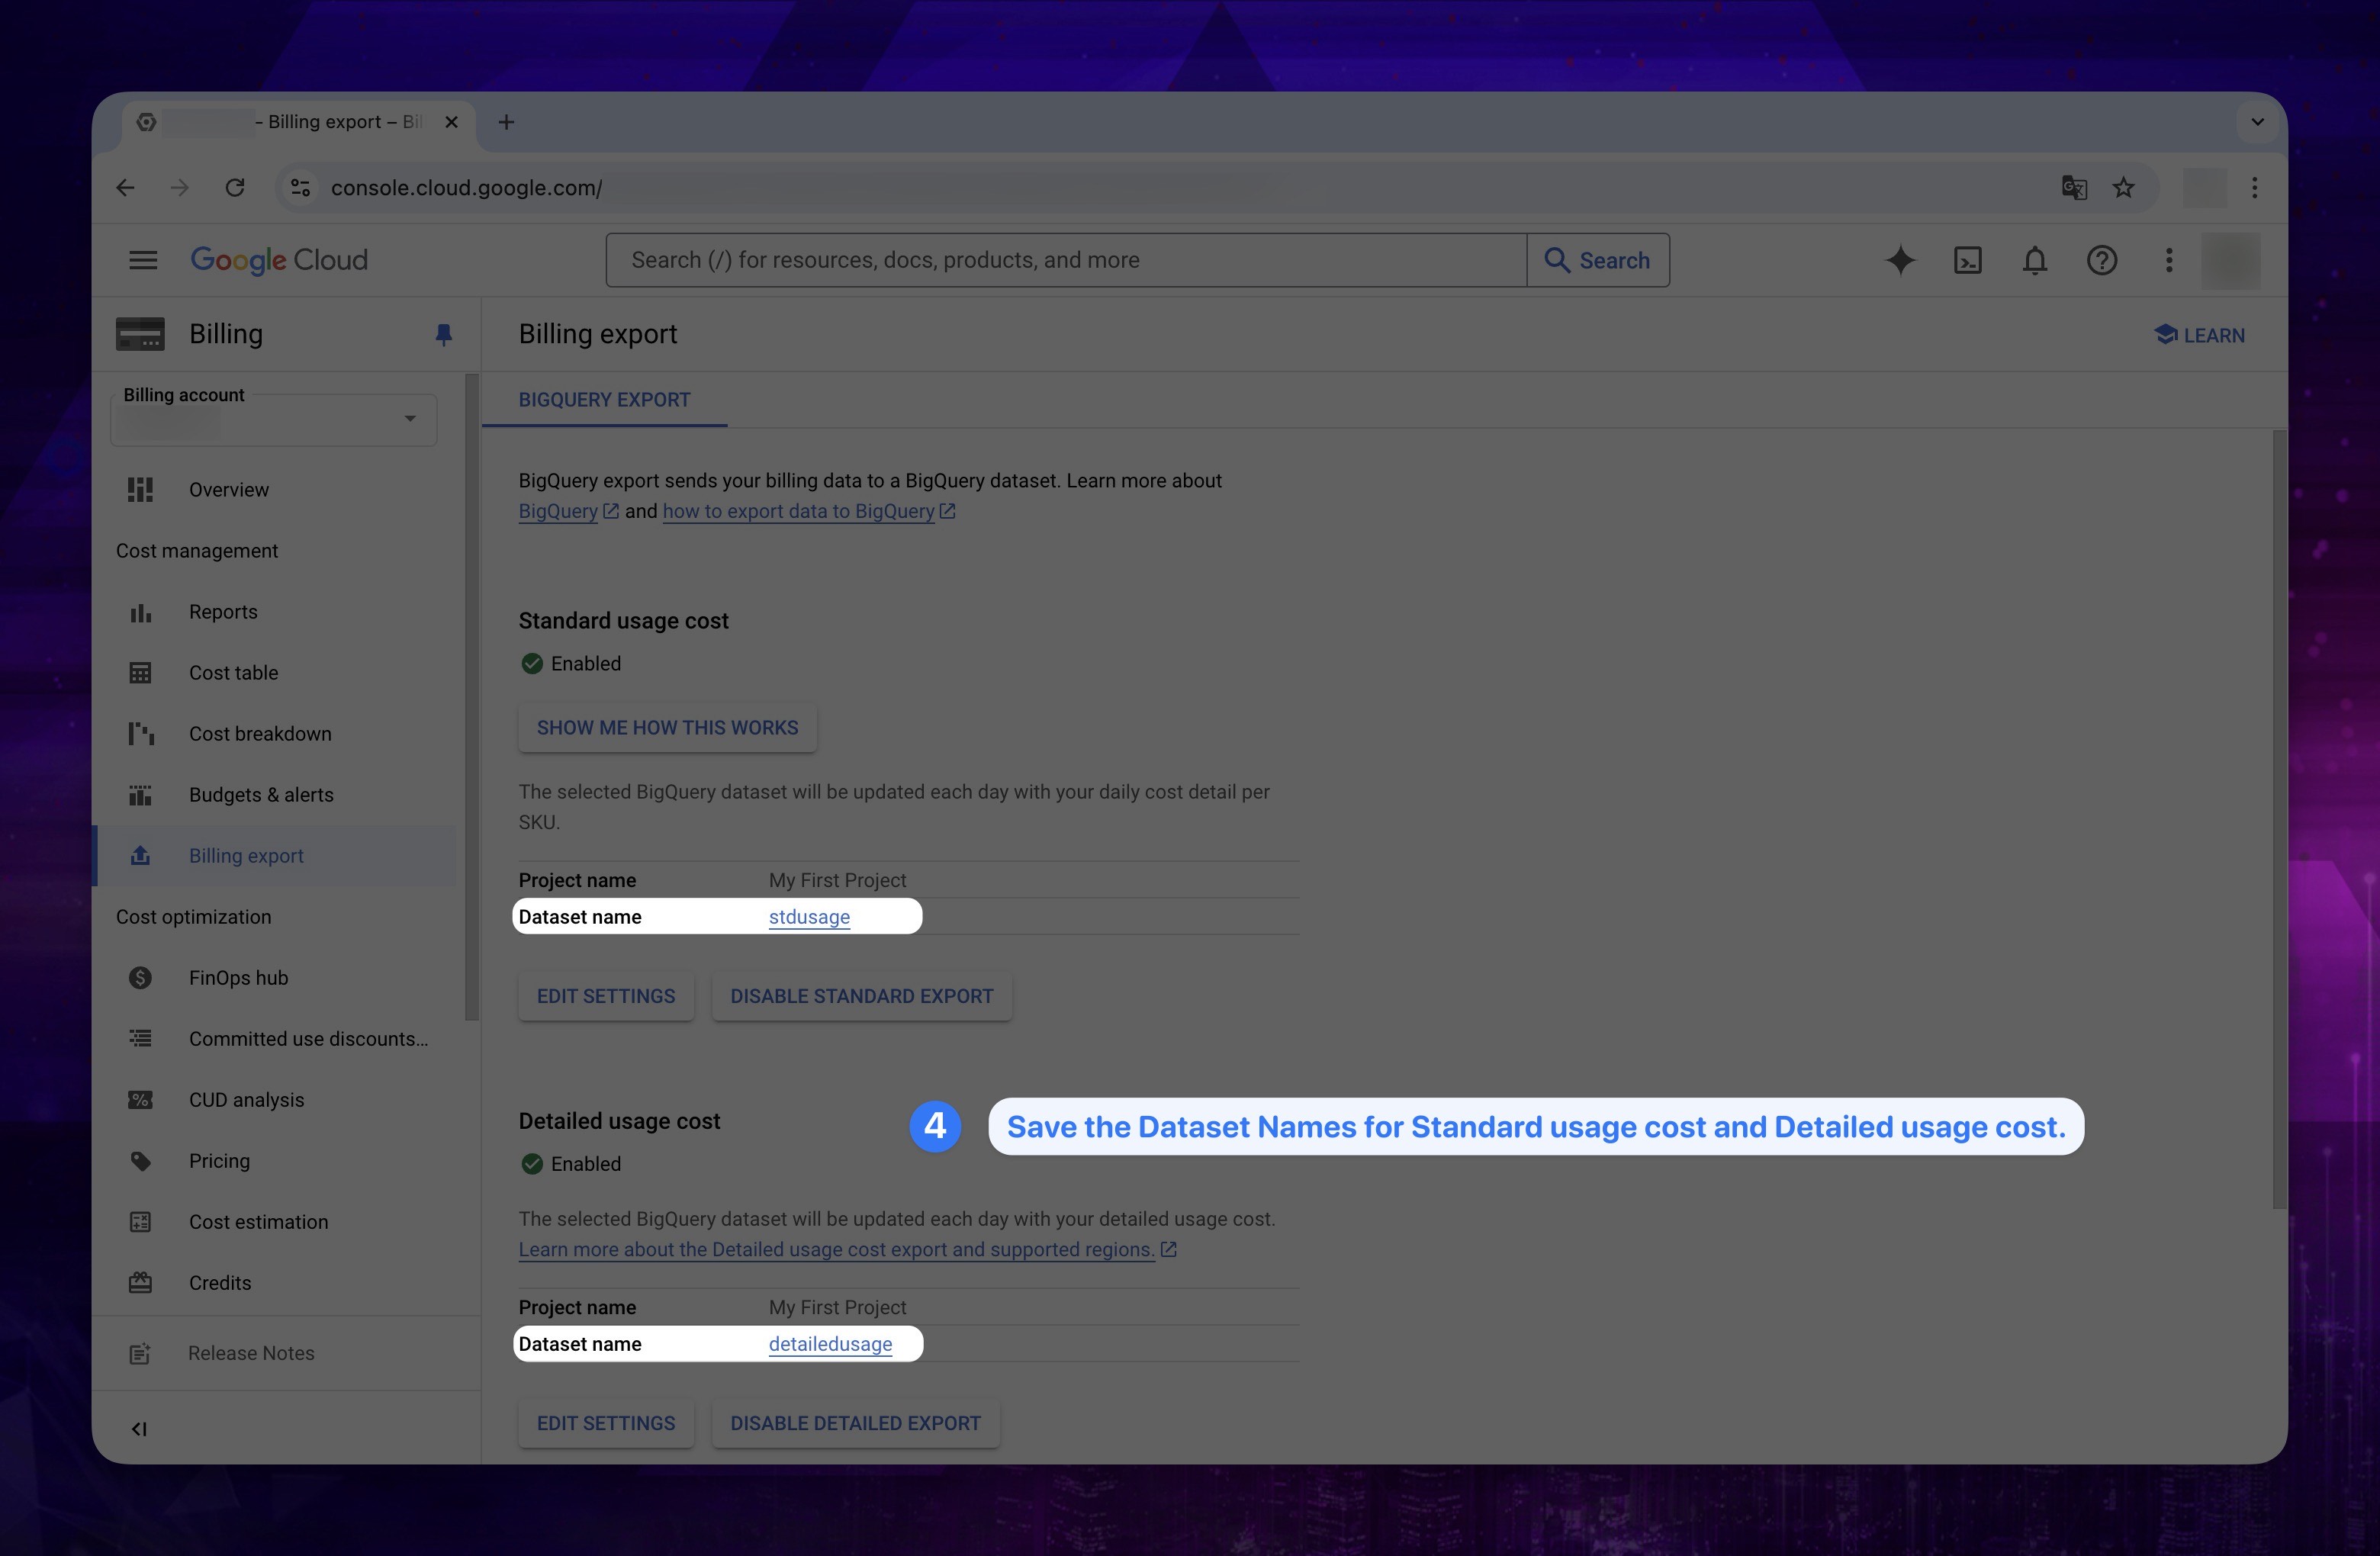
Make sure to keep the Dataset Name information for *Standard Usage Cost and Detailed Usage Cost.
If you cannot see the necessary dataset information on the opened page, most likely you haven't configured the dataset before. You can follow the instructions for guidance.
2. Getting Billing Account ID
-
Open your browser and go to the Google Cloud Console.
-
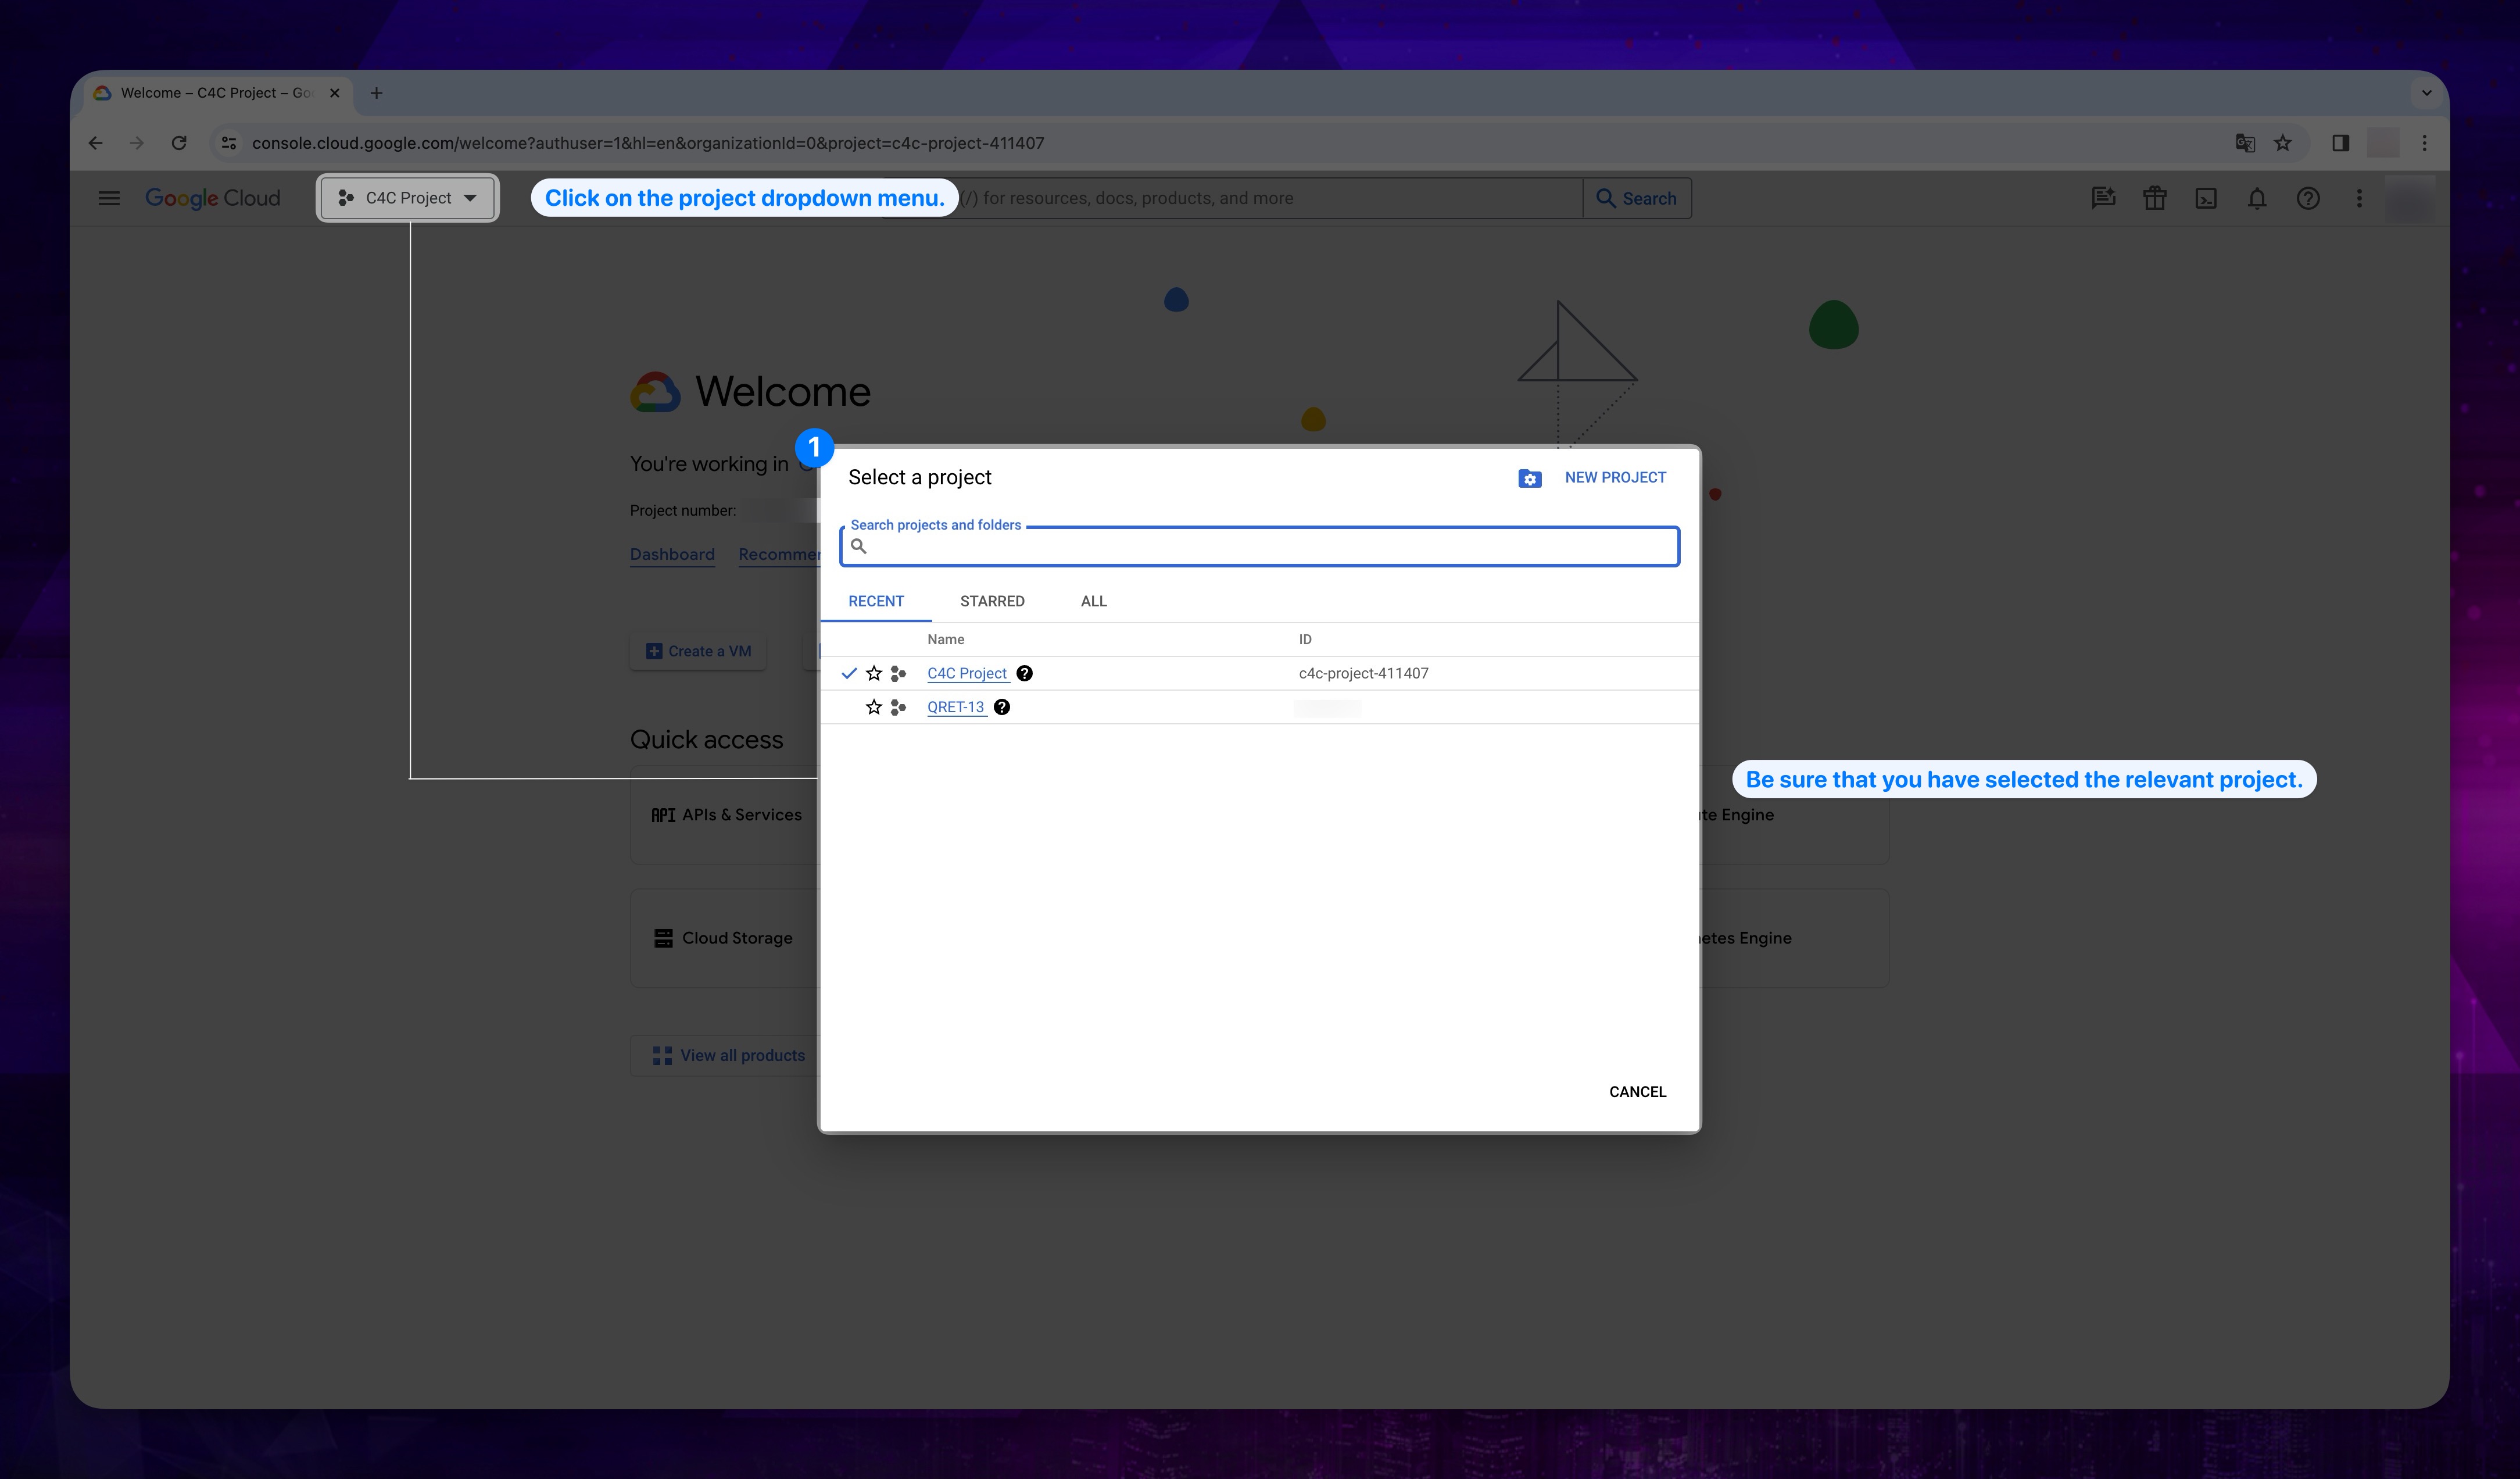
In the upper left corner, click on the project dropdown menu and be sure the you selected the relevant project.
Show the instruction with images
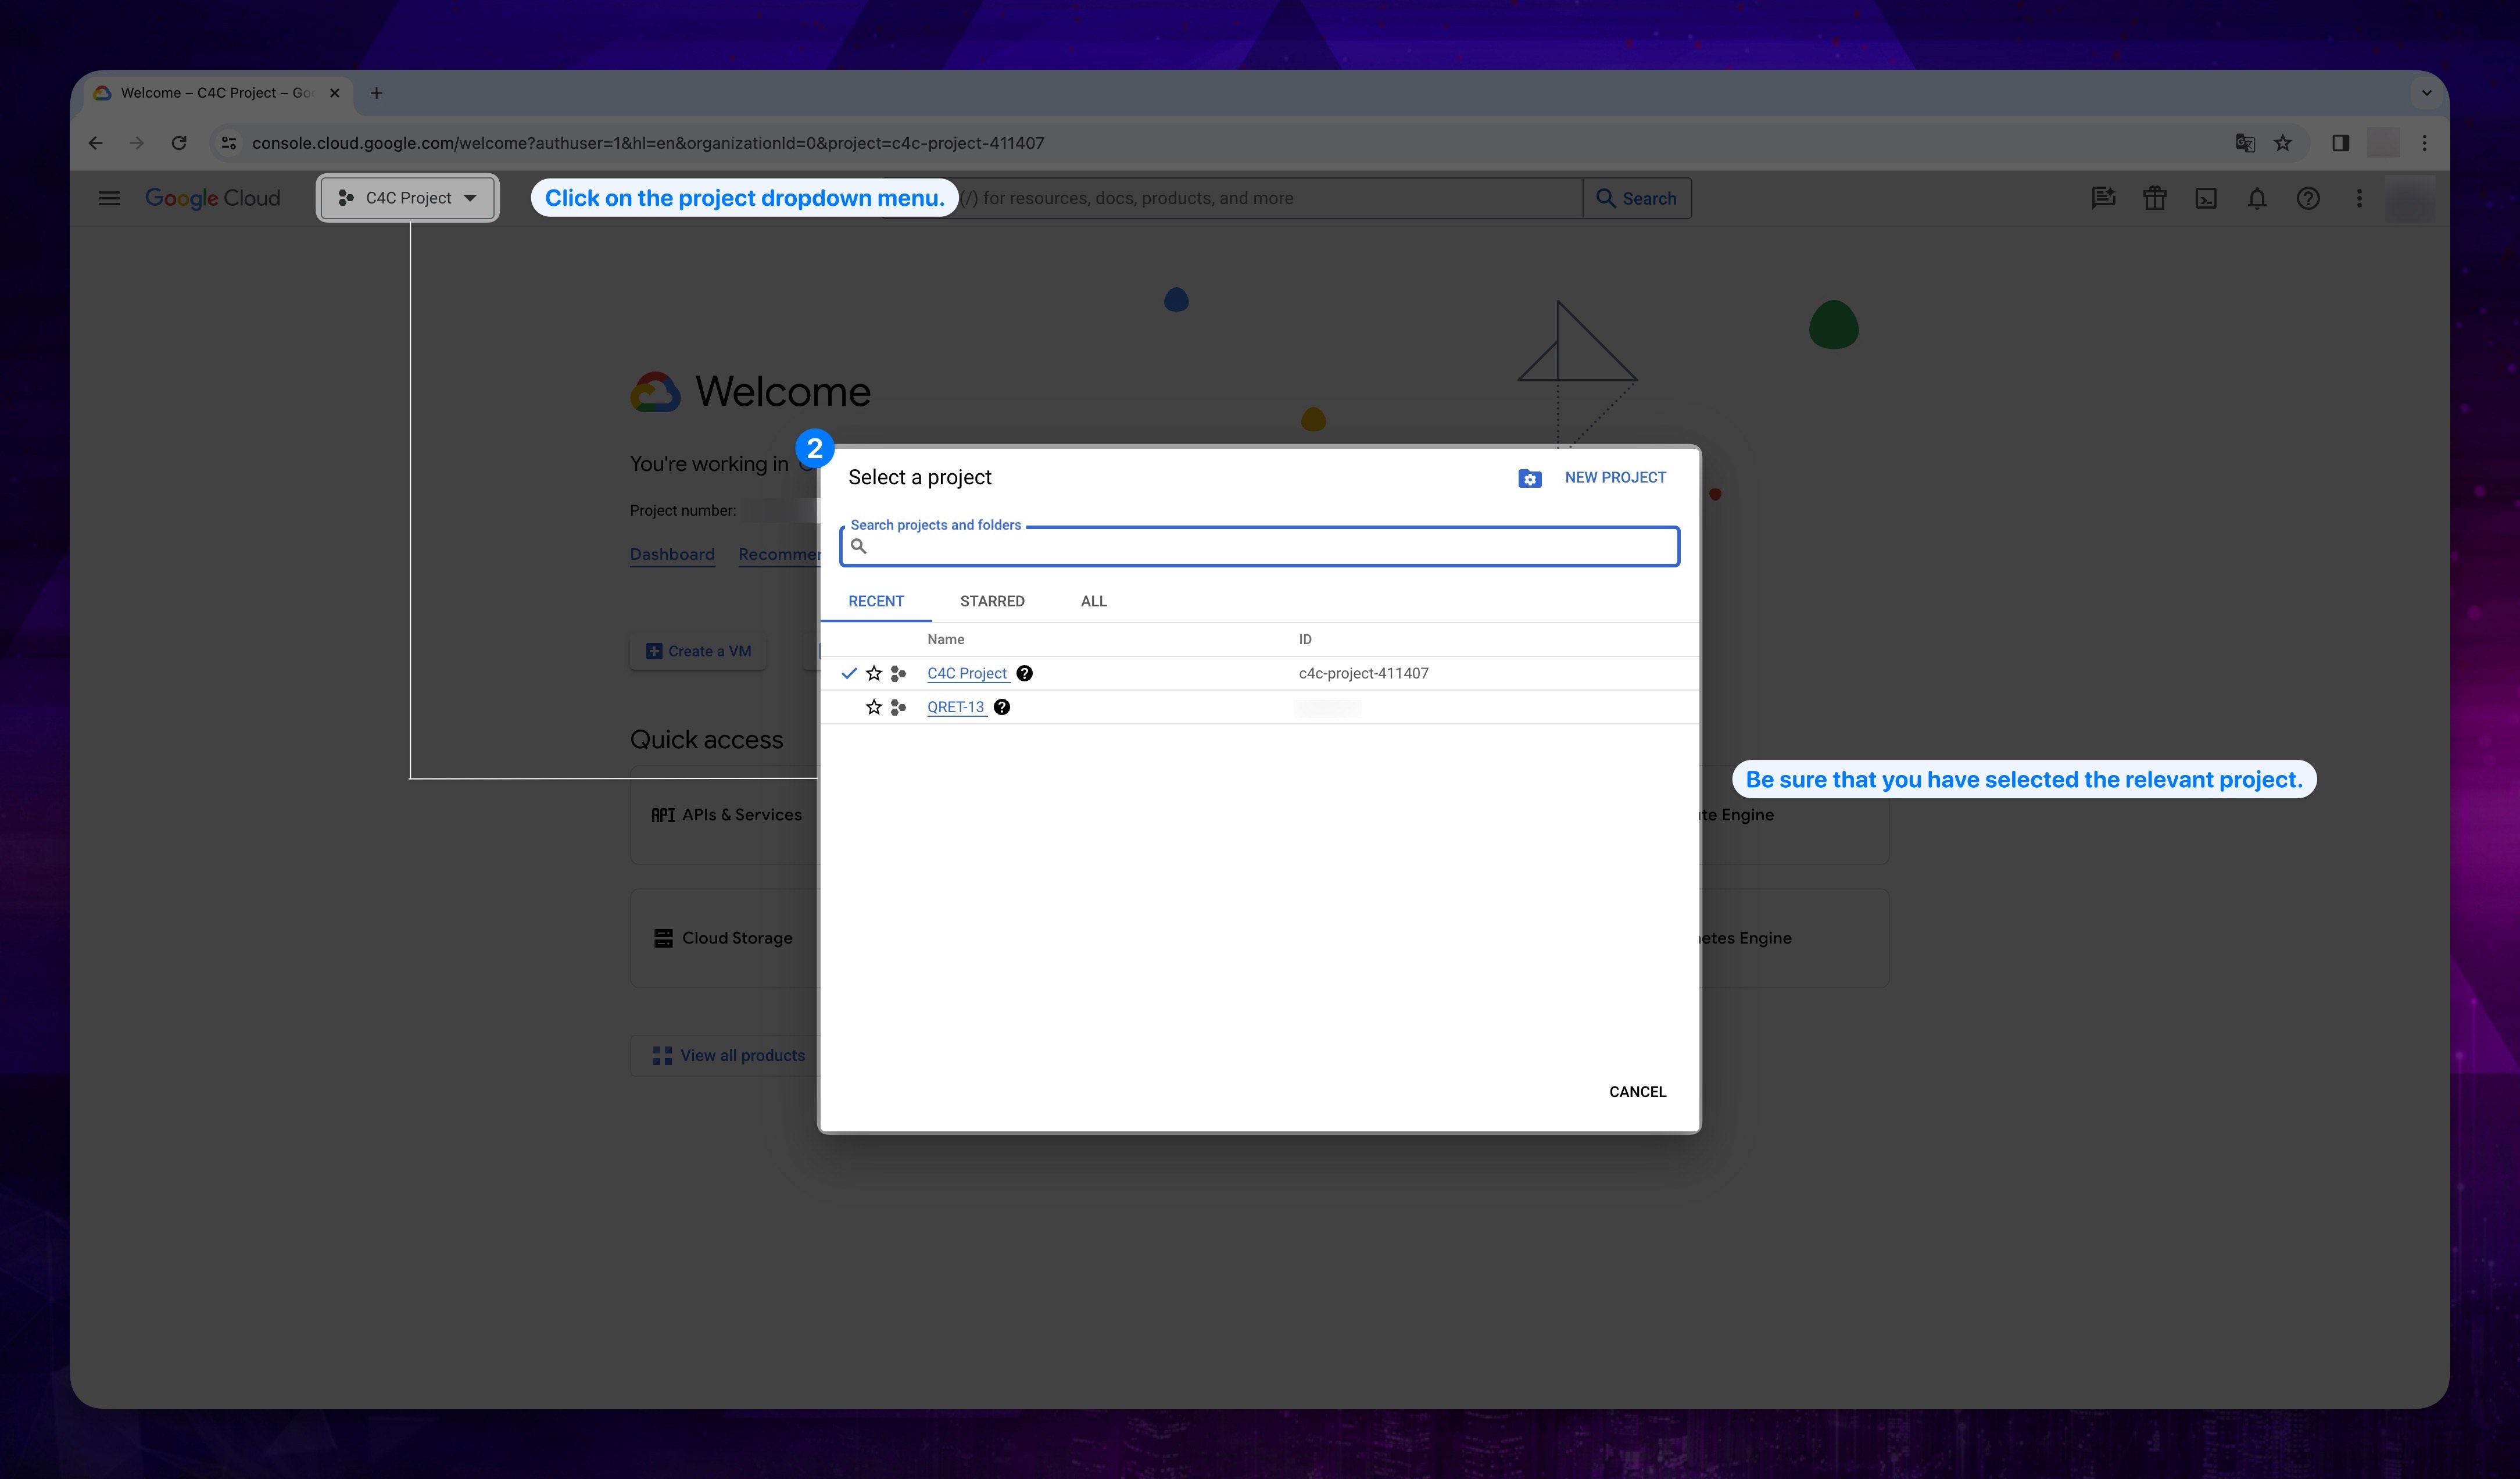
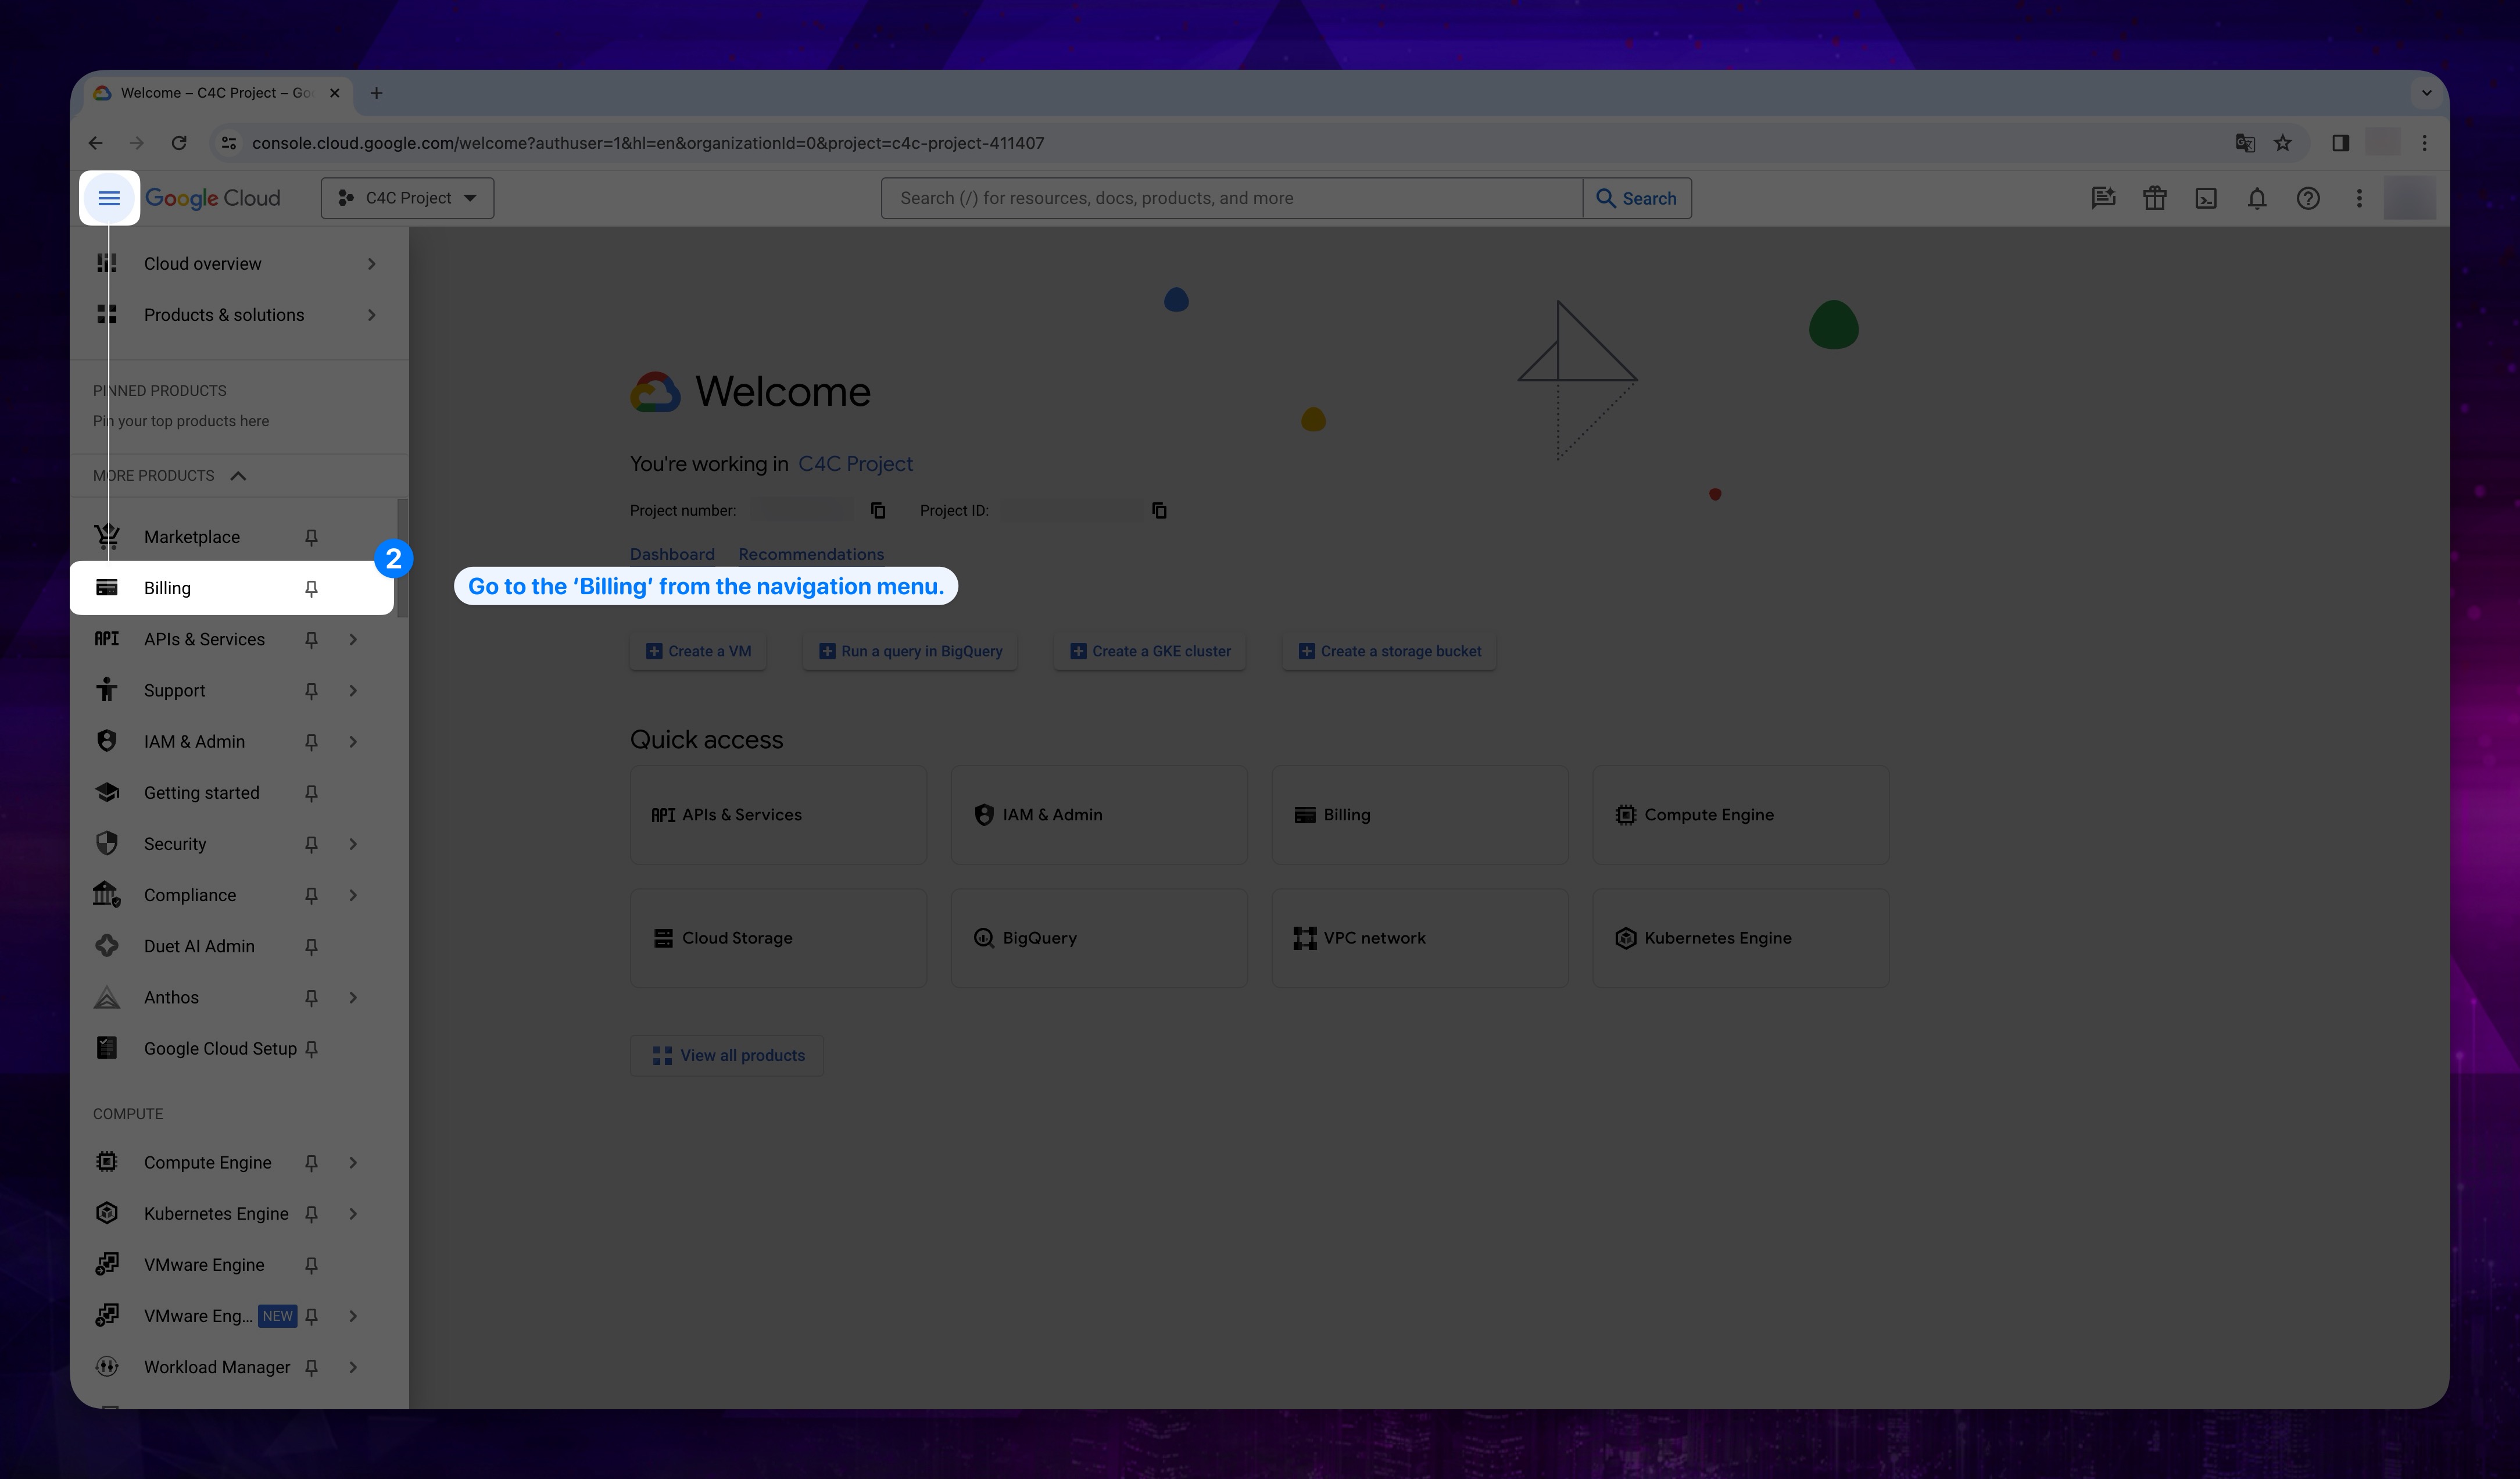
- In the left navigation pane, click on the Navigation menu (three horizontal lines) in the upper left corner. After that click the Billing.
Show the instruction with images
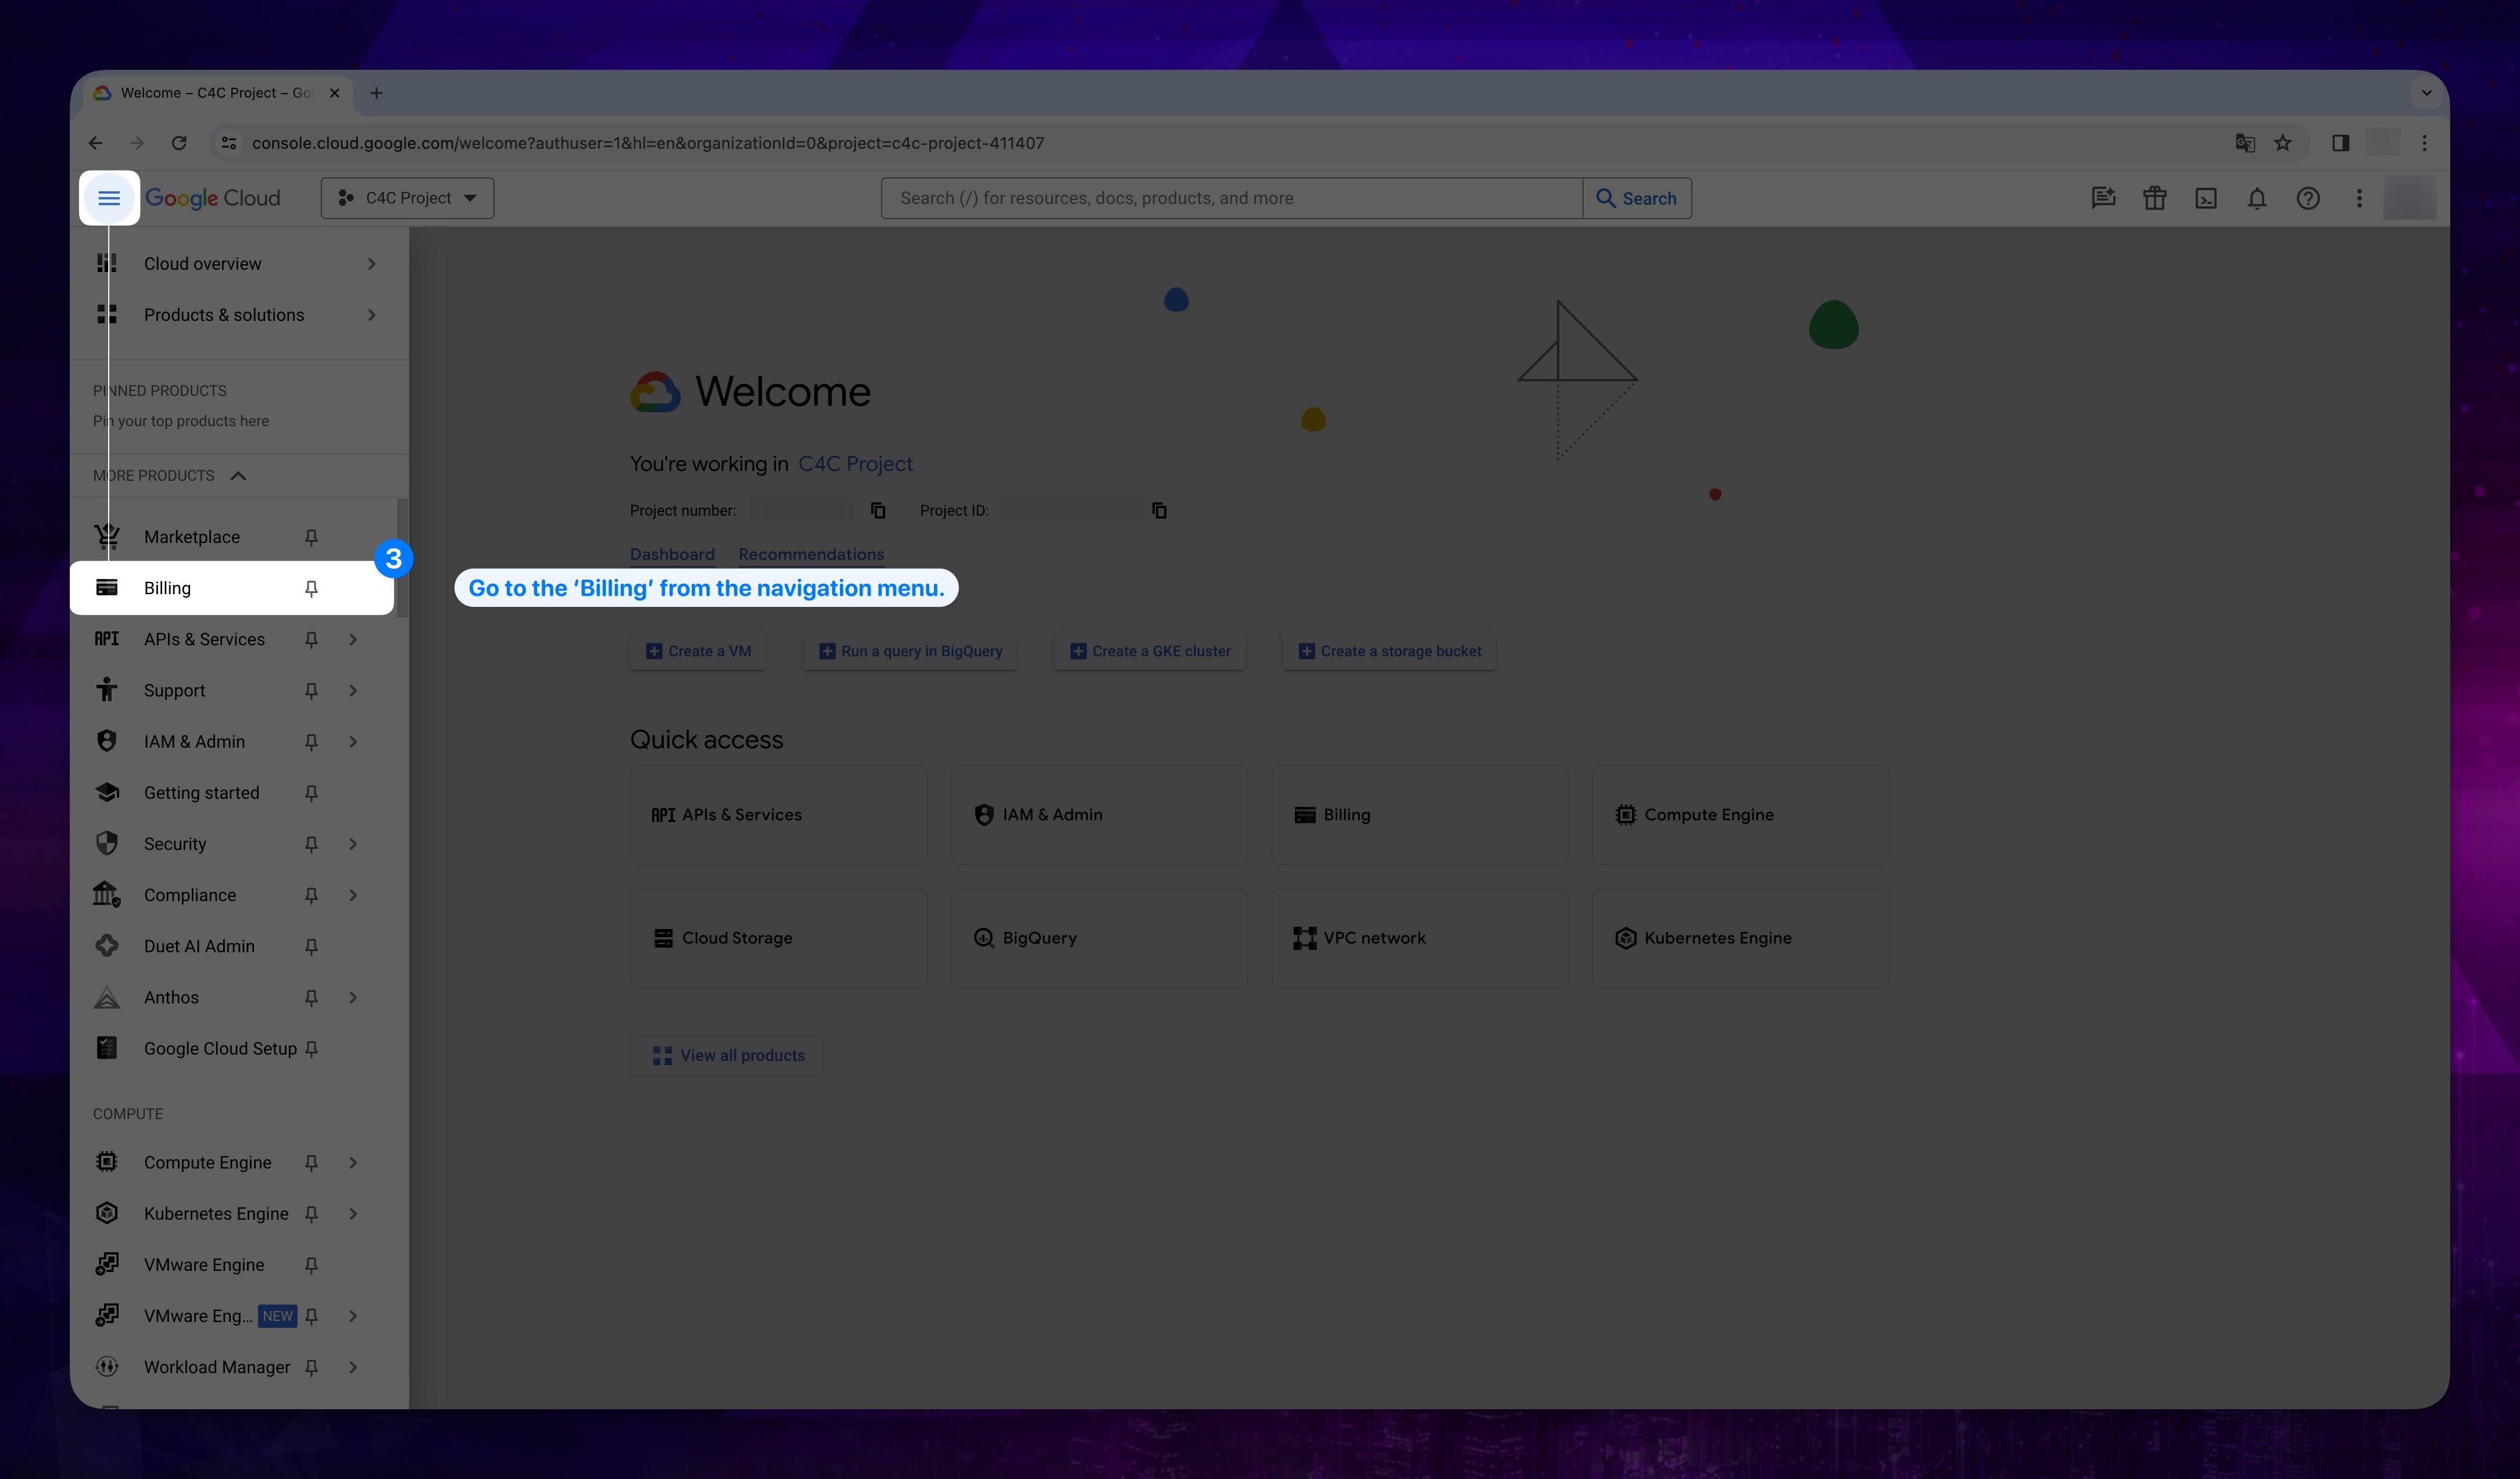
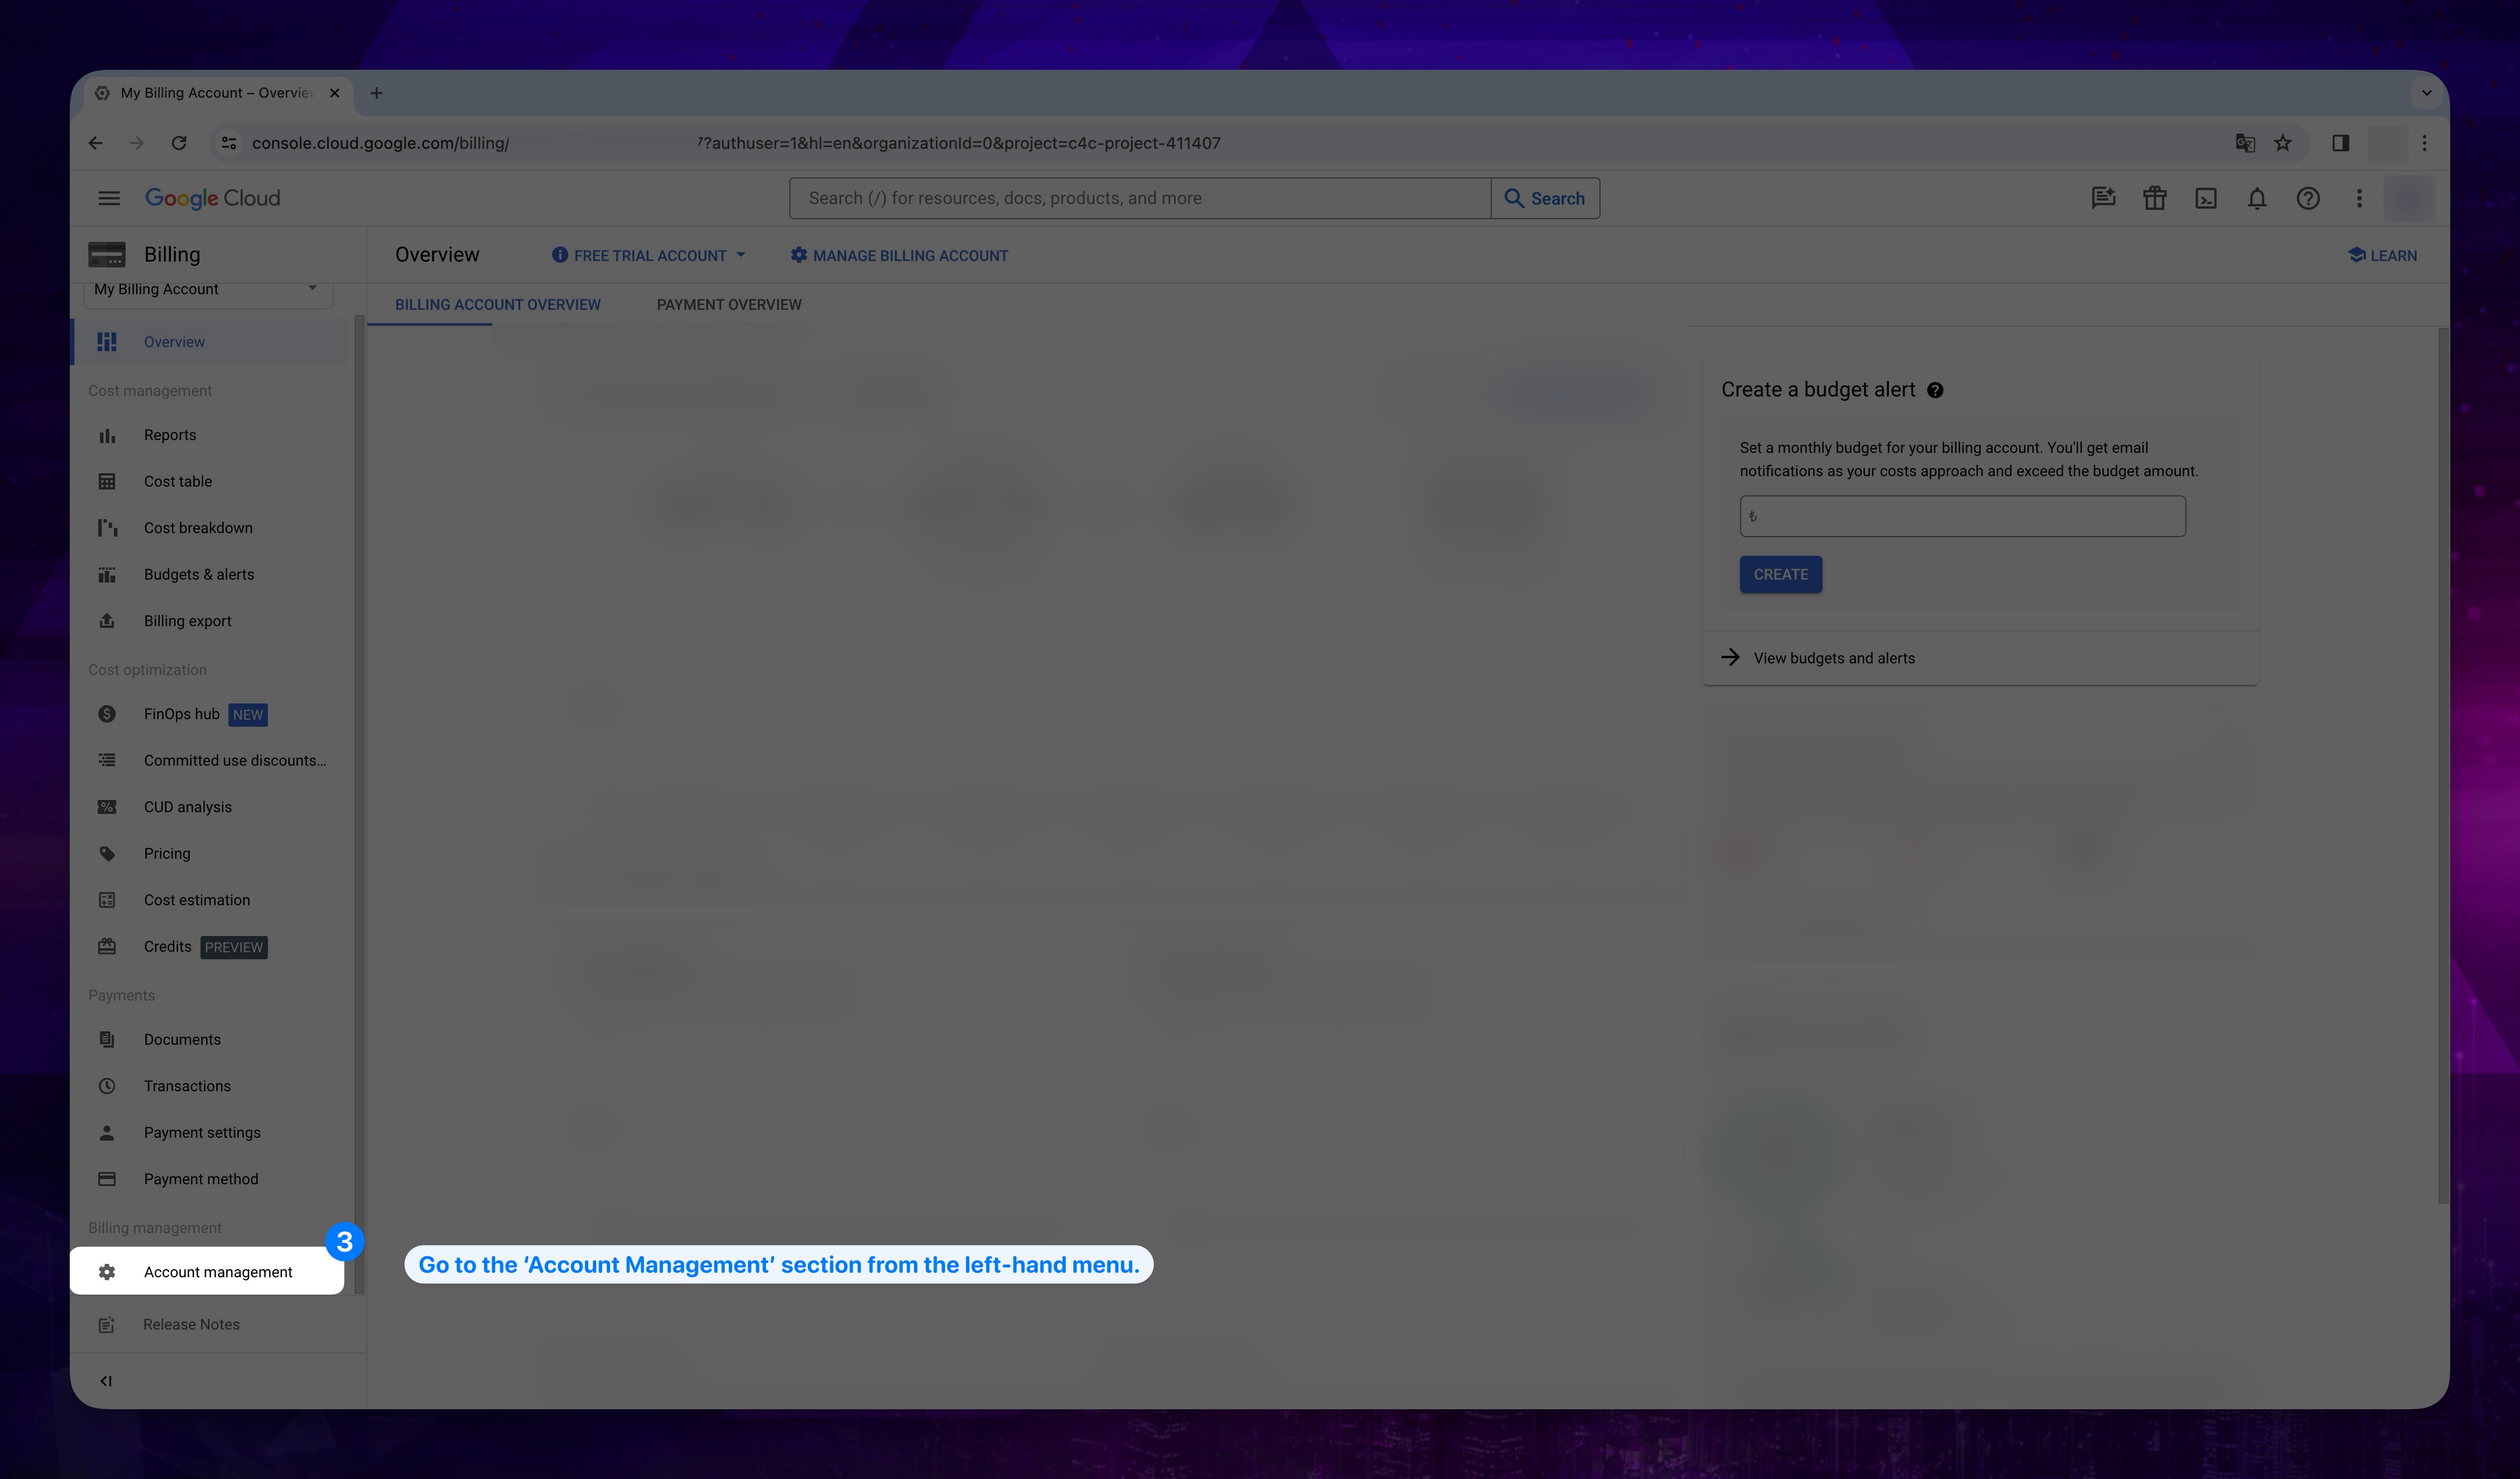
- Click on Account Management under the Billing Management section in the left-hand menu.
Show the instruction with images
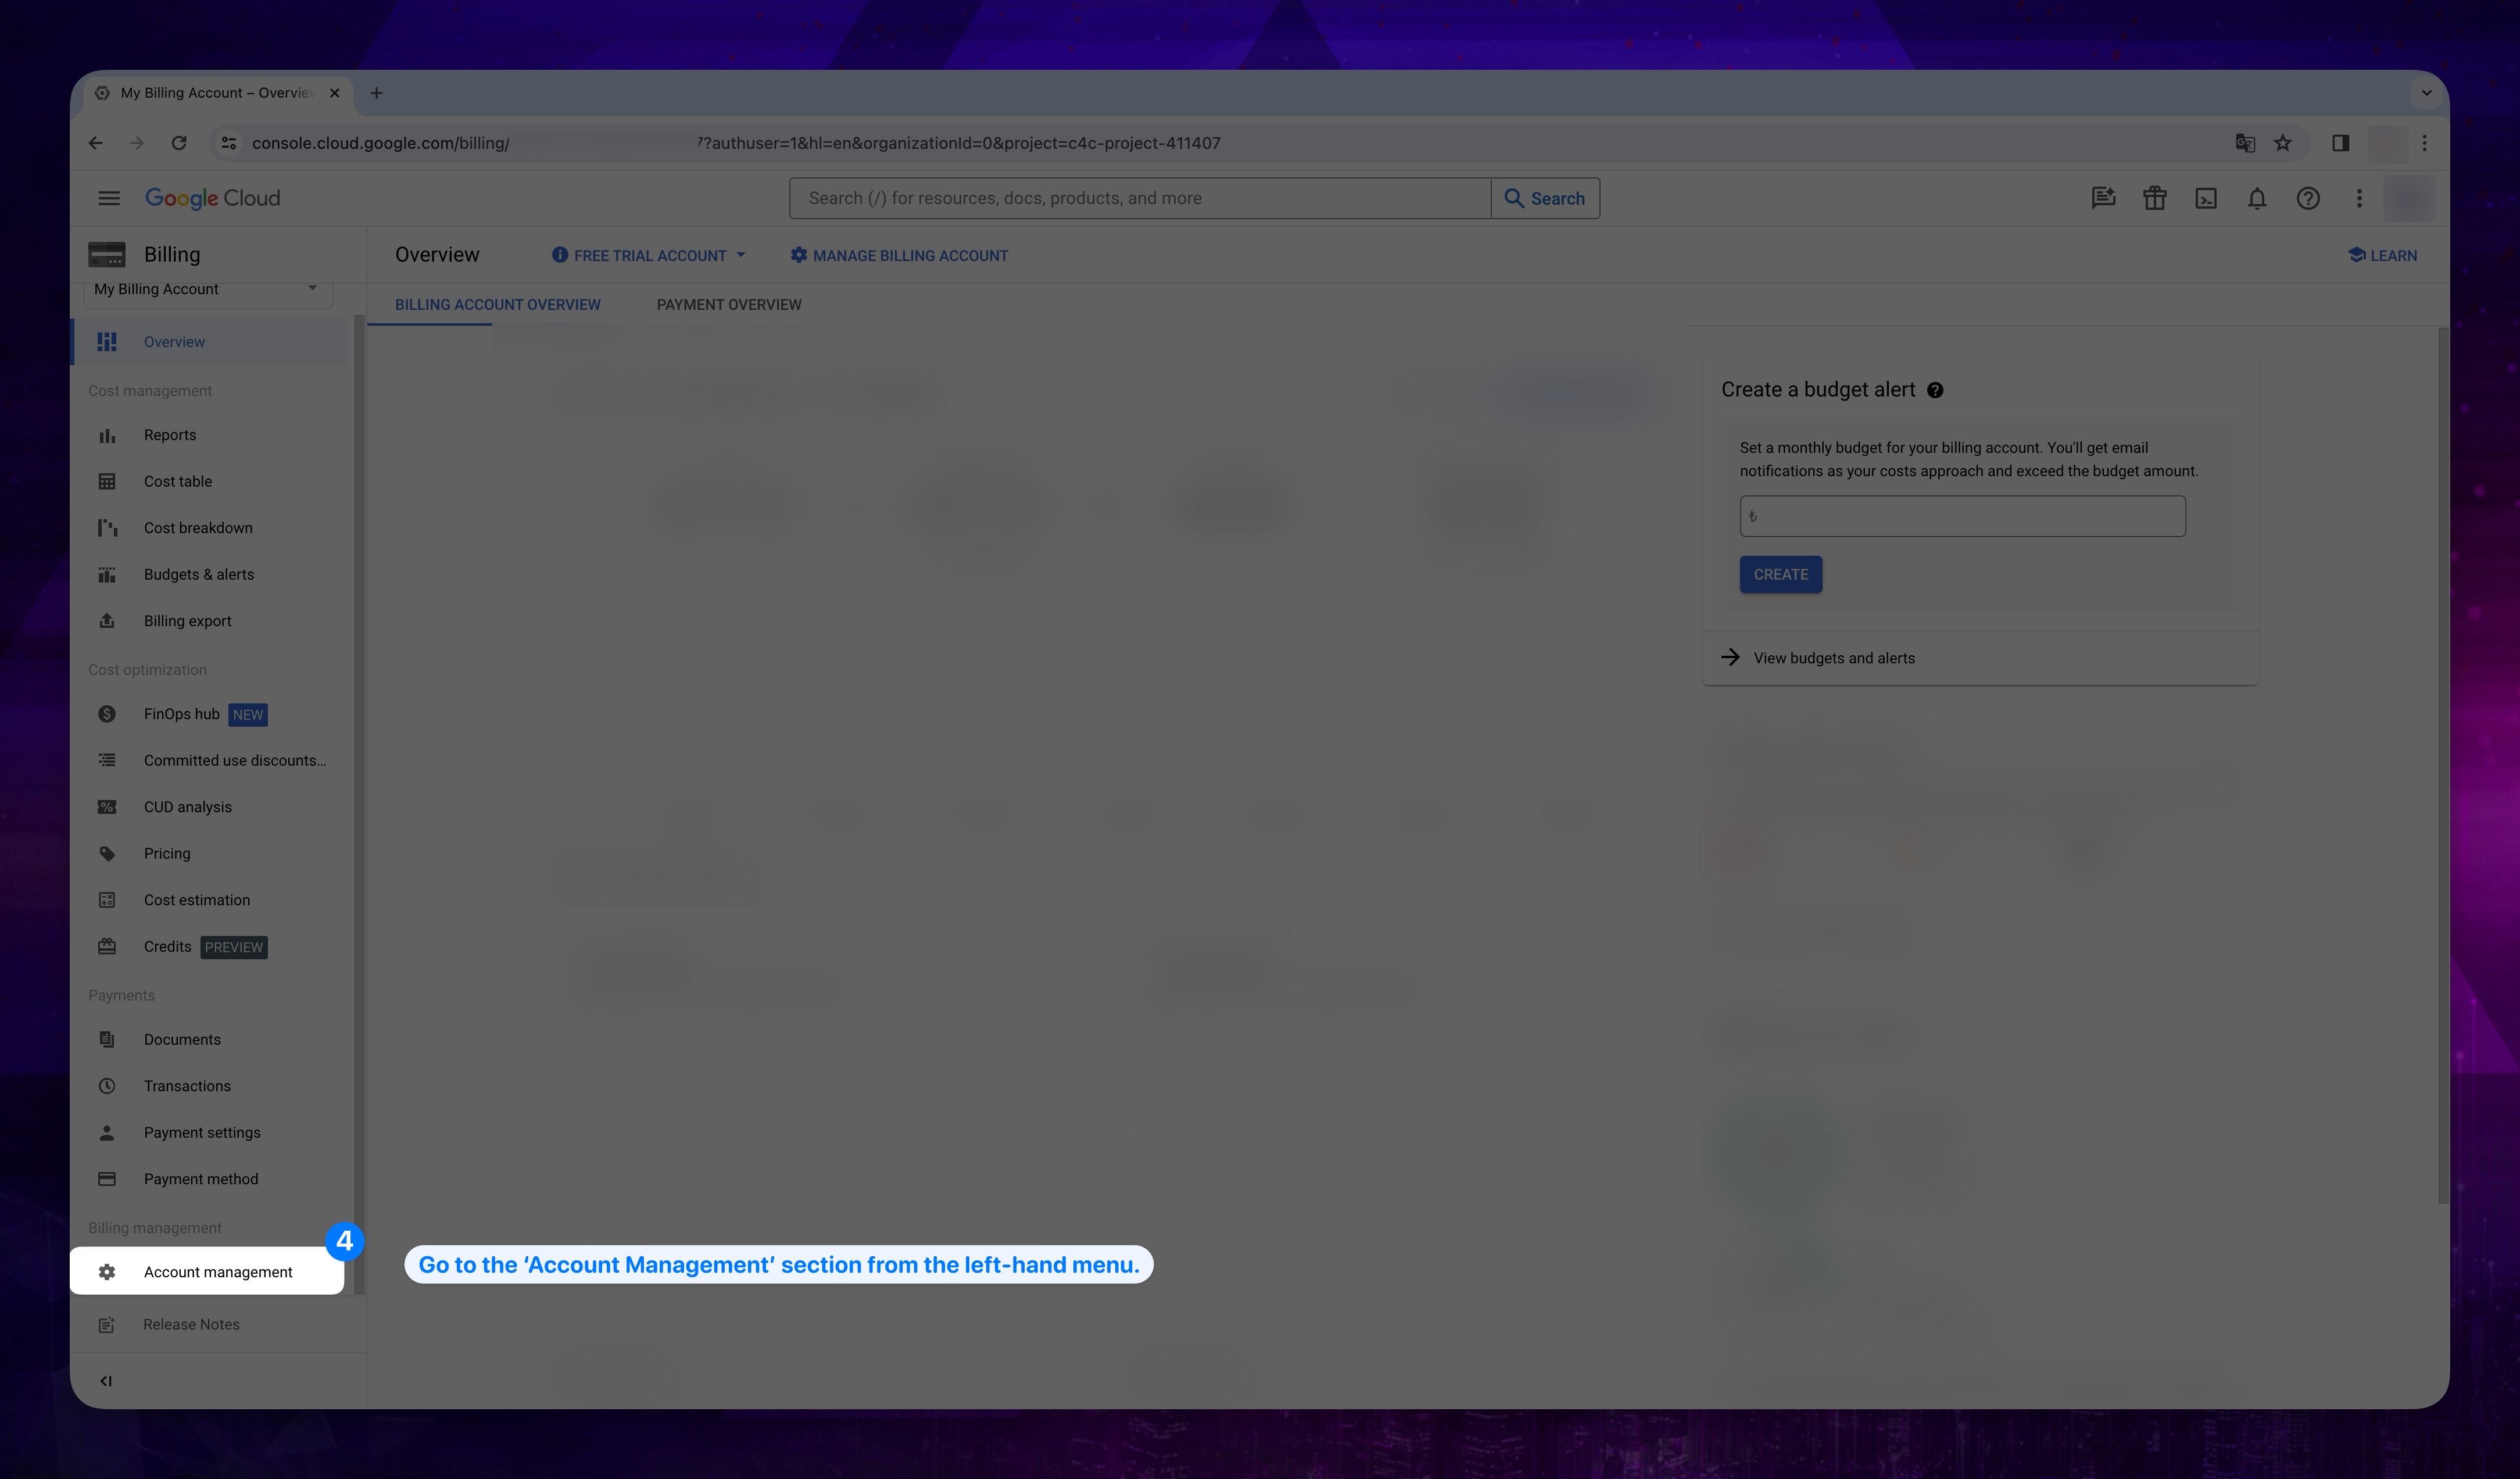
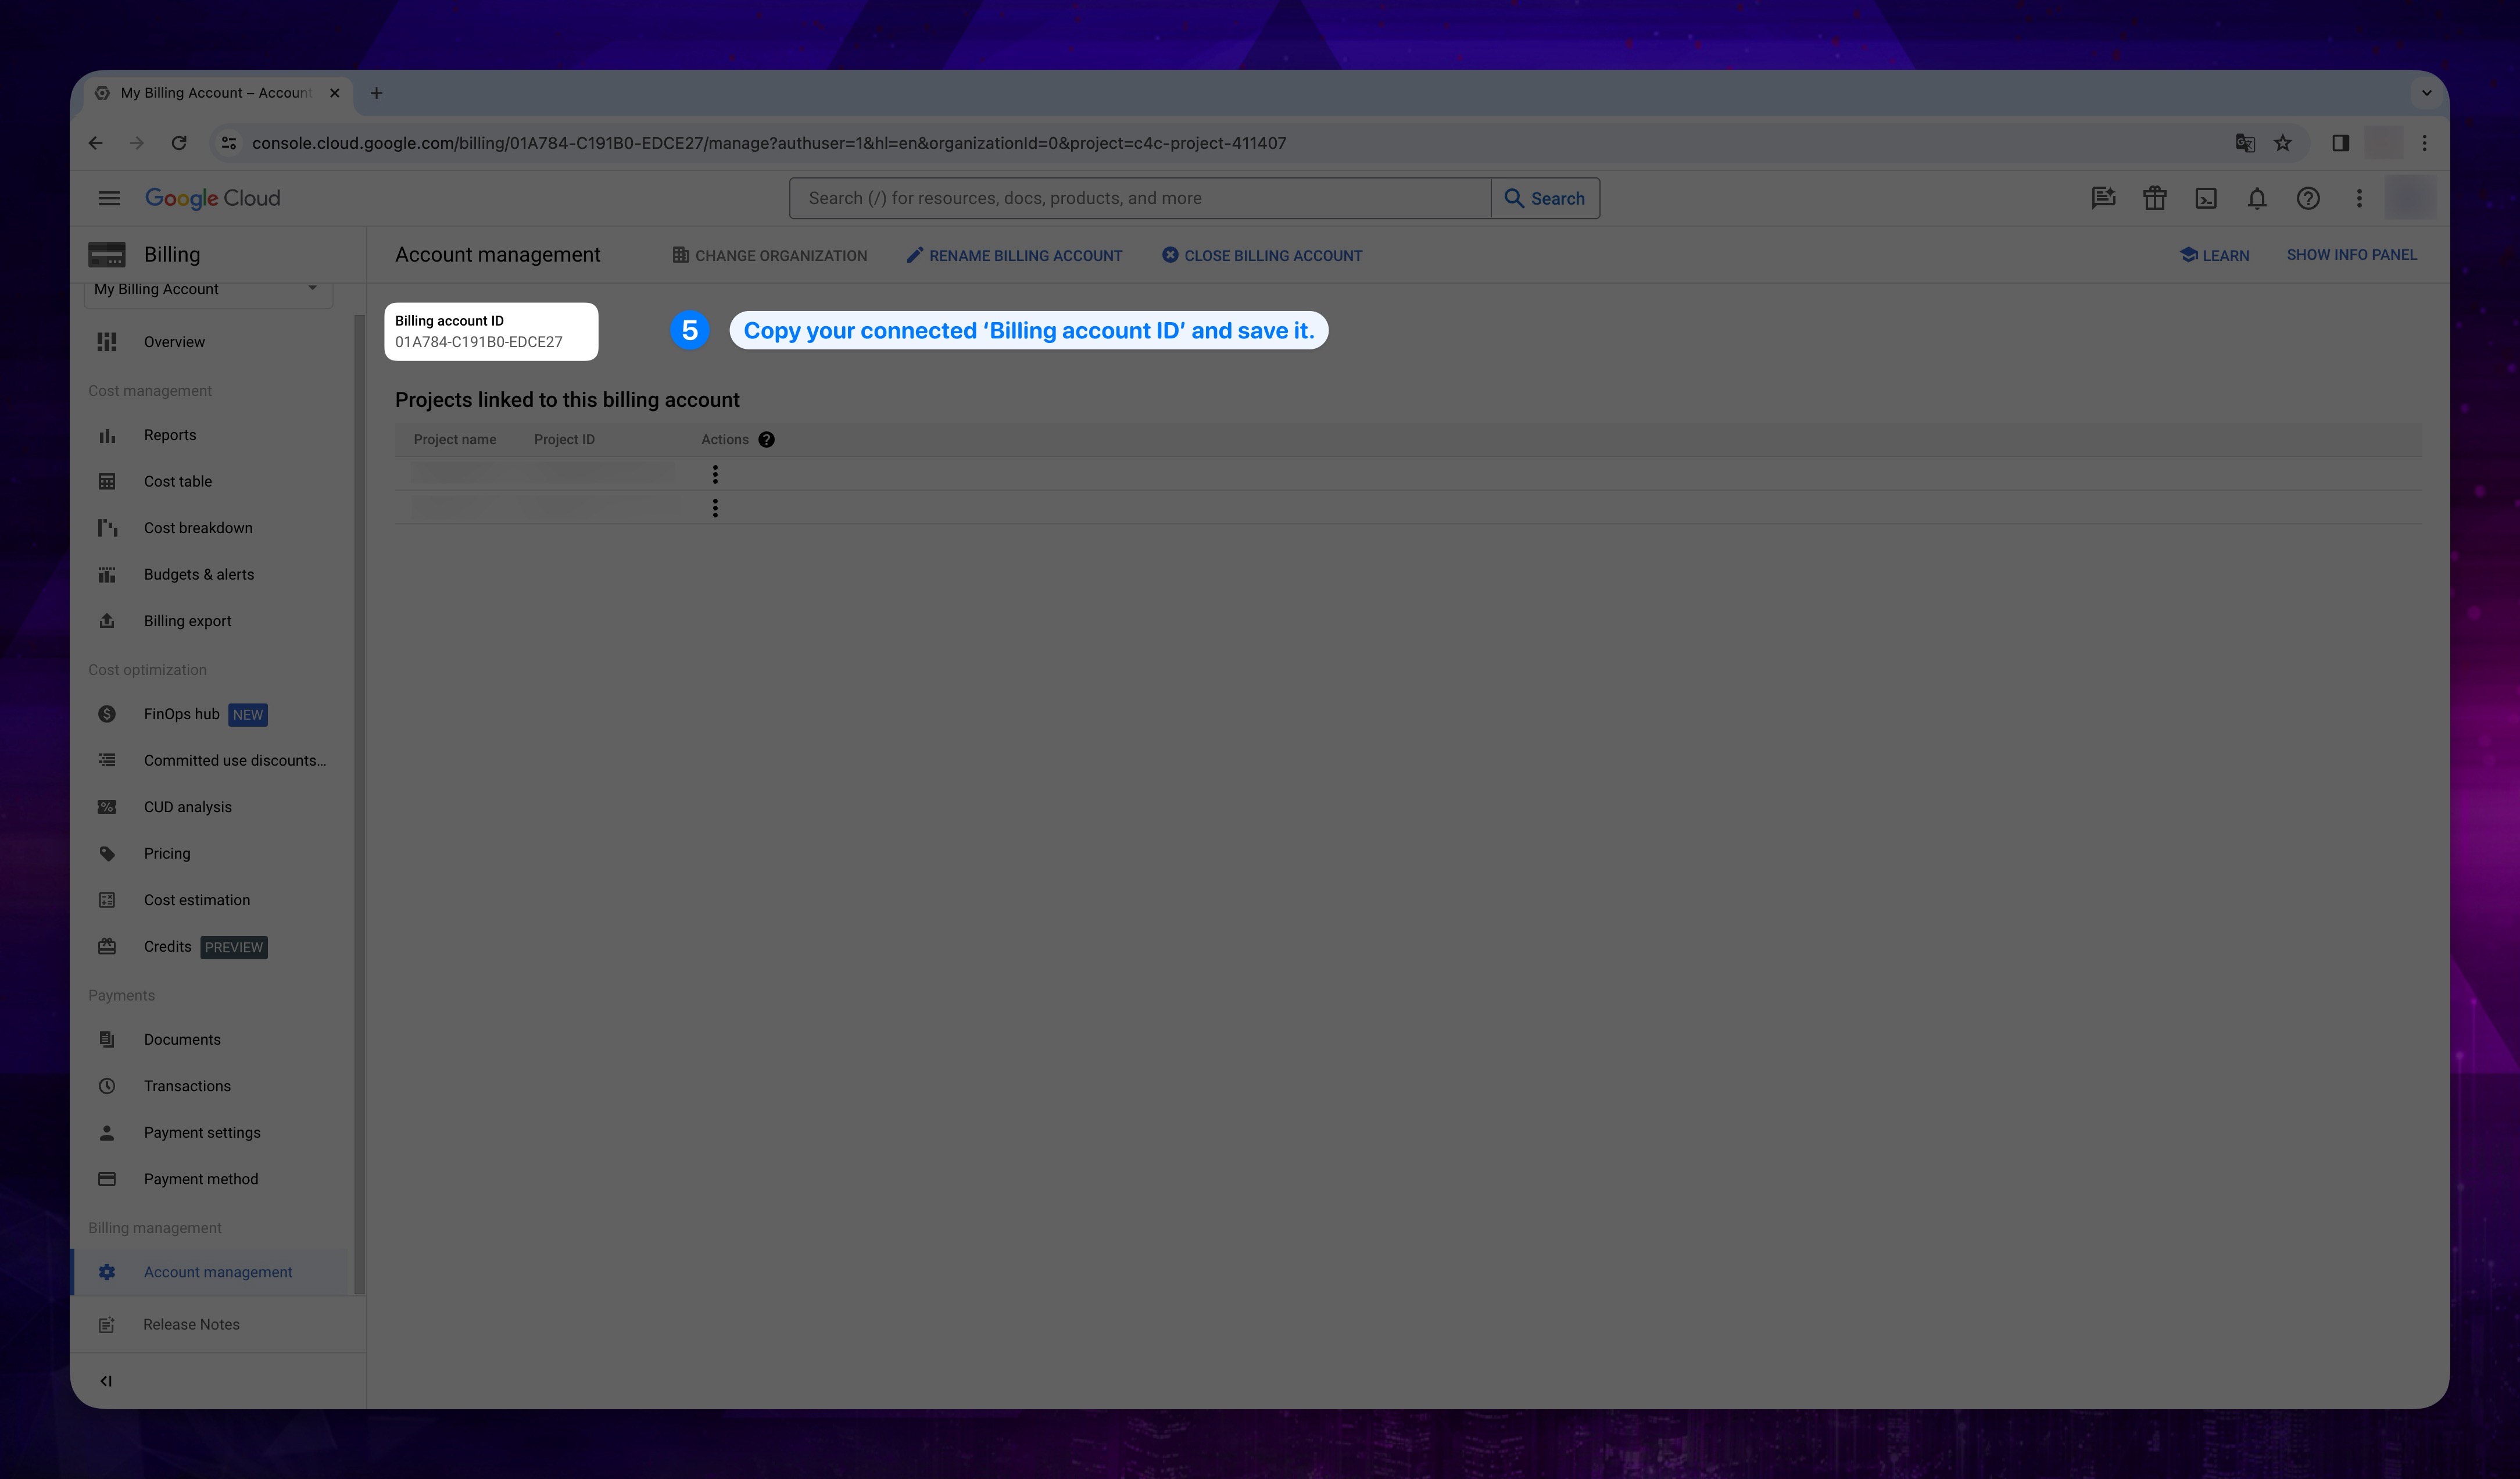
- From the opened screen, copy your Billing Account ID.
Save Billing Account ID securely for future use in our console.
Show the instruction with images
Creating Dataset for Billing Export
When entering your credentials on the onboarding screen, if you don't already have an existing dataset, you can follow the instructions in this section to create the dataset and obtain the necessary credentials.
1. New Dataset Creation
In order to analyze and delve into the cost and usage details of Google Cloud, it's essential to create two distinct datasets in BigQuery: one for Standard Usage Cost and another for Detailed Usage Cost. So you need to follow the instructions below twice.
-
Open your browser and go to the Google Cloud Console.
-
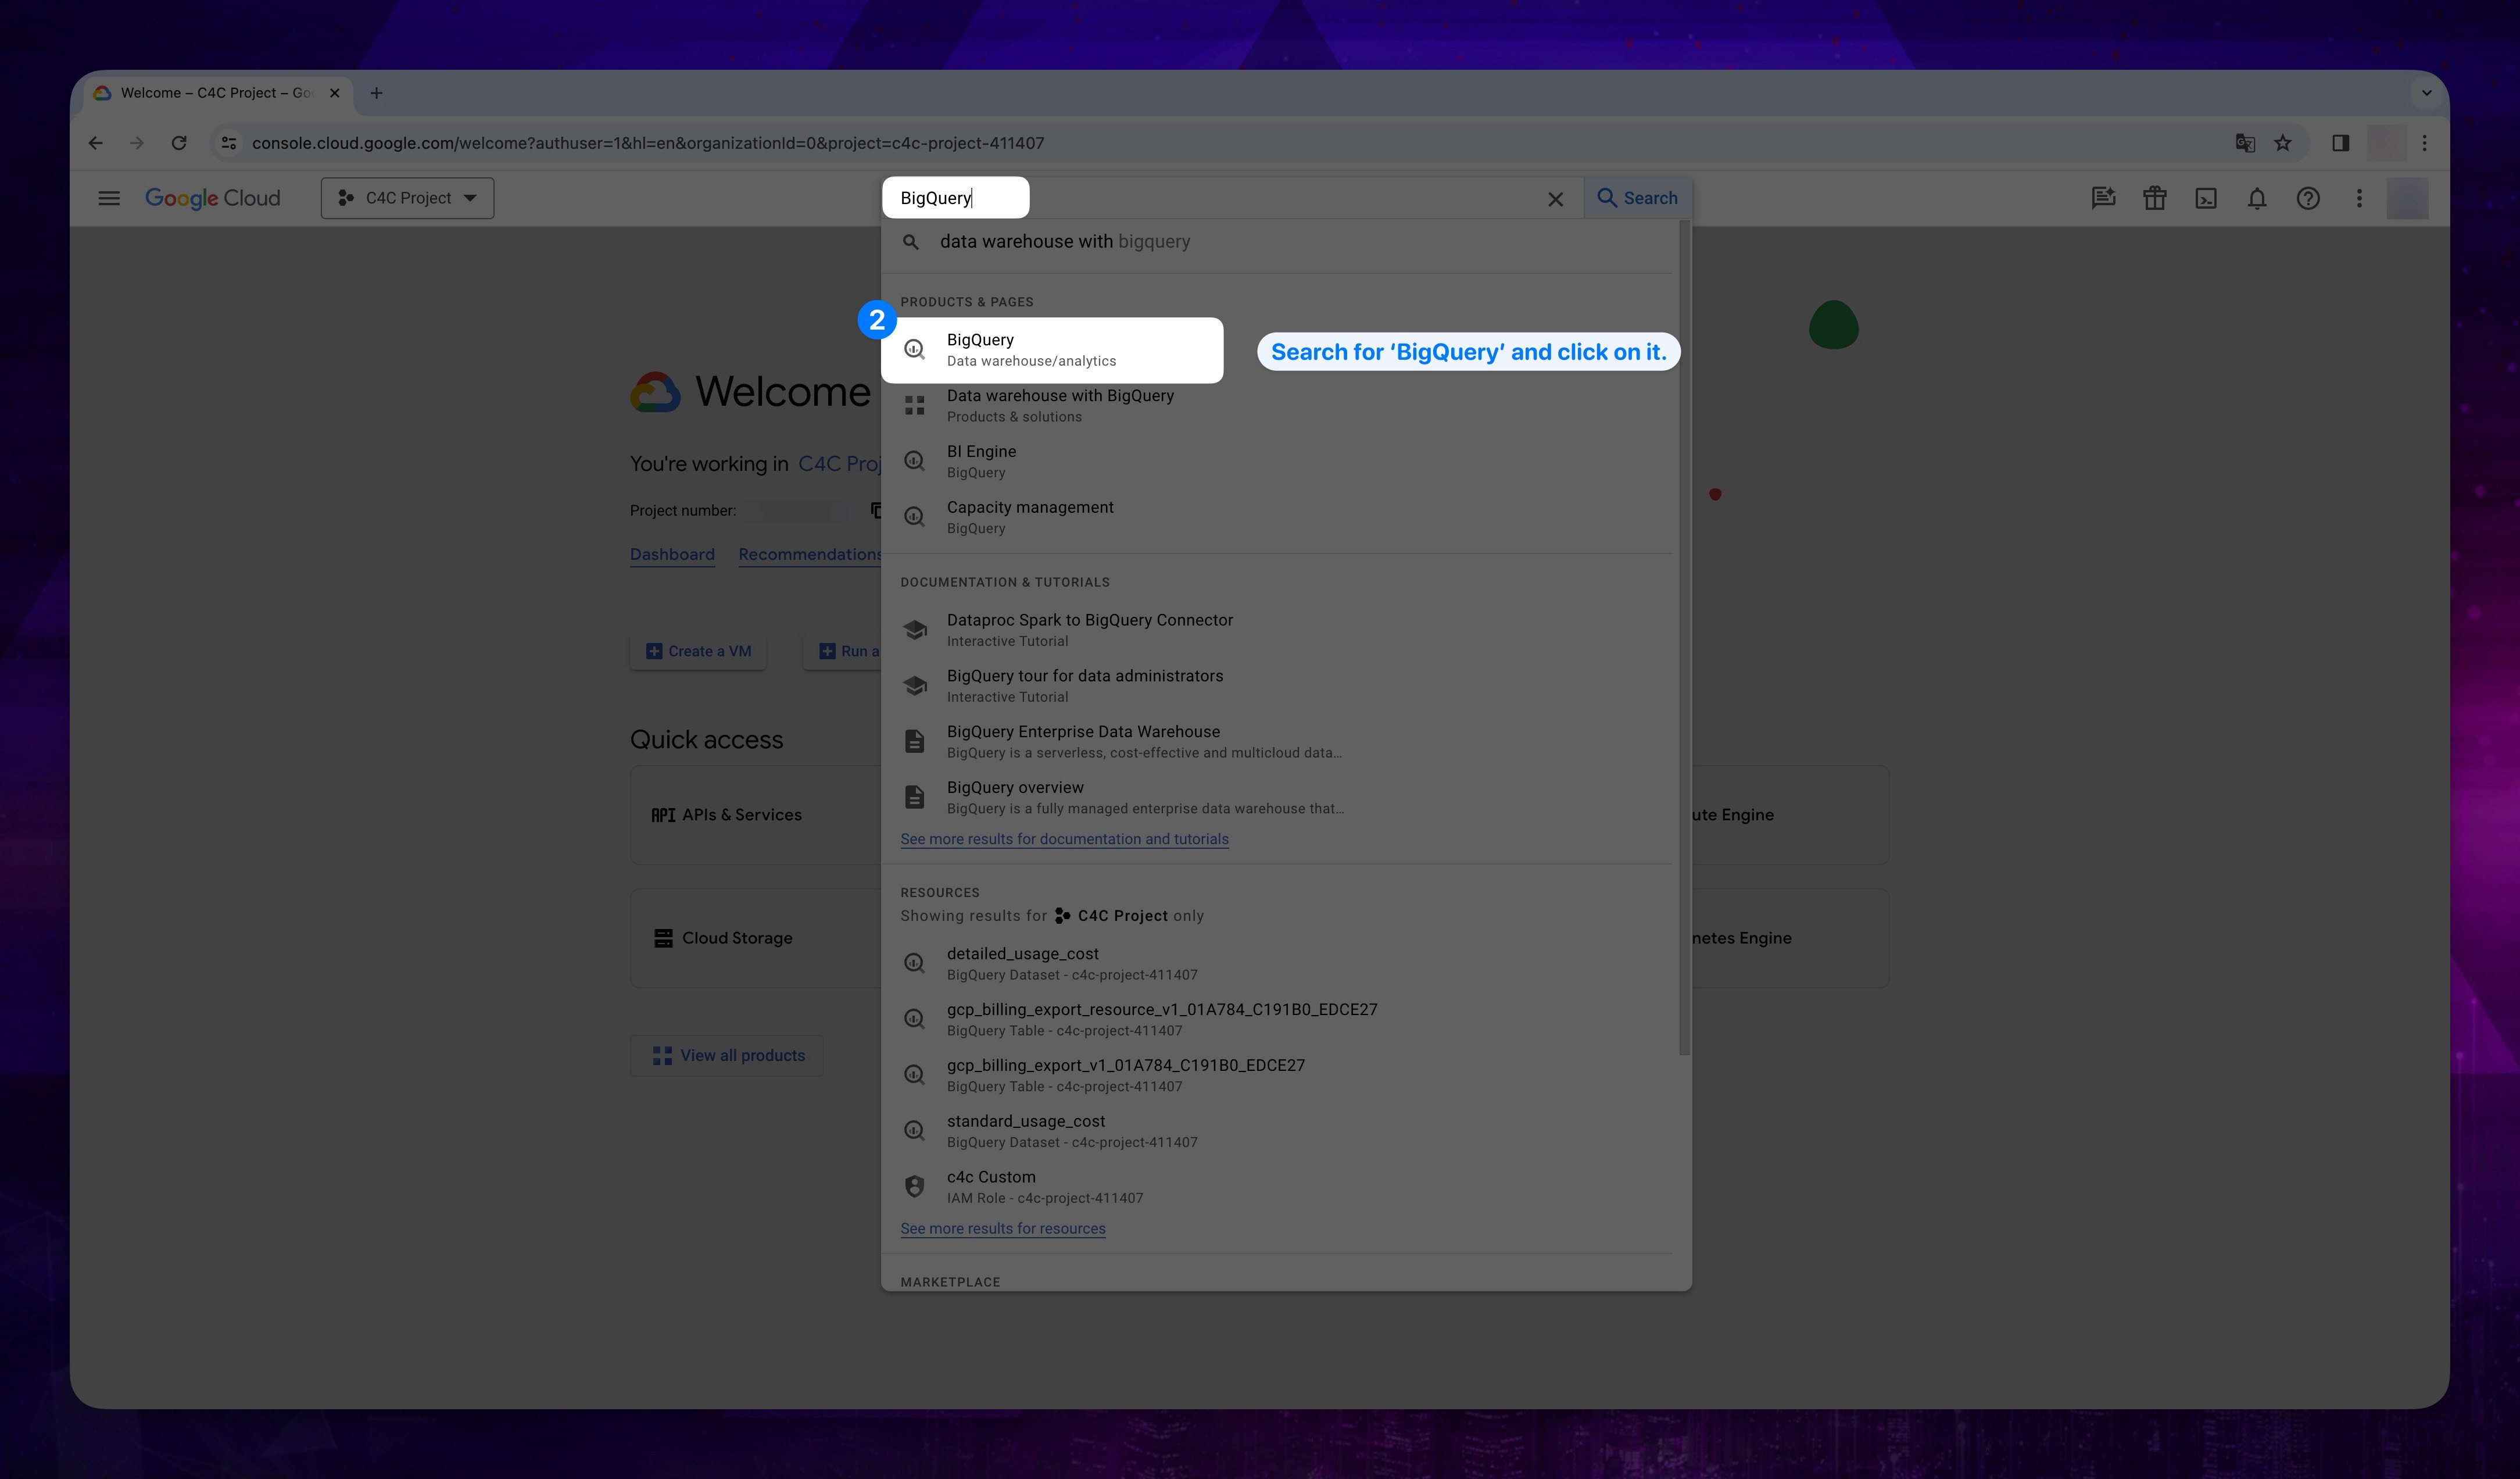
Go to the search bar and search for BigQuery and click on it.
Show the instruction with images
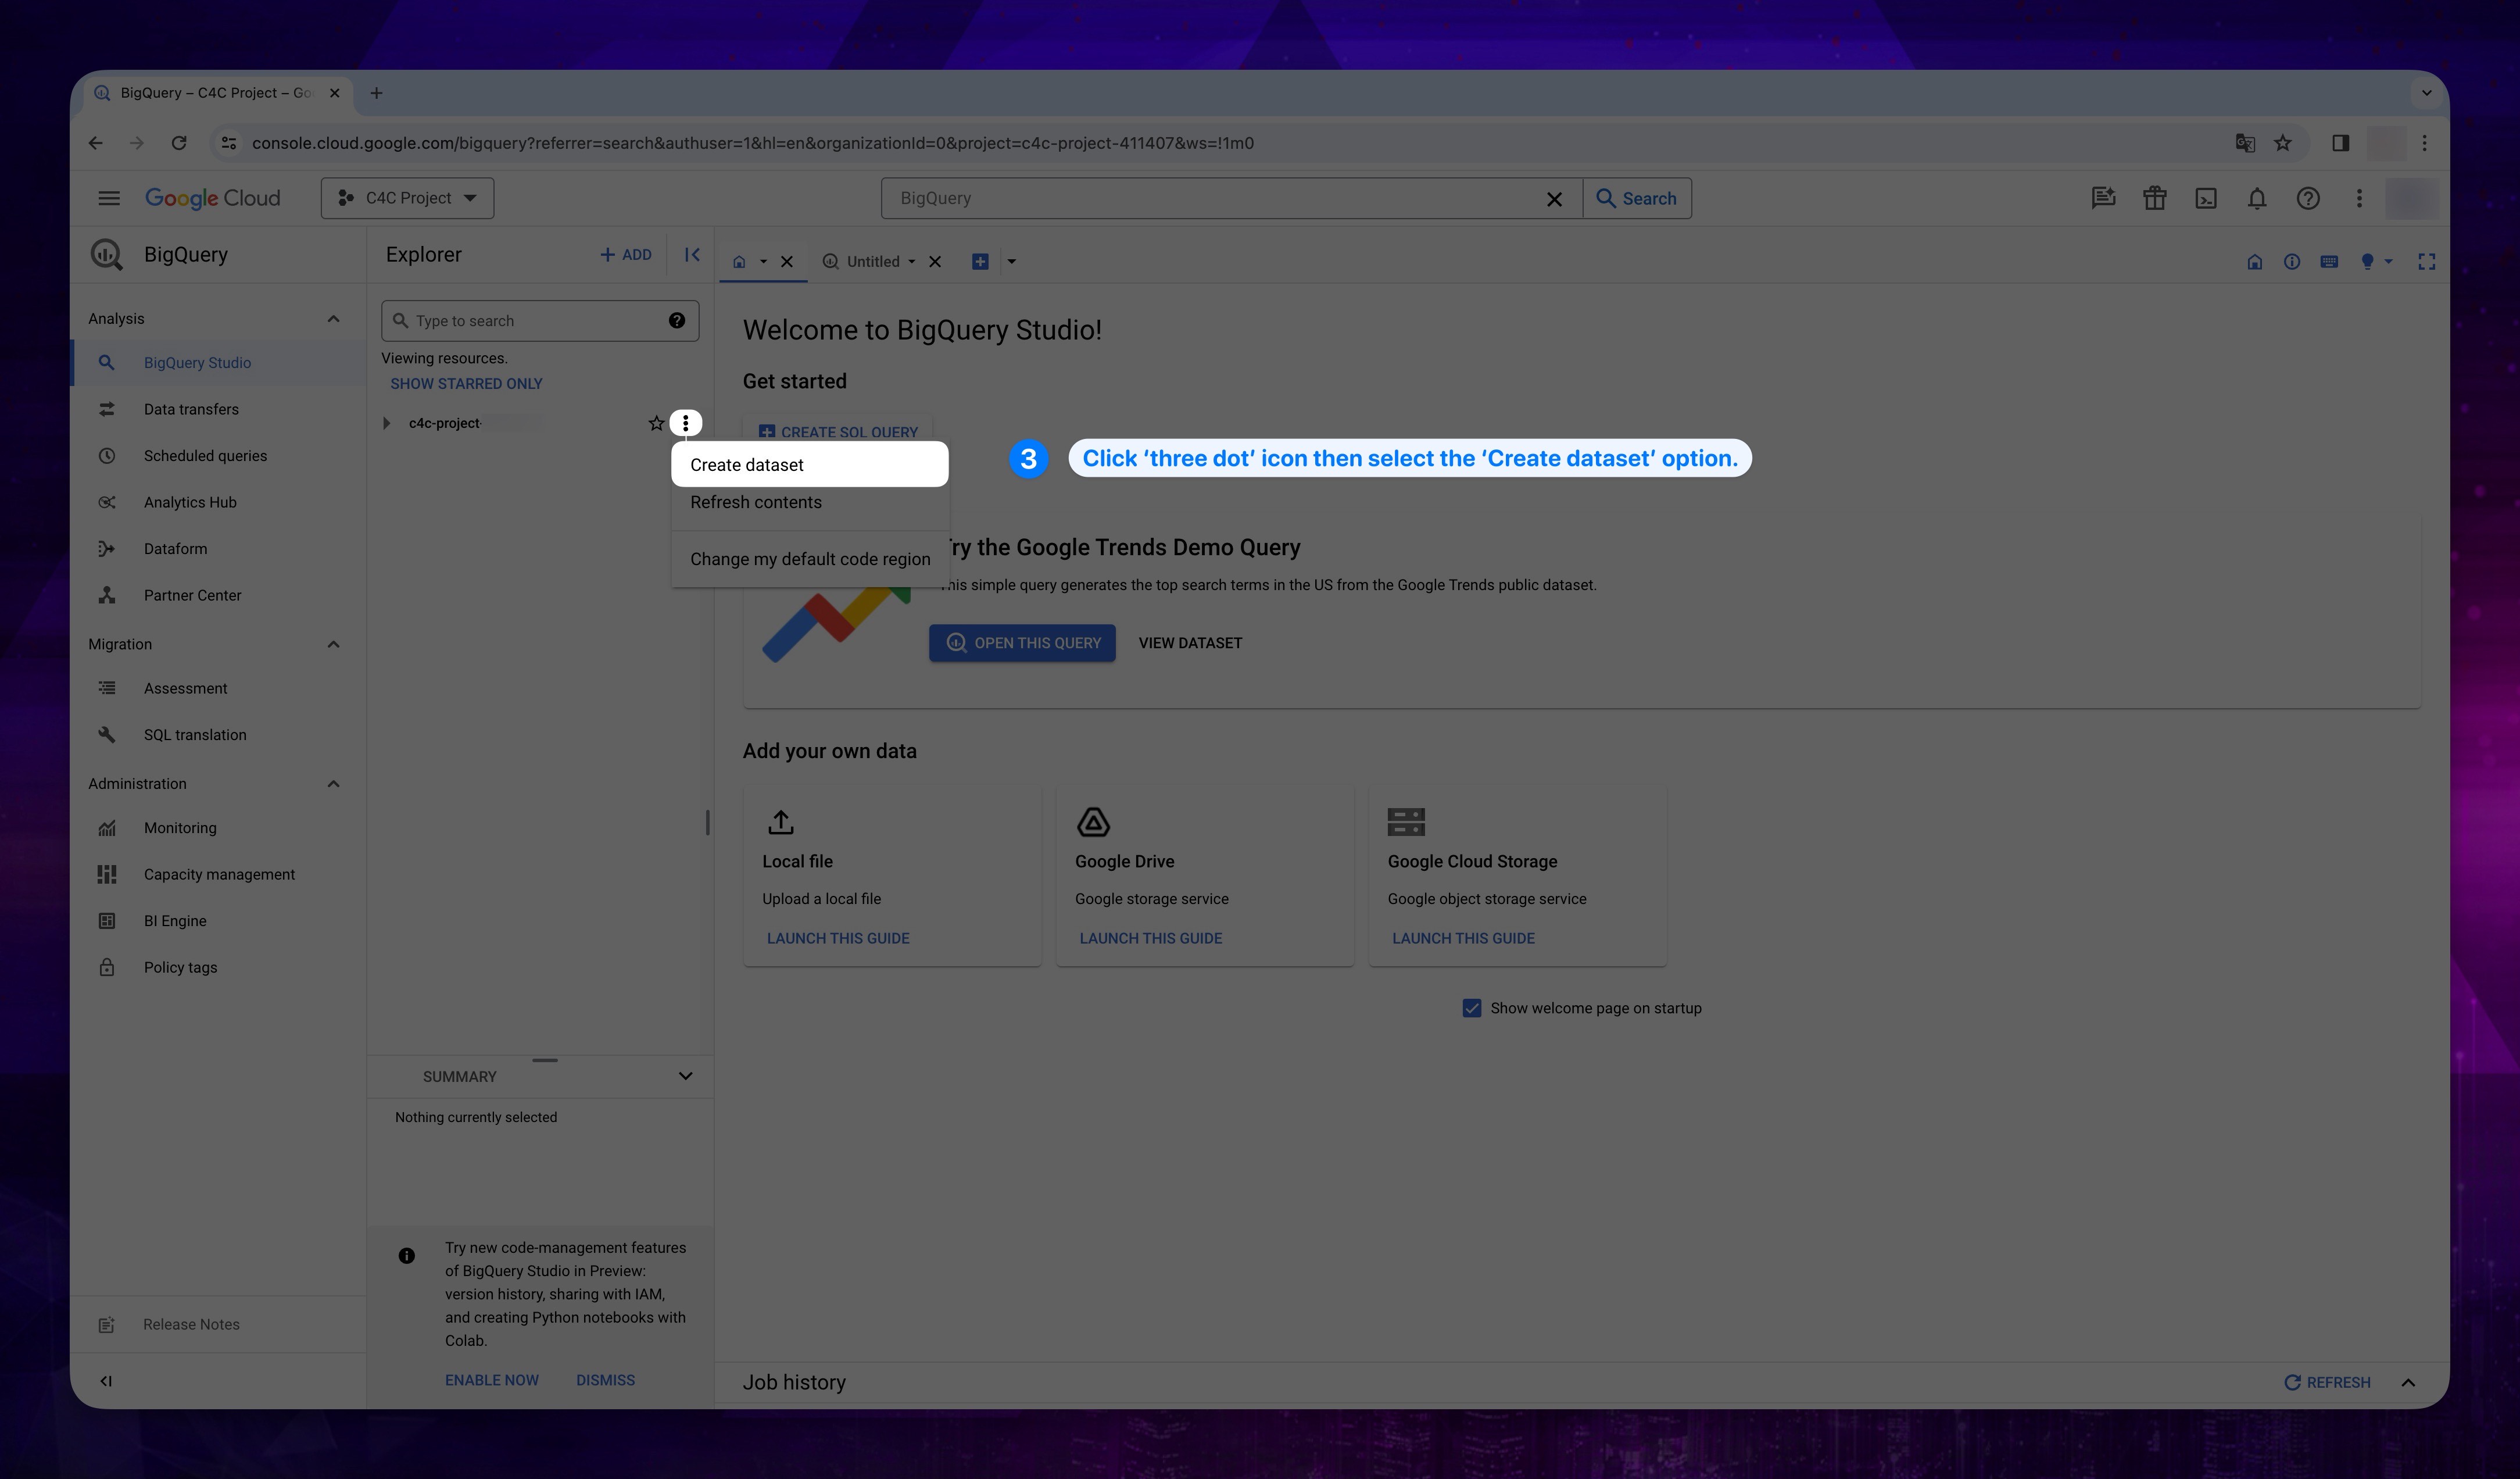
- In the Explorer panel, next to the project ID, click the View actions menu (three dots) and then select Create dataset section. The Create dataset panel opens.
Show the instruction with images
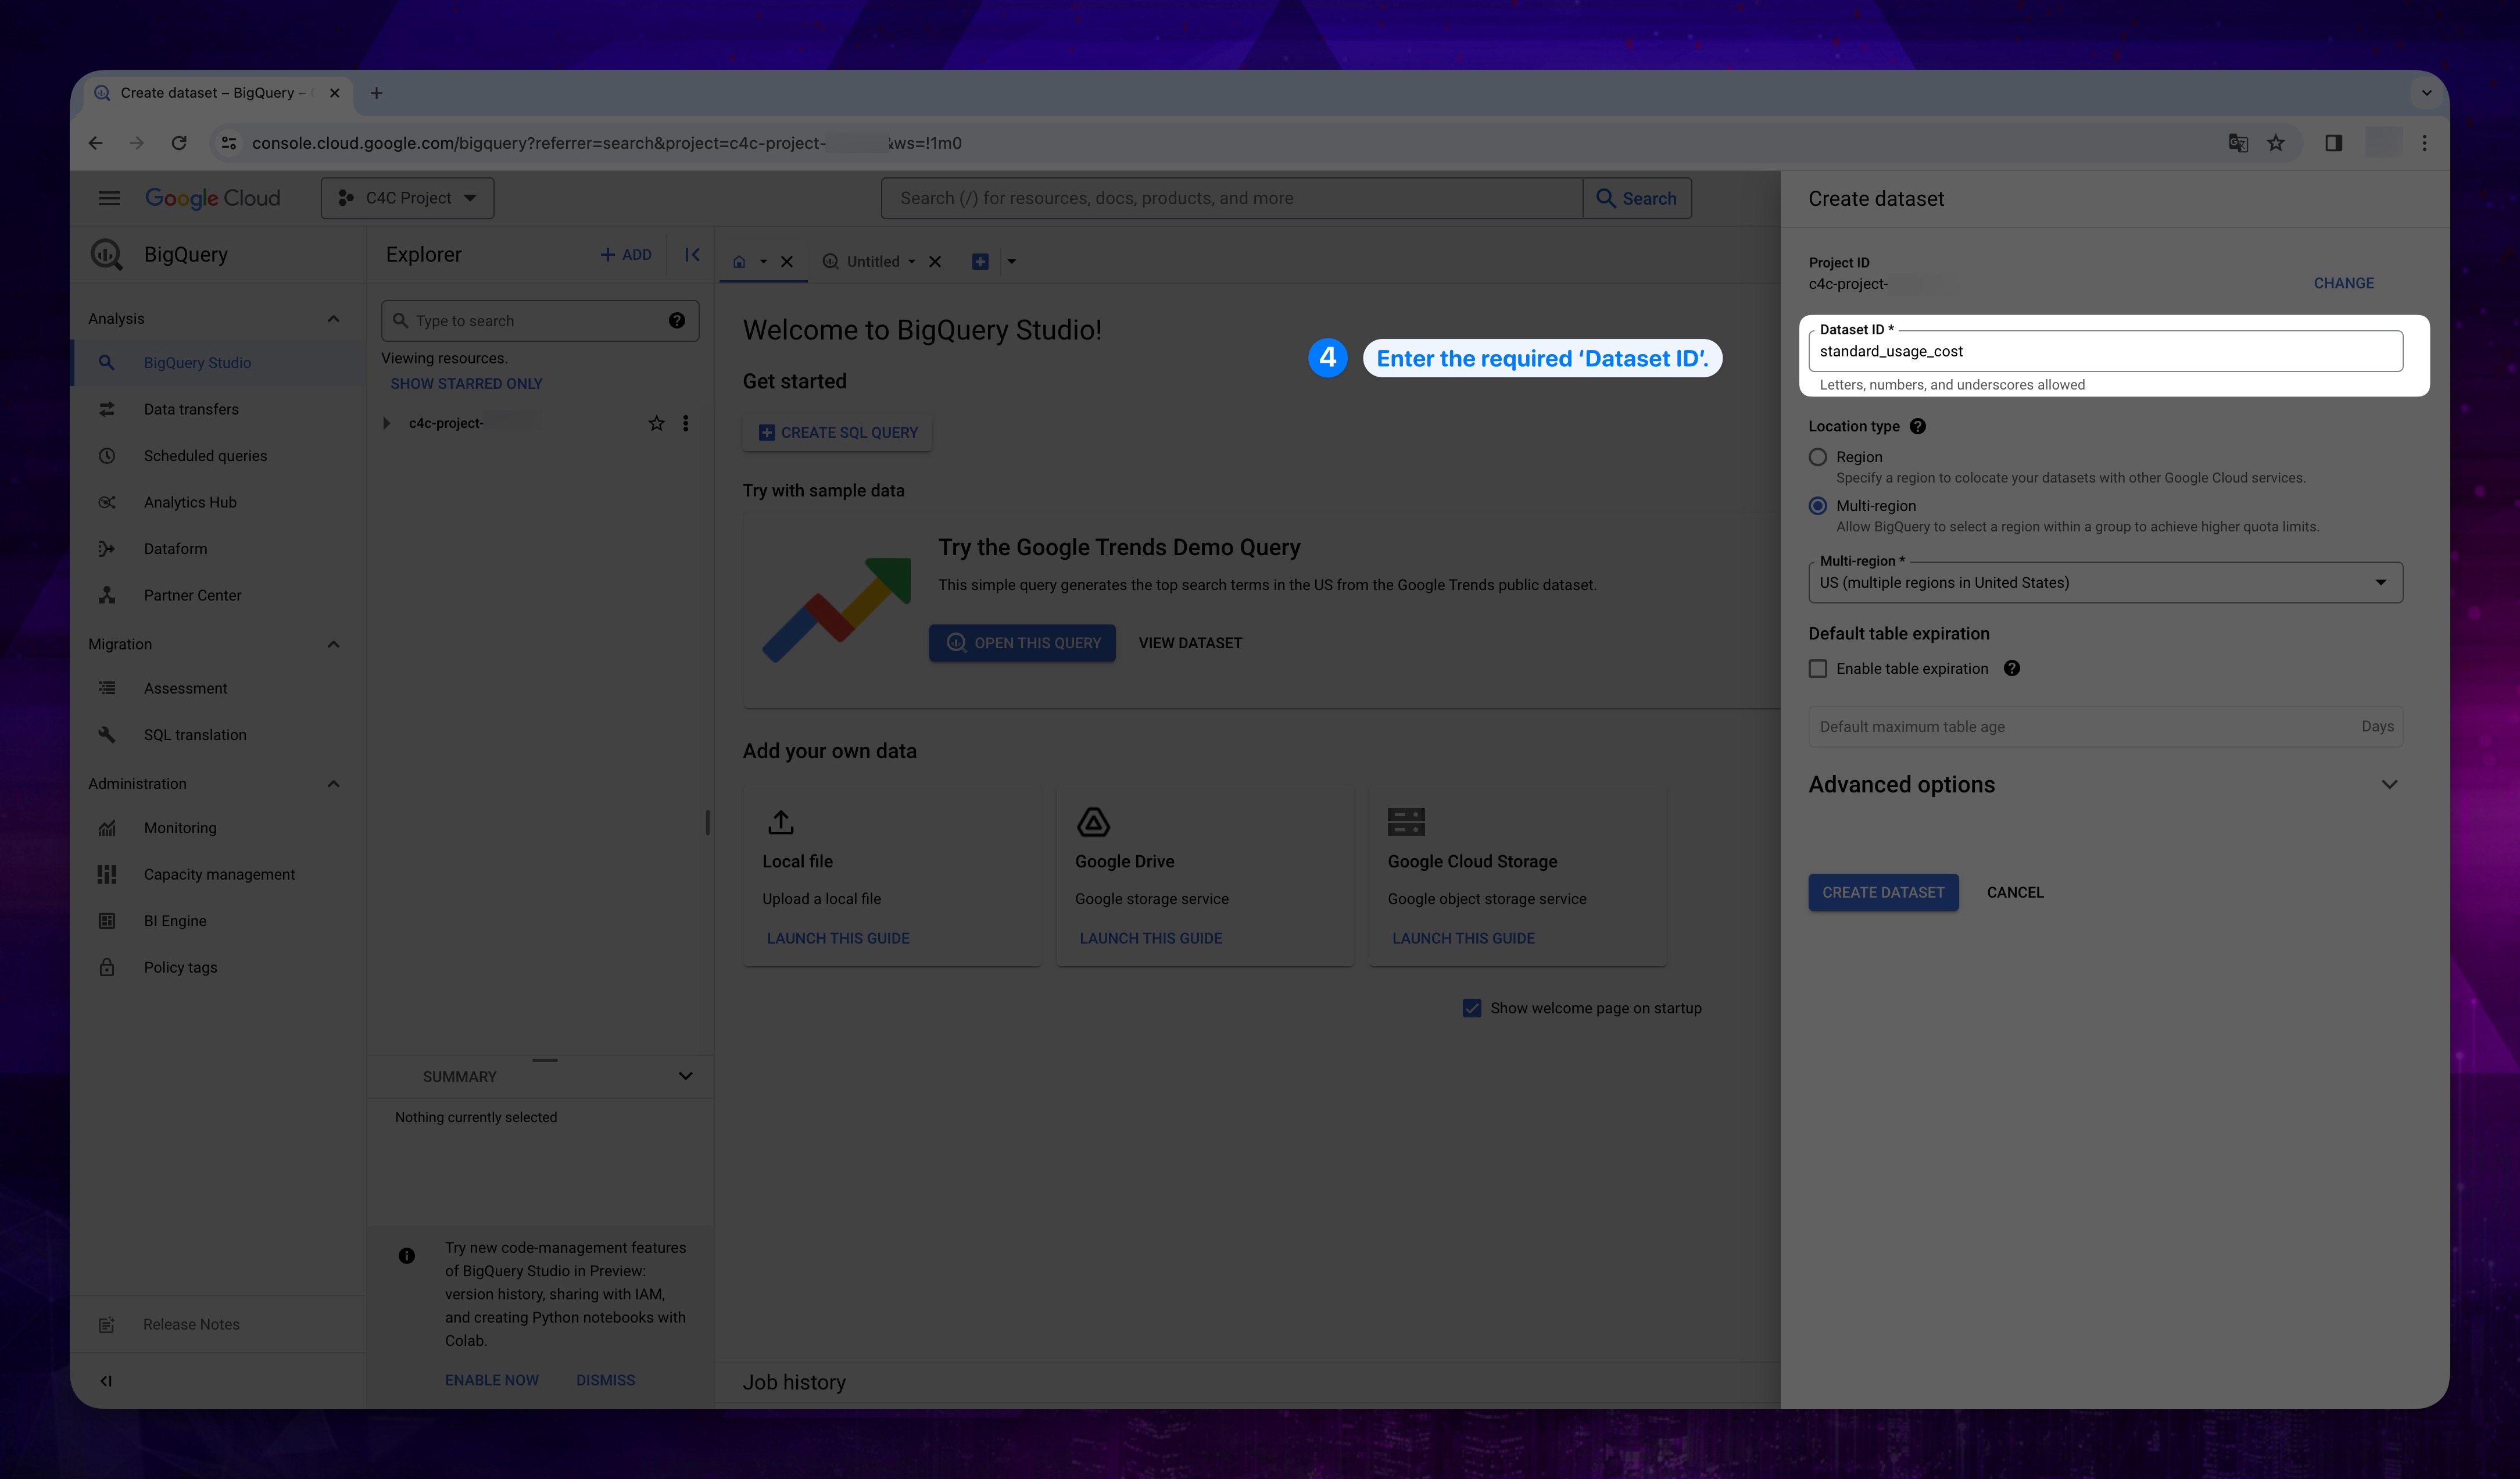
- Enter a Dataset ID and leave the other settings at their default values.
For the Dataset ID, you can choose any name you prefer, but it is recommended to select standard_usage_cost for one dataset and detailed_usage_cost for the other.
Show the instruction with images
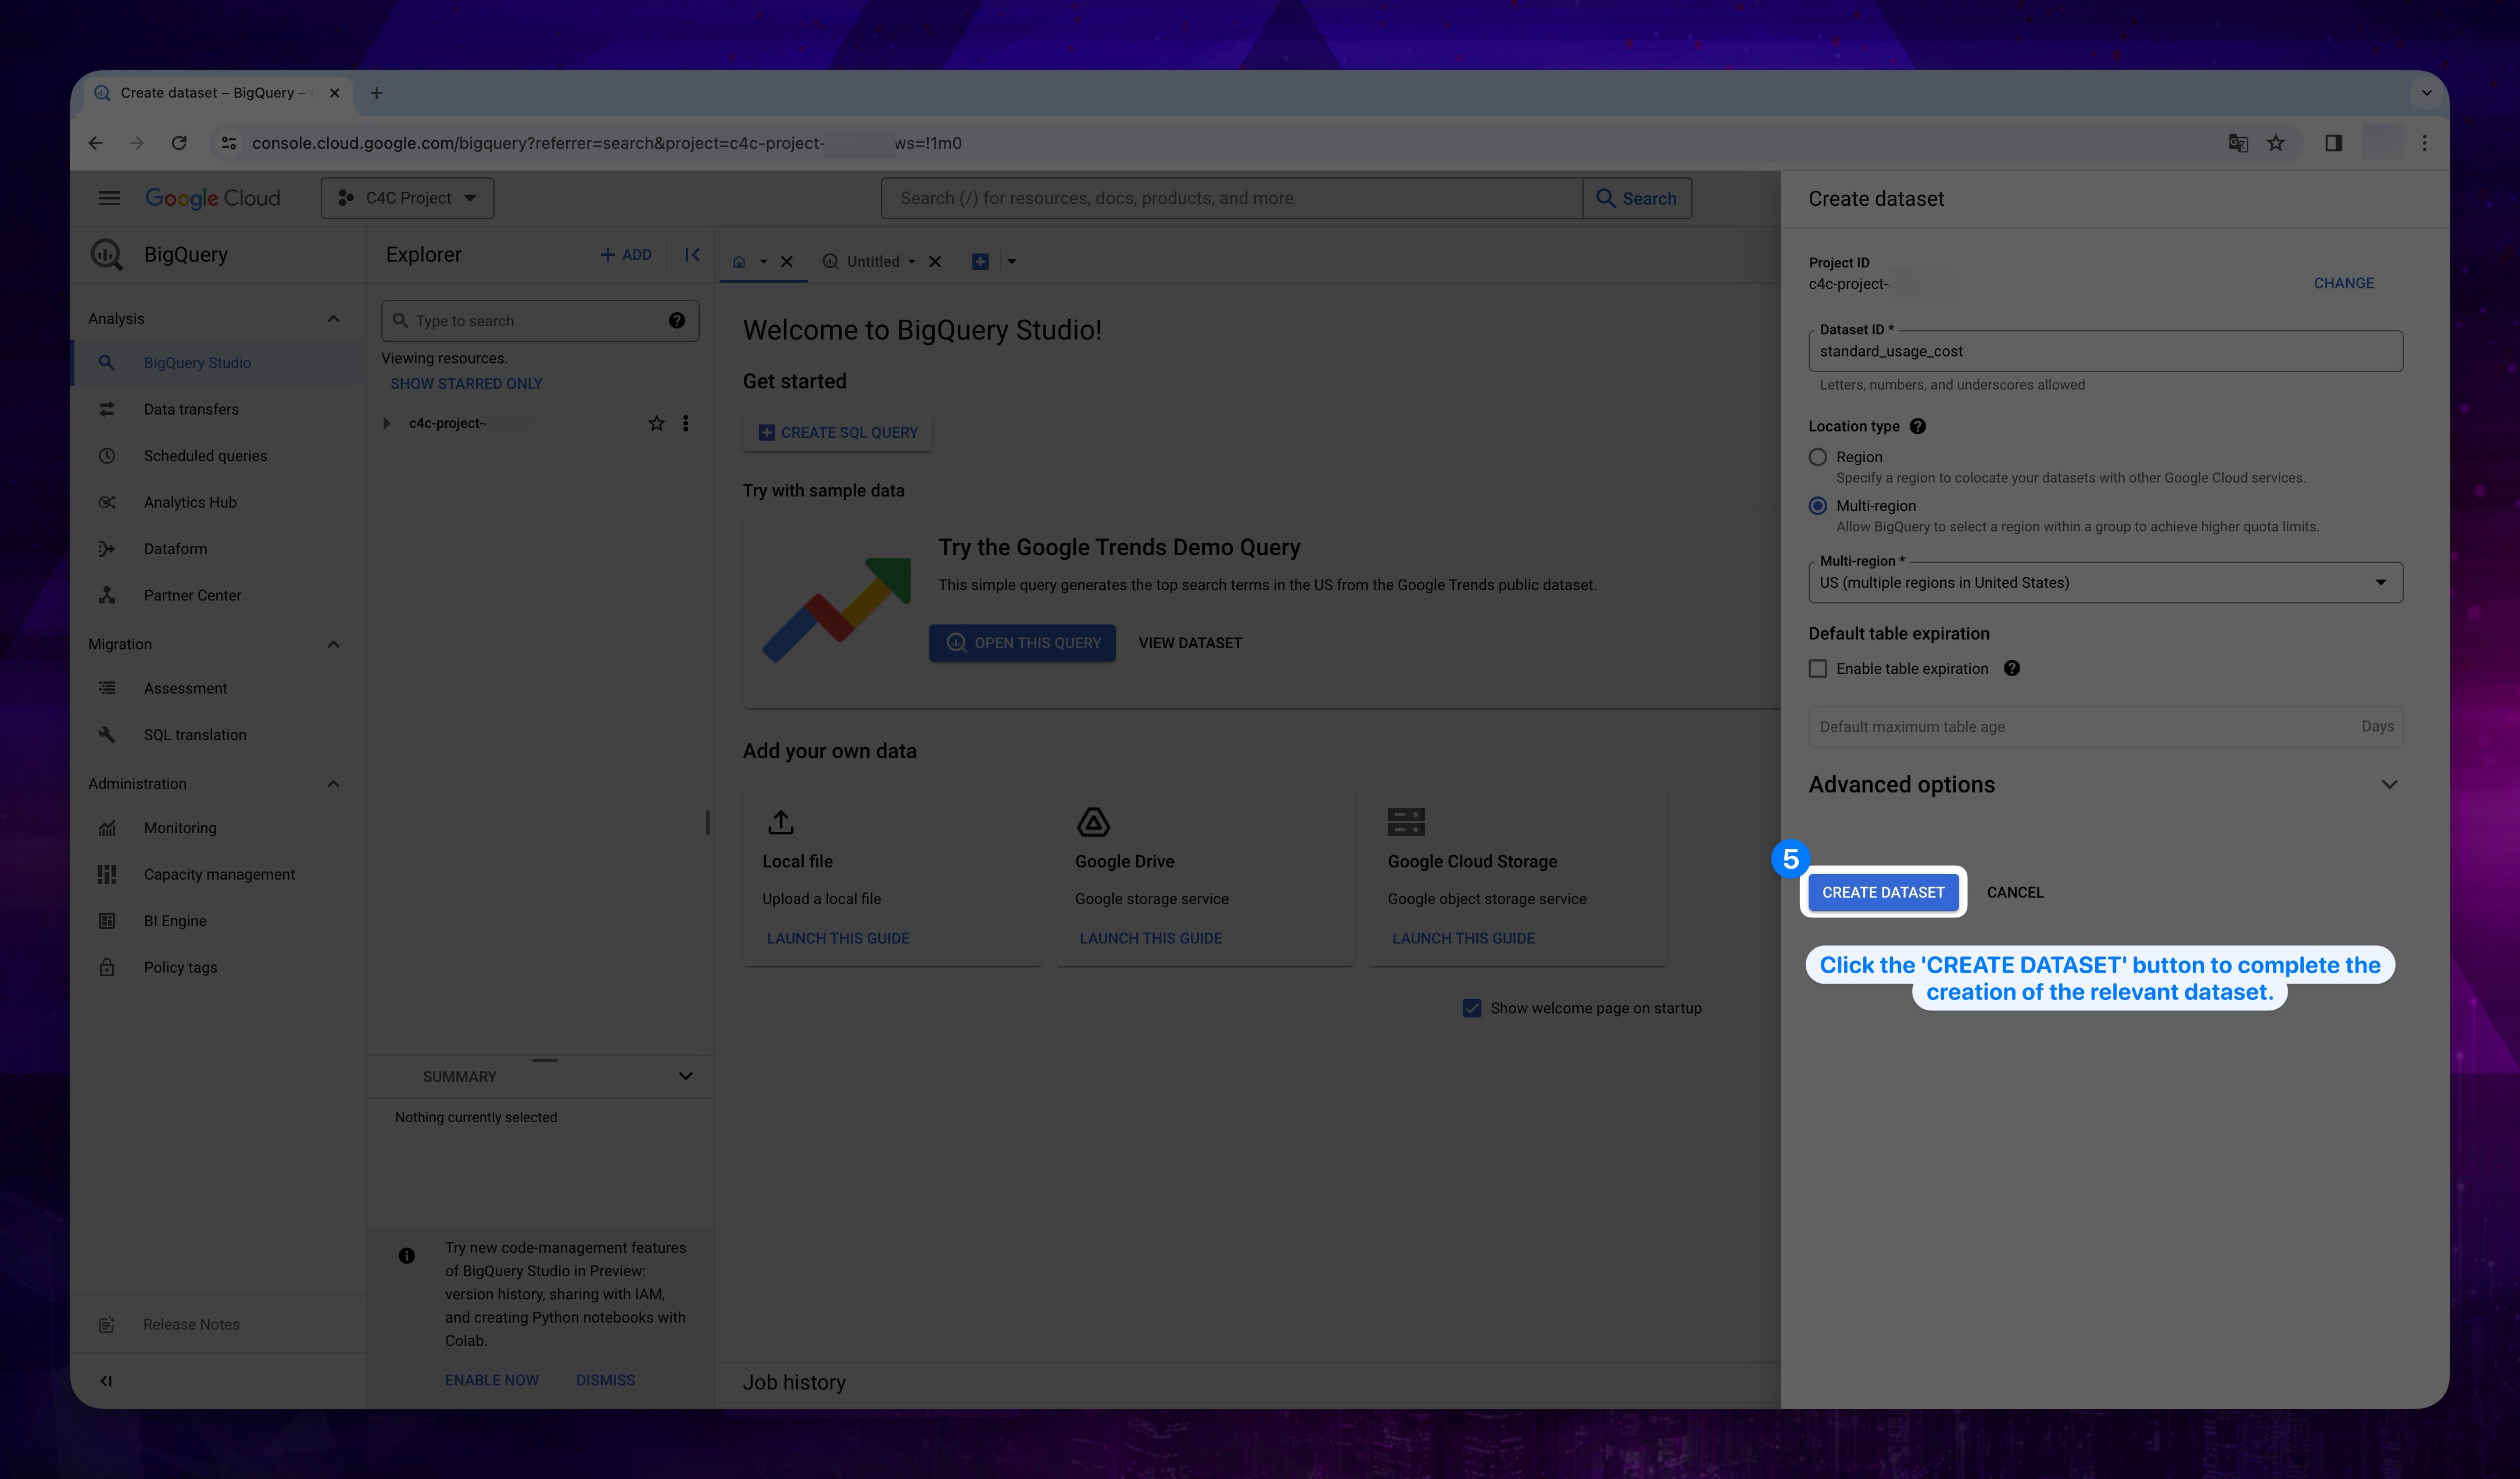
- Then click CREATE DATASET button to create dateset.
Show the instruction with images
At the end of these steps, you should have successfully created two separate datasets that can be used for billing export processes.
2. Assigning Datasets to Billing Export
-
Open your browser and go to the Google Cloud Console.
-
Go to the search bar and search for Billing Export and click on it.
Show the instruction with images

-
Choose the Cloud Billing account for which your selected project connected. The Billing export page opens for the selected billing account.
-
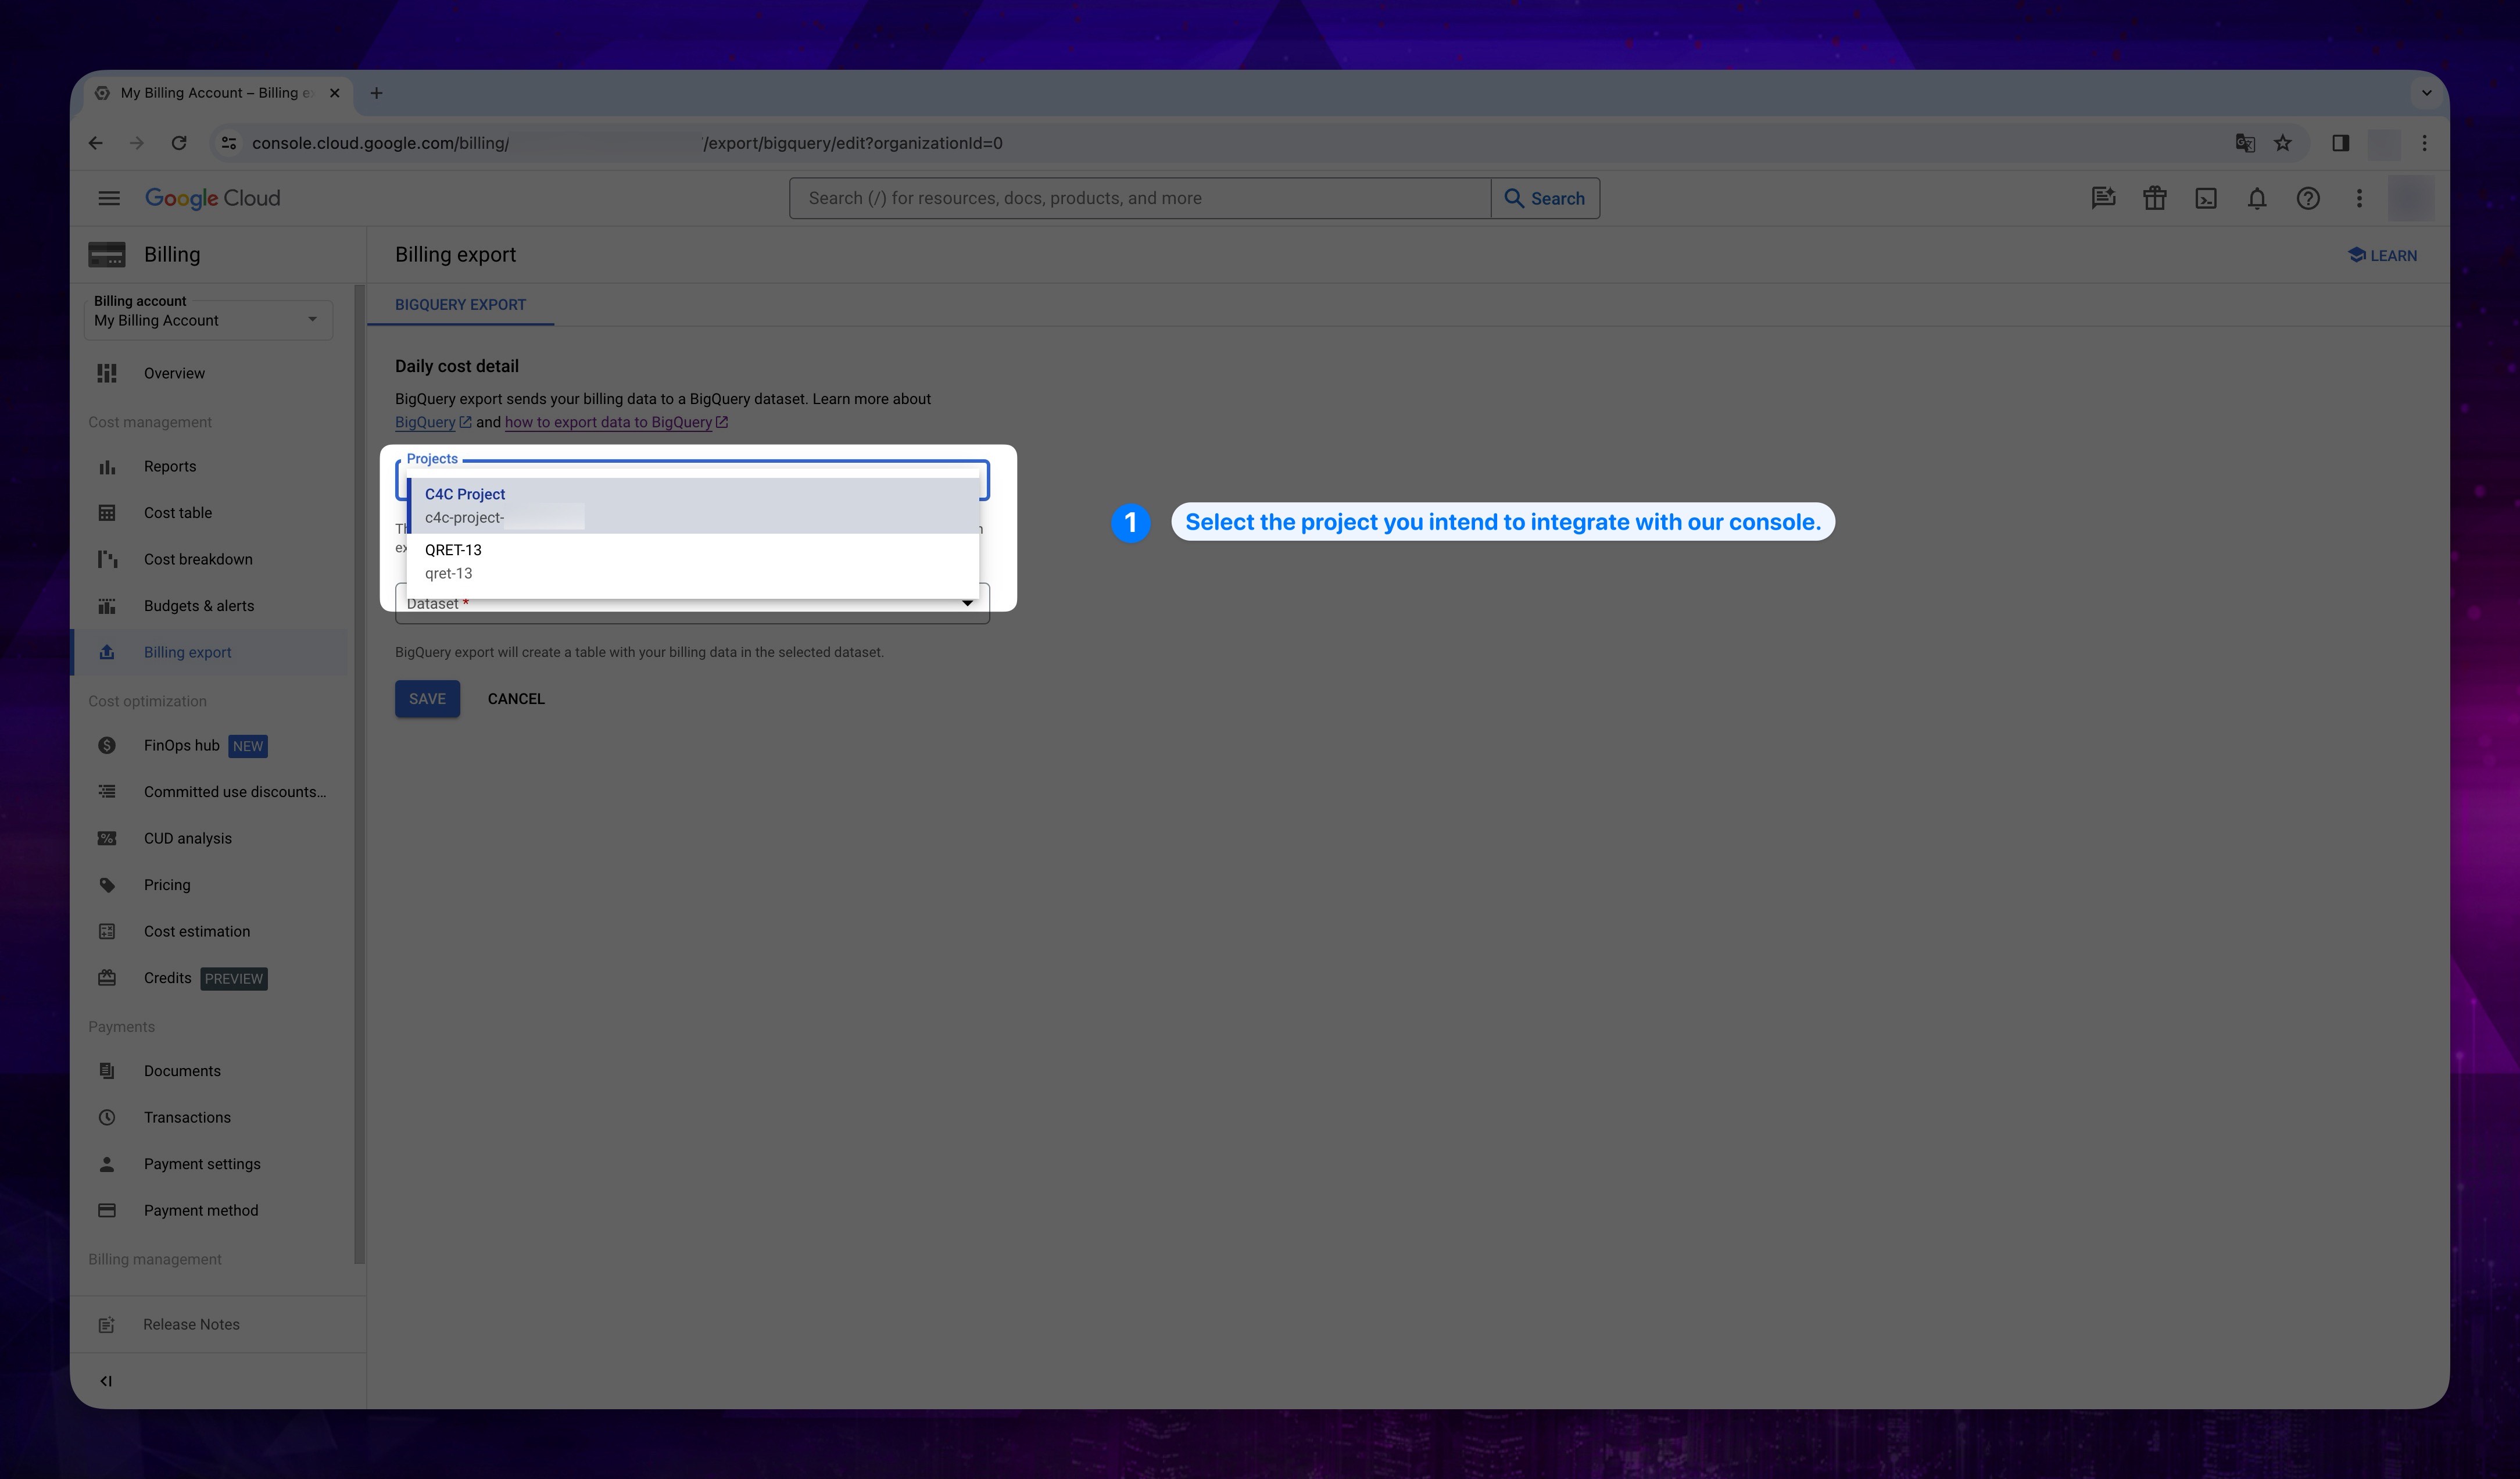
On the BigQuery export tab, click Edit settings for Standard Usage Cost and Detailed Usage Cost type of data. Each type of data is configured separately.
- From the Projects list, select the project that you connected with our console.
Show the instruction with images
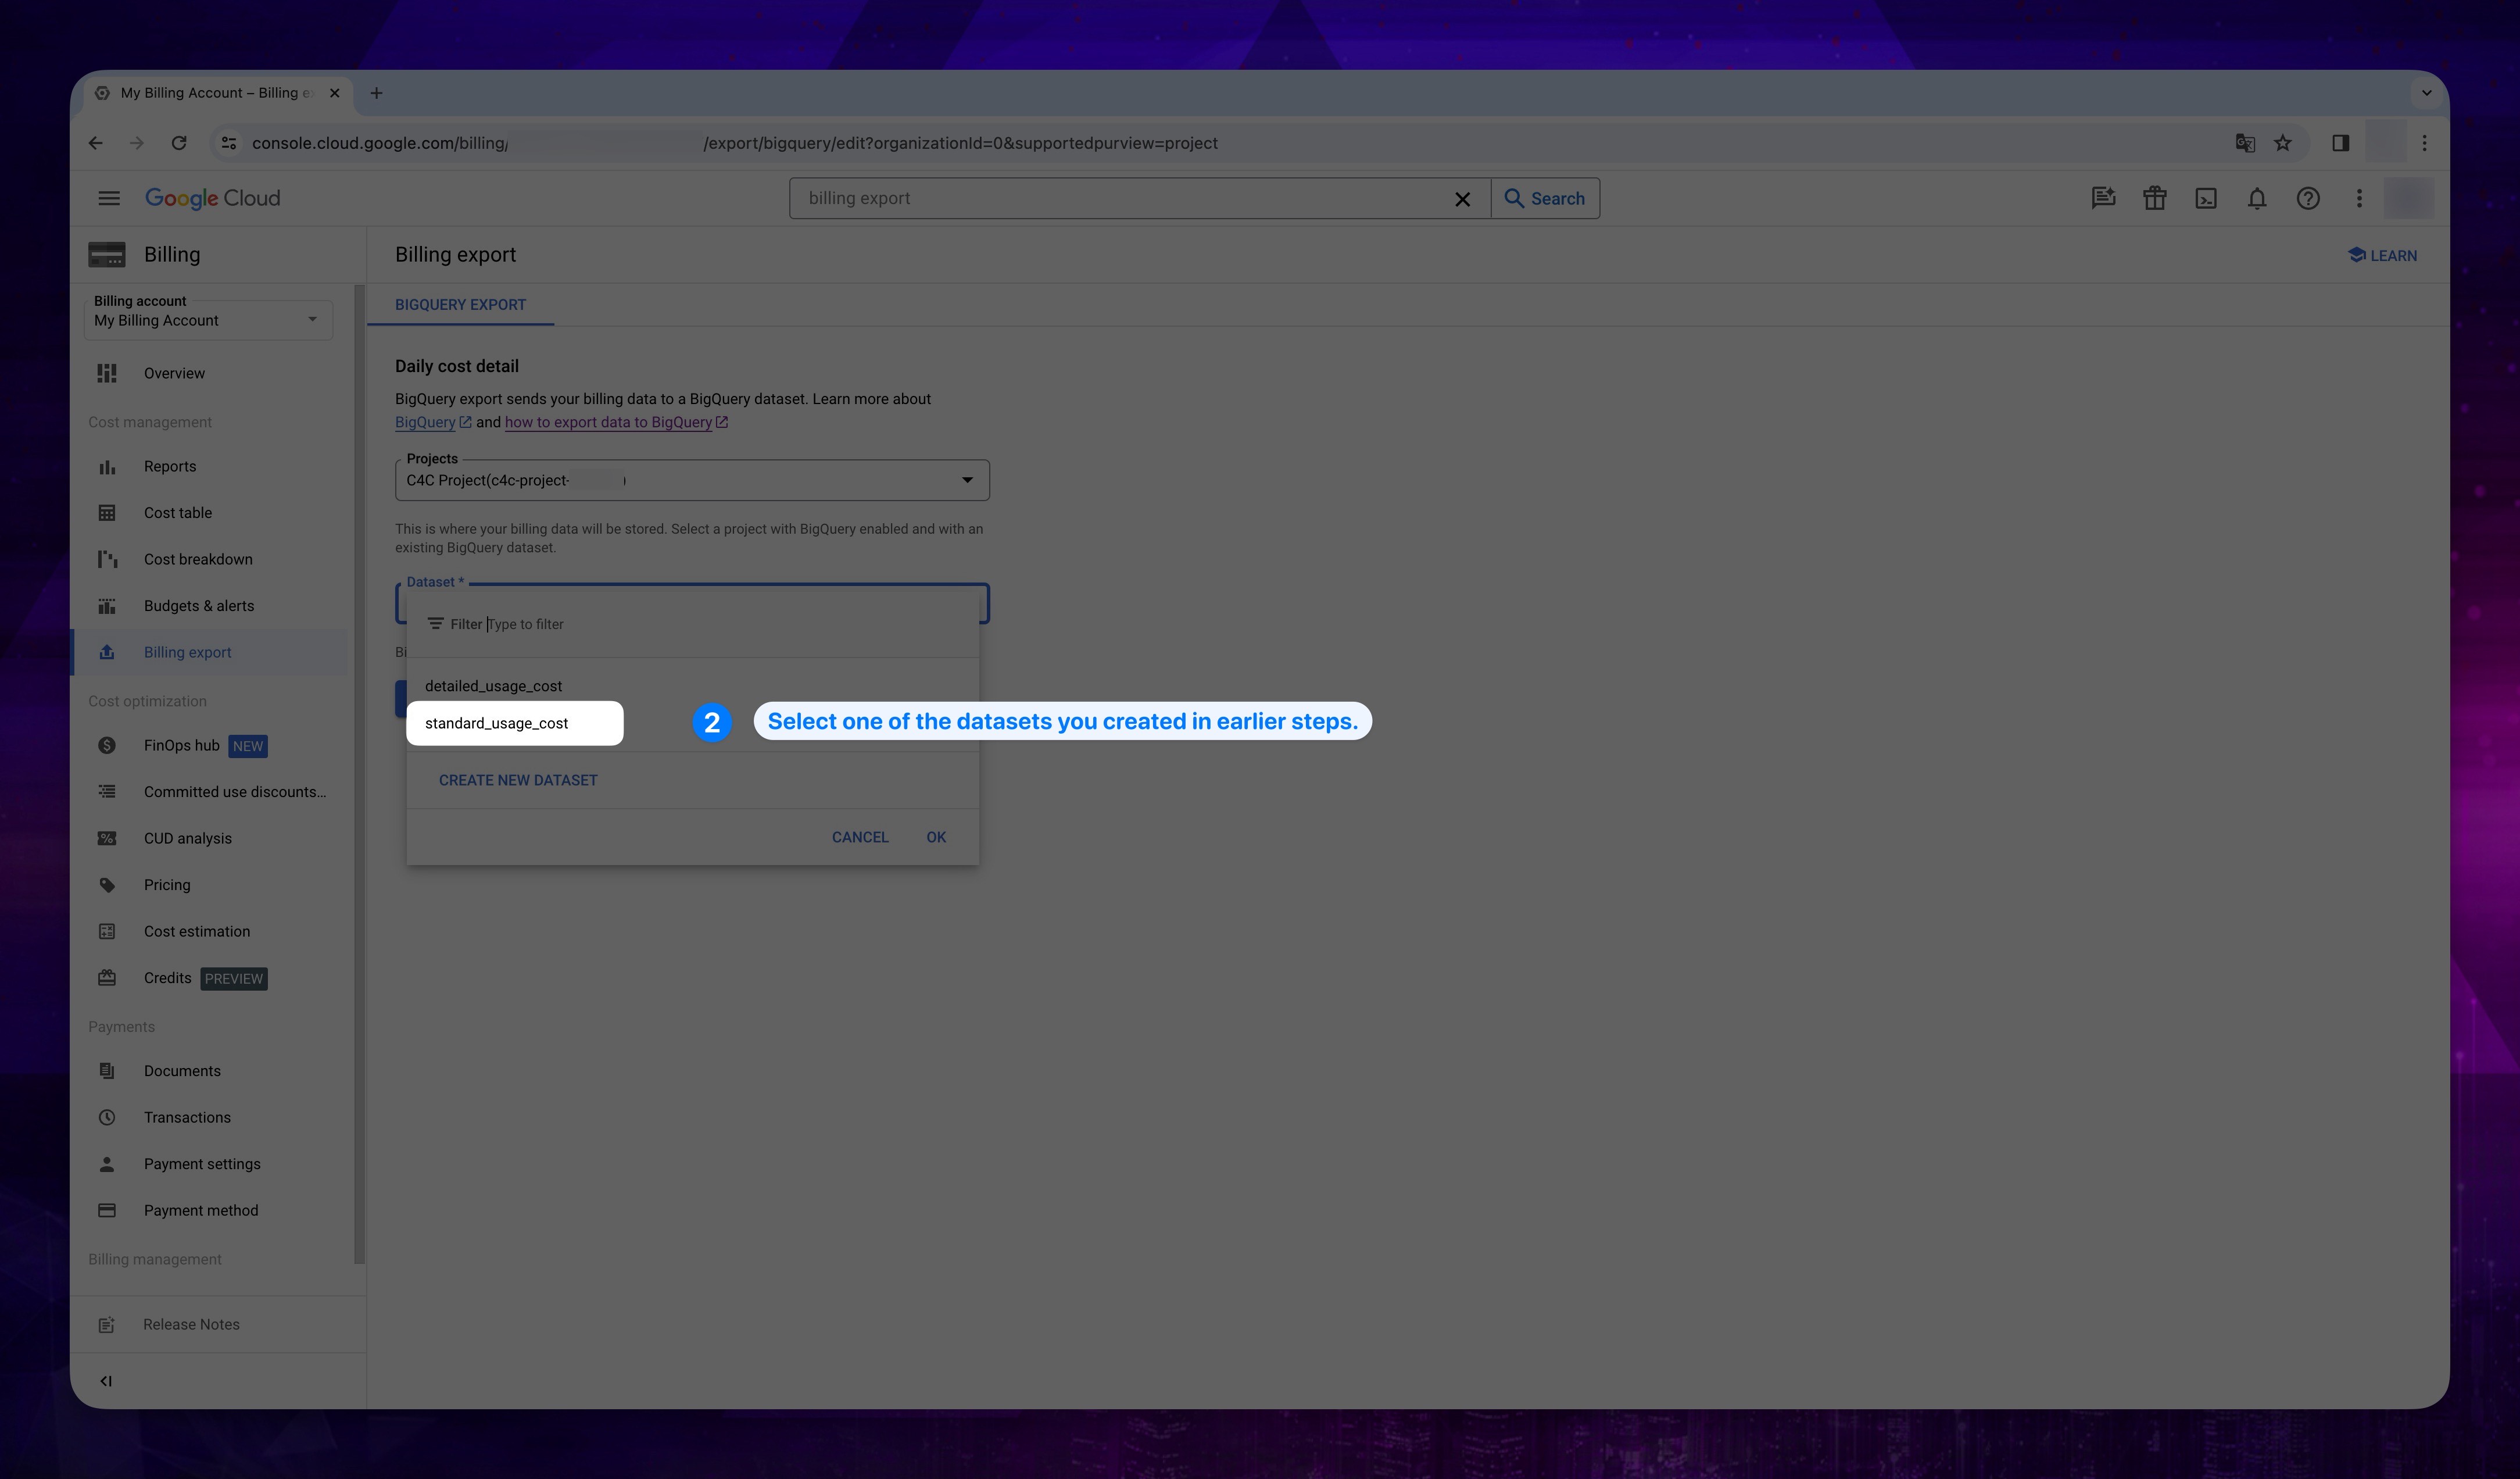
- From the Dataset ID field, select the dataset that you created at early steps.
Show the instruction with images
- Click the Save button.
Show the instruction with images
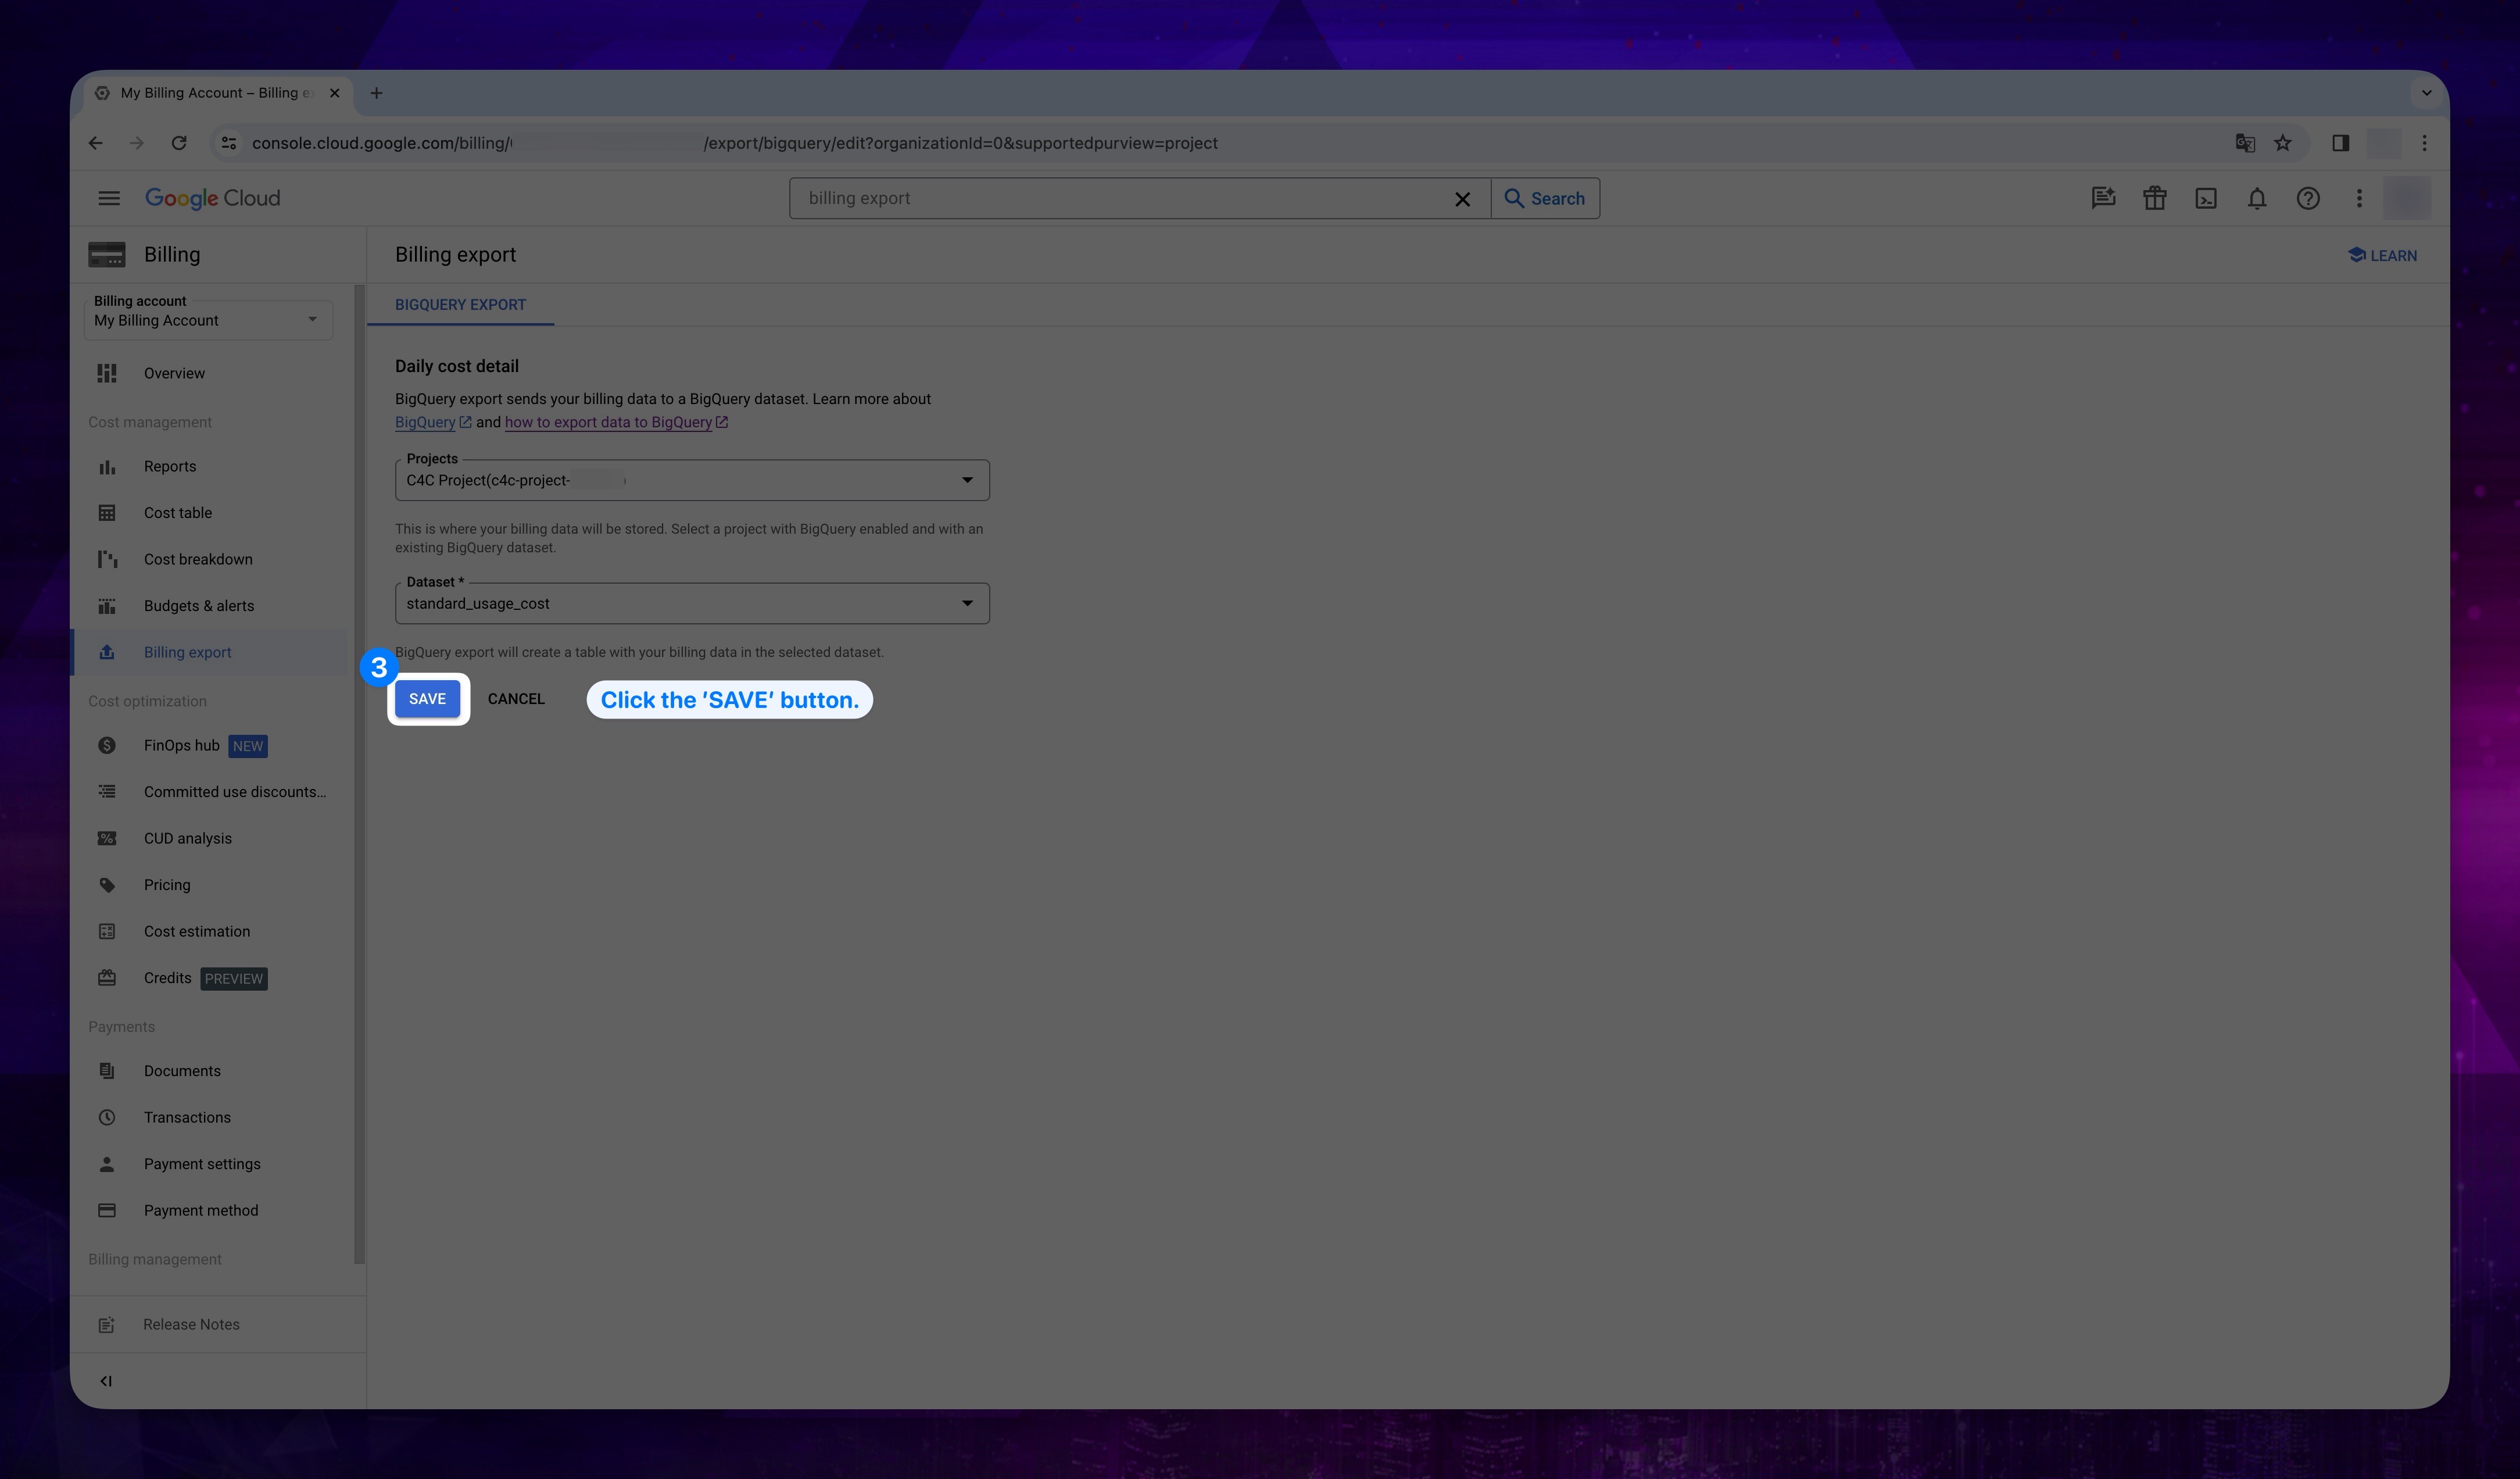
Ensure that you apply these three steps for both Standard usage cost and Detailed usage cost datasets.
3. Getting Dataset Name
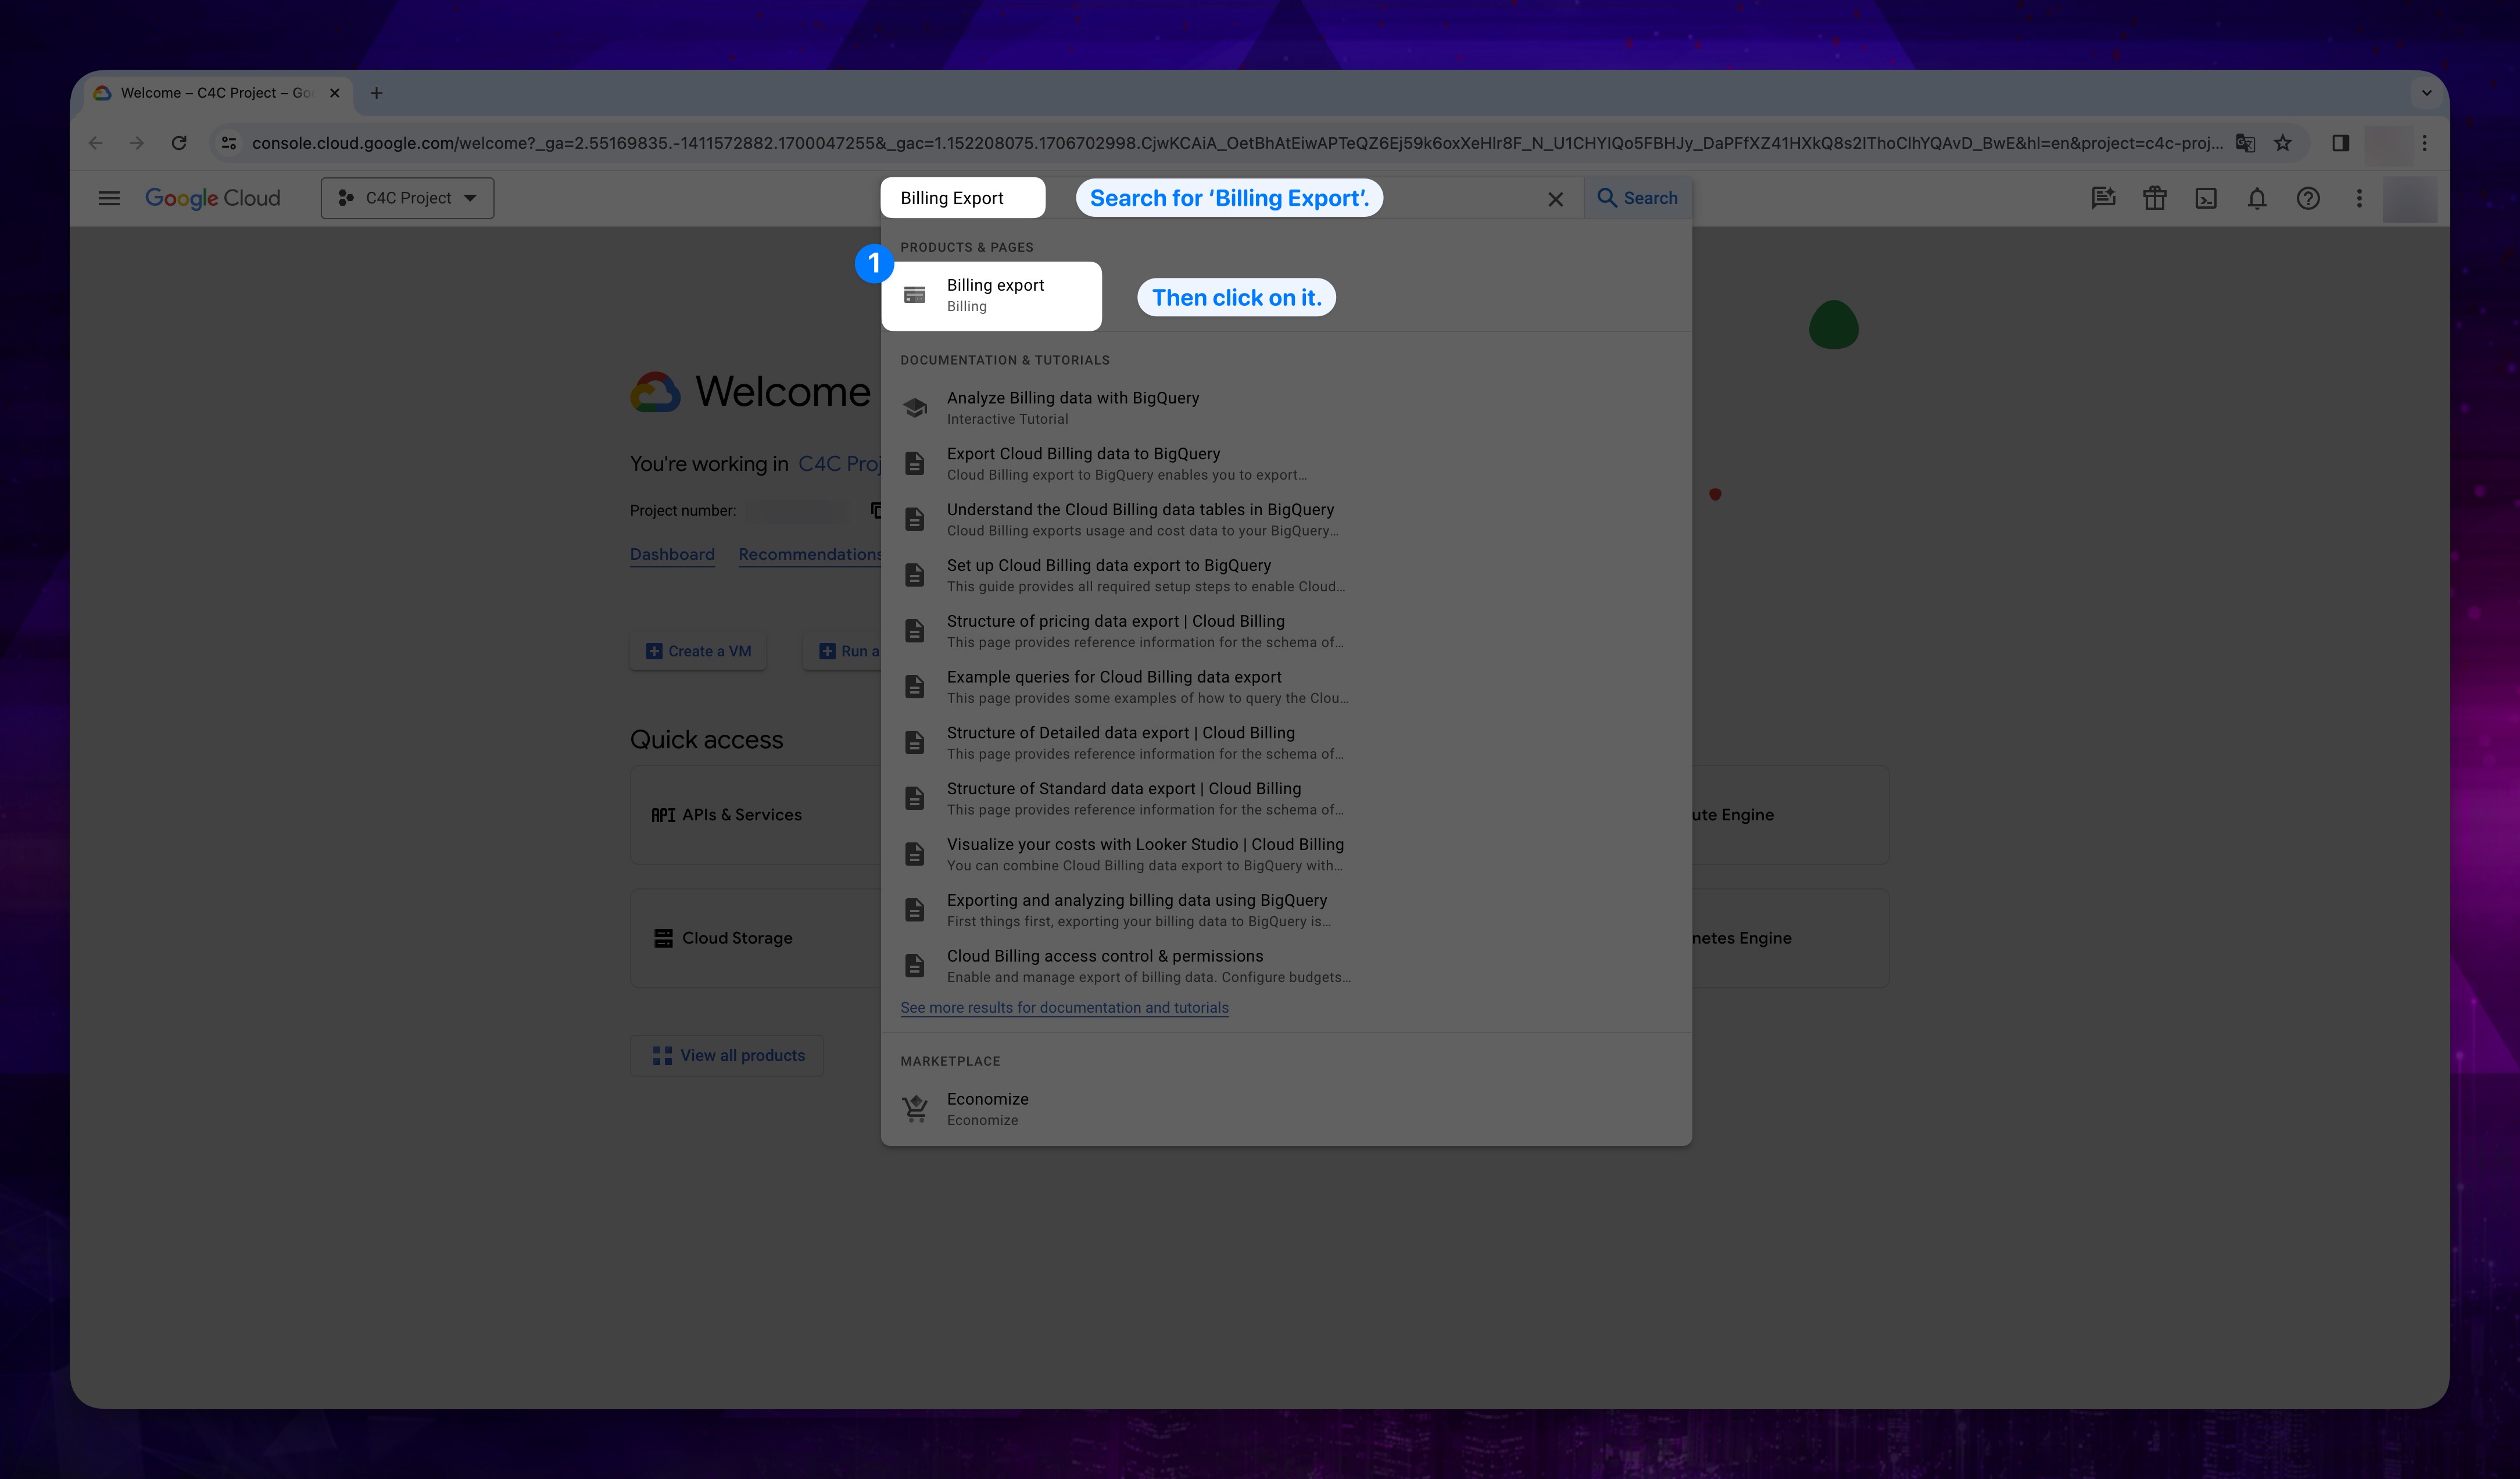
- Go to the search bar and search for Billing Export and click on it.
Show the instruction with images
-
Choose the Billing account for which your selected project connected. The Billing export page opens for the selected billing account.
-
Click on the selected BigQuery dataset name. This action will redirect you to the screen where Dataset Info is located. Repeat this process for both the Standard usage cost and Detailed usage cost datasets.
Show the instruction with images
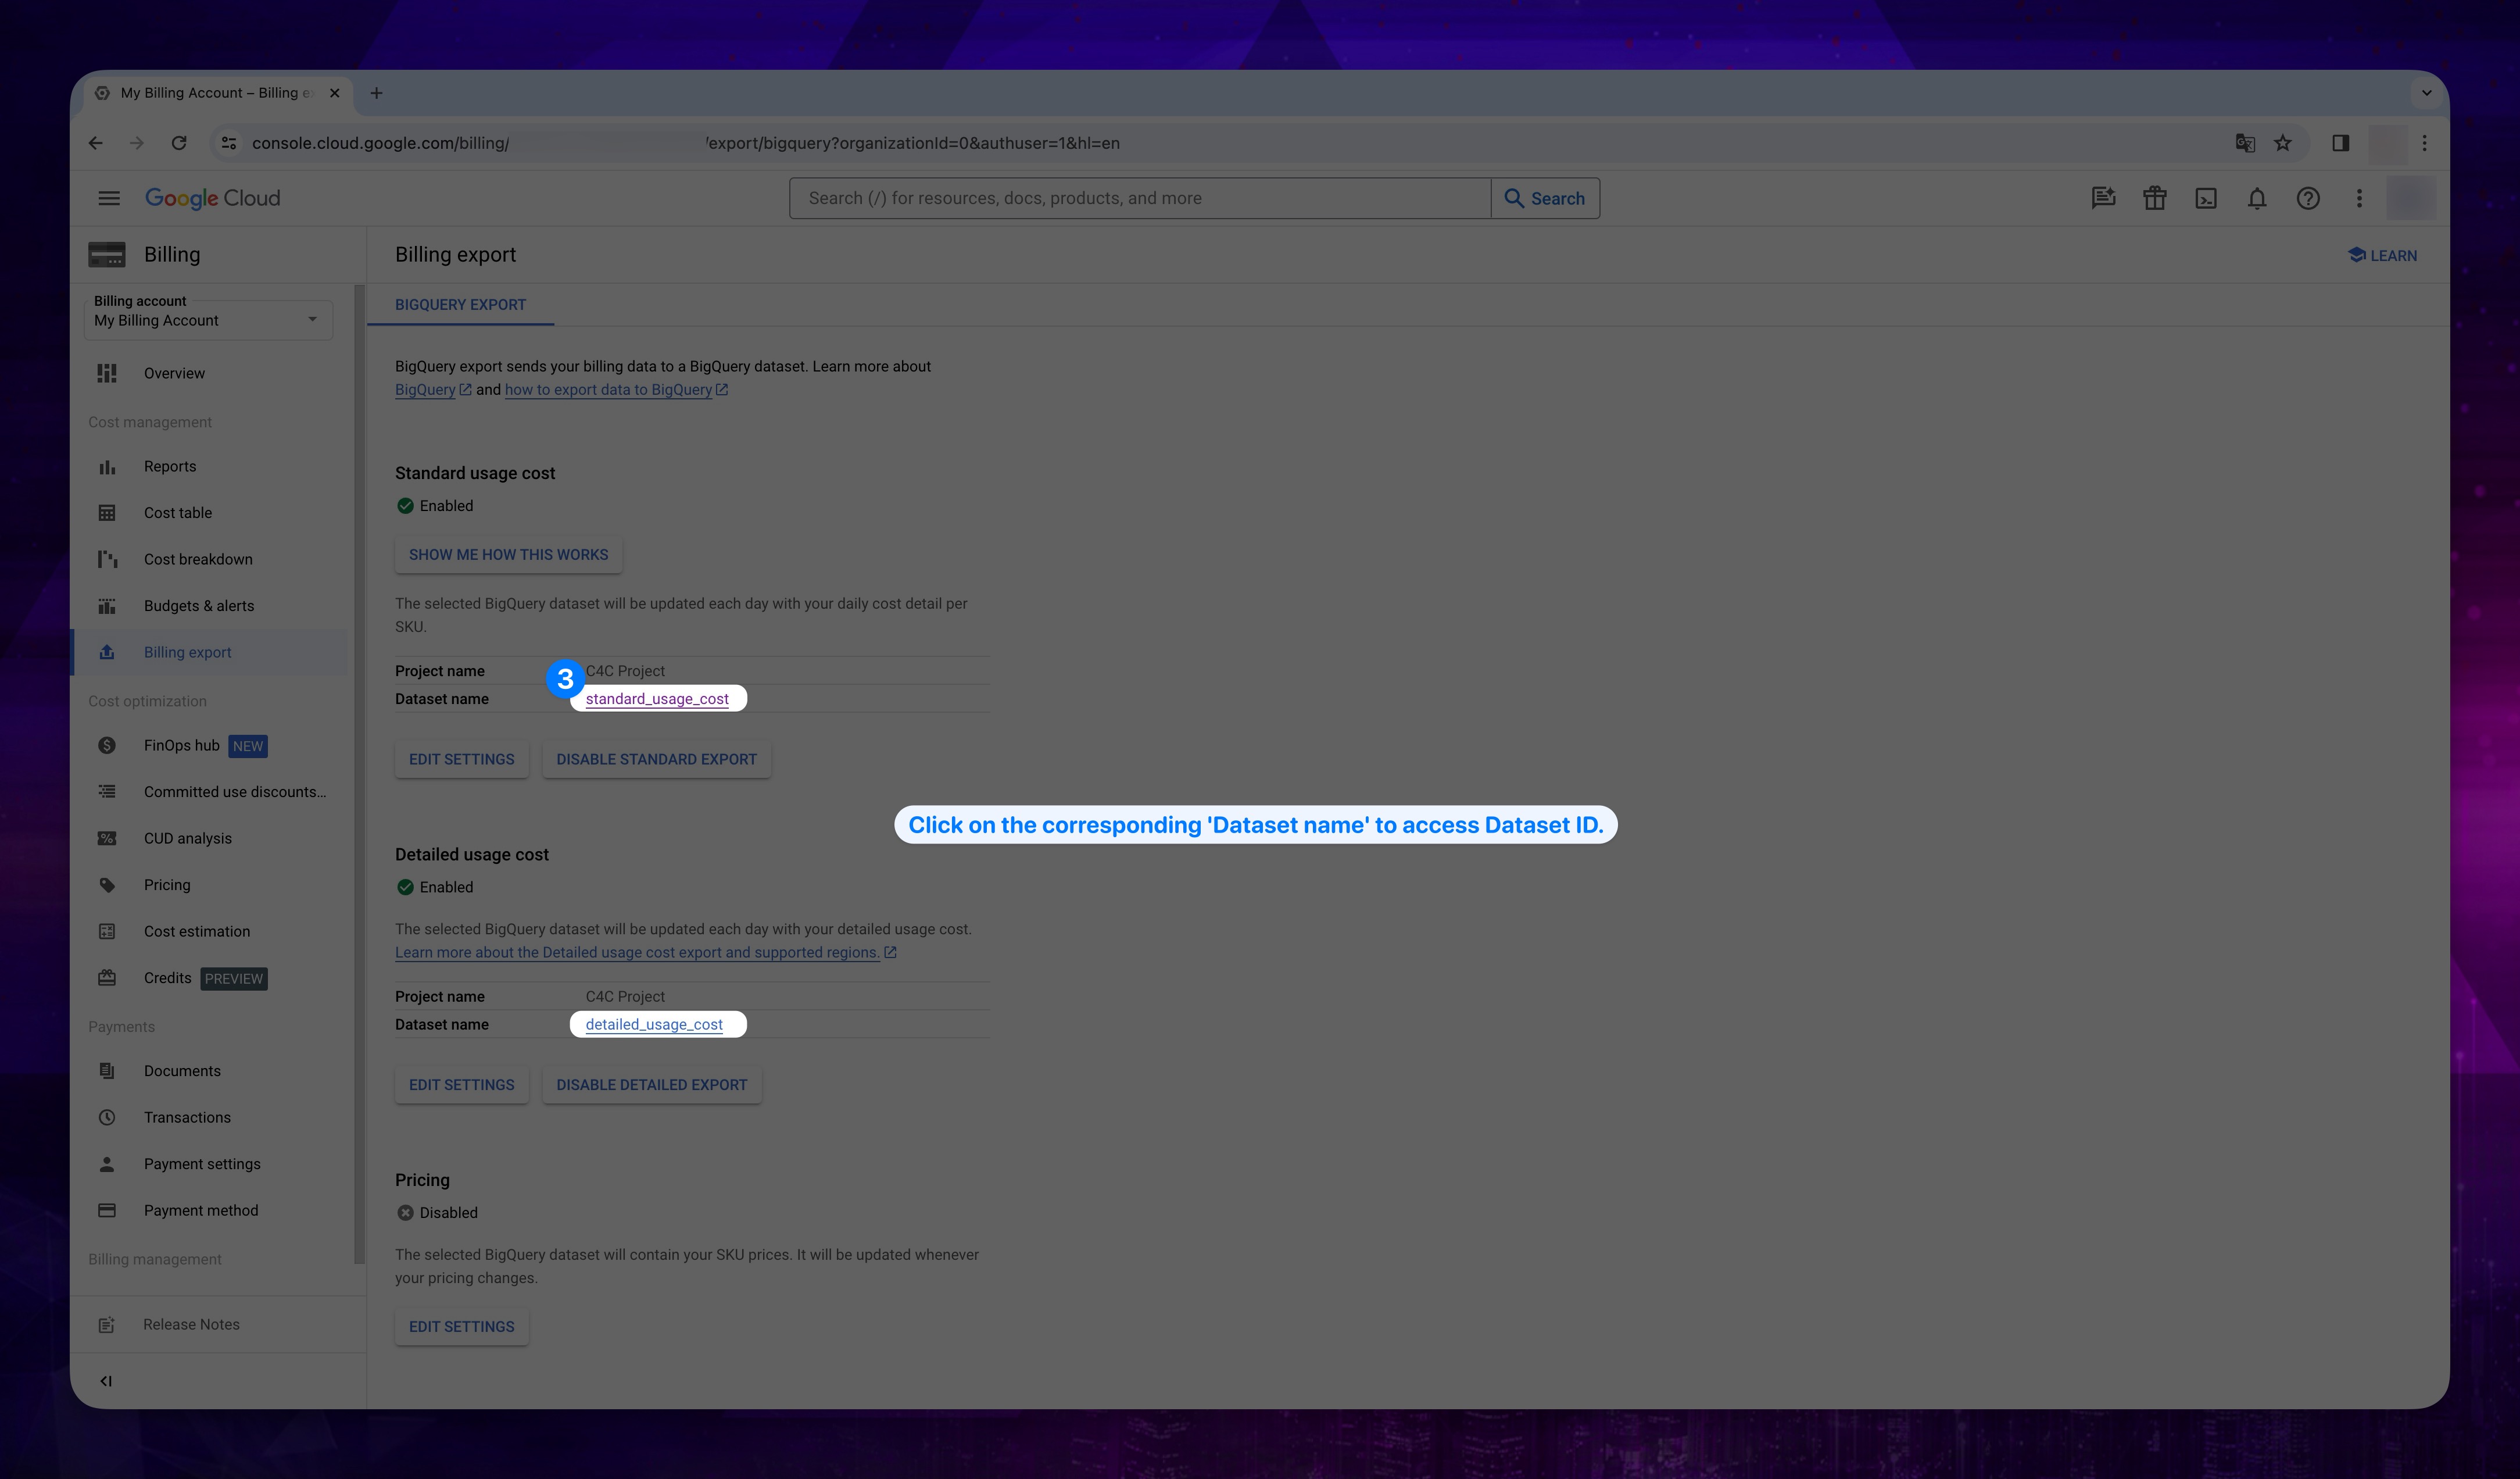
- In the Billing export page, you will see options for Detailed Usage and Standard Usage exports. Each option will display the configured BigQuery Dataset Name under the respective export type. Note down the dataset names for both Detailed Usage and Standard Usage as shown in the interface.
Show the instruction with images.

Make sure to keep the Dataset Name information for Standard Usage Cost and Detailed Usage Cost.
4. Getting Billing Account ID
- In the upper left corner, click on the project dropdown menu and be sure the you selected the relevant project.
Show the instruction with images
- In the left navigation pane, click on the Navigation menu (three horizontal lines) in the upper left corner. After that click the Billing.
Show the instruction with images
- Click on Account Management under the Billing Management section in the left-hand menu.
Show the instruction with images
- From the opened screen, copy your Billing Account ID.
Save Billing Account ID securely for future use in our console.
Show the instruction with images
After completing the usage cost configuration, you should have all the necessary credentials for the GCP provider and have made the required settings.