Getting Credentials for All C4C Services
You are required to perform some operations in Microsoft Azure to configure your Azure provider in our system. The images attached below will guide you. Please follow the instructions below.
1. Subscription Adding
If you don't have a subscription for your Azure account, you need to first add a subscription. You can follow the steps below. However, if you already have a subscription, you can skip this section.
-
Go to Azure Portal and log in to your account.
-
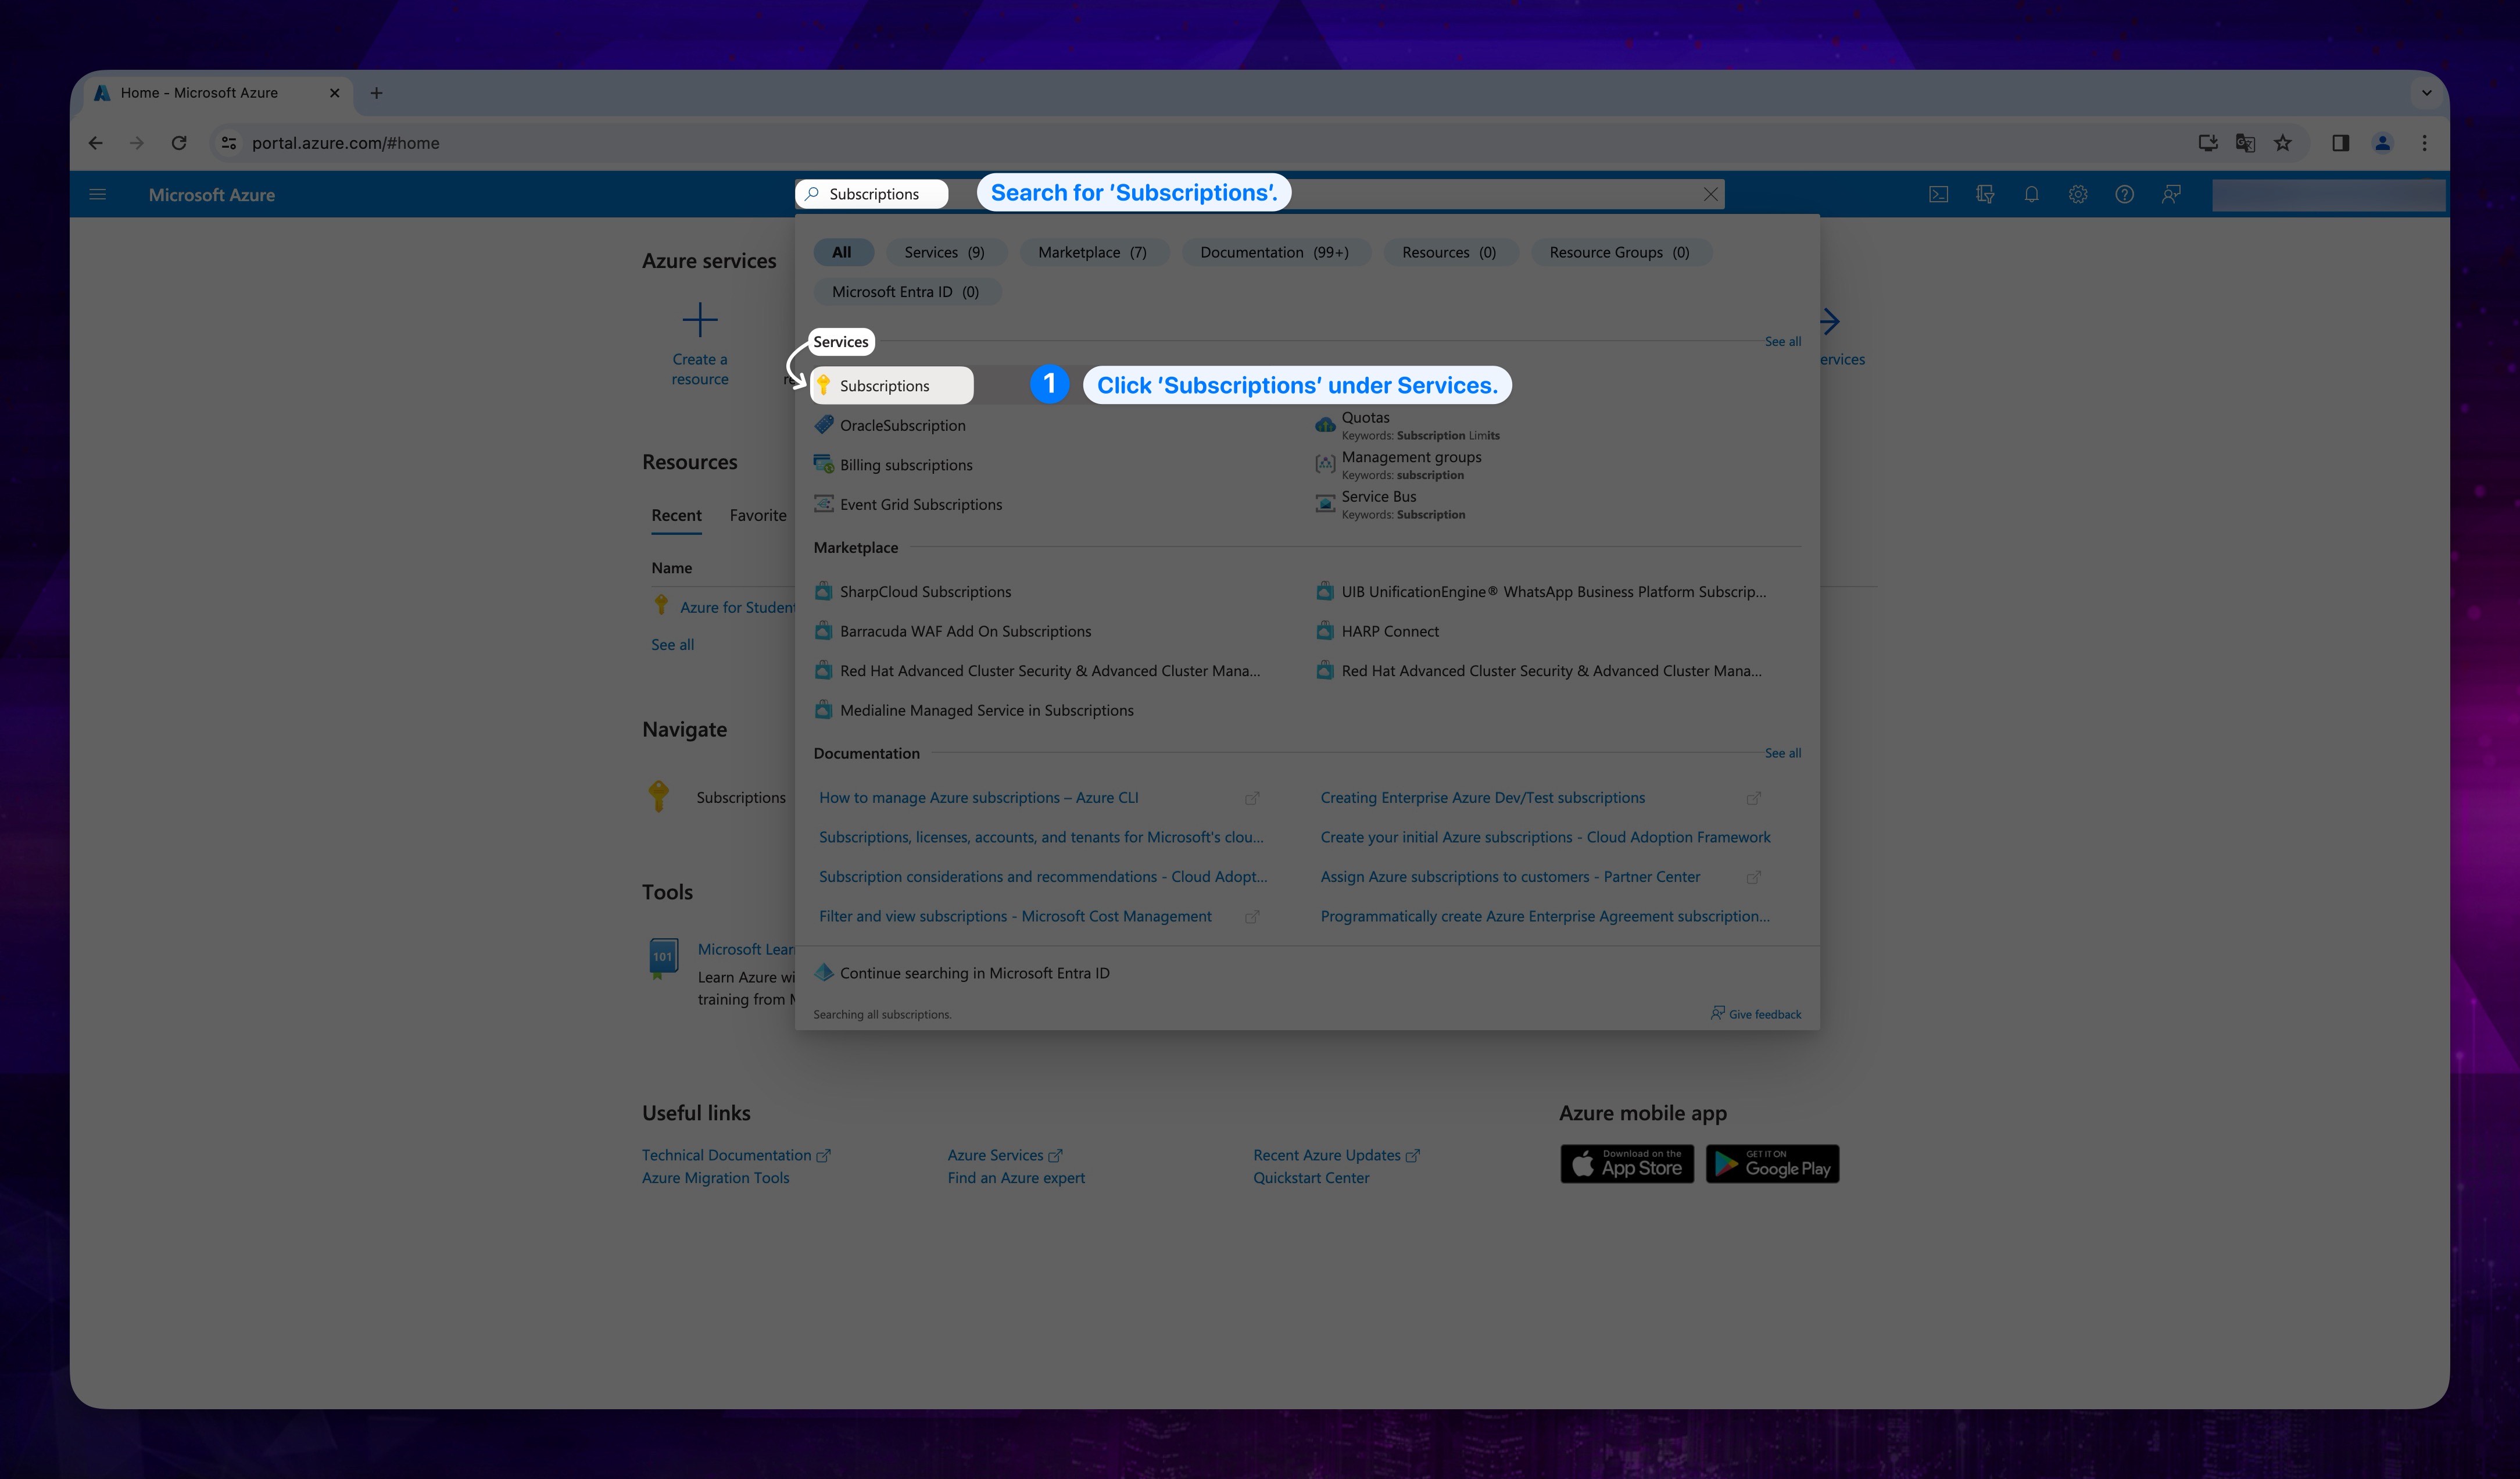
Go to the search bar and look for Subscriptions, then choose Subscriptions under Services.
Show the instructions with images

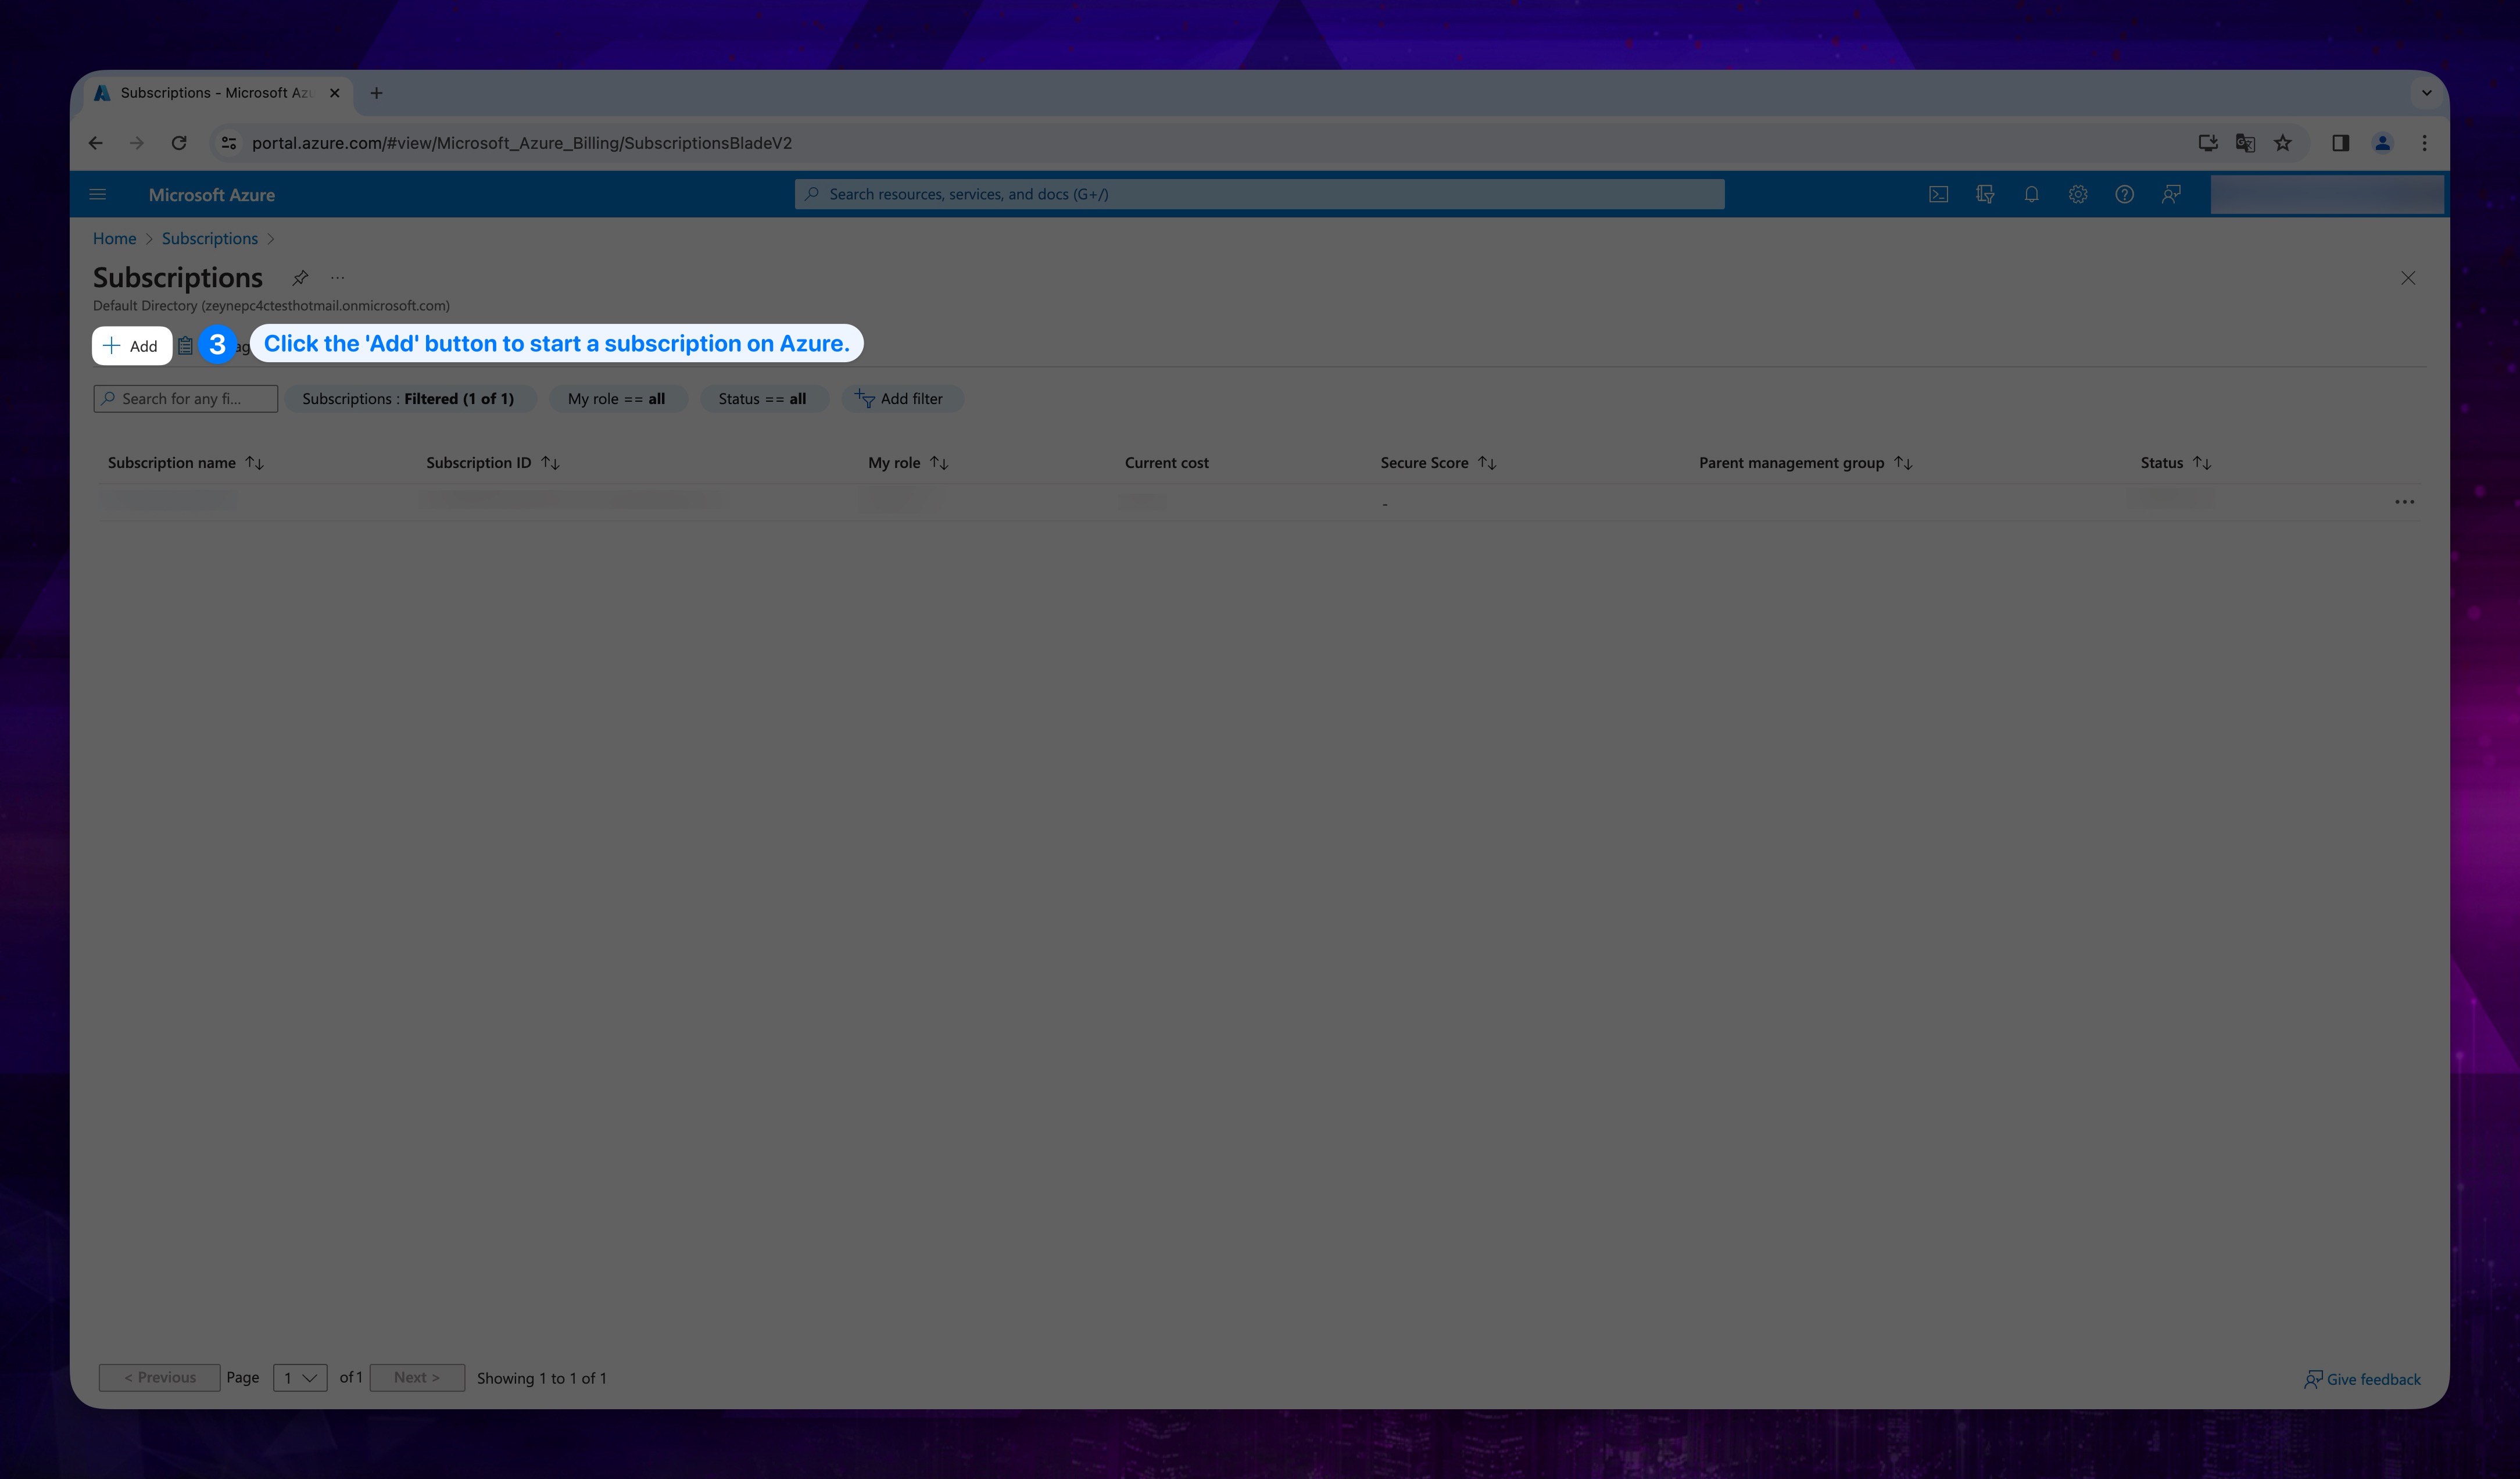
- Click on the Add button located at the top.
Show the instructions with images
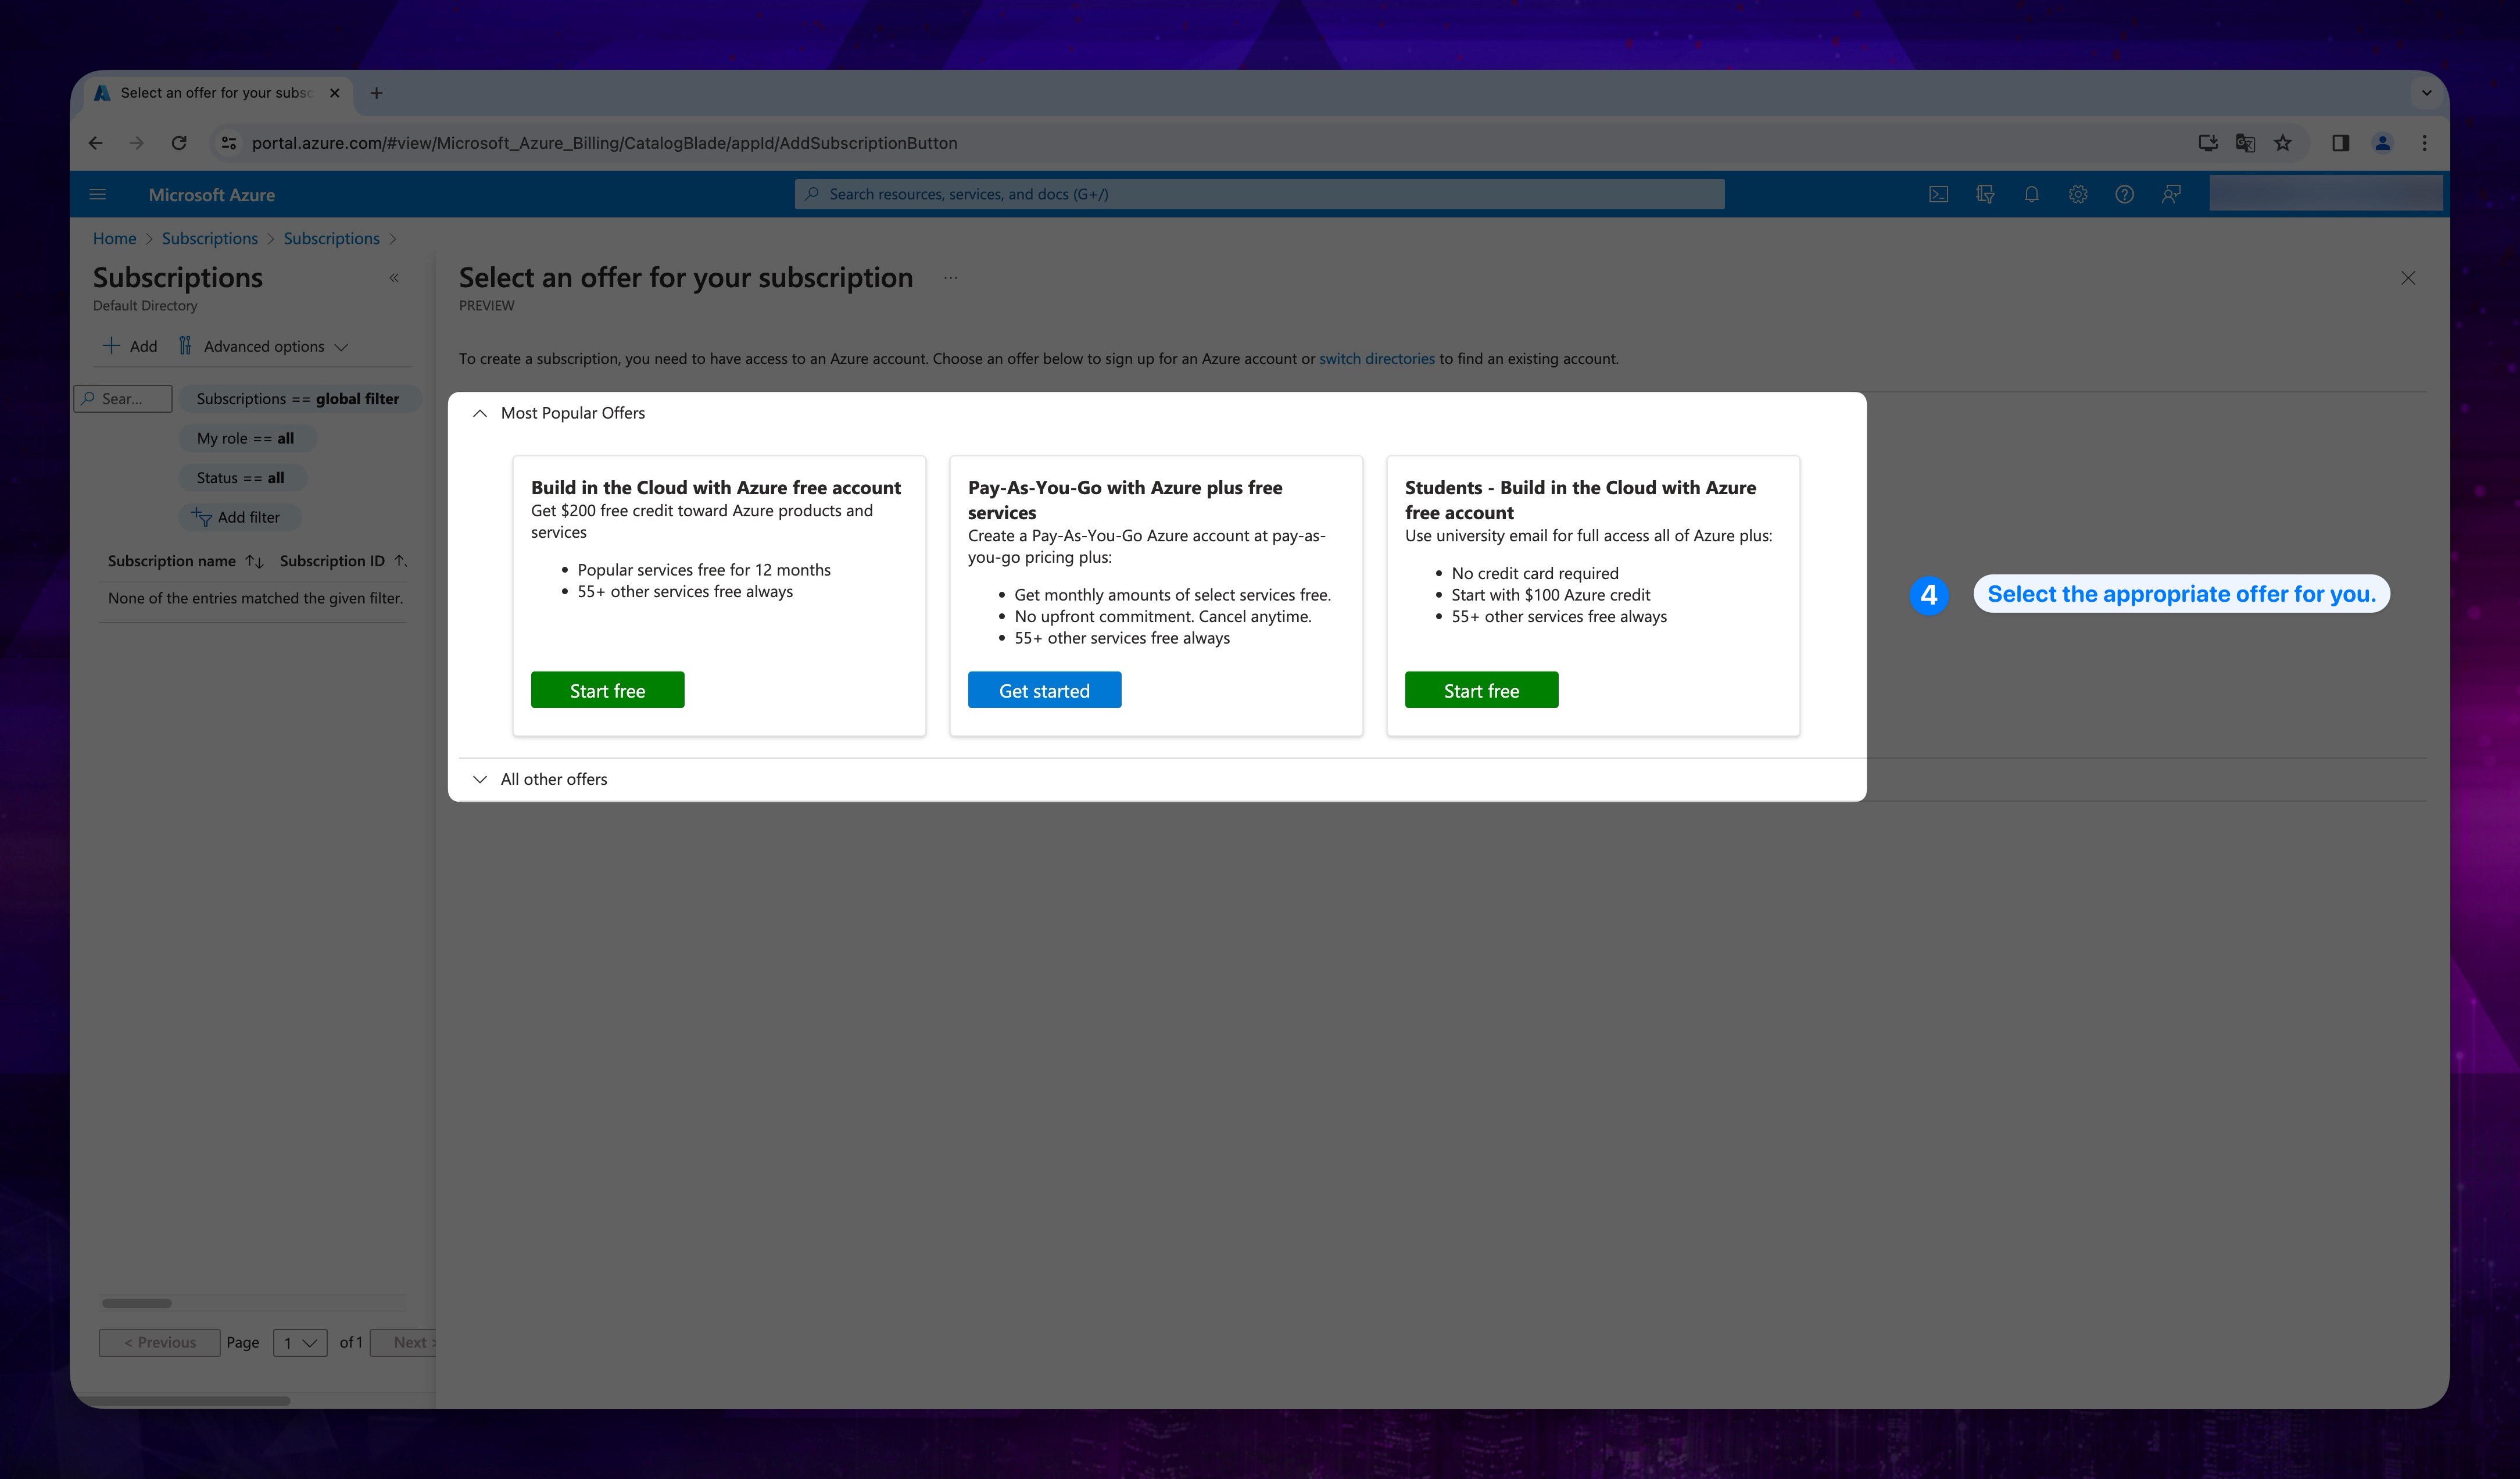
- Choose the offer that suits you and proceed.
Show the instructions with images
- After selecting the appropriate offer, follow the steps on the page directed by Azure. After creating your profile, complete the process by verifying your identity with card authentication.
2. App Registration
-
Go to Azure Portal and log in to your account.
-
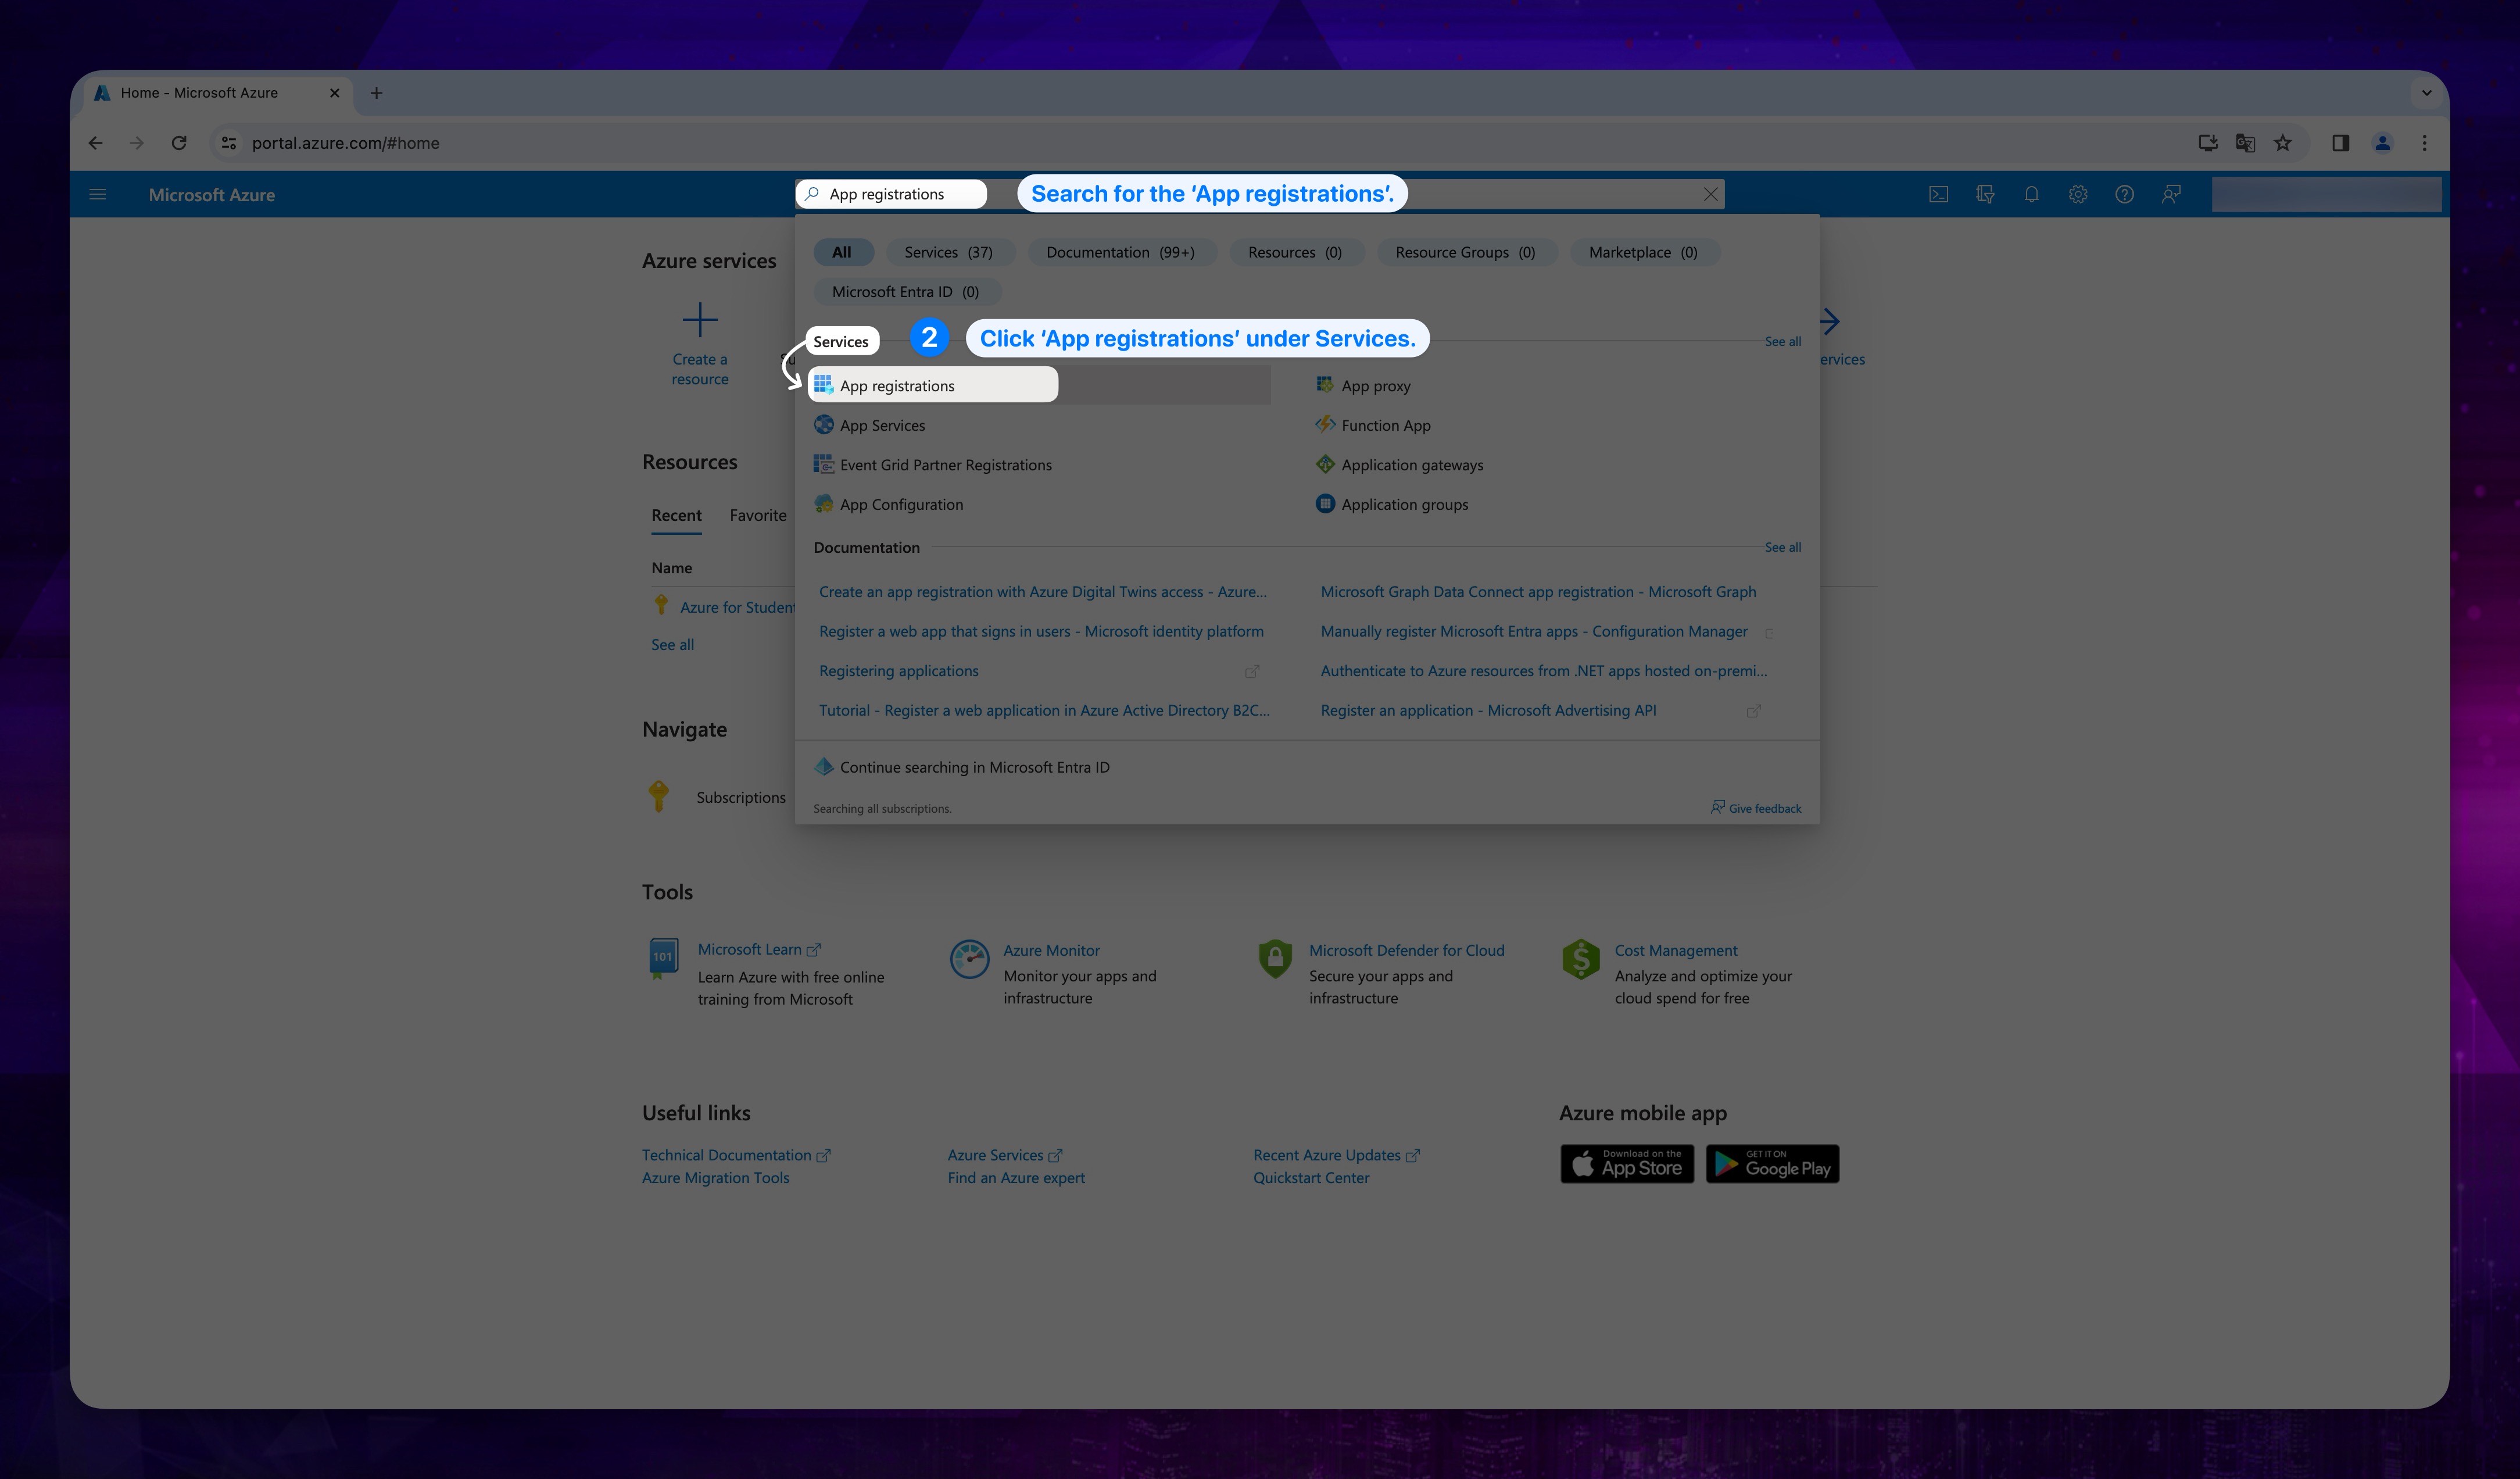
Go to the search bar and look for App registrations, then choose App registrations under Services.
Show the instructions with images
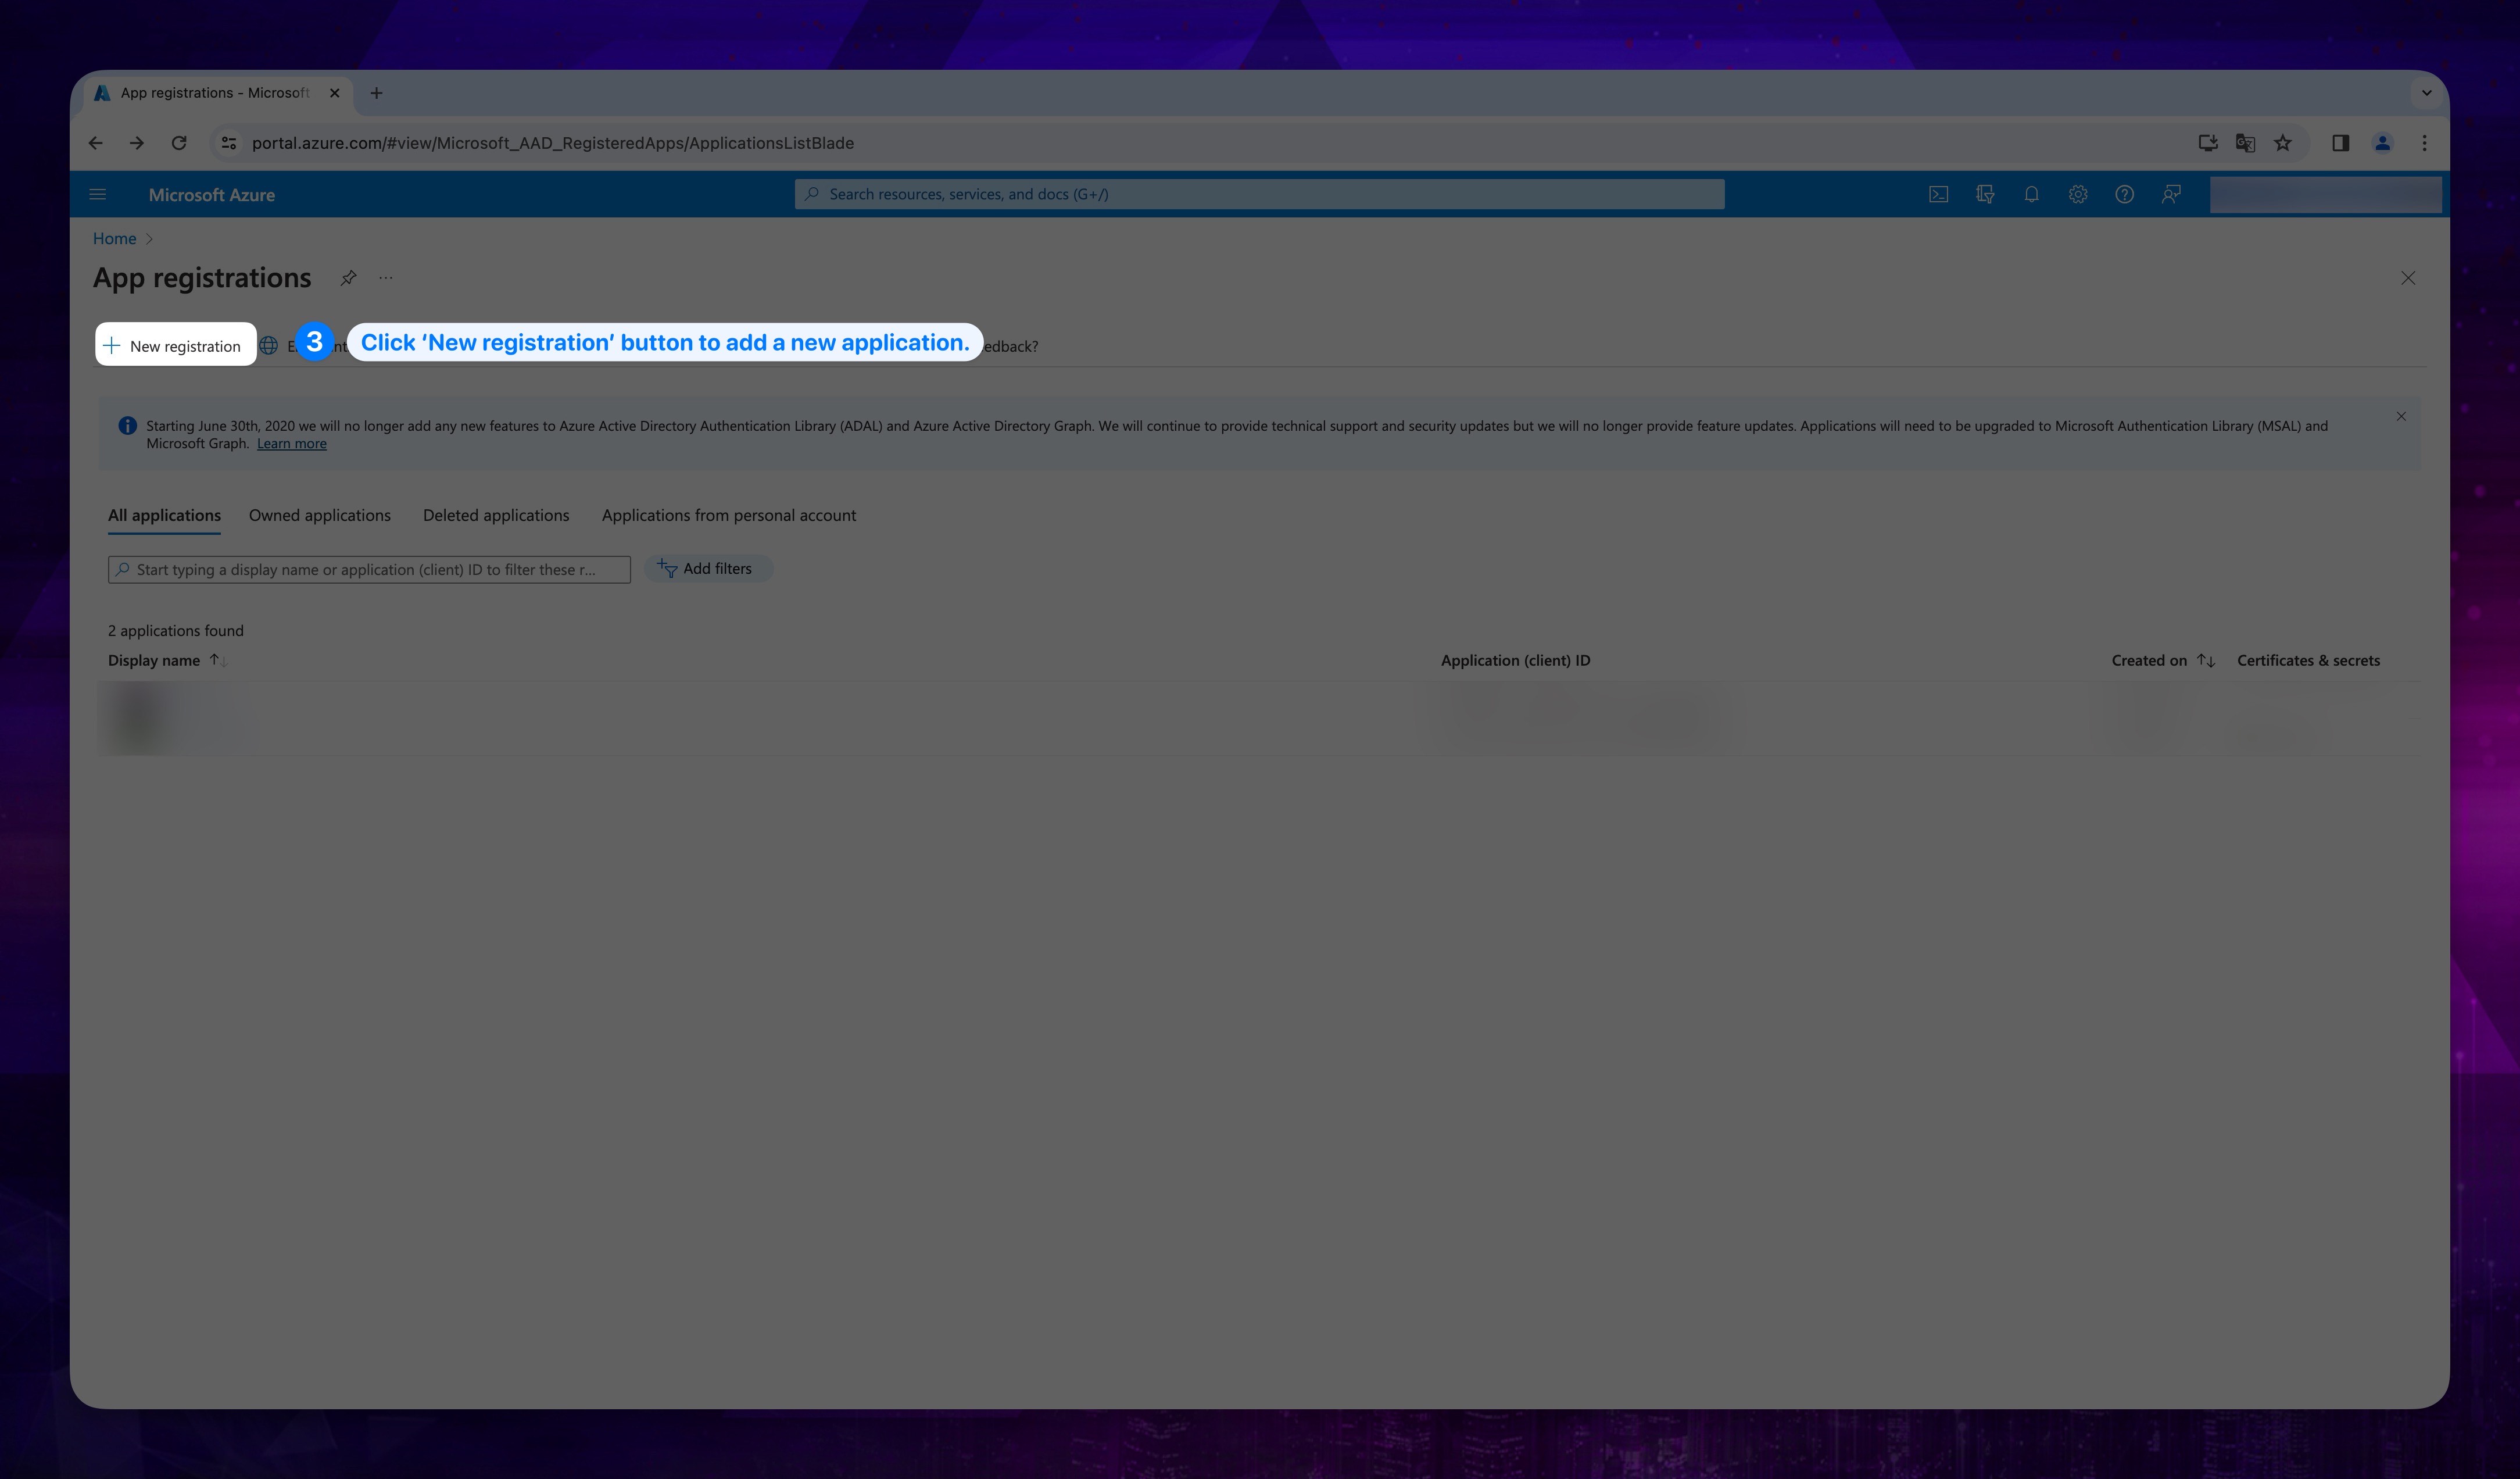
- Click New Registration on the top.
Show the instructions with images
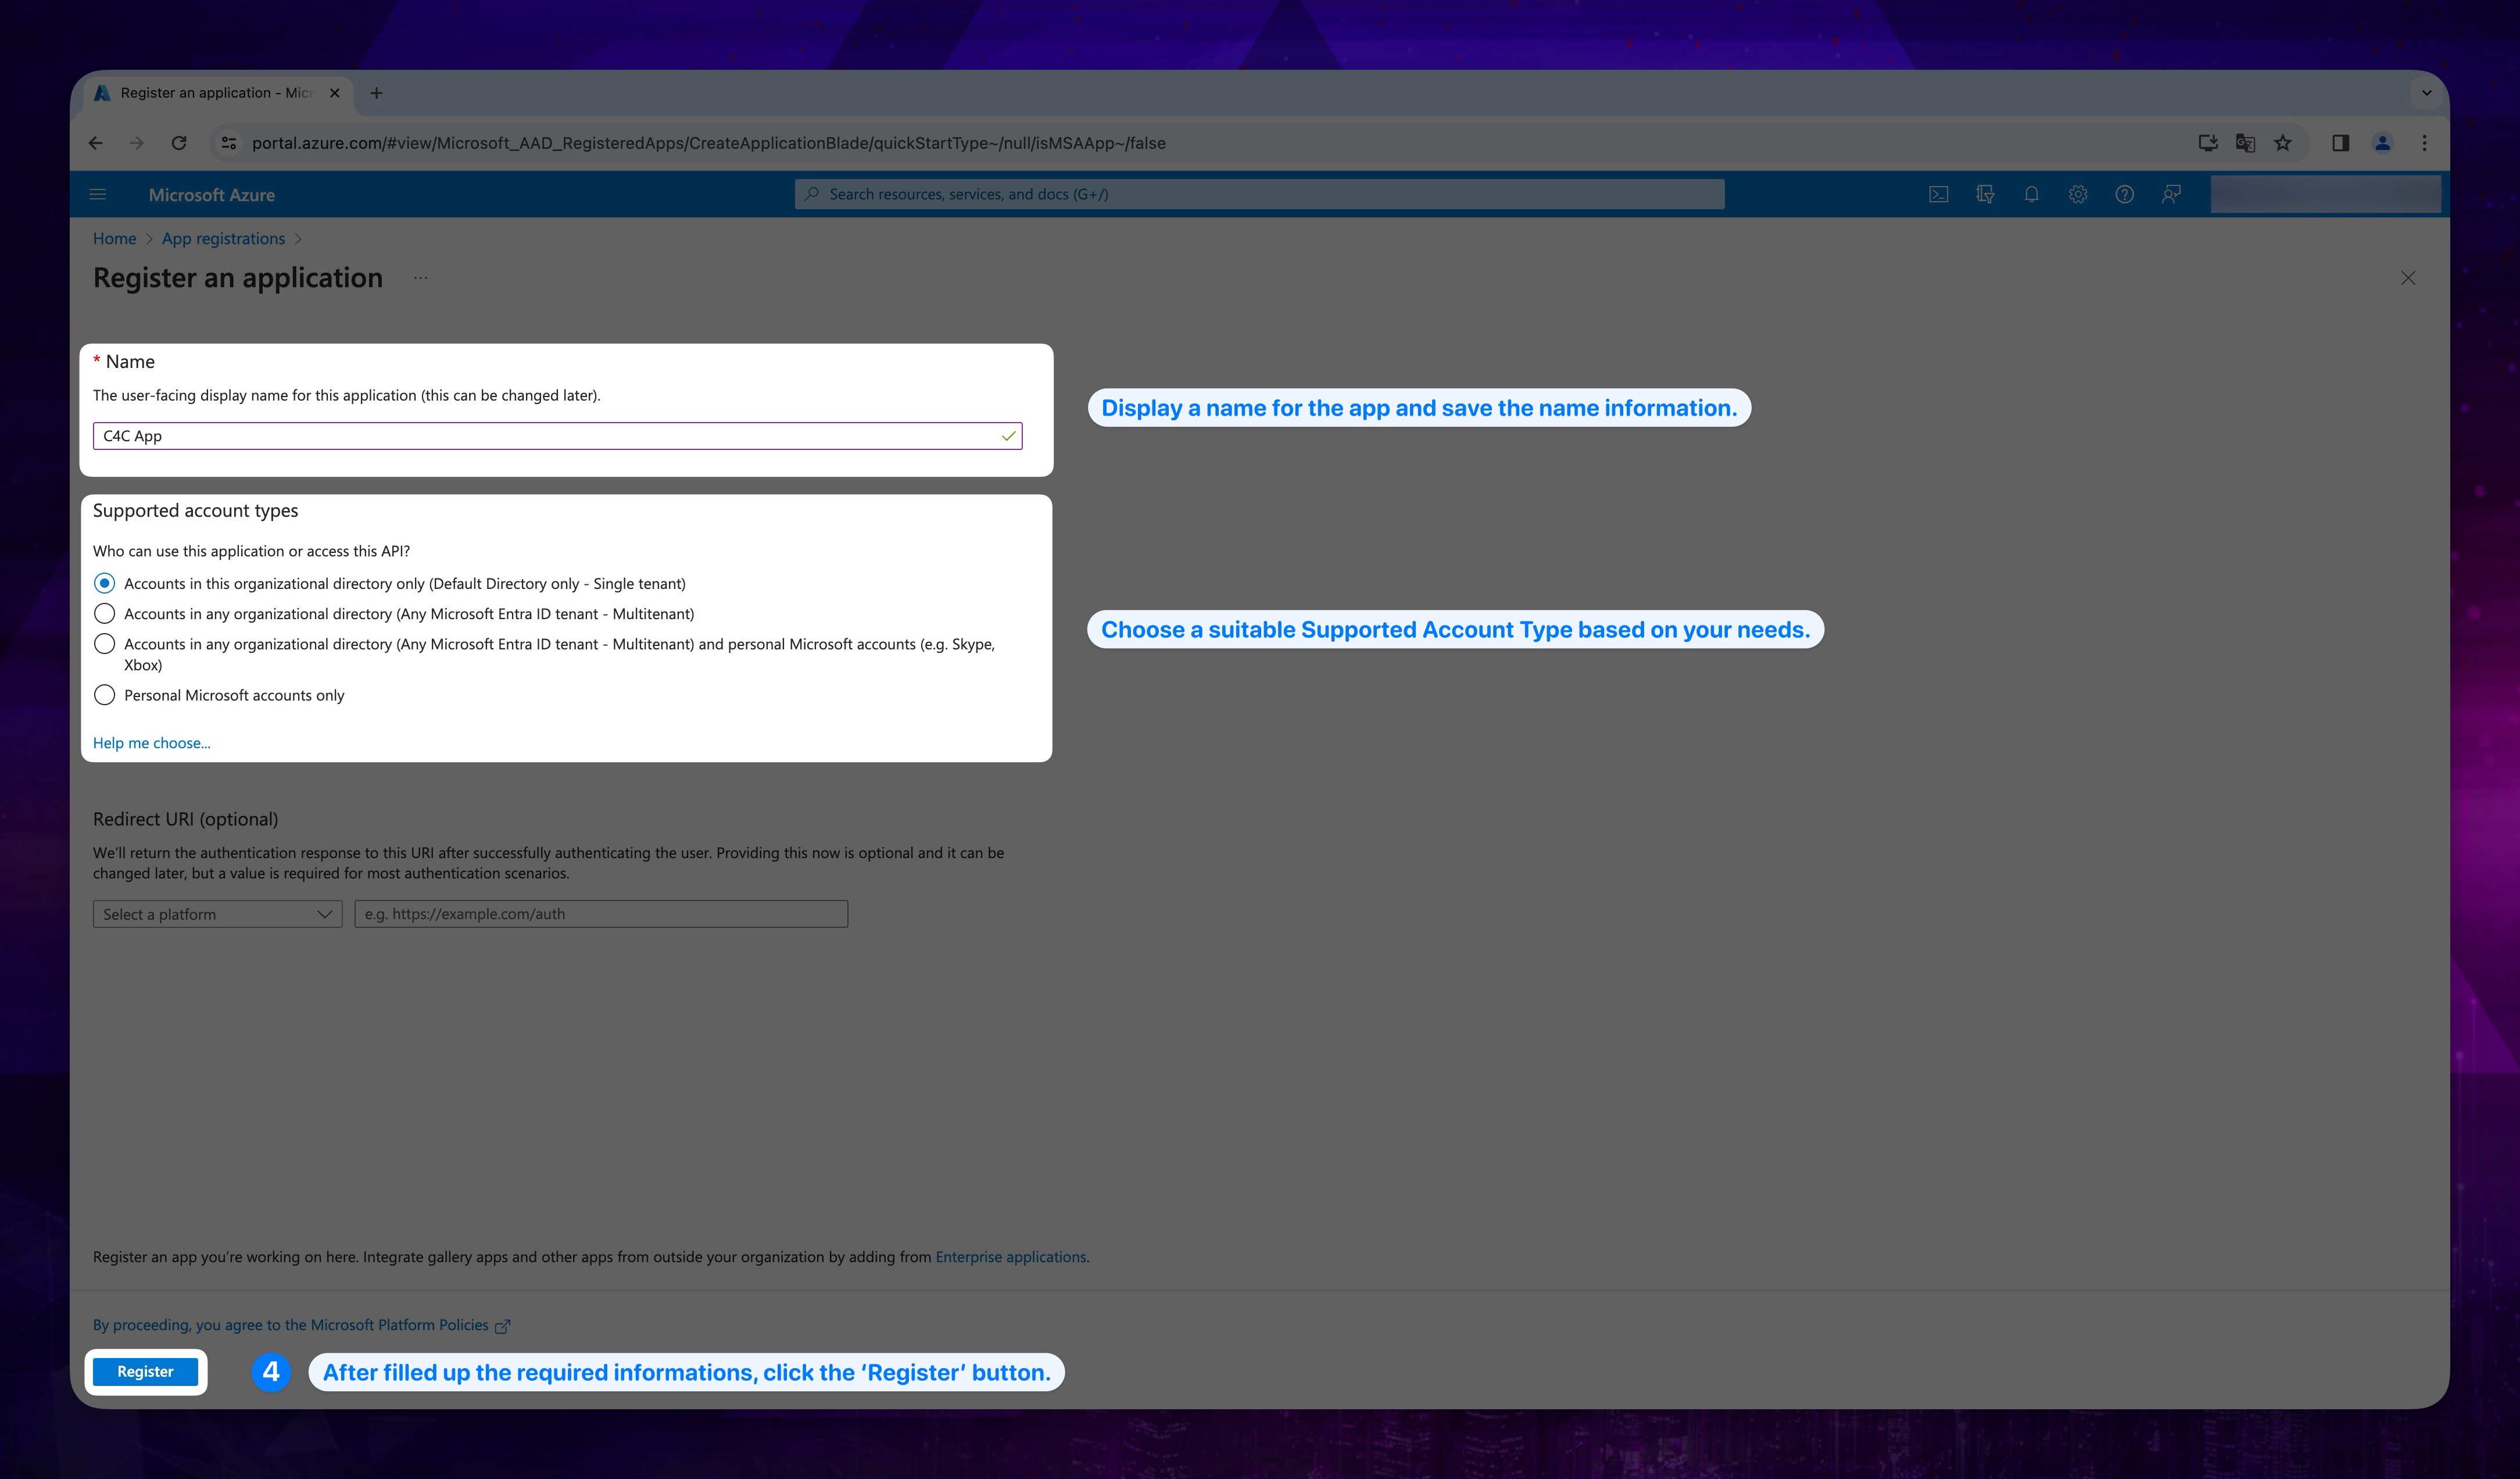
-
Fill up the given inputs (name and supported account types) and click Register.
noteYou can choose a proper Supported Account Type as your need.
warningKeep the name information you will need it later.
Show the instructions with images
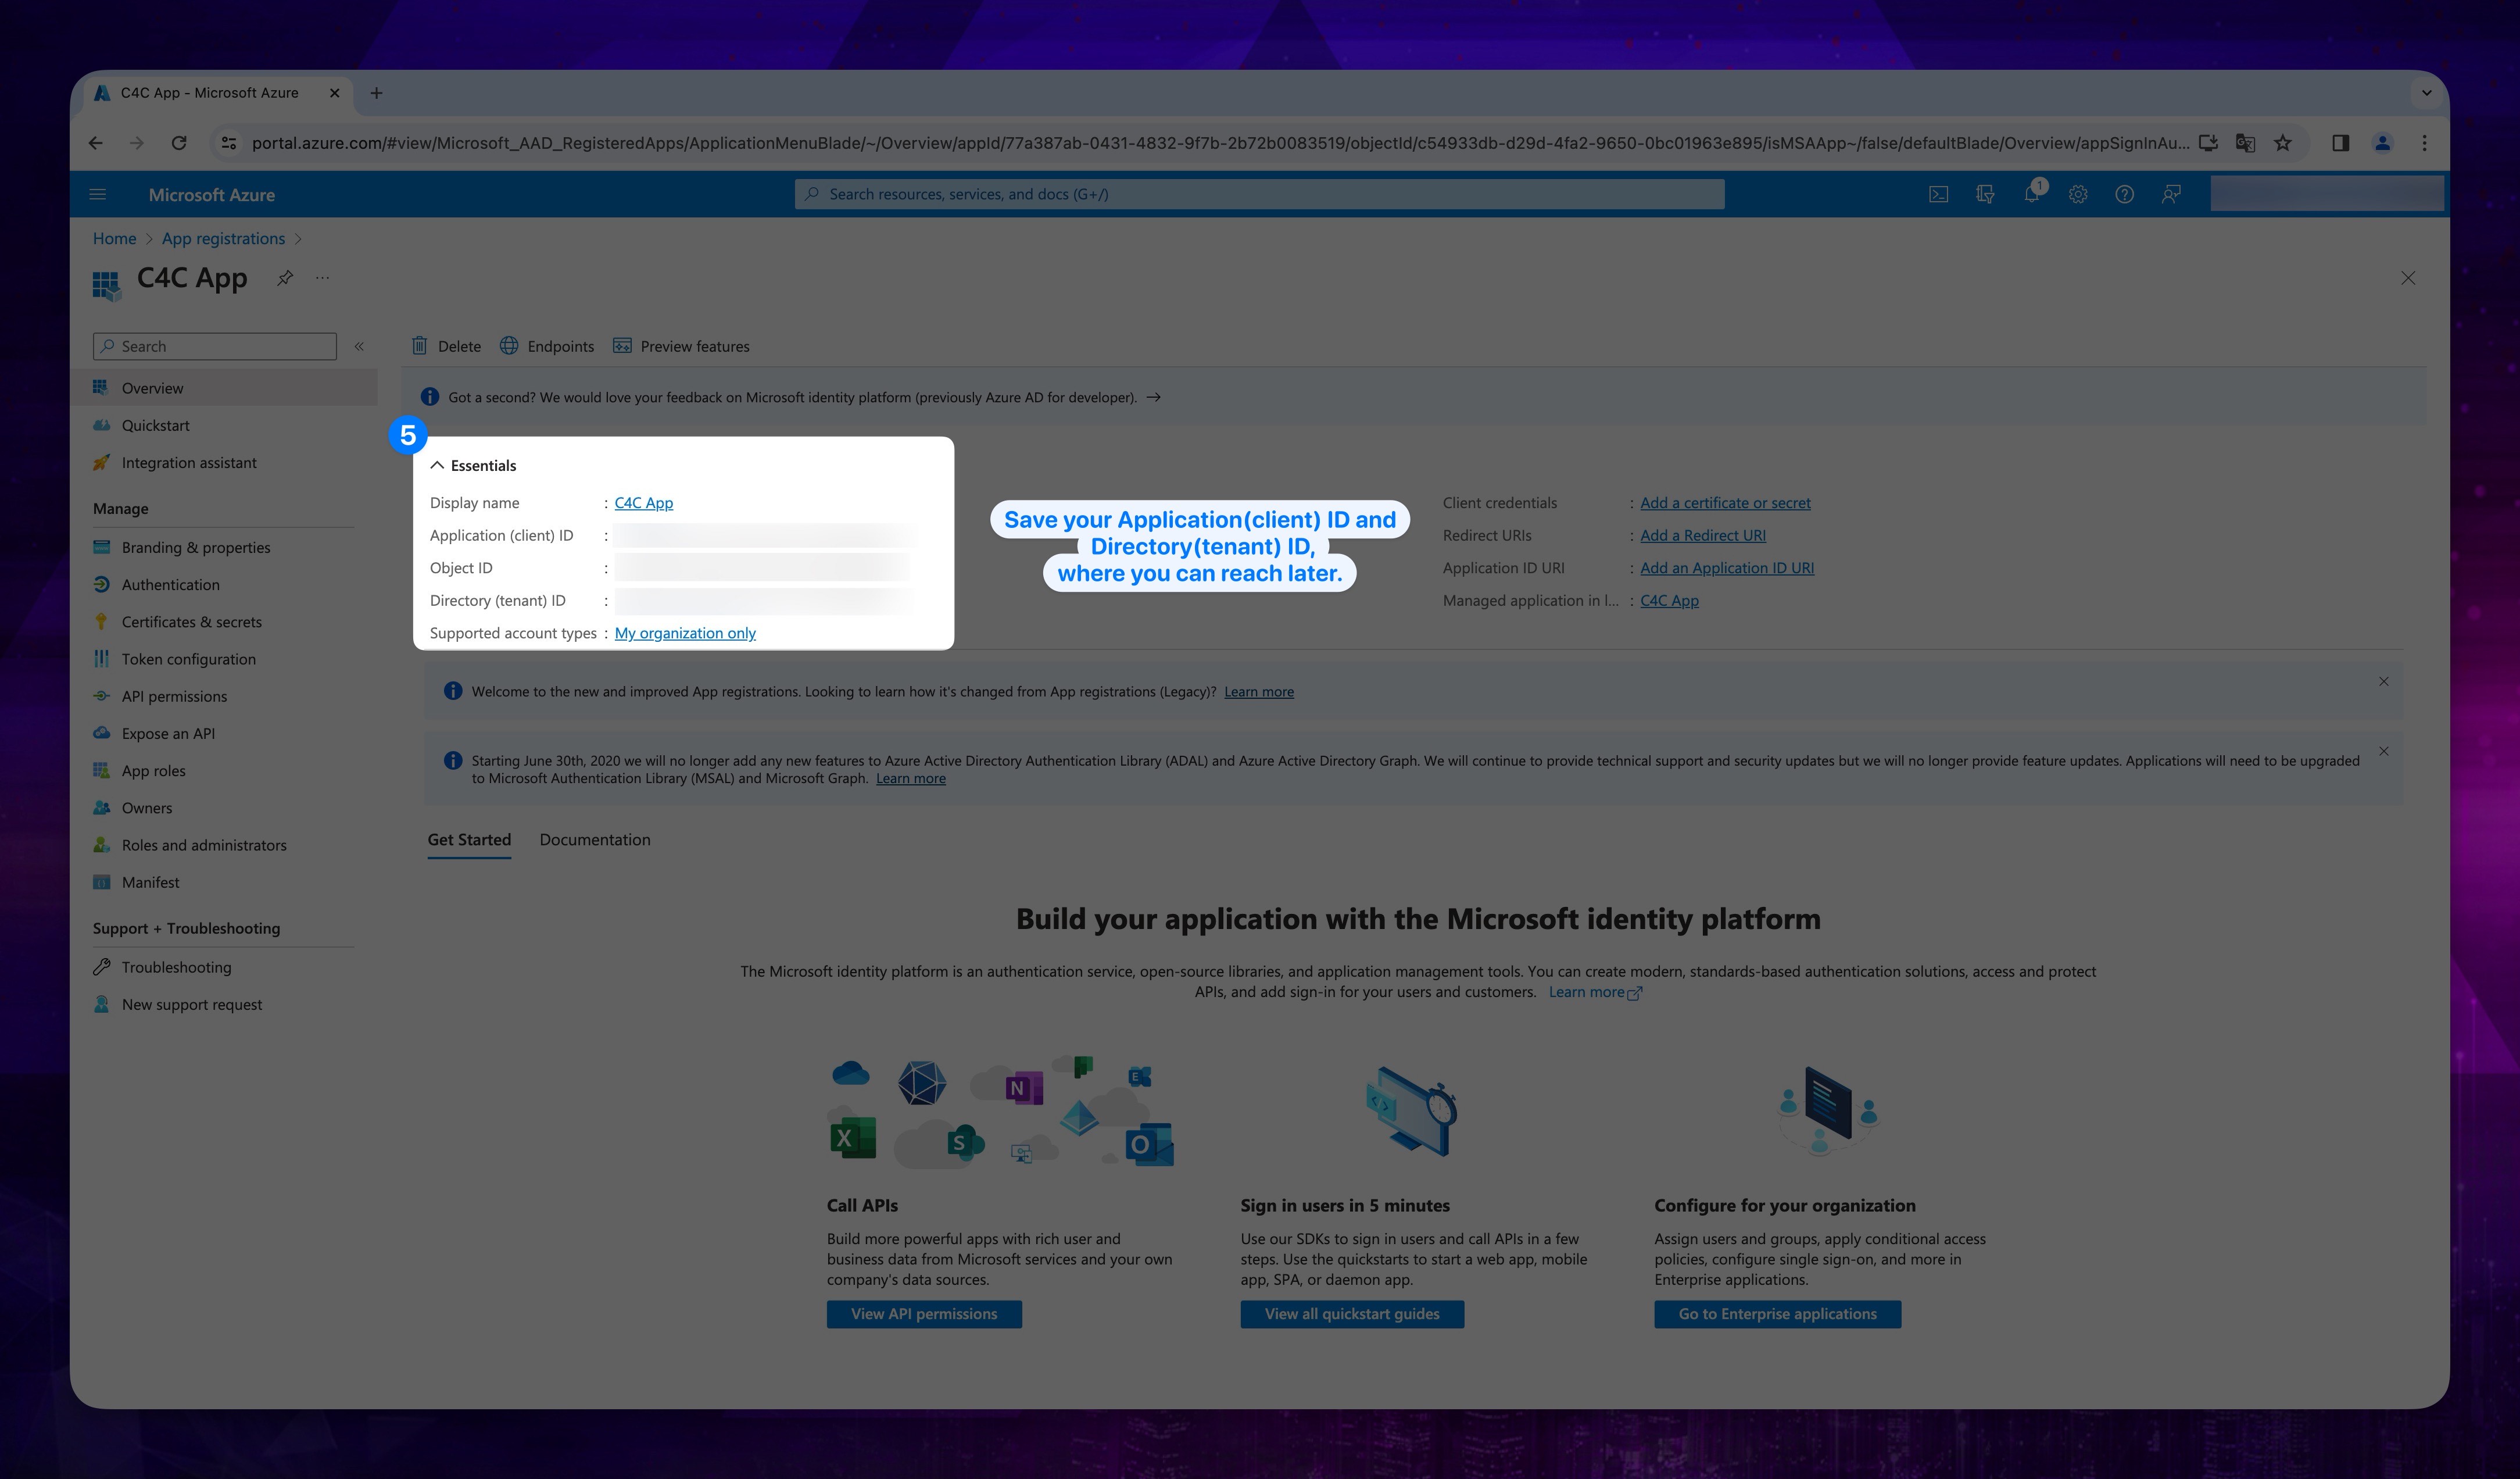
-
You will be navigated to a page that contains your Application (client) ID and Directory (tenant) ID.
CRITICAL STEPKeep Application (client) ID and Directory (tenant) ID where you can reach, you will need them for further operations in our console.
Show the instructions with images
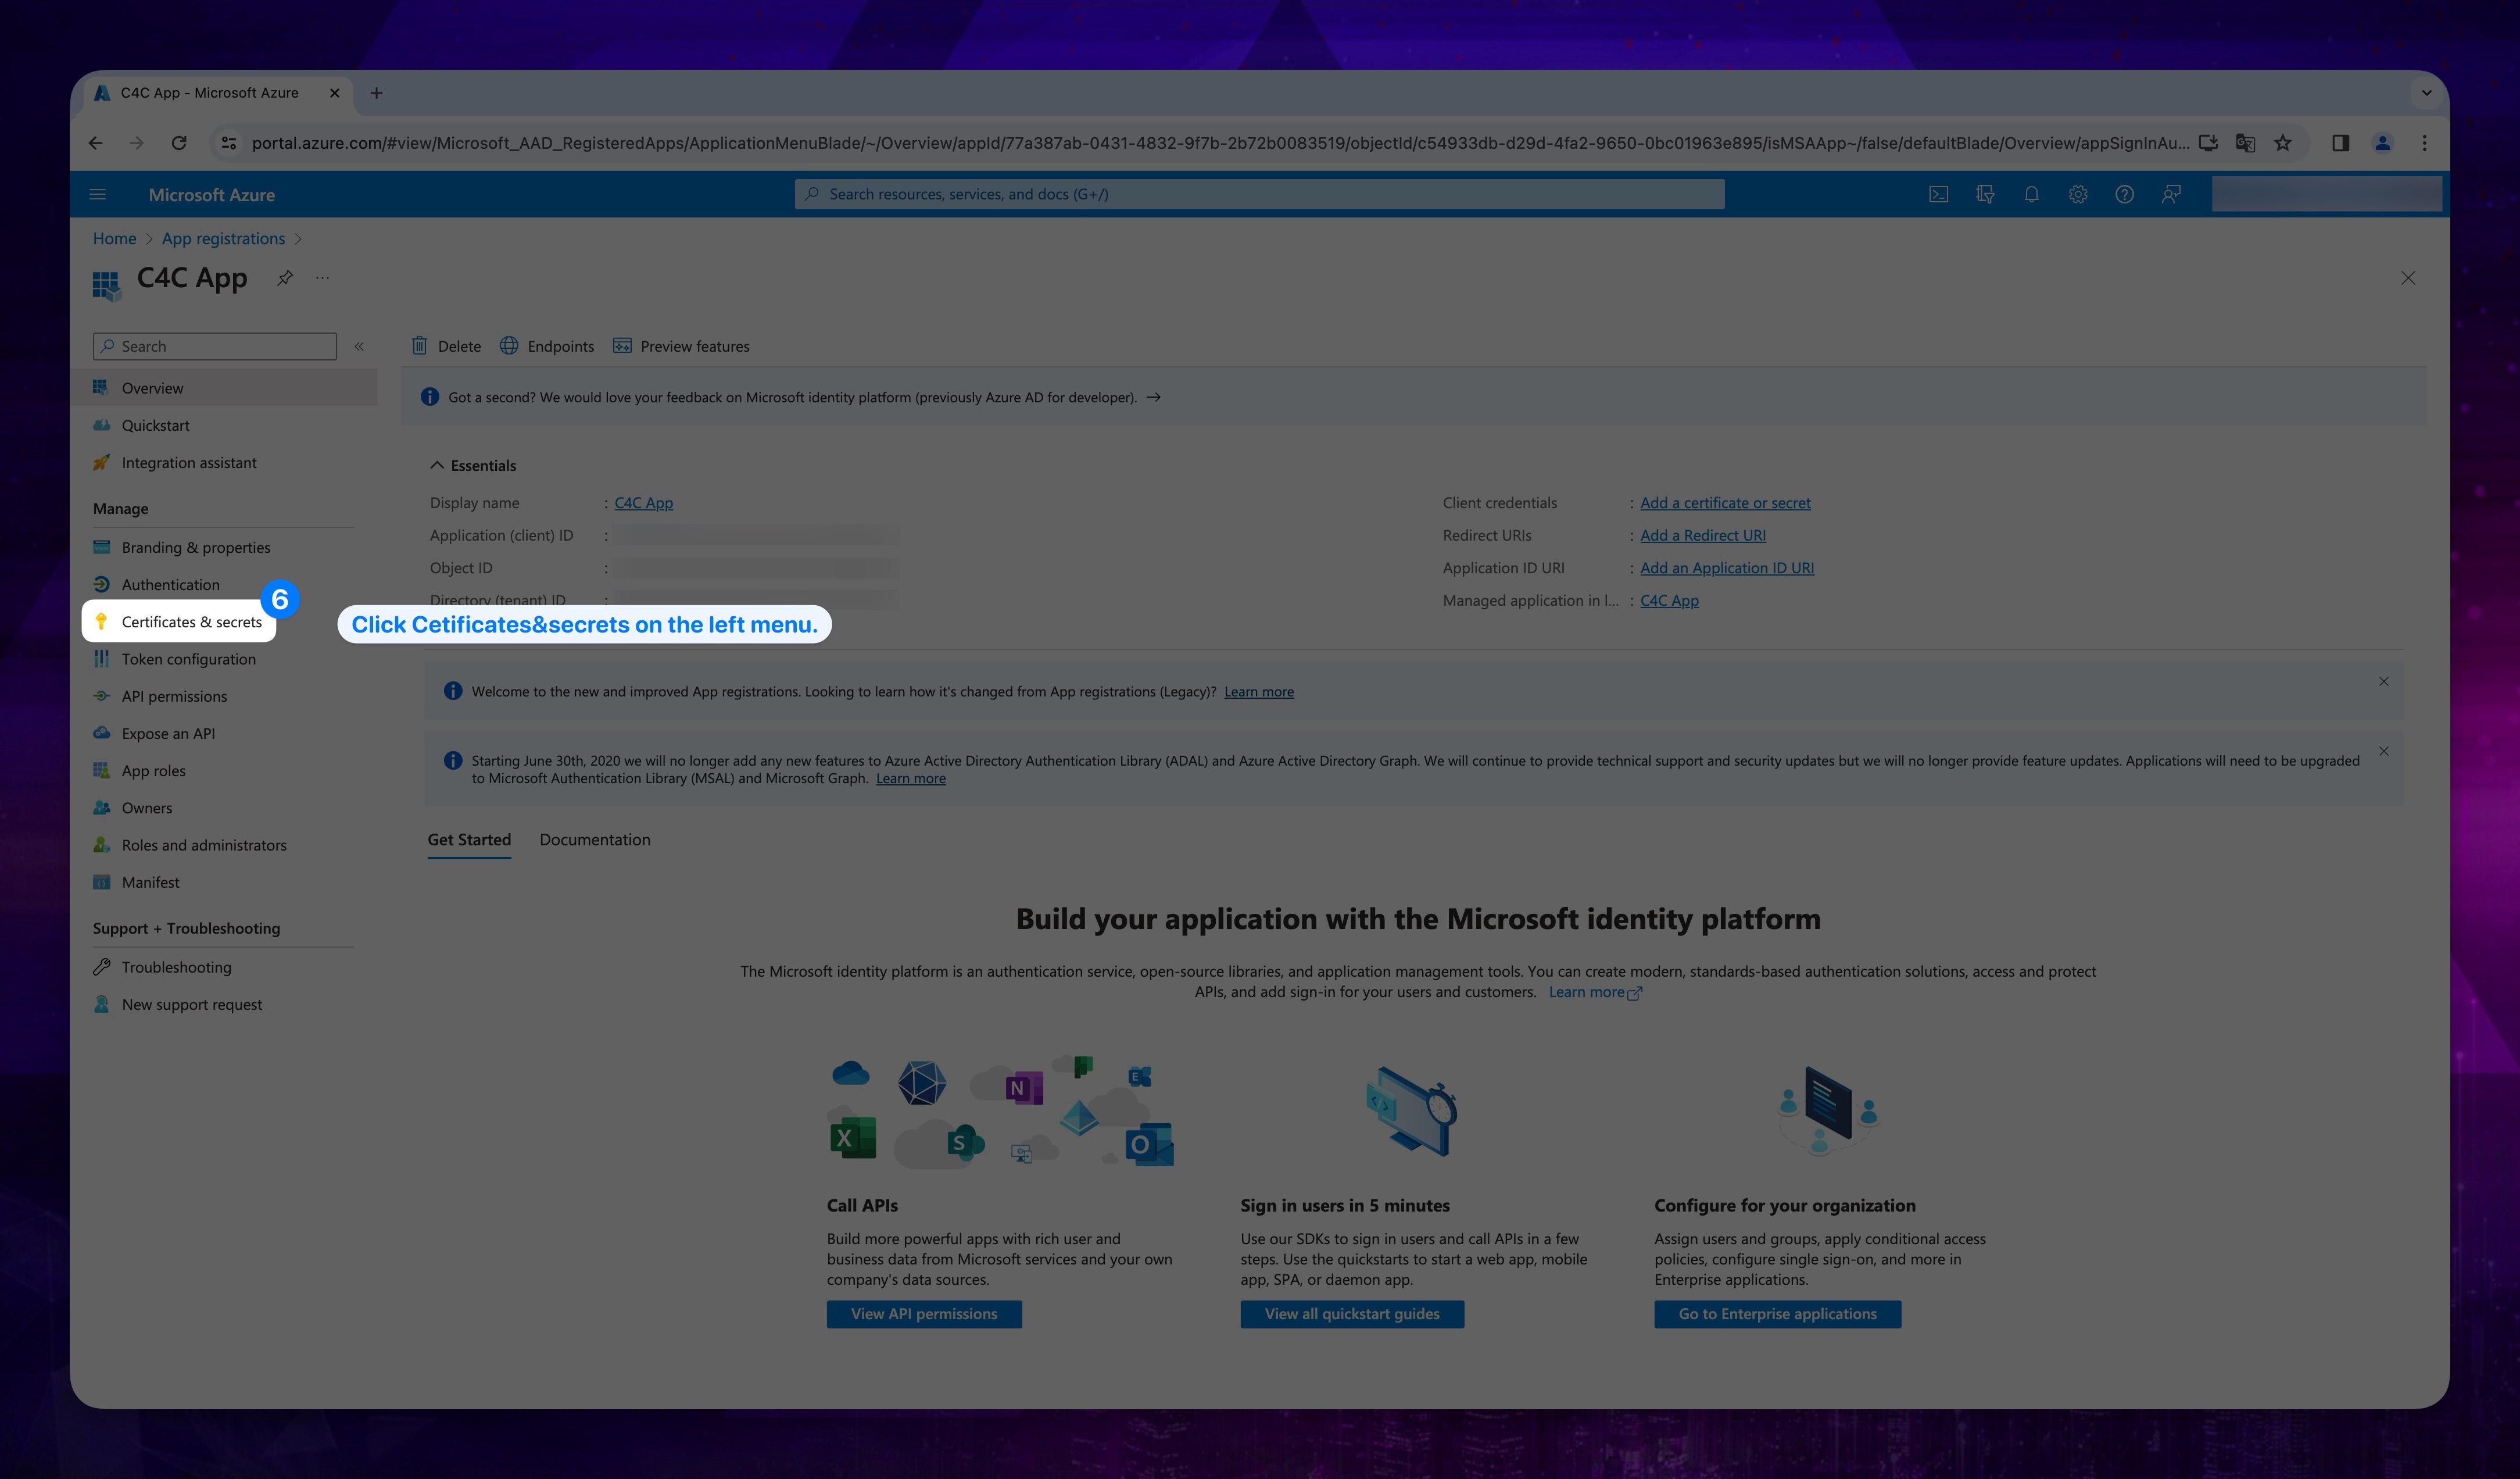
- Click Certificate & Secrets on the left menu.
Show the instructions with images
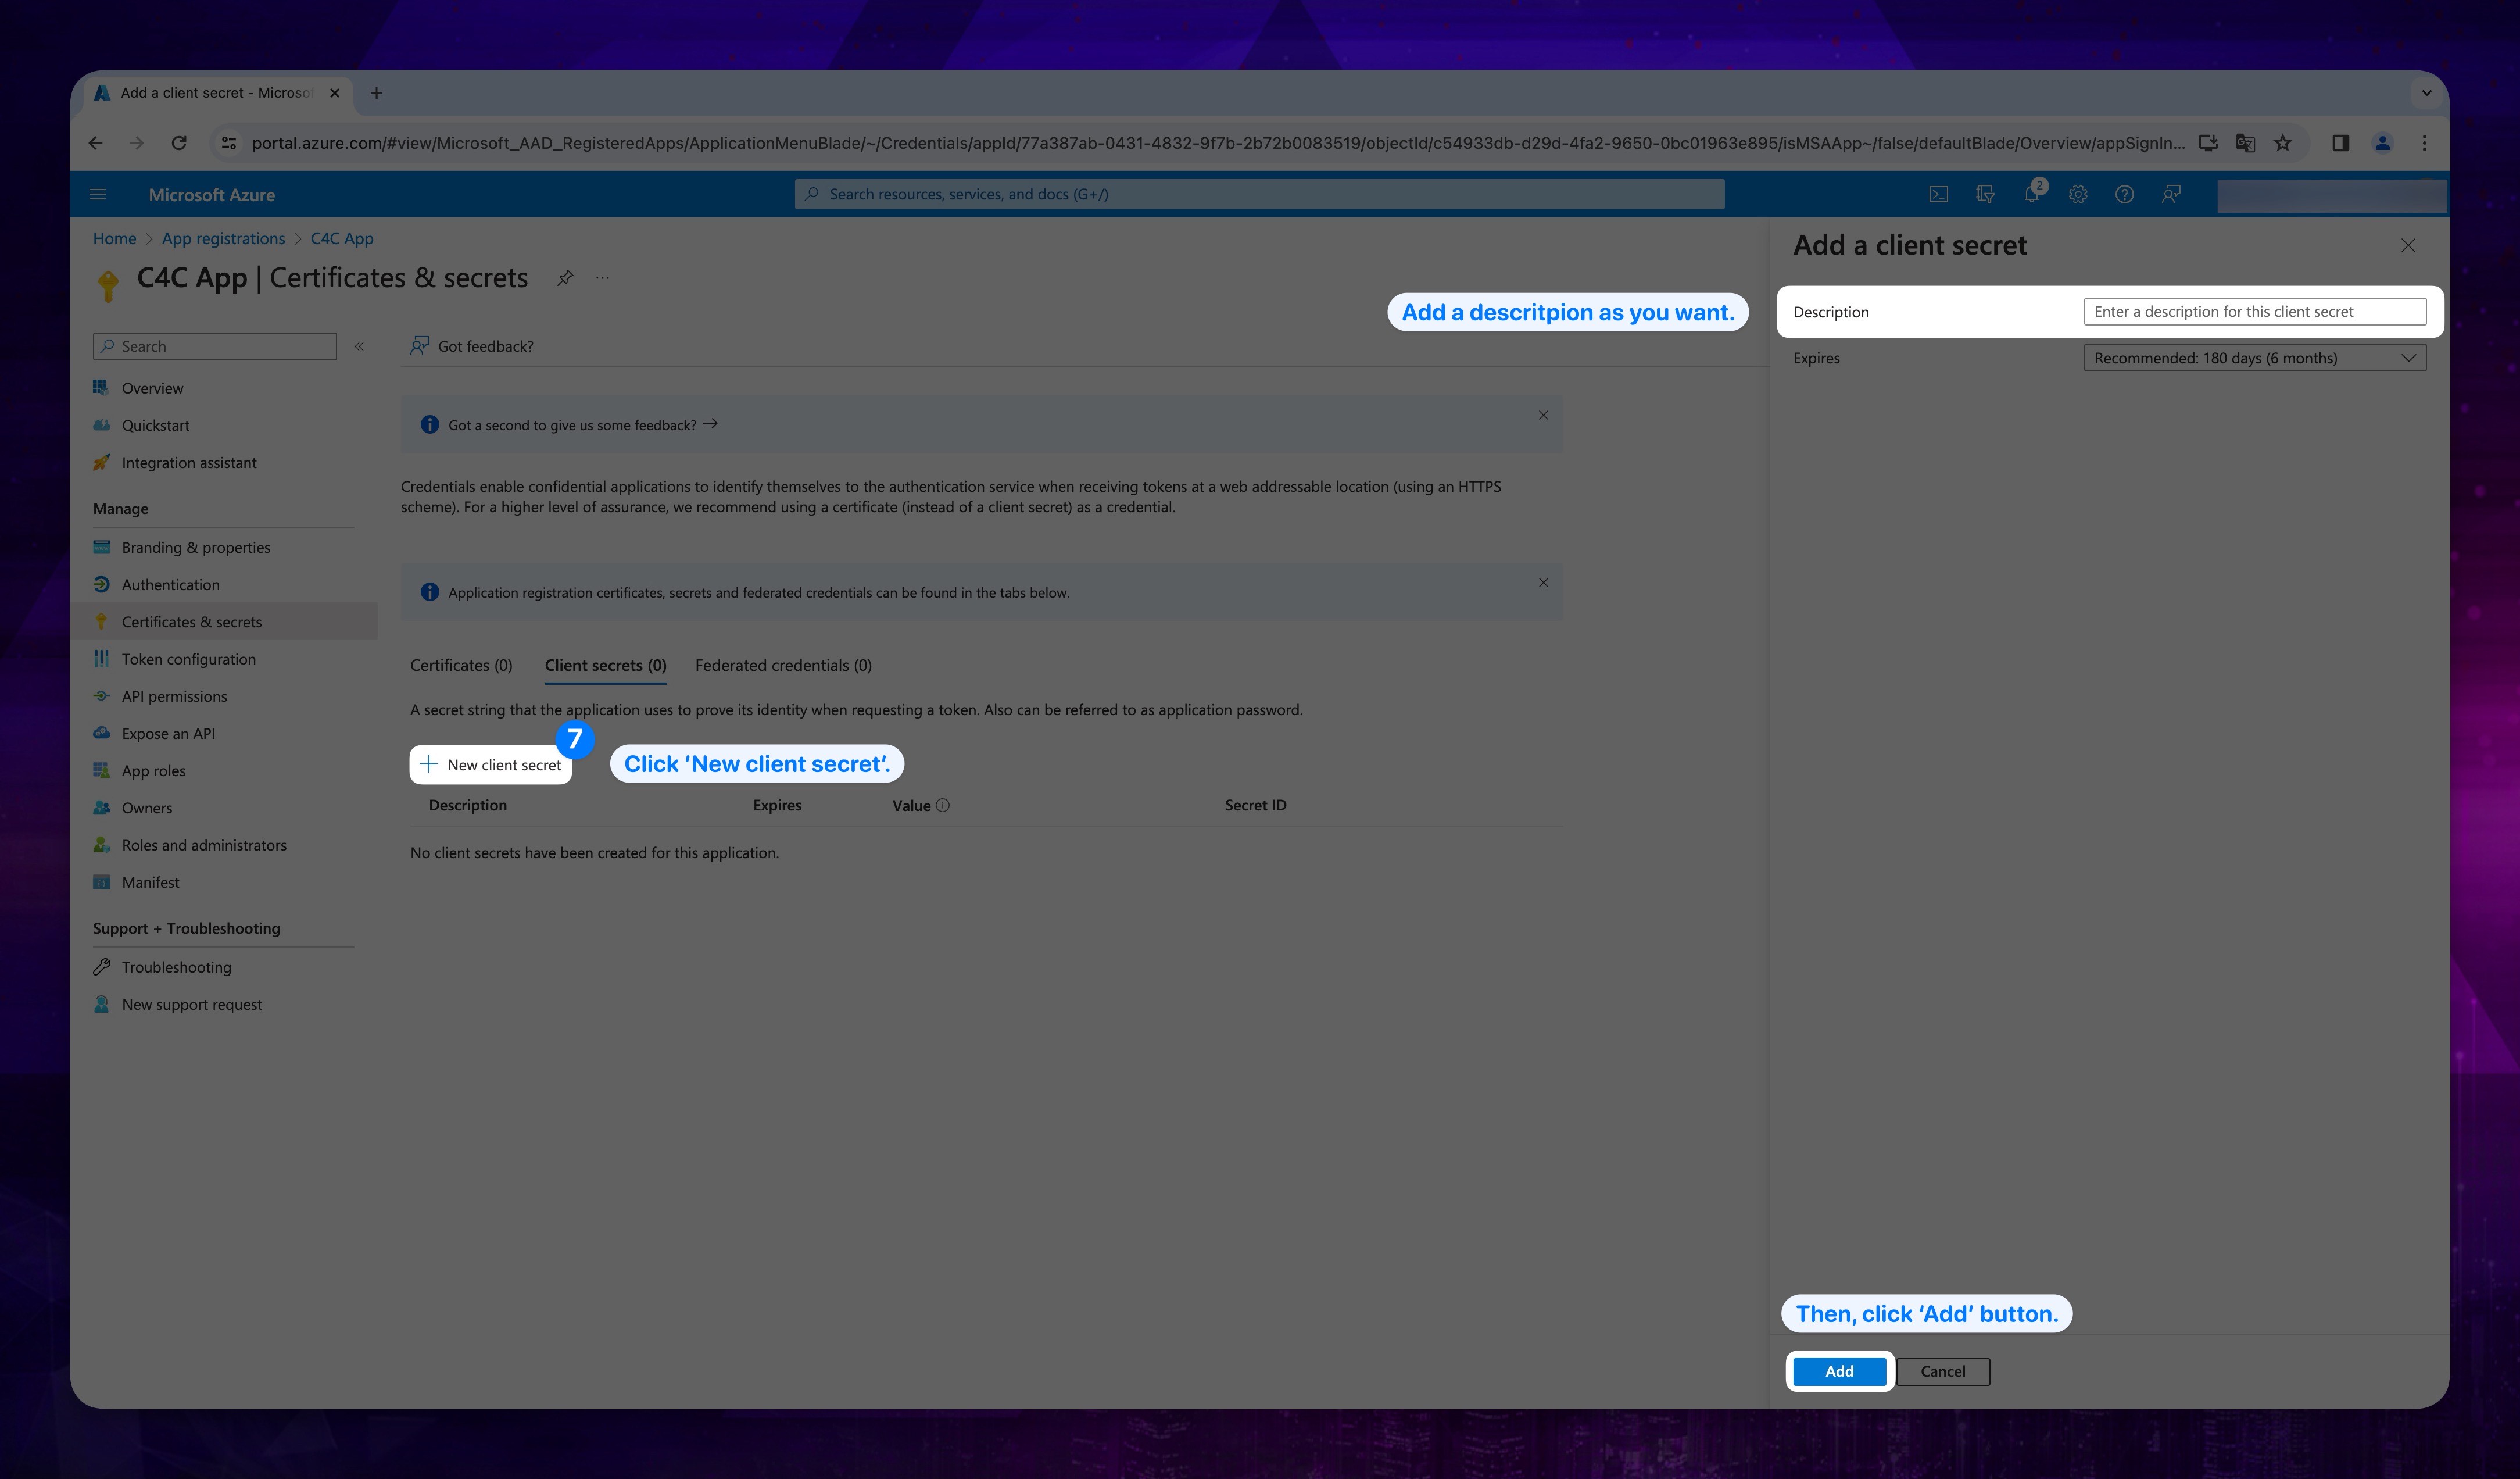
-
Create a client secret by clicking on the New client secret button. After providing a description for your client secret, proceed to click the Add button. Choosing the longest possible duration for the "expires" option is important.
CRITICAL STEPYou will see your Value on the same page after clicking the add button. Copy and keep it somewhere you can reach later.
Show the instructions with images
3. Getting Subscription ID
- Go to the search bar and search for Subscriptions, then click Subscriptions under Services.
Show the instructions with images
-
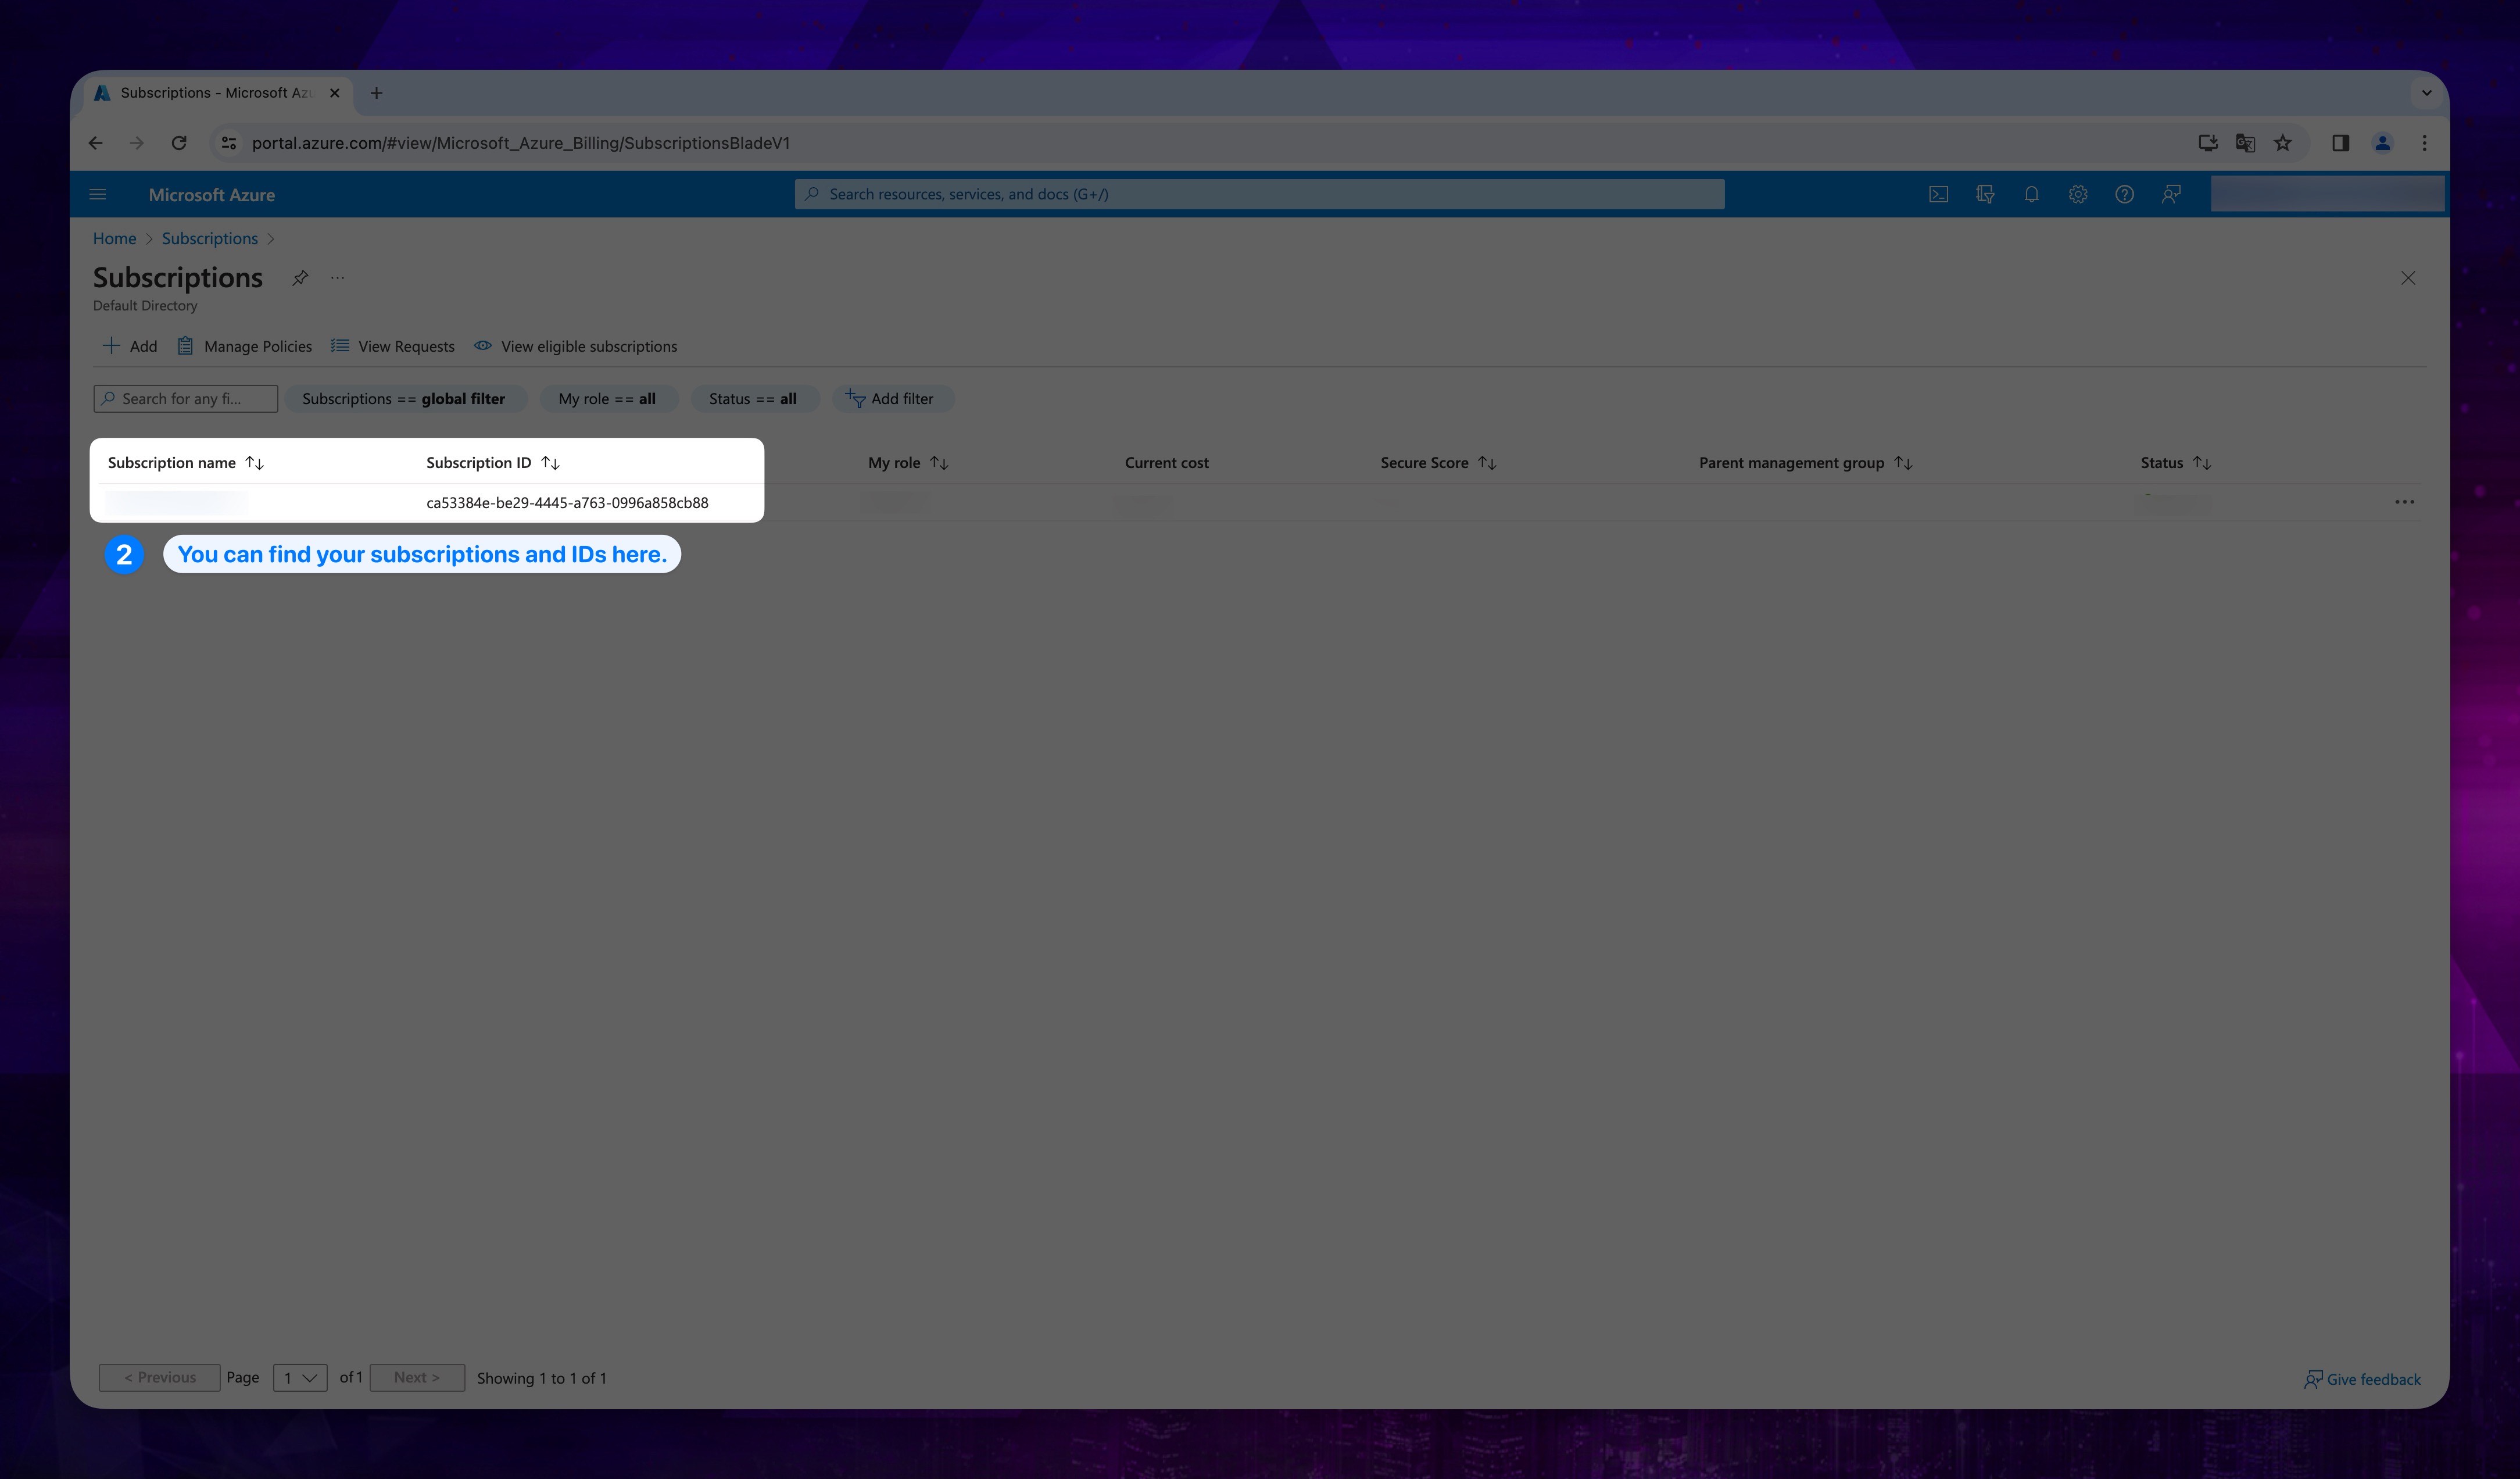
After opening the page, copy your Subscription ID somewhere accessible for future reference.
CRITICAL STEPPlease be sure you have copied your Subscription ID somewhere you can reach later.
Show the instructions with images
4. Adding C4C Custom Role
Now, we need to create the role that contains the necessary permissions.
We can do this in two ways: the first is with a file, and the second is with a code block.
The file method includes performing the necessary actions along with a file we will provide you.
The code block method, on the other hand, involves pasting the code into the relevant location under the same section.
You can proceed by selecting your preference.
- File
- Code
If you wish to proceed with this method, please follow the steps below.
- Go to the search bar and search for Subscriptions, then click Subscriptions under Services.
Show the instructions with images
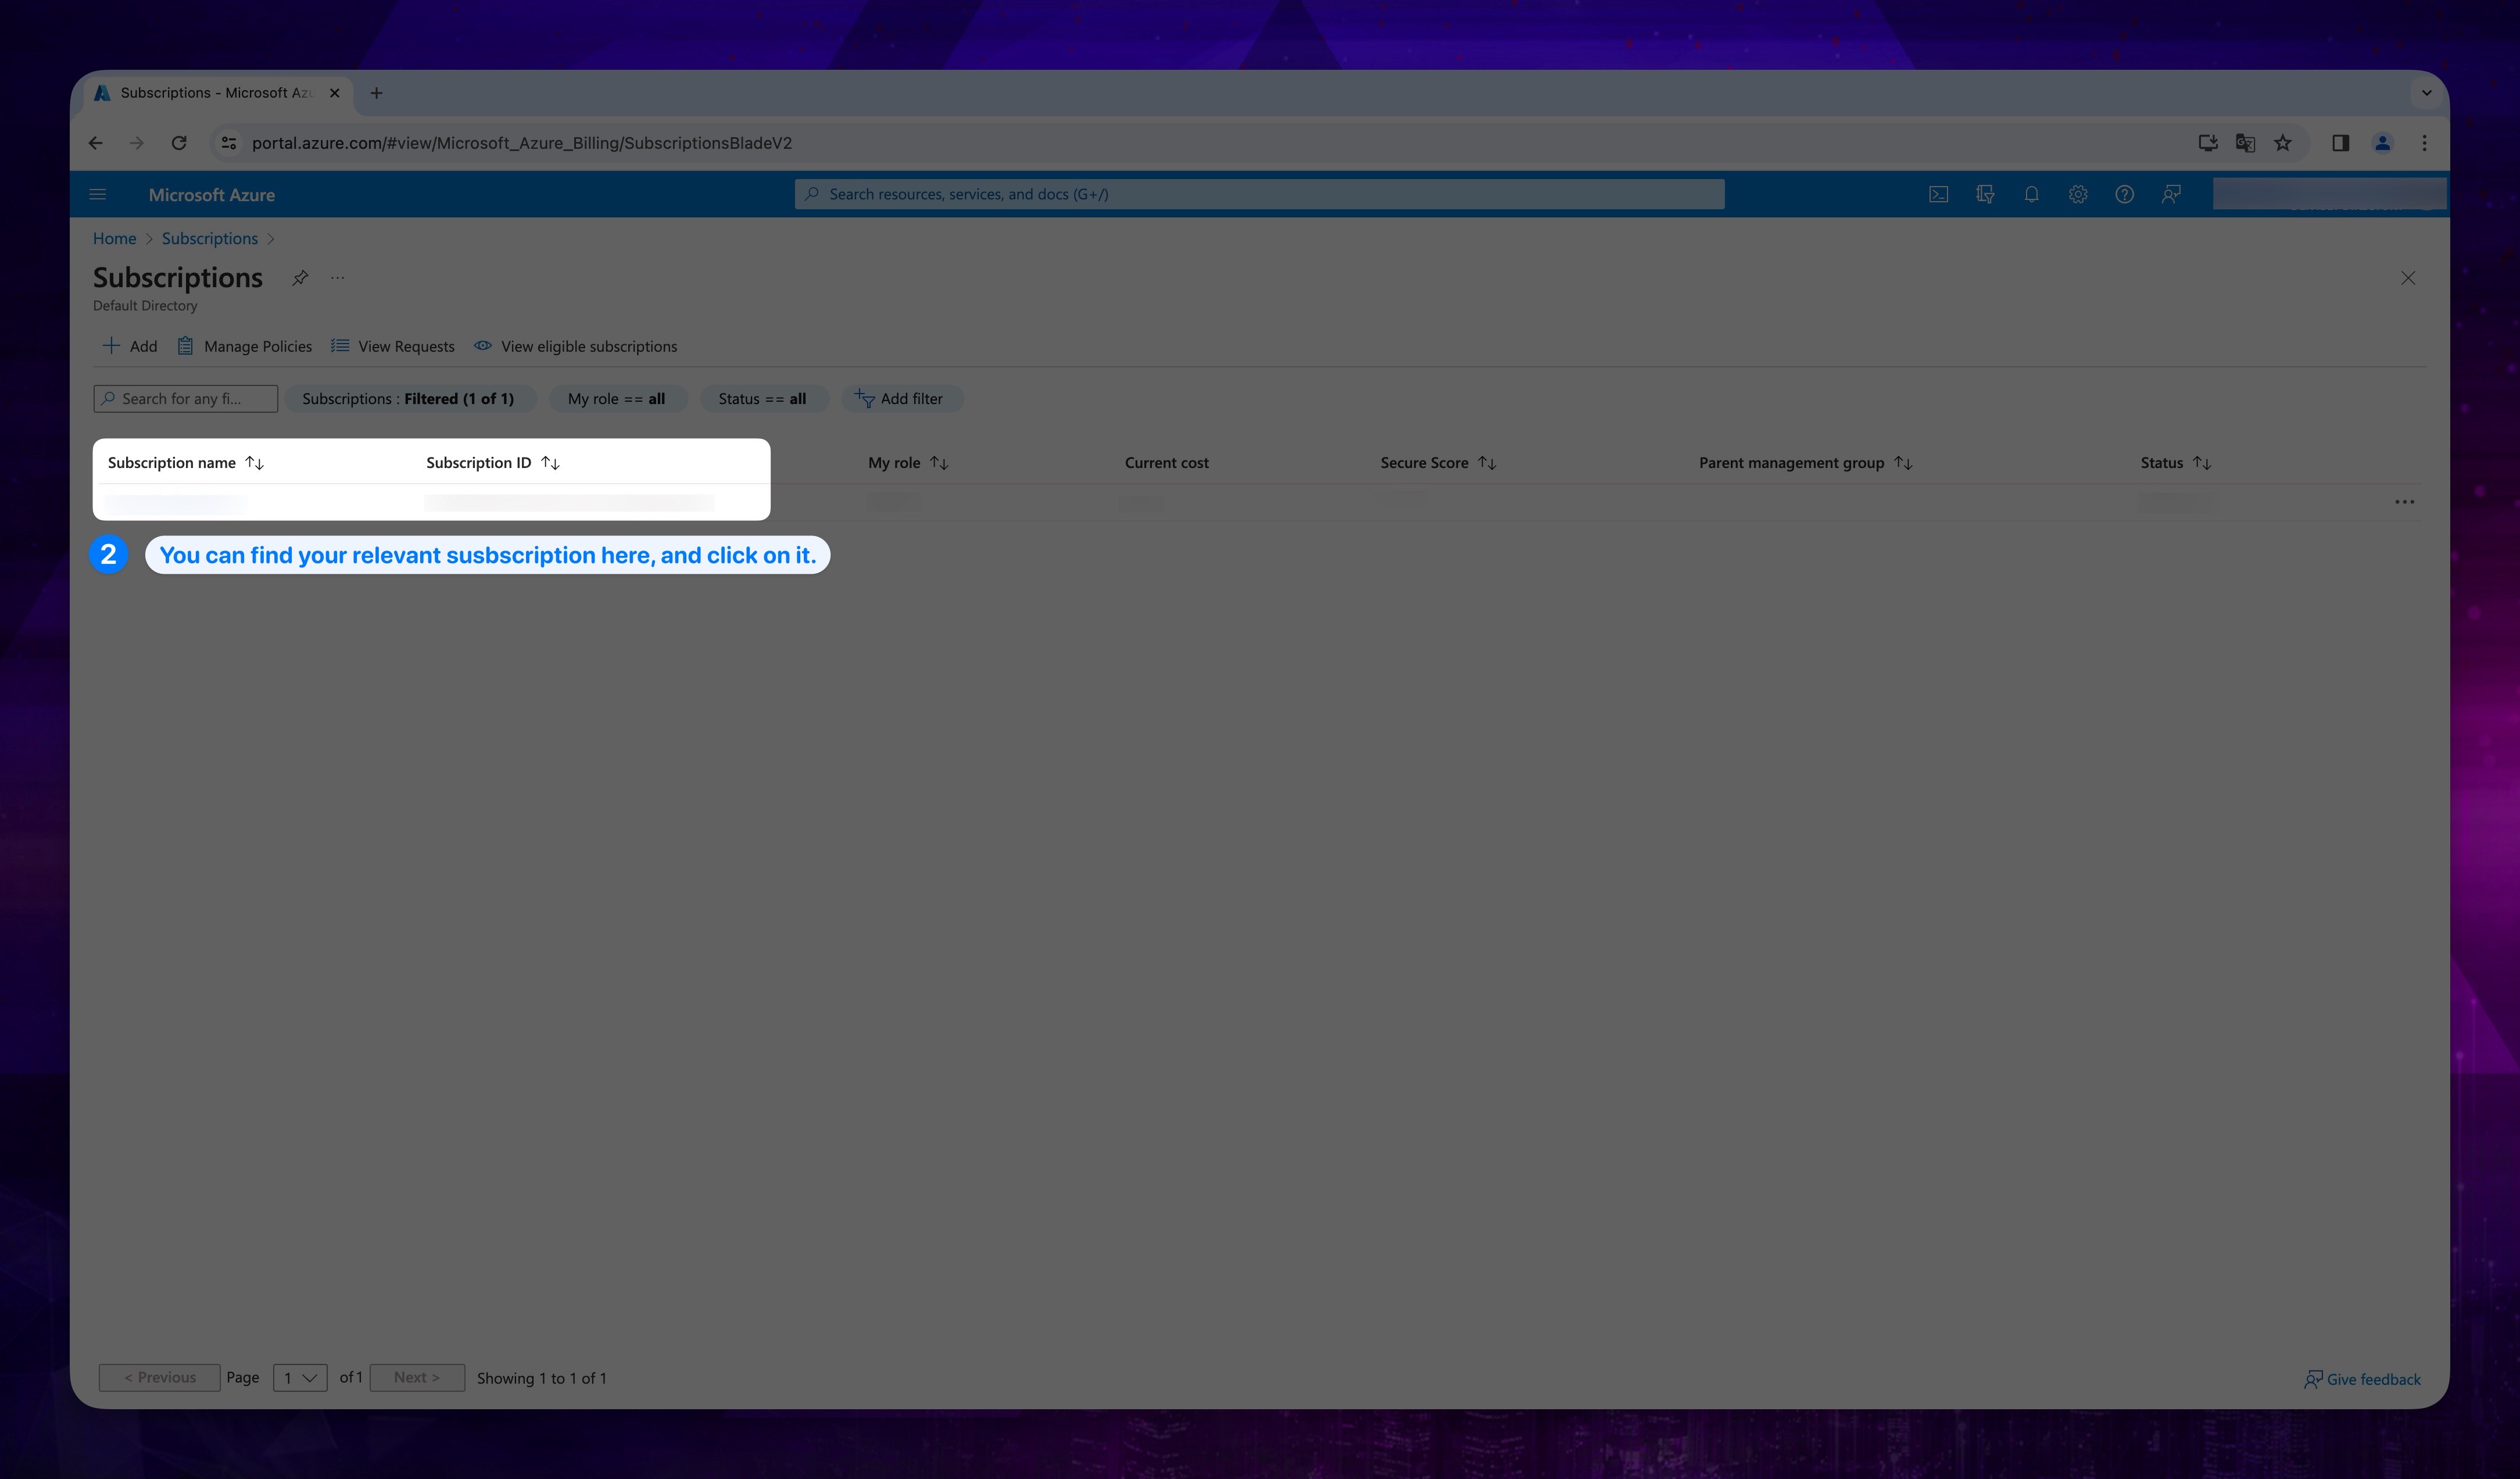
- Click on your related Subscription Name.
Show the instructions with images
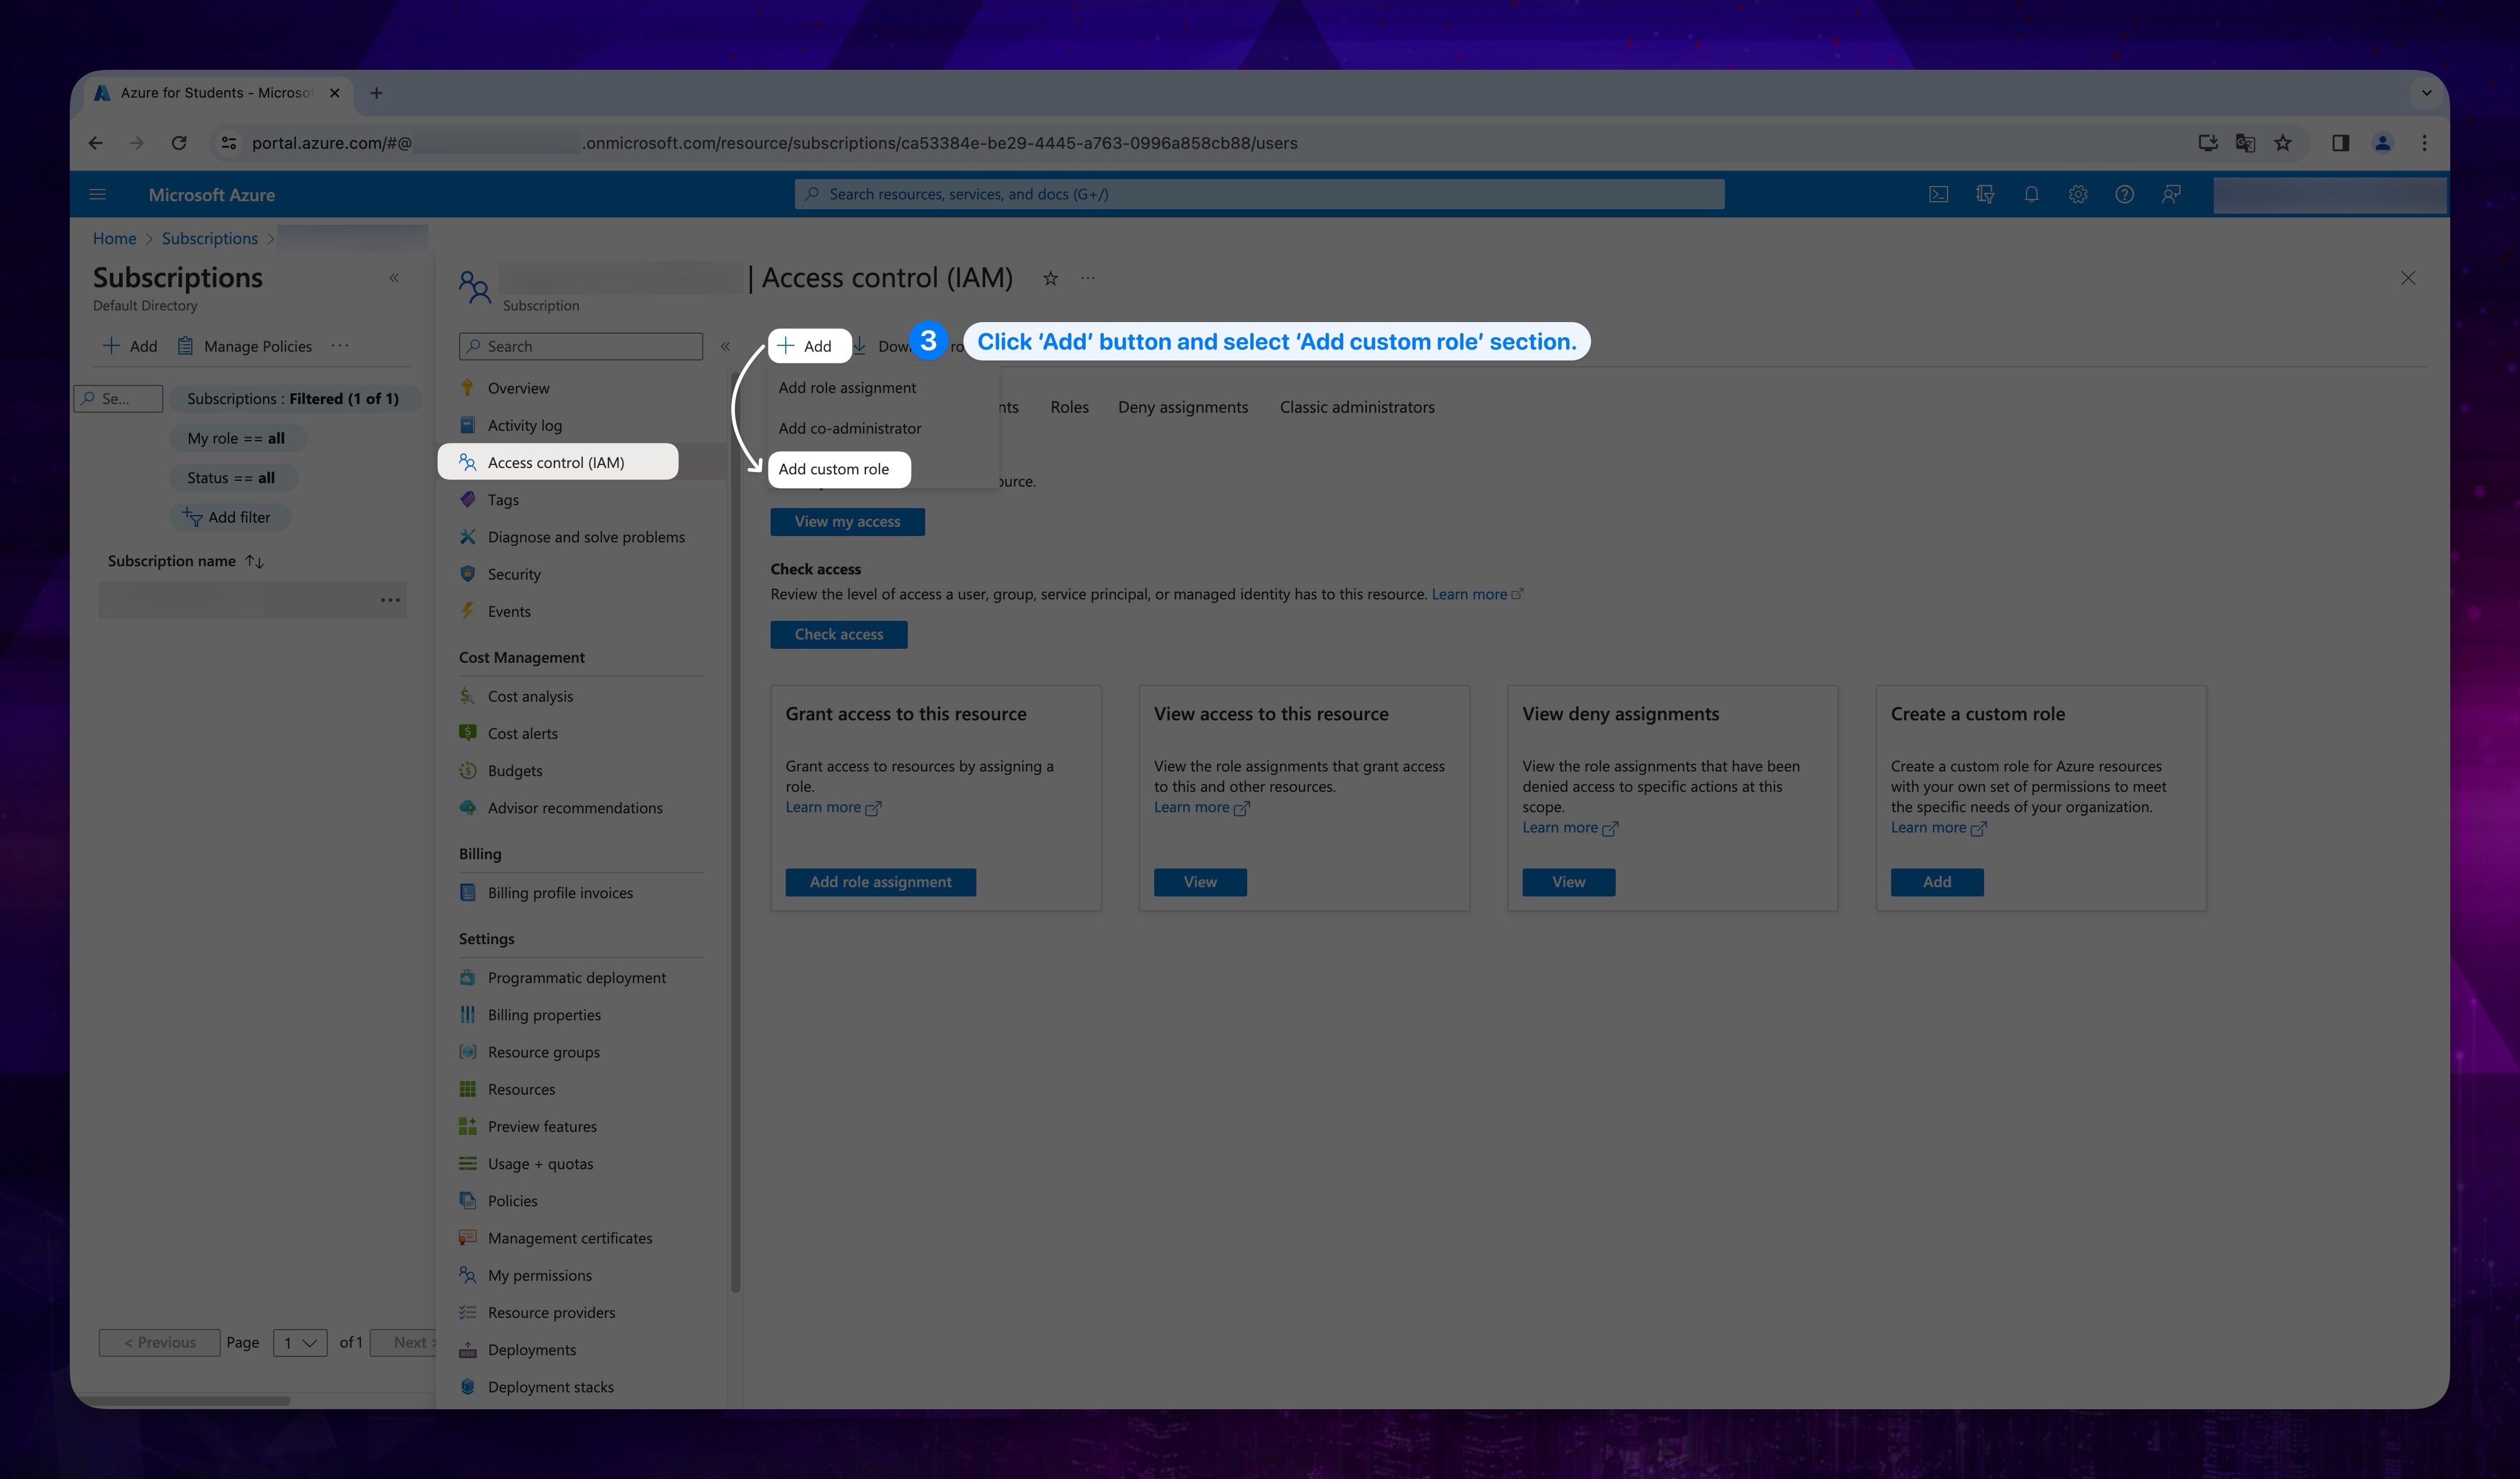
- Click on Access Control (IAM) from the left-hand menu, then click on the Add button above, and select Add custom role.
Show the instructions with images
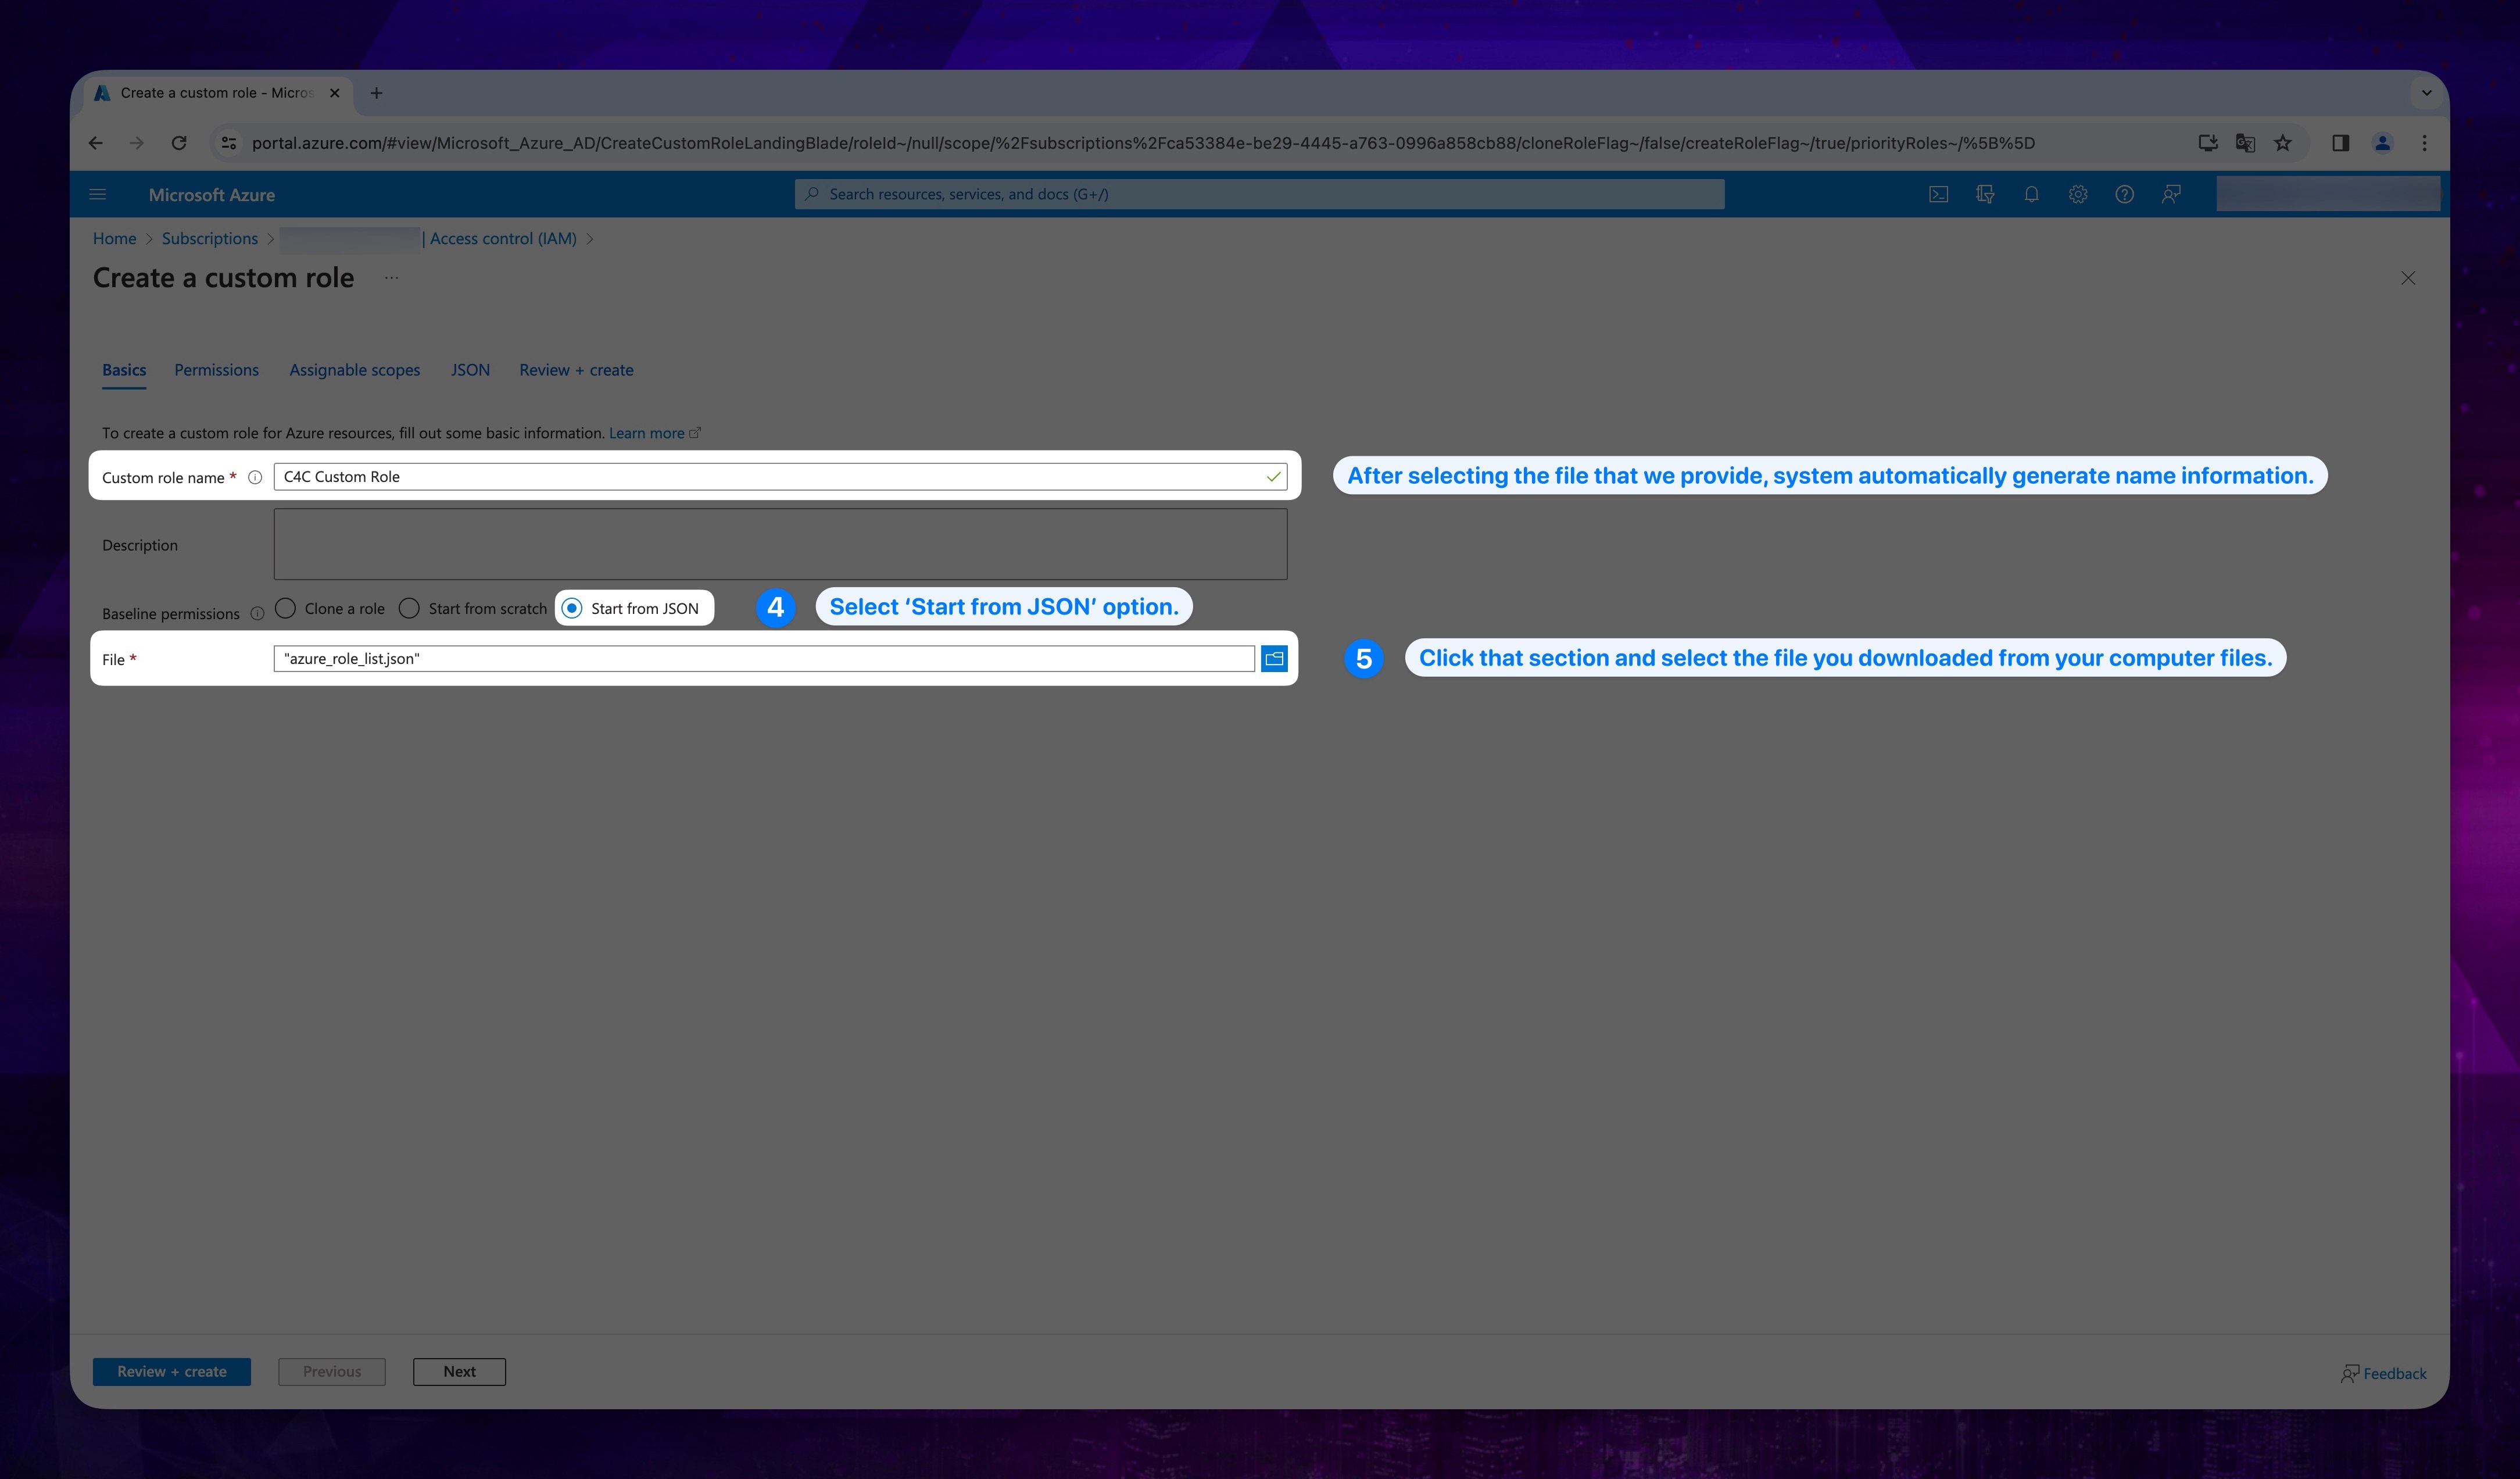
- Select the Start from JSON option, for the Baseline Permissions.
Download this file, for the relevant permissions.
-
Click the Select a file section and locate and select the file you downloaded in the previous step on your computer.
warningAfter selecting the relevant file, the system will automatically generate a Custom role name with C4C Custom Role AllServices.
Show the instructions with images
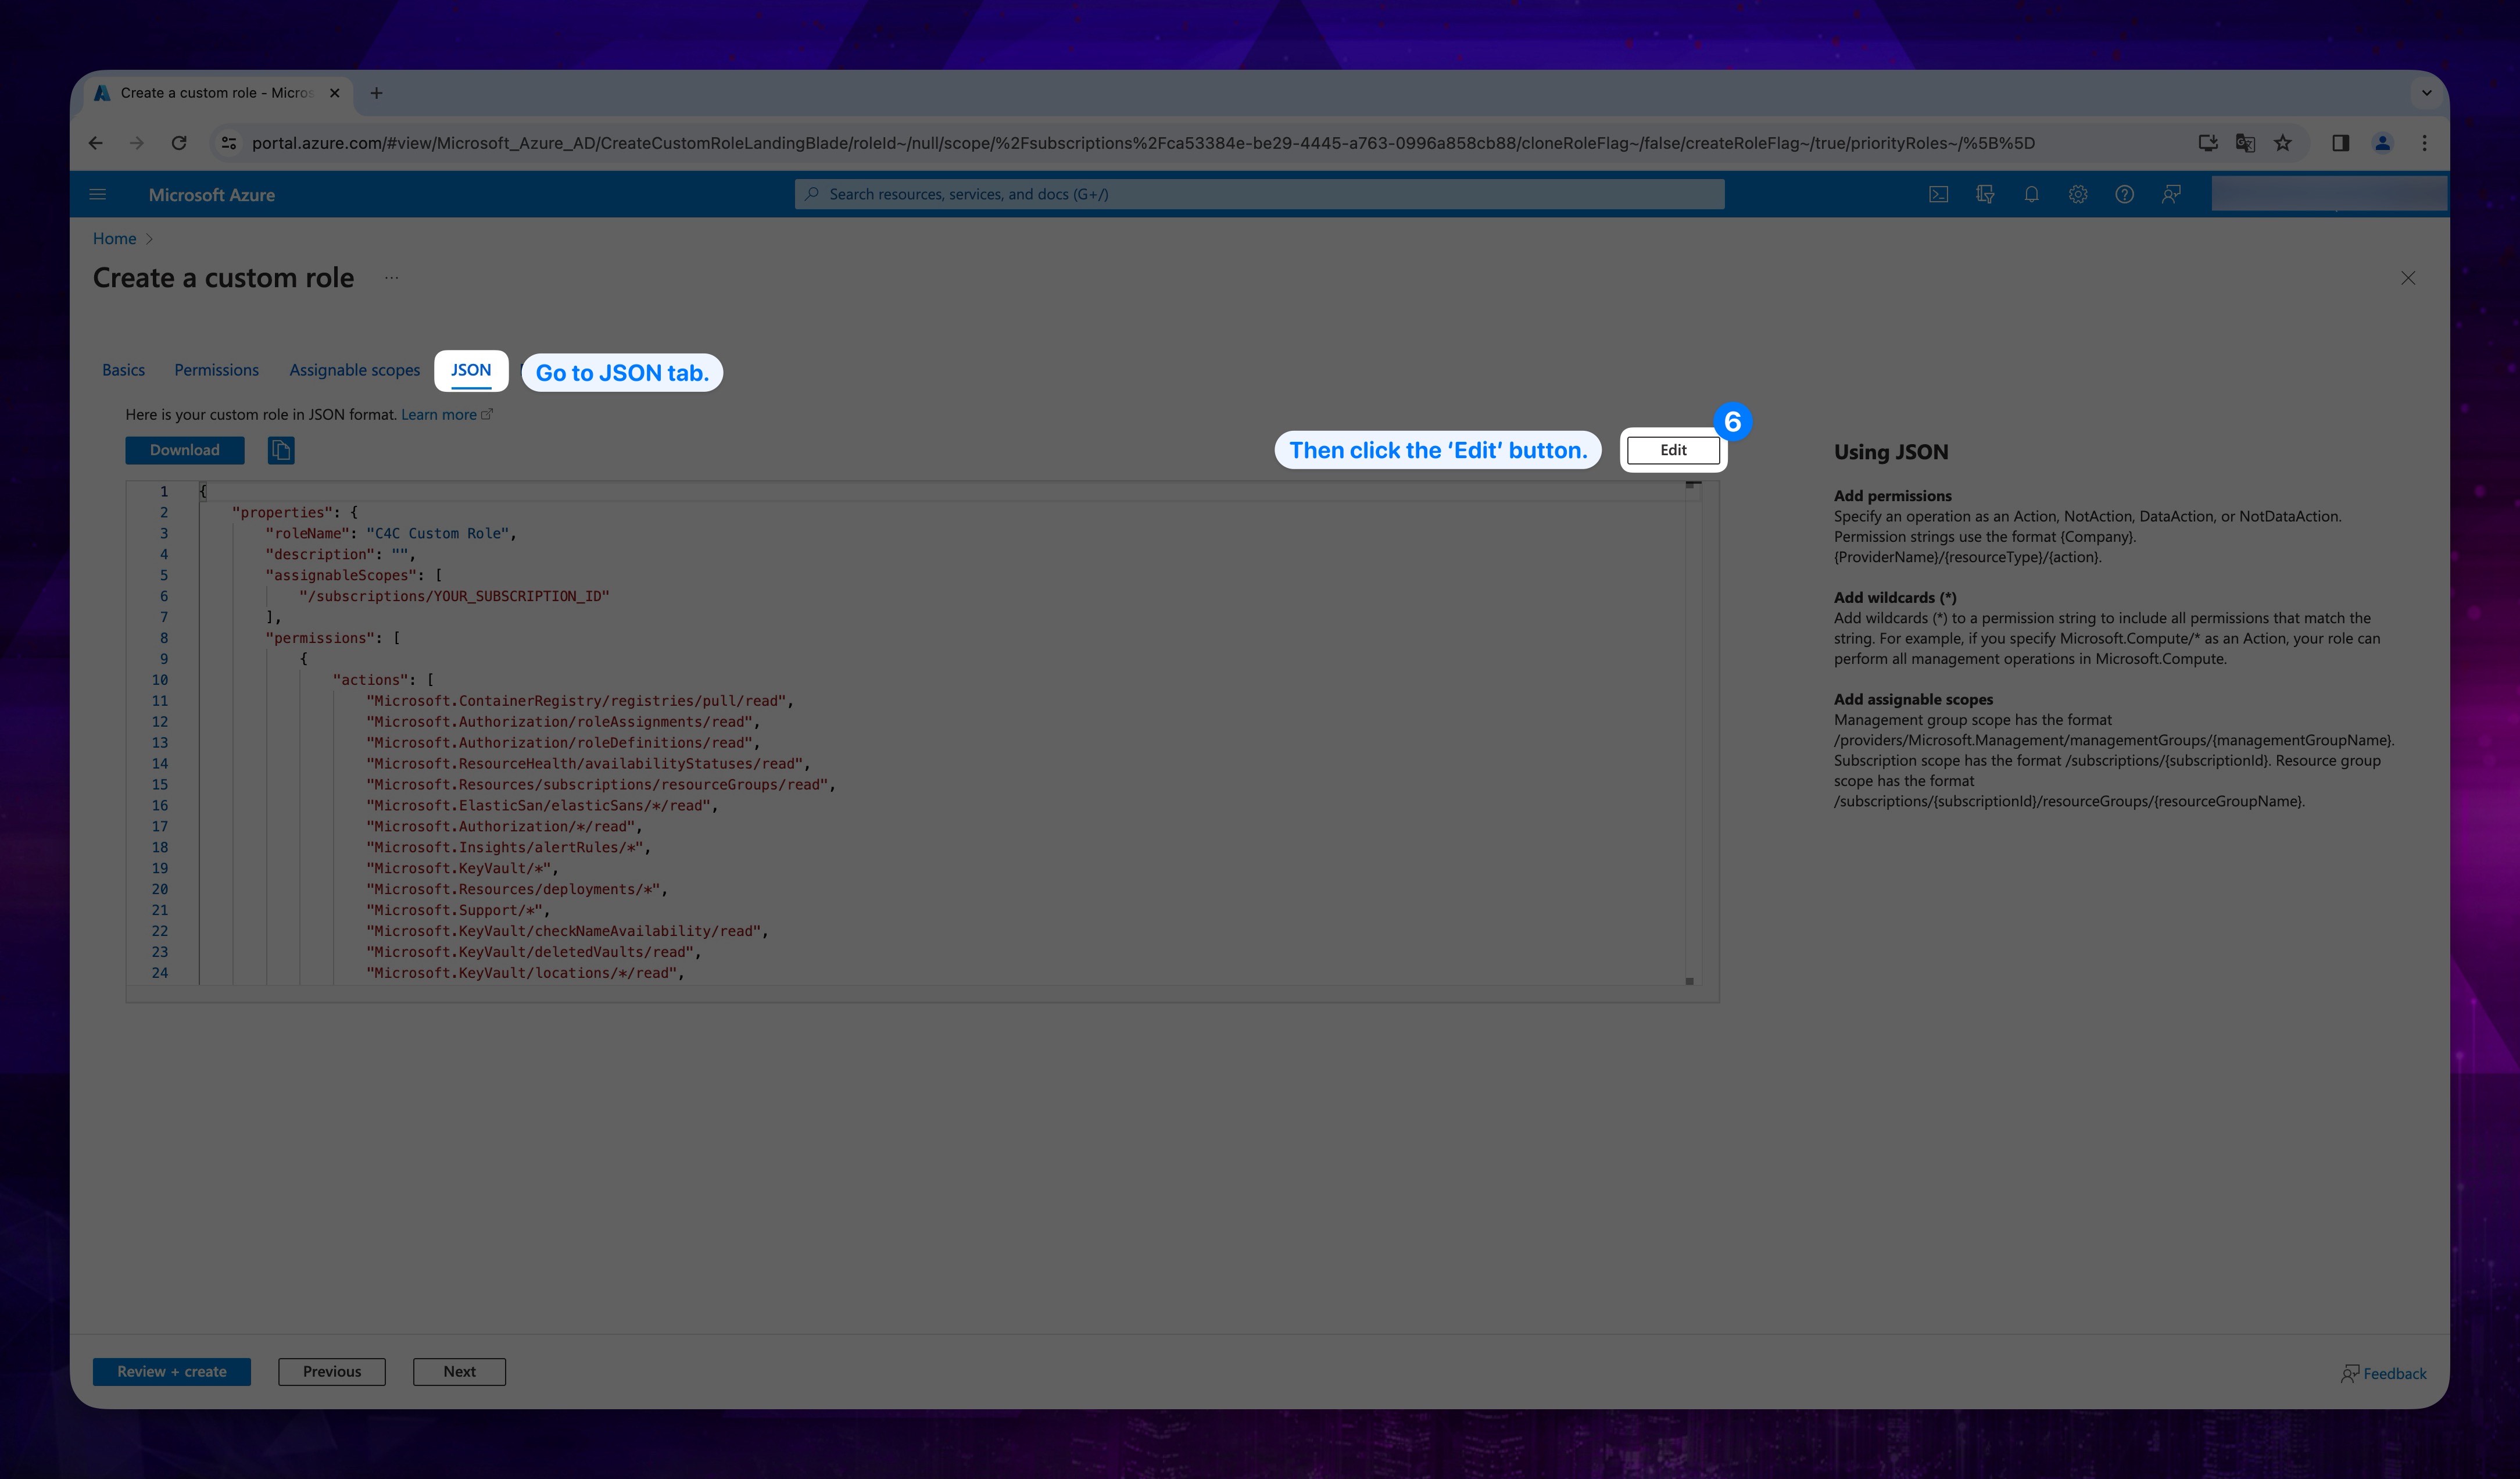
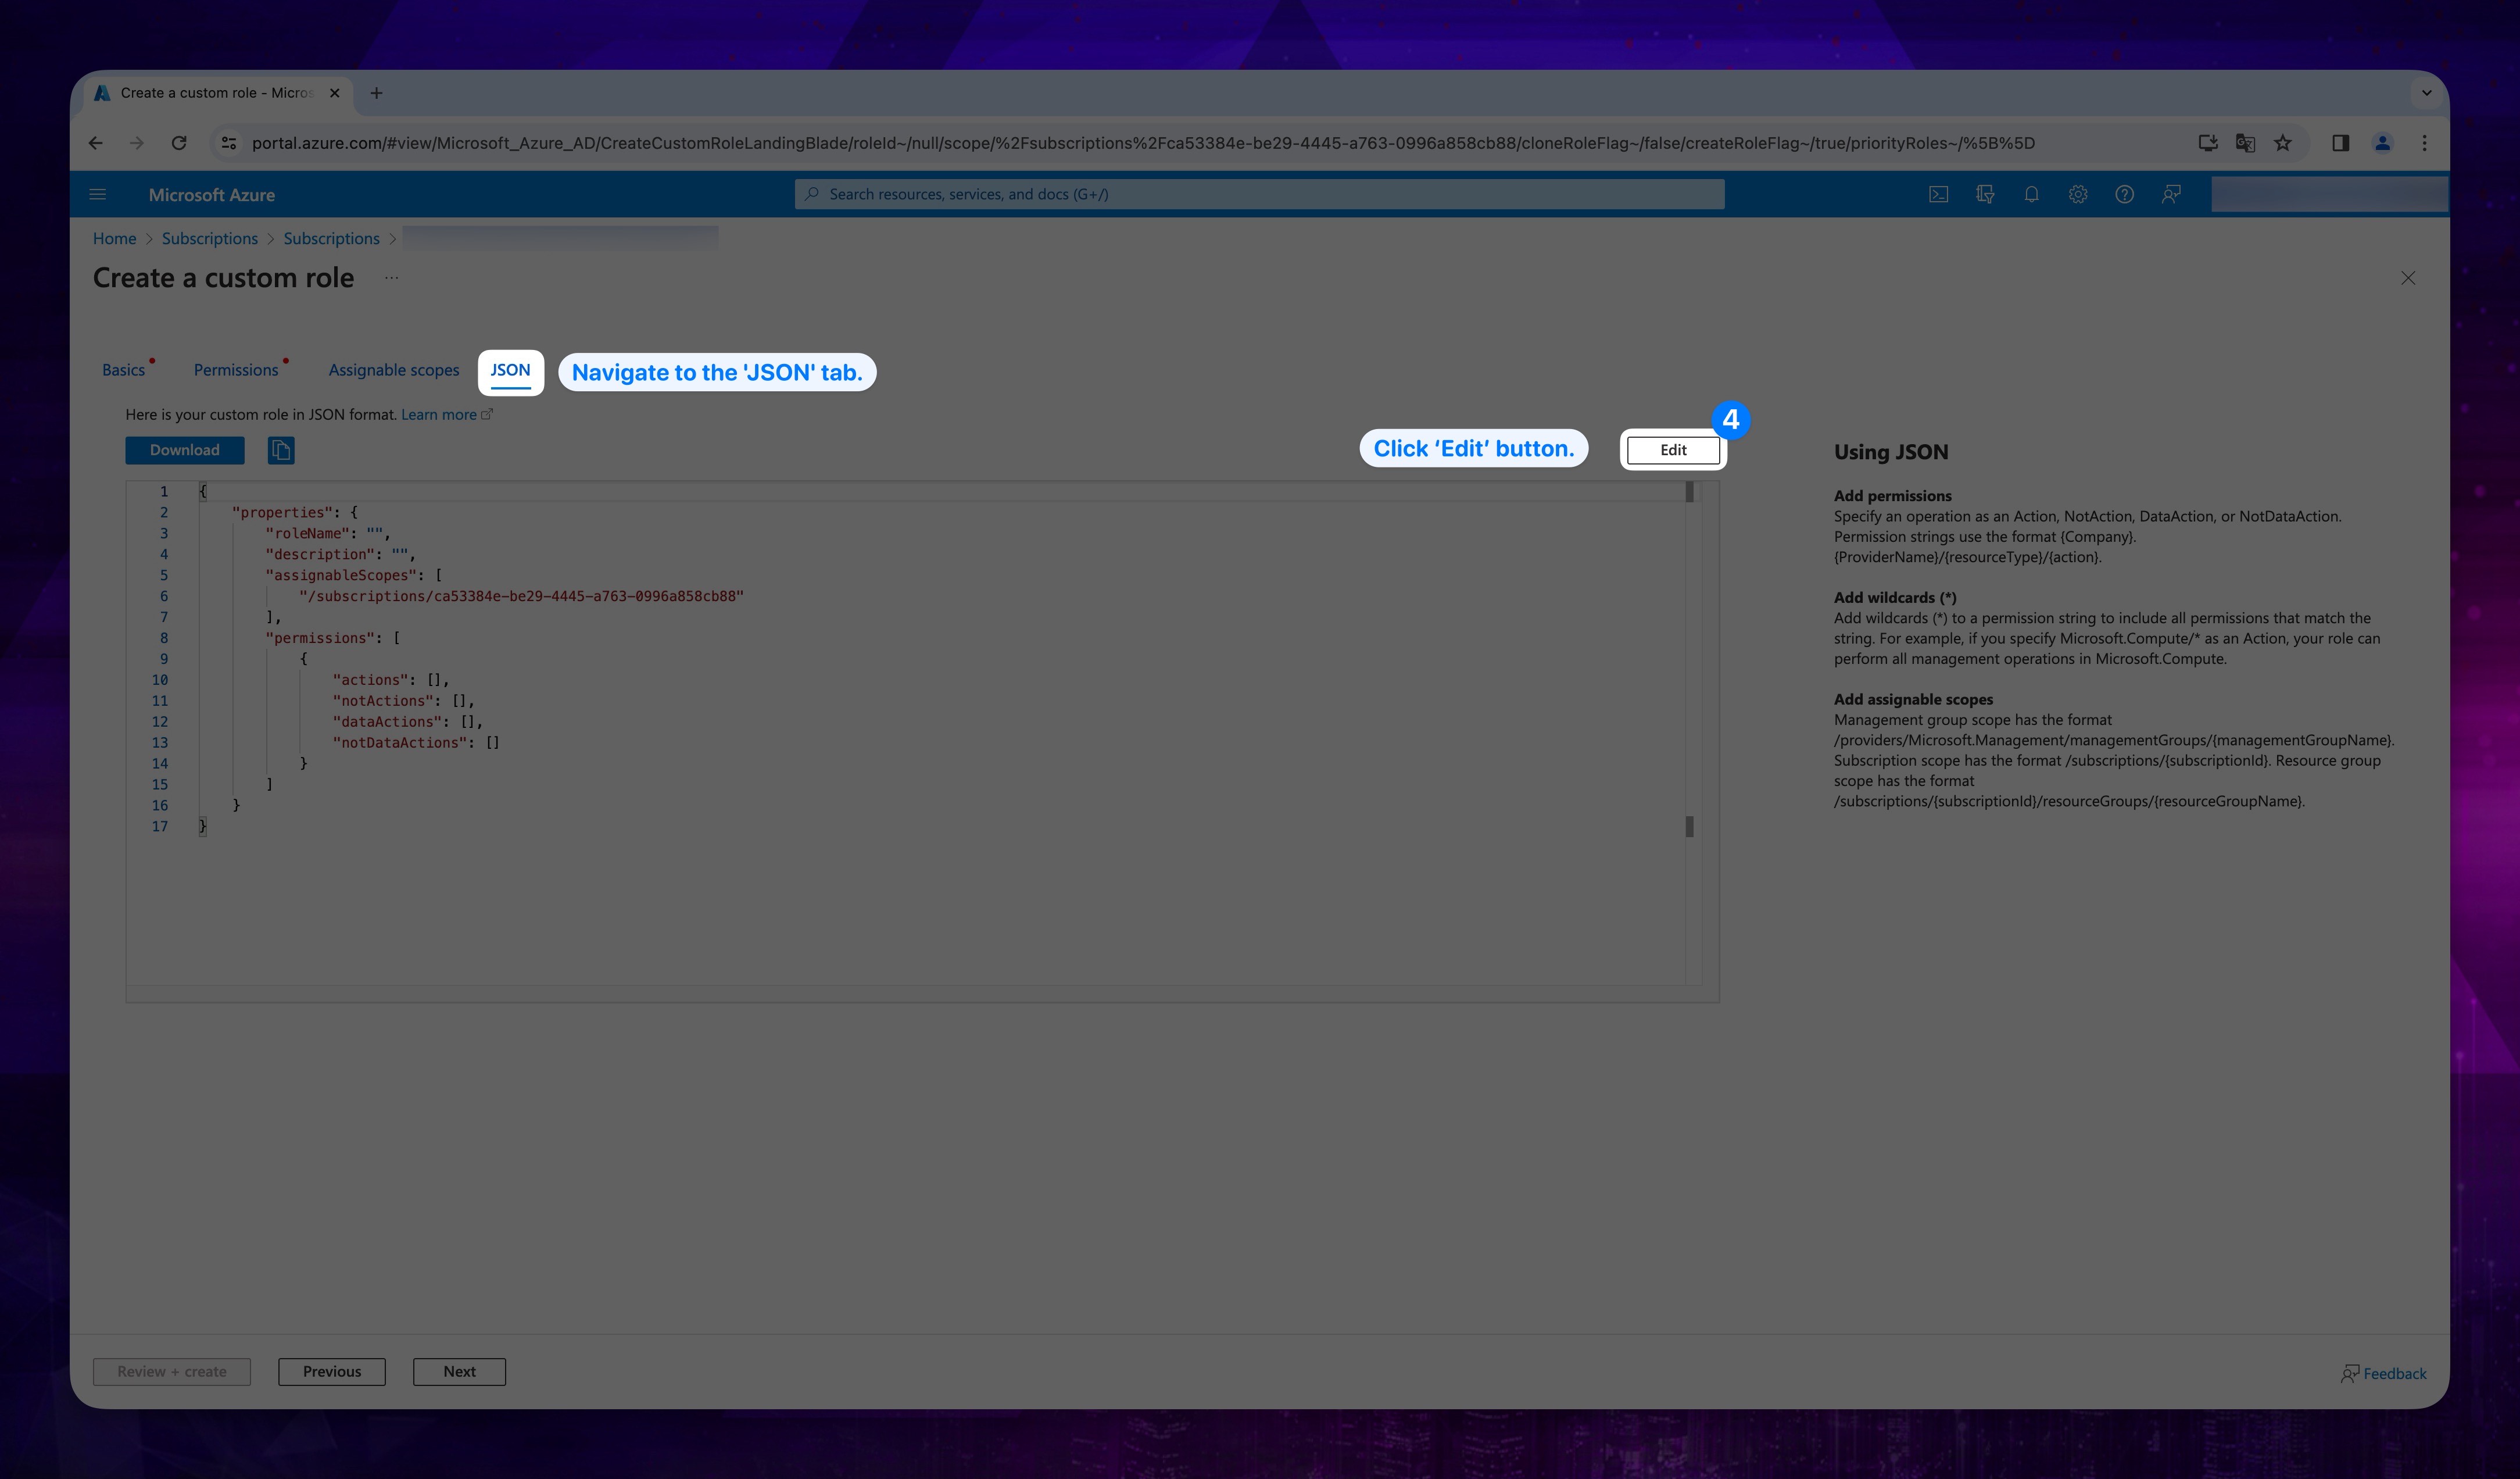
- Click JSON tab from the top, then click the Edit button.
Show the instructions with images
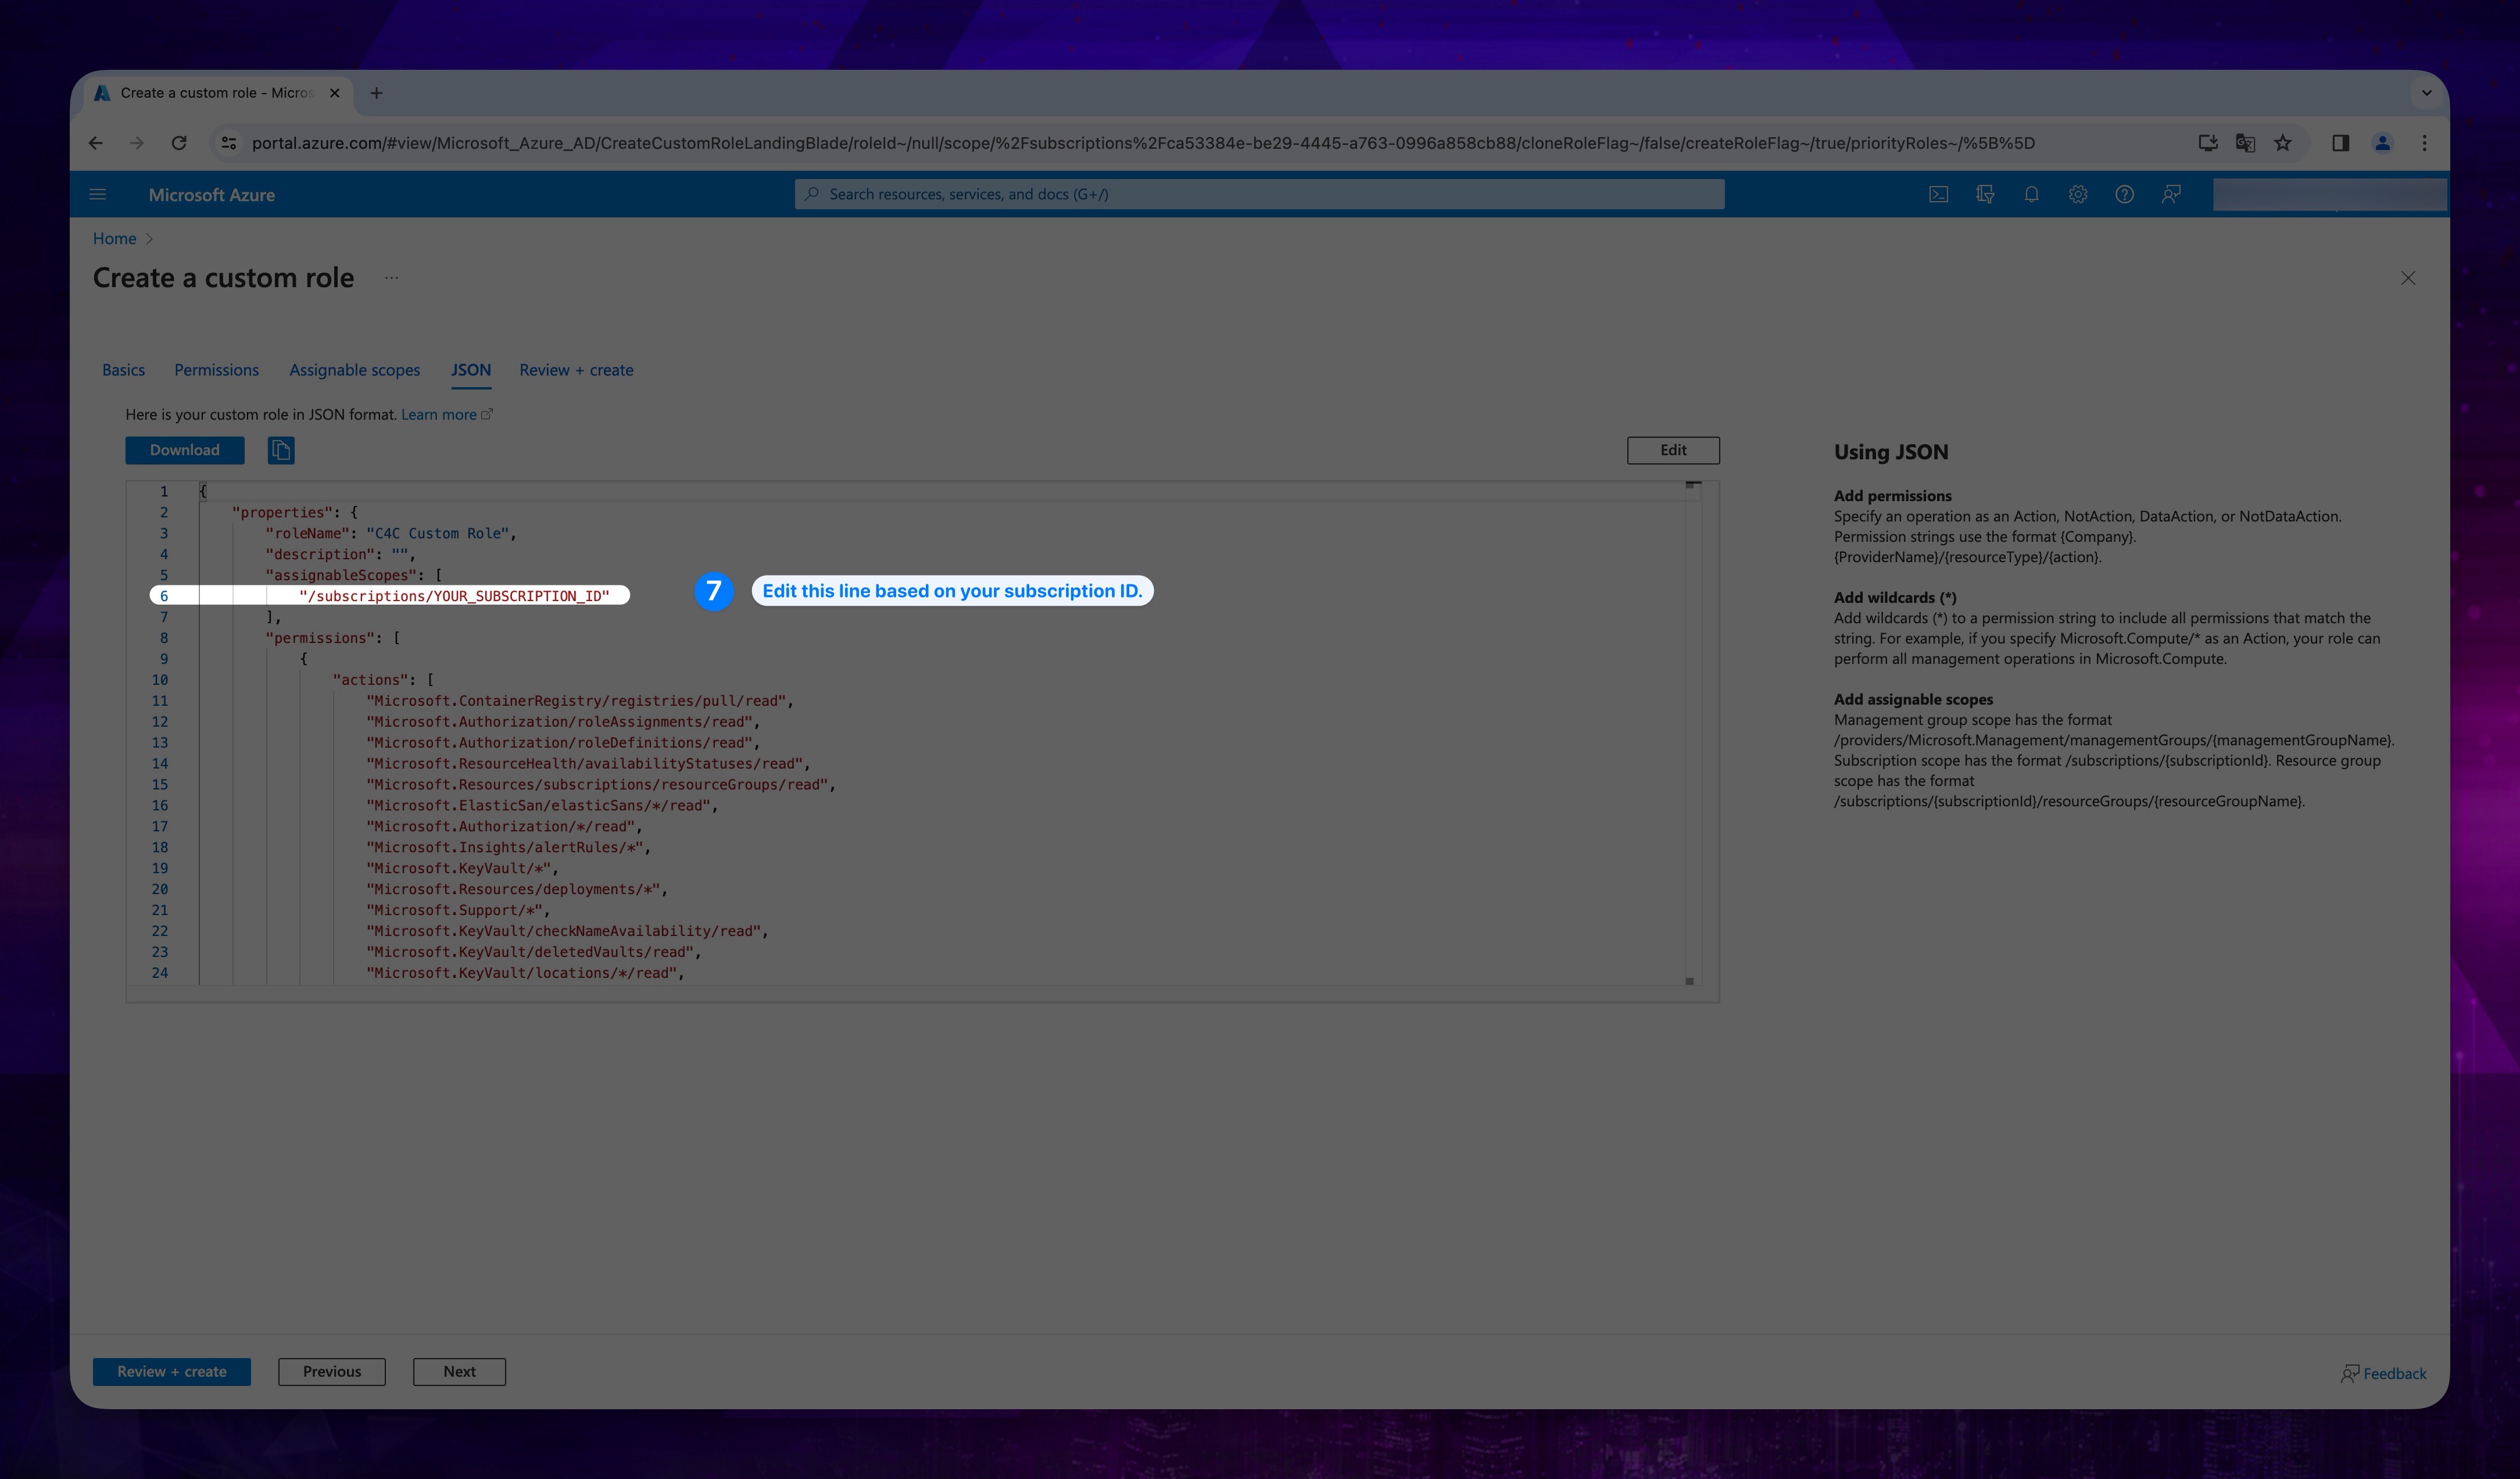
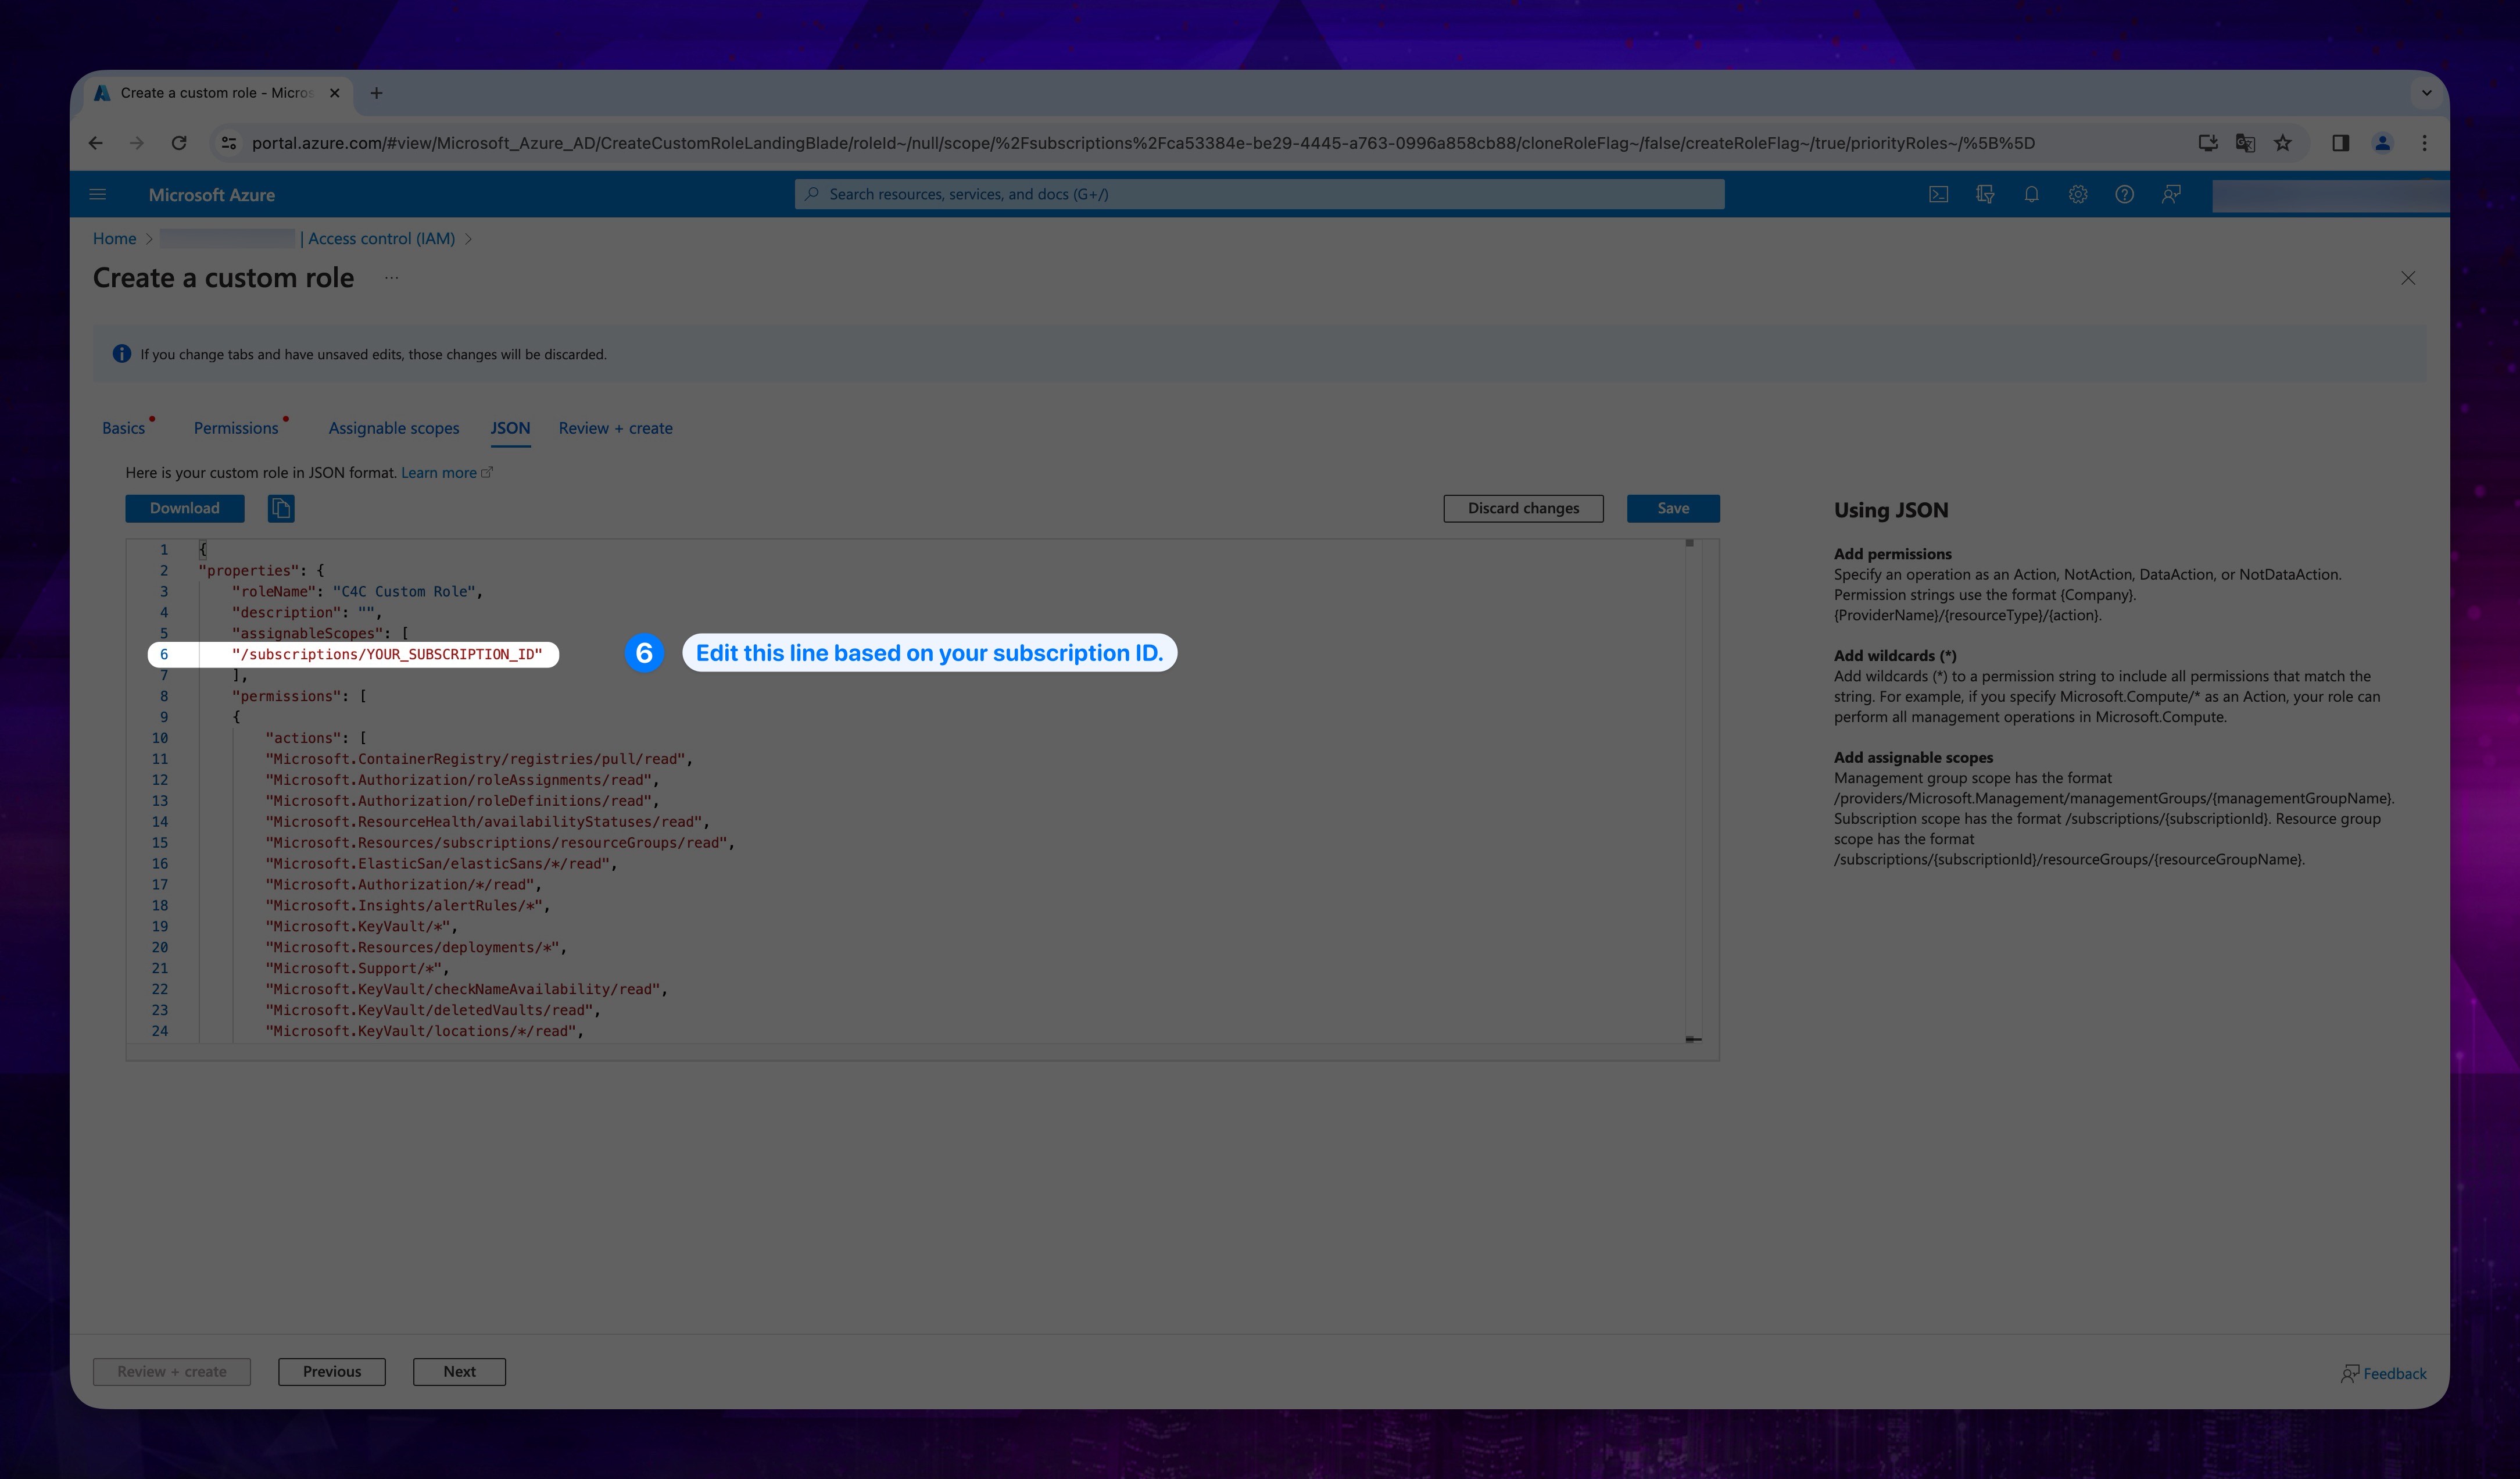
- In the pasted code block, locate the expression /subscriptions/YOUR_SUBSCRIPTION_ID and replace YOUR_SUBSCRIPTION_ID with the subscription ID we asked you to save earlier.
Show the instructions with images
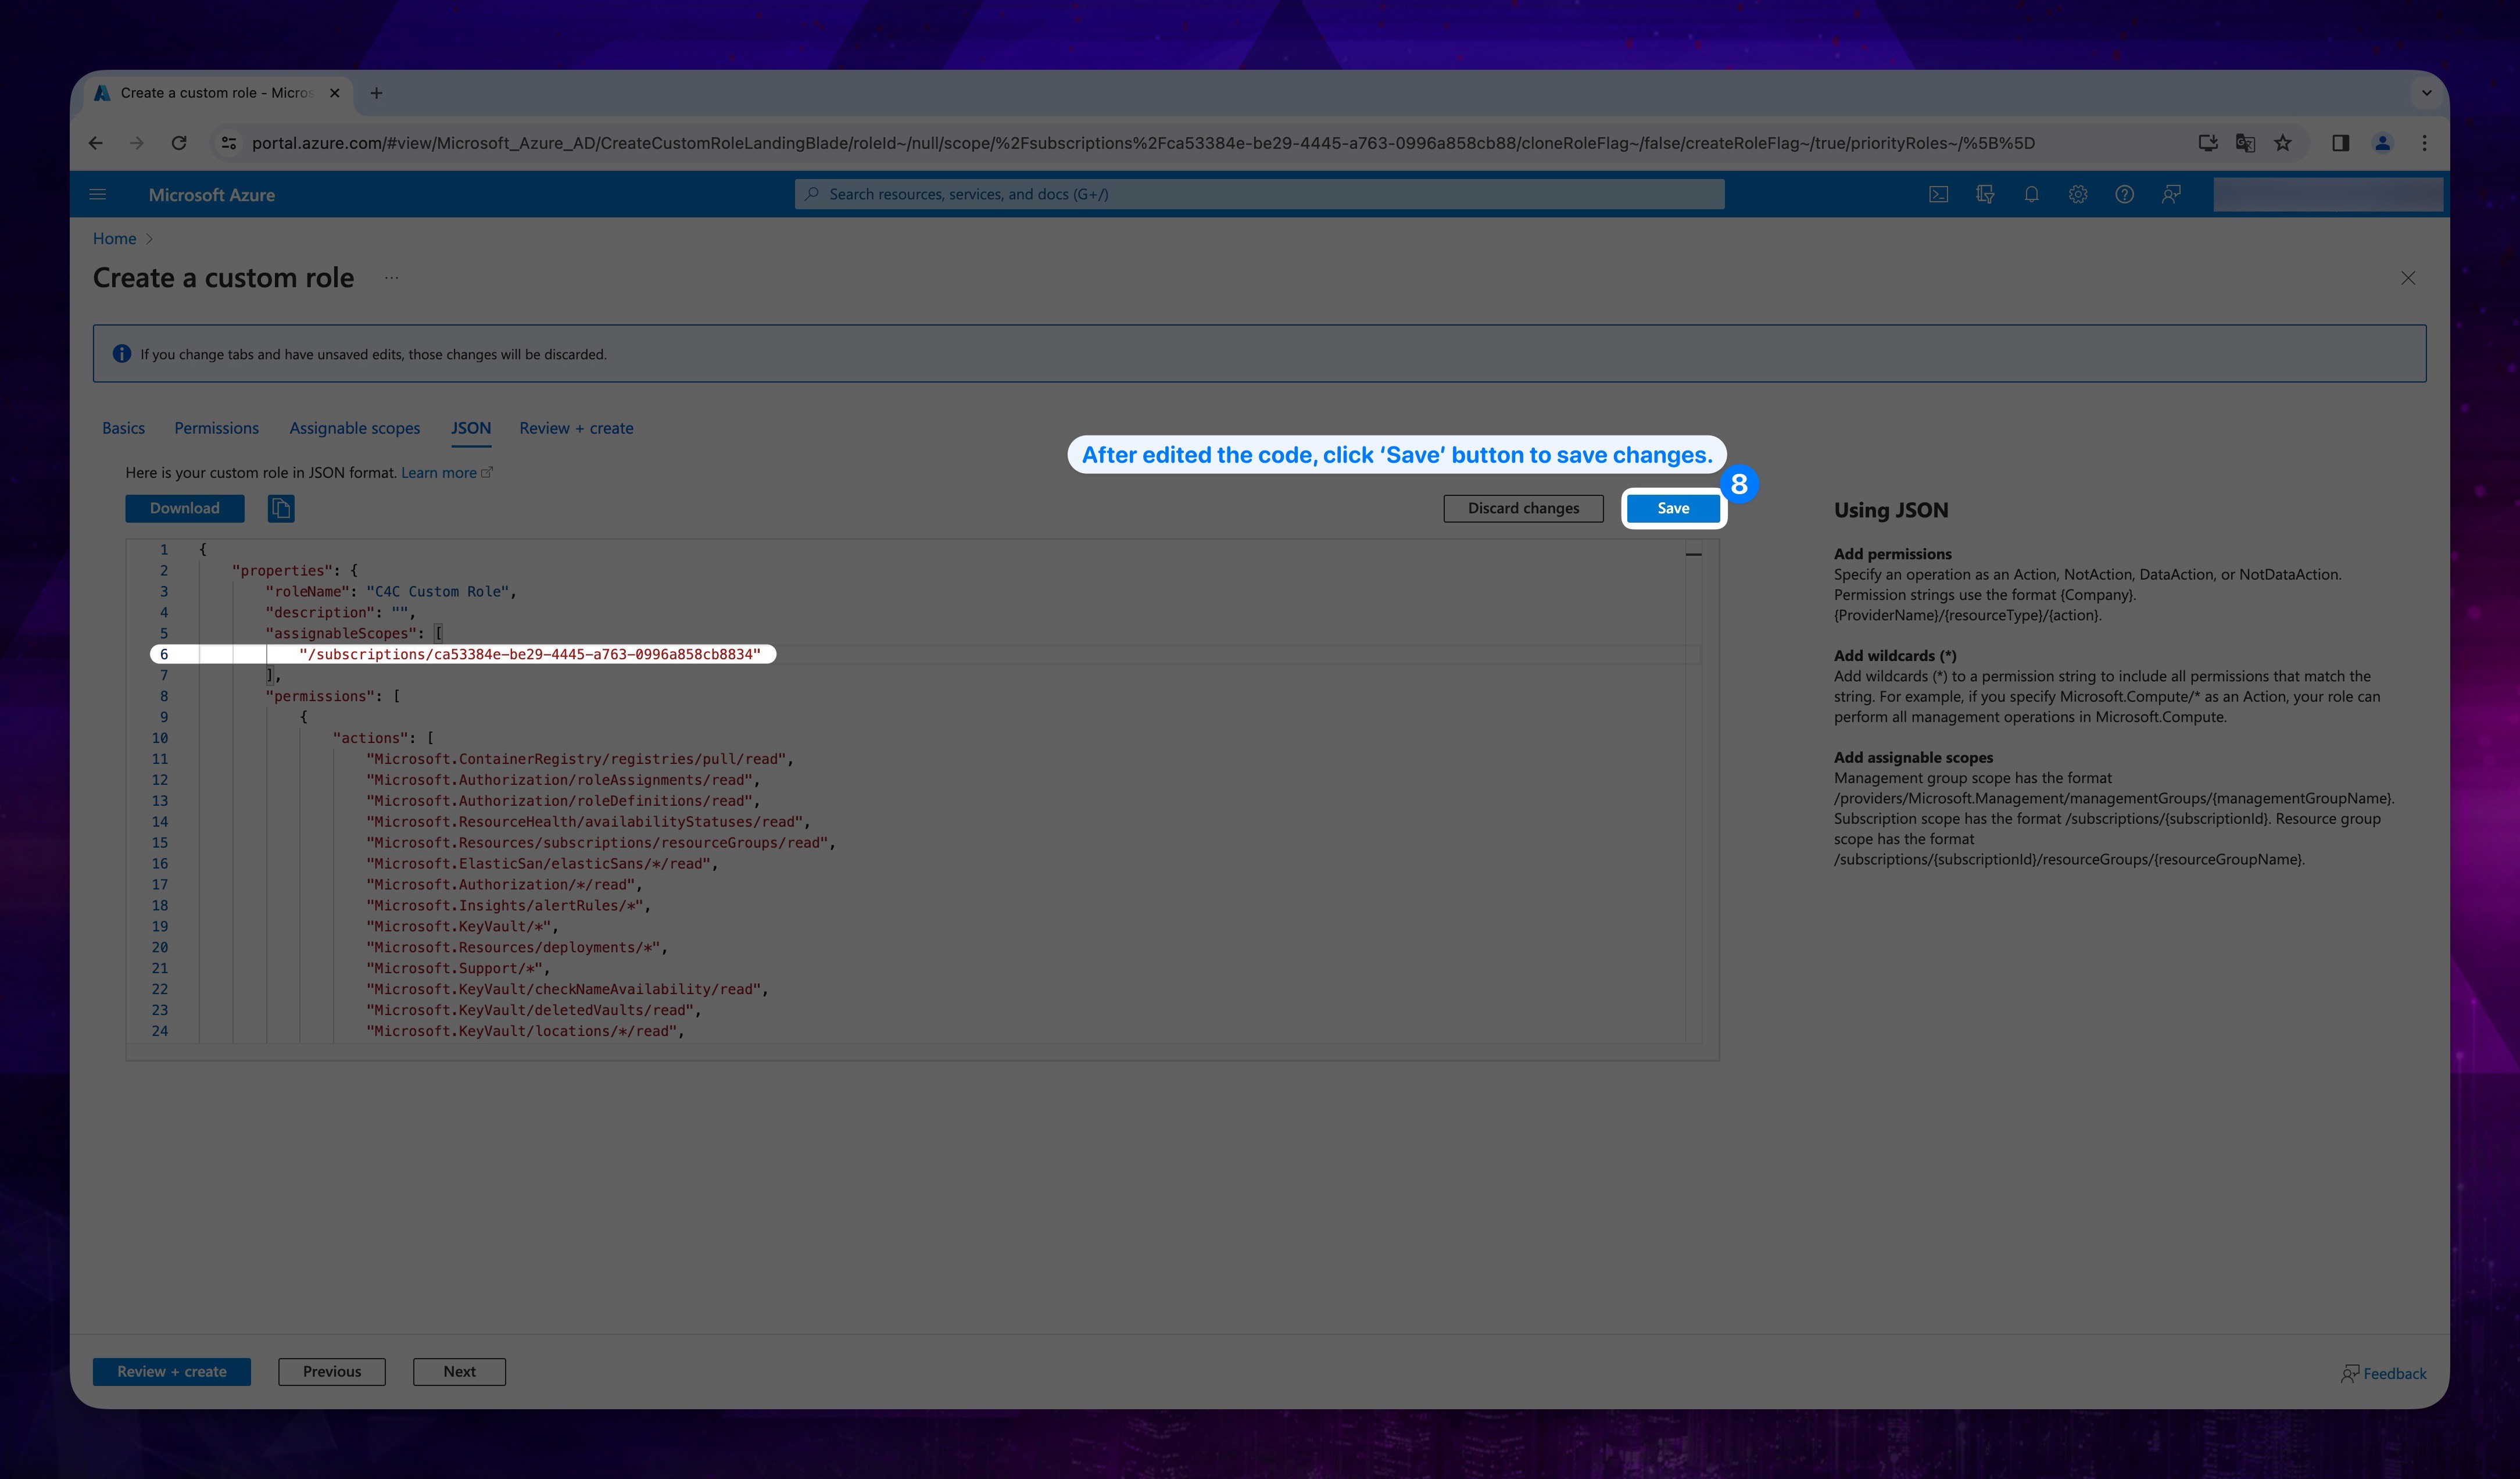
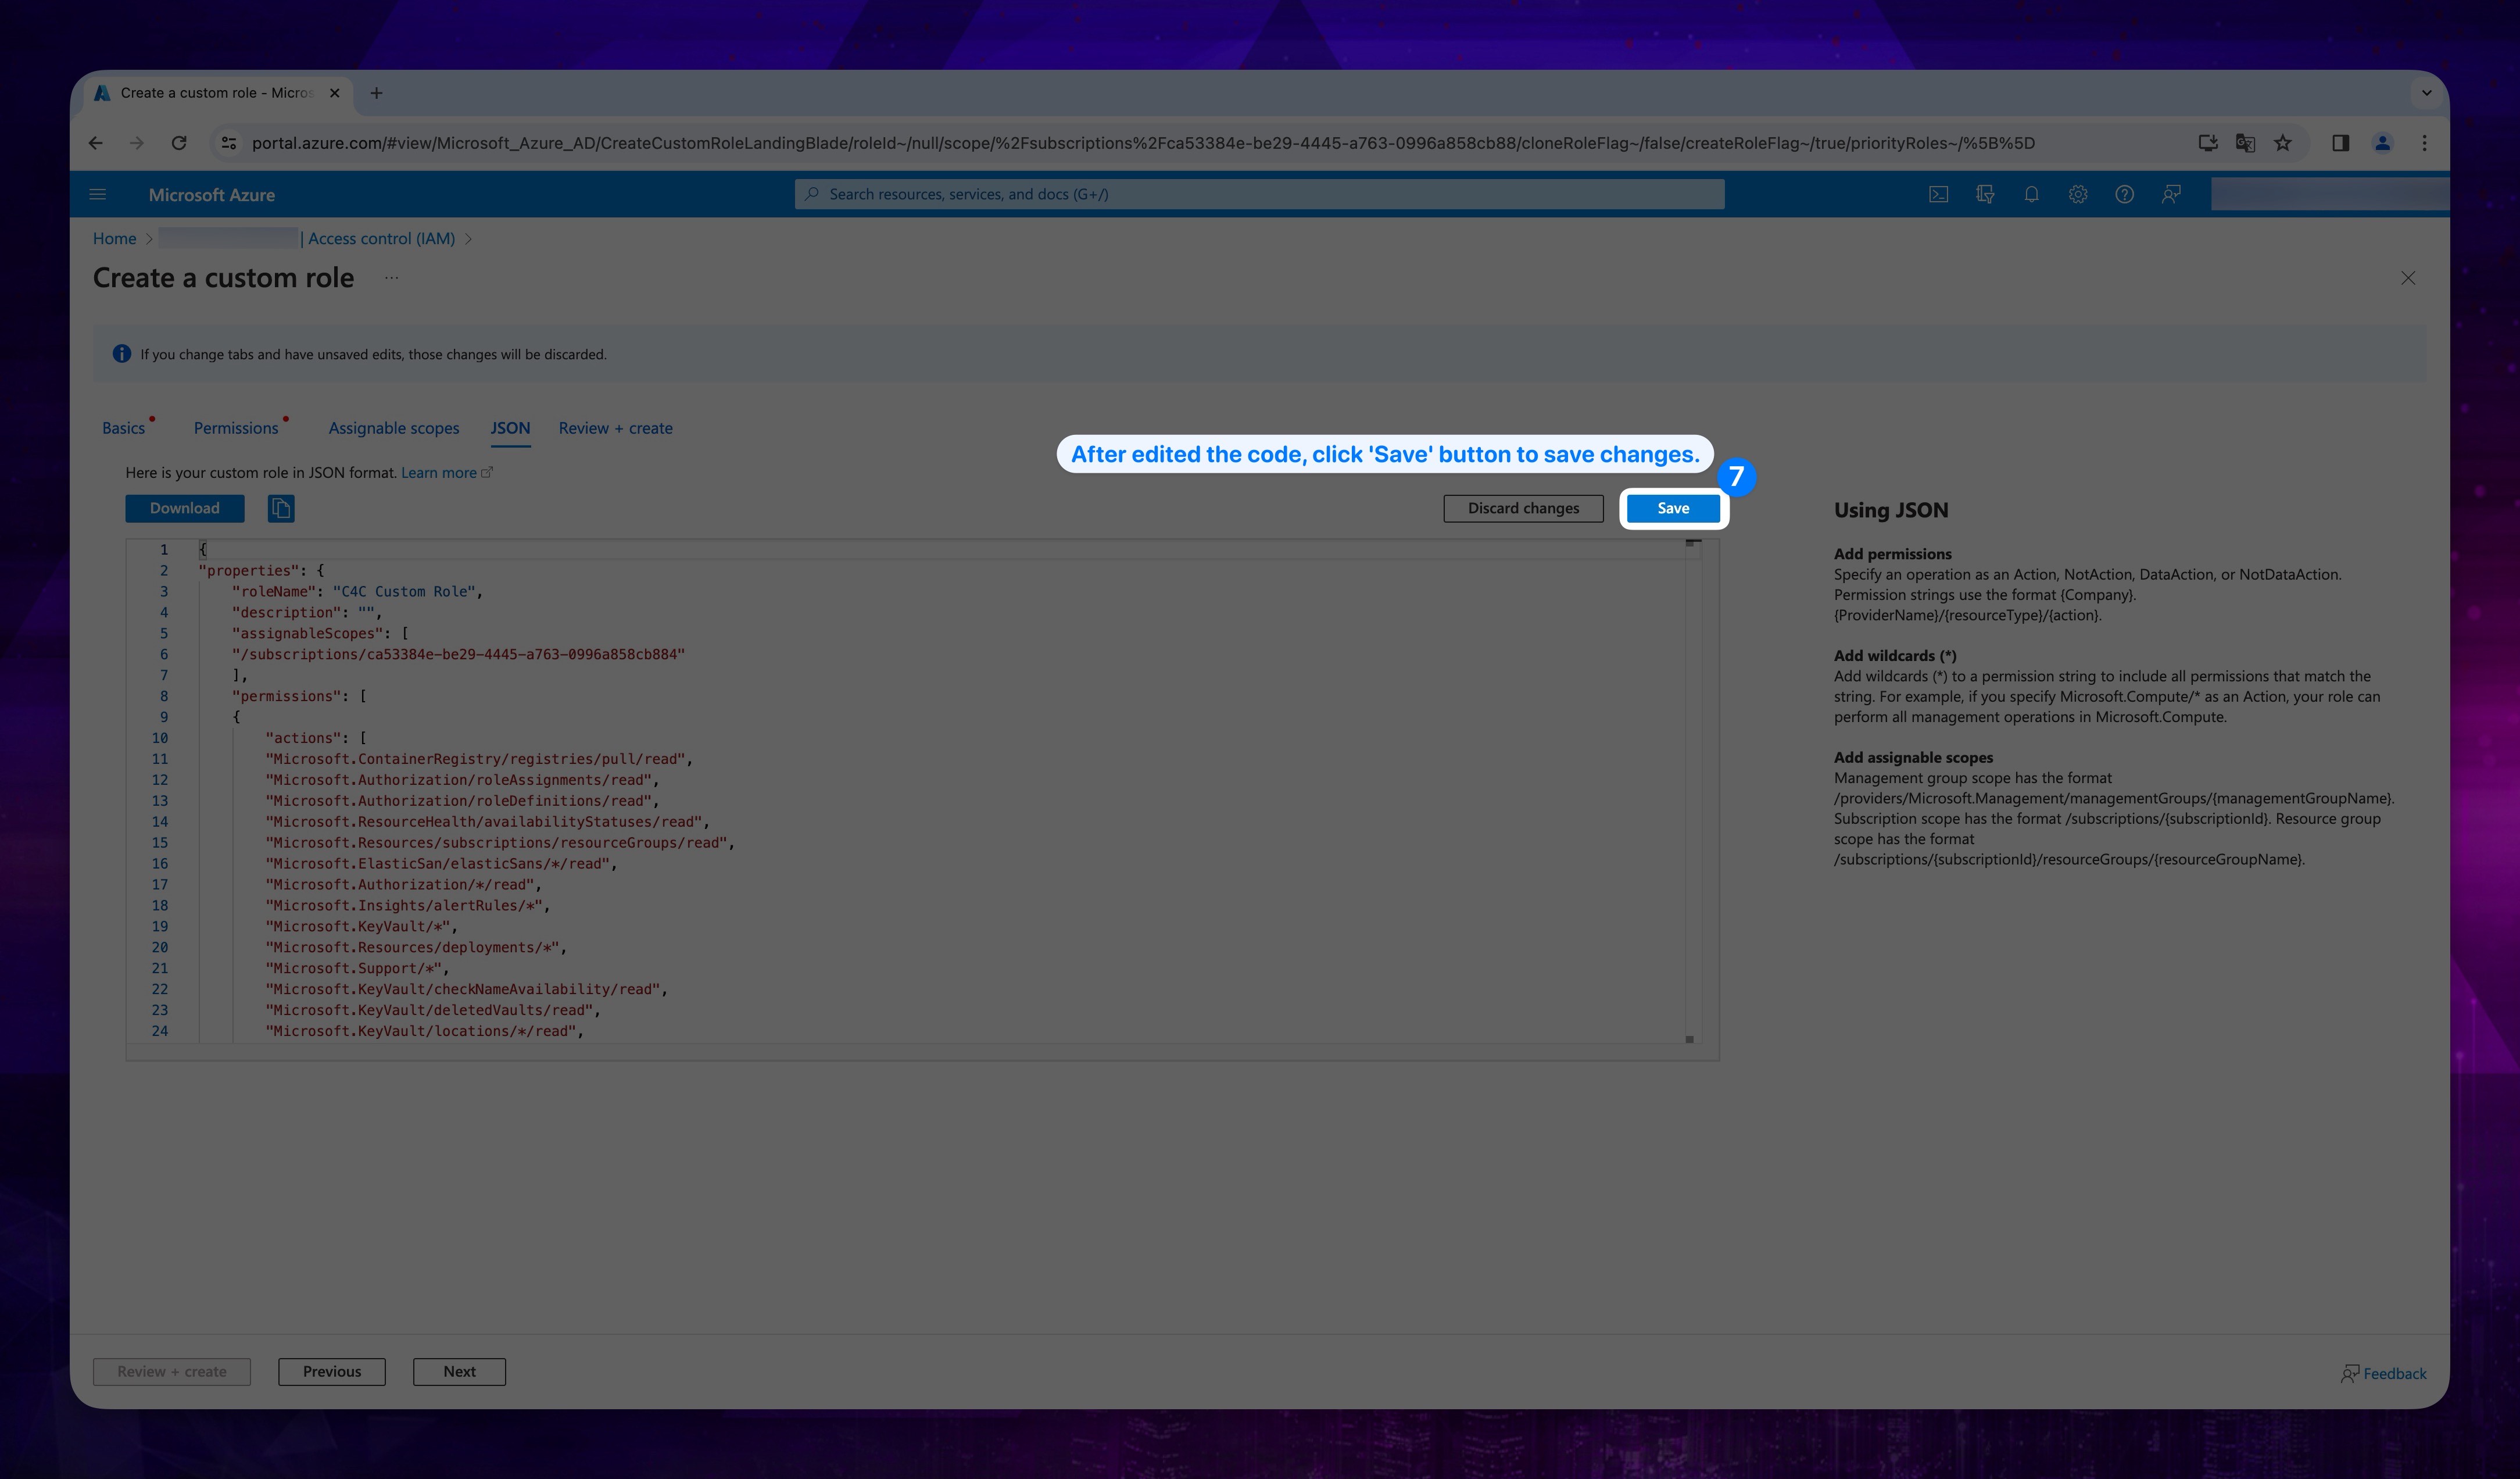
- After editing the code, click on the Save button.
Show the instructions with images
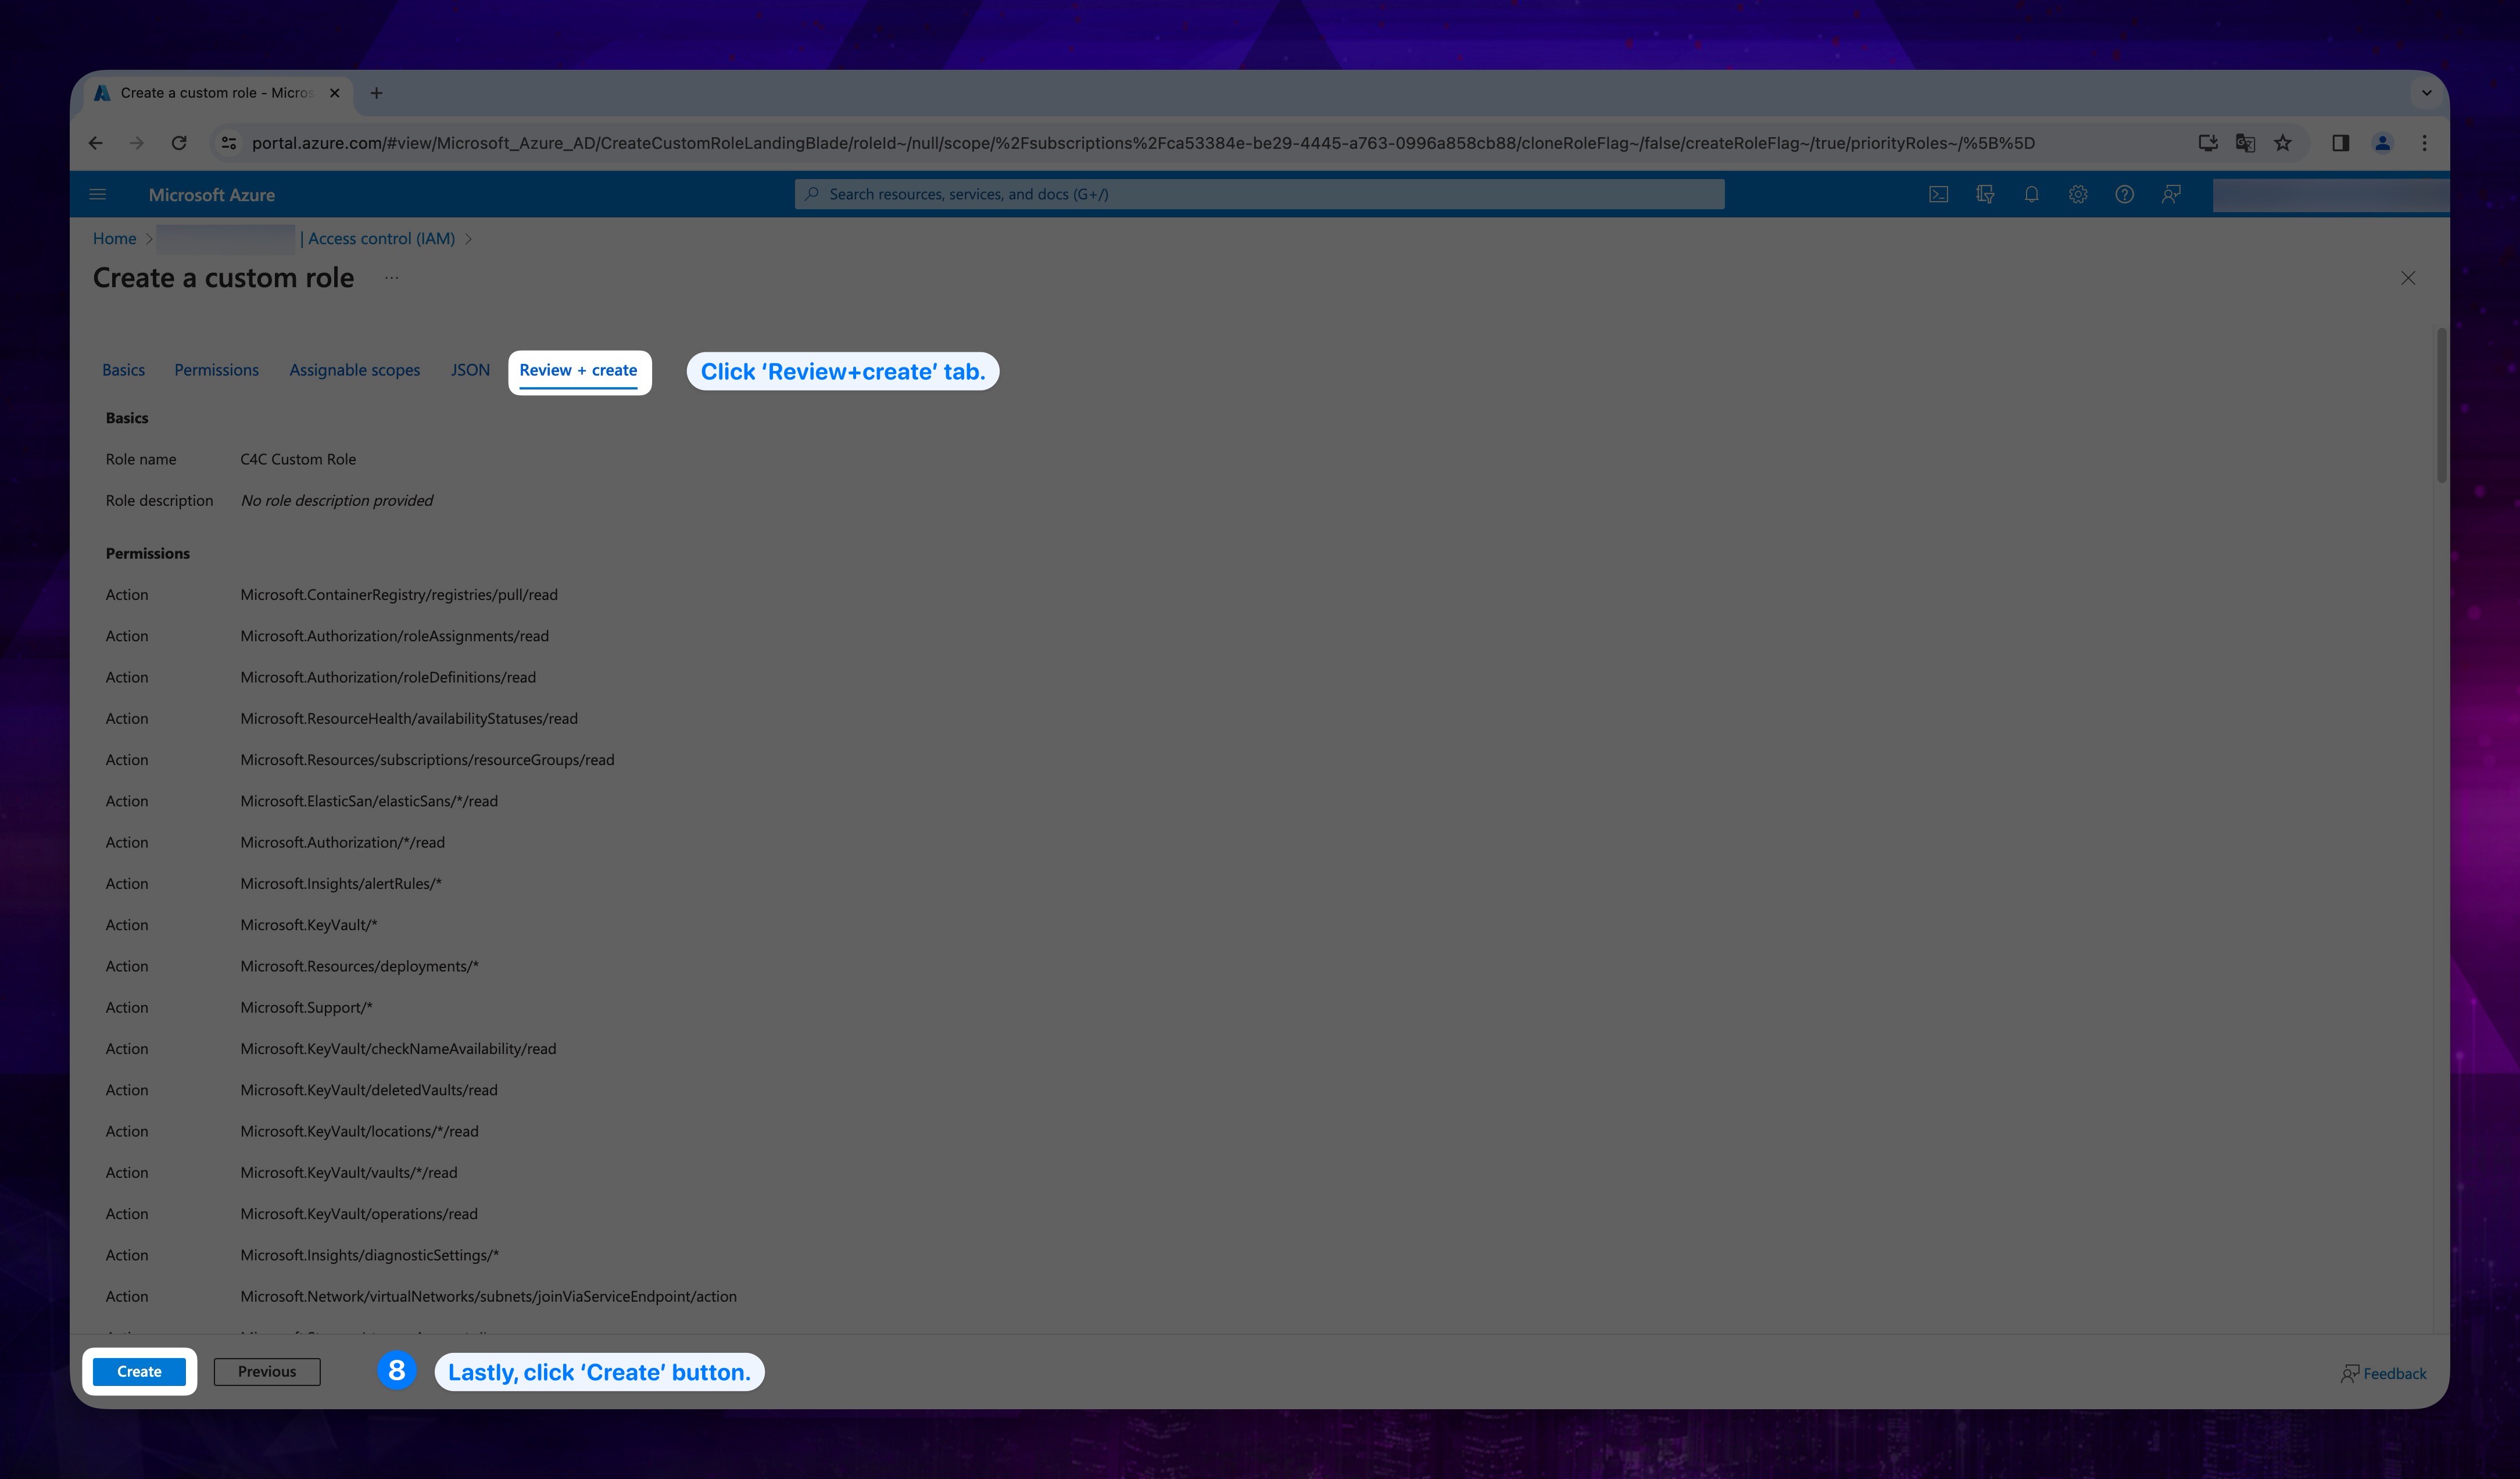
- Click Review + create tab from the top then click the Create button located at the bottom left of the page.
Show the instructions with images

You should have received a system message indicating that the role has been successfully created.
If you wish to proceed with this method, please follow the steps below.
-
Go to the search bar and search for Subscriptions, then click Subscriptions under Services.
-
Click on your related Subscription Name.
Show the instructions with images
- Click on Access Control (IAM) from the left-hand menu, then click on the Add button above, and select Add custom role.
Show the instructions with images
- Click the JSON tab.Then you will see the Edit button right of the page.
Show the instructions with images
-
Delete the existing code and paste the code below in its place.
Show the code block.
{
    "properties": {
        "roleName": "C4C Custom Role AllServices",
        "description": "Access to resources required for collecting servers information",
        "assignableScopes": [
            "/subscriptions/YOUR_SUBSCRIPTION_ID"
        ],
        "permissions": [
            {
                "actions": [
                    "microsoft.alertsManagement/smartDetectorAlertRules/delete",
                    "microsoft.alertsManagement/smartDetectorAlertRules/write",
                    "Microsoft.ApiManagement/register/action",
                    "Microsoft.AppPlatform/register/action",
                    "Microsoft.Authorization/*/read",
                    "Microsoft.Authorization/roleAssignments/delete",
                    "Microsoft.Authorization/roleAssignments/read",
                    "Microsoft.Authorization/roleAssignments/write",
                    "Microsoft.Authorization/roleDefinitions/delete",
                    "Microsoft.Authorization/roleDefinitions/read",
                    "Microsoft.Authorization/roleDefinitions/write",
                    "Microsoft.Automation/register/action",
                    "Microsoft.AVS/register/action",
                    "Microsoft.Billing/billingProperty/read",
                    "Microsoft.BotService/register/action",
                    "Microsoft.Cache/register/action",
                    "Microsoft.Cdn/profiles/afdEndpoints/delete",
                    "Microsoft.Cdn/profiles/afdEndpoints/read",
                    "Microsoft.Cdn/profiles/afdendpoints/routes/delete",
                    "Microsoft.Cdn/profiles/afdendpoints/routes/read",
                    "Microsoft.Cdn/profiles/afdendpoints/routes/read",
                    "Microsoft.Cdn/profiles/afdendpoints/routes/write",
                    "Microsoft.Cdn/profiles/afdEndpoints/write",
                    "Microsoft.Cdn/profiles/customdomains/delete",
                    "Microsoft.Cdn/profiles/customdomains/read",
                    "Microsoft.Cdn/profiles/customdomains/RefreshValidationToken/action",
                    "Microsoft.Cdn/profiles/customdomains/write",
                    "Microsoft.Cdn/profiles/delete",
                    "Microsoft.Cdn/profiles/originGroups/delete",
                    "Microsoft.Cdn/profiles/originGroups/origins/delete",
                    "Microsoft.Cdn/profiles/originGroups/origins/read",
                    "Microsoft.Cdn/profiles/originGroups/origins/write",
                    "Microsoft.Cdn/profiles/originGroups/read",
                    "Microsoft.Cdn/profiles/originGroups/write",
                    "Microsoft.Cdn/profiles/read",
                    "Microsoft.Cdn/profiles/ruleSets/delete",
                    "Microsoft.Cdn/profiles/ruleSets/read",
                    "Microsoft.Cdn/profiles/ruleSets/rules/delete",
                    "Microsoft.Cdn/profiles/ruleSets/rules/read",
                    "Microsoft.Cdn/profiles/ruleSets/rules/write",
                    "Microsoft.Cdn/profiles/ruleSets/write",
                    "Microsoft.Cdn/profiles/secrets/delete",
                    "Microsoft.Cdn/profiles/secrets/read",
                    "Microsoft.Cdn/profiles/secrets/write",
                    "Microsoft.Cdn/profiles/securityPolicies/delete",
                    "Microsoft.Cdn/profiles/securityPolicies/read",
                    "Microsoft.Cdn/profiles/securityPolicies/write",
                    "Microsoft.Cdn/profiles/write",
                    "Microsoft.Cdn/register/action",
                    "Microsoft.CognitiveServices/register/action",
                    "Microsoft.Compute/register/action",
                    "Microsoft.ContainerInstance/containerGroups/read",
                    "Microsoft.ContainerInstance/containerGroups/start/action",
                    "Microsoft.ContainerInstance/containerGroups/write",
                    "Microsoft.ContainerInstance/register/action",
                    "Microsoft.ContainerRegistry/register/action",
                    "Microsoft.ContainerRegistry/registries/listCredentials/action",
                    "Microsoft.ContainerRegistry/registries/pull/read",
                    "Microsoft.ContainerRegistry/registries/read",
                    "Microsoft.ContainerService/register/action",
                    "Microsoft.CostManagement/*",
                    "Microsoft.CustomProviders/register/action",
                    "Microsoft.Databricks/register/action",
                    "Microsoft.DataFactory/factories/datasets/delete",
                    "Microsoft.DataFactory/factories/datasets/read",
                    "Microsoft.DataFactory/factories/datasets/write",
                    "Microsoft.DataFactory/factories/delete",
                    "Microsoft.DataFactory/factories/linkedservices/delete",
                    "Microsoft.DataFactory/factories/linkedservices/read",
                    "Microsoft.DataFactory/factories/linkedServices/write",
                    "Microsoft.DataFactory/factories/pipelineruns/read",
                    "Microsoft.DataFactory/factories/pipelines/createRun/action",
                    "Microsoft.DataFactory/factories/pipelines/delete",
                    "Microsoft.DataFactory/factories/pipelines/read",
                    "Microsoft.DataFactory/factories/pipelines/write",
                    "Microsoft.DataFactory/factories/read",
                    "Microsoft.DataFactory/factories/write",
                    "Microsoft.DataLakeAnalytics/register/action",
                    "Microsoft.DataLakeStore/register/action",
                    "Microsoft.DataMigration/register/action",
                    "Microsoft.DataProtection/register/action",
                    "Microsoft.DBforMariaDB/register/action",
                    "Microsoft.DBforMySQL/register/action",
                    "Microsoft.DBforPostgreSQL/register/action",
                    "Microsoft.DesktopVirtualization/register/action",
                    "Microsoft.Devices/register/action",
                    "Microsoft.DevTestLab/register/action",
                    "Microsoft.DocumentDB/register/action",
                    "Microsoft.ElasticSan/elasticSans/*/read",
                    "Microsoft.EventGrid/*",
                    "Microsoft.EventHub/register/action",
                    "Microsoft.GuestConfiguration/register/action",
                    "Microsoft.HDInsight/register/action",
                    "Microsoft.HealthcareApis/register/action",
                    "Microsoft.Insights/actionGroups/delete",
                    "Microsoft.Insights/actionGroups/read",
                    "Microsoft.Insights/actionGroups/write",
                    "Microsoft.Insights/alertRules/*",
                    "Microsoft.Insights/components/currentbillingfeatures/read",
                    "Microsoft.Insights/components/currentbillingfeatures/write",
                    "Microsoft.Insights/components/delete",
                    "Microsoft.Insights/components/read",
                    "Microsoft.Insights/components/write",
                    "Microsoft.Insights/diagnosticSettings/*",
                    "Microsoft.Insights/metricAlerts/delete",
                    "Microsoft.Insights/metricAlerts/read",
                    "Microsoft.Insights/metricAlerts/write",
                    "microsoft.insights/register/action",
                    "Microsoft.KeyVault/*",
                    "Microsoft.KeyVault/checkNameAvailability/read",
                    "Microsoft.KeyVault/deletedVaults/read",
                    "Microsoft.KeyVault/hsmPools/*",
                    "Microsoft.KeyVault/locations/*/read",
                    "Microsoft.KeyVault/locations/deletedVaults/purge/action",
                    "Microsoft.KeyVault/managedHsms/*",
                    "Microsoft.KeyVault/operations/read",
                    "Microsoft.KeyVault/vaults/*/read",
                    "Microsoft.Kusto/register/action",
                    "Microsoft.Logic/register/action",
                    "Microsoft.MachineLearningServices/register/action",
                    "Microsoft.Maintenance/*",
                    "Microsoft.ManagedIdentity/register/action",
                    "Microsoft.ManagedServices/register/action",
                    "Microsoft.Management/register/action",
                    "Microsoft.Maps/register/action",
                    "Microsoft.Media/register/action",
                    "Microsoft.MixedReality/register/action",
                    "Microsoft.Network/FrontDoorWebApplicationFirewallPolicies/read",
                    "Microsoft.Network/FrontDoorWebApplicationFirewallPolicies/write",
                    "Microsoft.Network/register/action",
                    "Microsoft.Network/virtualNetworks/subnets/joinViaServiceEndpoint/action",
                    "Microsoft.NotificationHubs/register/action",
                    "Microsoft.OperationalInsights/register/action",
                    "Microsoft.OperationalInsights/workspaces/read",
                    "Microsoft.OperationalInsights/workspaces/write",
                    "Microsoft.OperationsManagement/register/action",
                    "Microsoft.PolicyInsights/register/action",
                    "Microsoft.PowerBIDedicated/register/action",
                    "Microsoft.RecoveryServices/register/action",
                    "Microsoft.Relay/register/action",
                    "Microsoft.ResourceHealth/availabilityStatuses/read",
                    "Microsoft.Resources/deployments/*",
                    "Microsoft.Resources/subscriptions/read",
                    "Microsoft.Resources/subscriptions/resourcegroups/delete",
                    "Microsoft.Resources/subscriptions/resourceGroups/read",
                    "Microsoft.Resources/subscriptions/resourceGroups/write",
                    "Microsoft.Search/register/action",
                    "Microsoft.Security/register/action",
                    "Microsoft.SecurityInsights/register/action",
                    "Microsoft.ServiceBus/register/action",
                    "Microsoft.ServiceFabric/register/action",
                    "Microsoft.Sql/register/action",
                    "Microsoft.Storage/register/action",
                    "Microsoft.Storage/storageAccounts/*",
                    "Microsoft.Storage/storageAccounts/blobServices/containers/delete",
                    "Microsoft.Storage/storageAccounts/blobServices/containers/read",
                    "Microsoft.Storage/storageAccounts/blobServices/containers/write",
                    "Microsoft.Storage/storageAccounts/blobServices/generateUserDelegationKey/action",
                    "Microsoft.StreamAnalytics/register/action",
                    "Microsoft.Support/*",
                    "Microsoft.Web/register/action",
                    "Microsoft.Web/serverFarms/delete",
                    "Microsoft.Web/serverFarms/read",
                    "Microsoft.Web/serverFarms/write",
                    "Microsoft.Web/sites/basicPublishingCredentialsPolicies/read",
                    "Microsoft.Web/sites/config/list/action",
                    "Microsoft.Web/sites/config/read",
                    "Microsoft.Web/sites/config/write",
                    "Microsoft.Web/sites/delete",
                    "Microsoft.Web/sites/functions/write",
                    "Microsoft.Web/sites/host/listkeys/action",
                    "Microsoft.Web/sites/read",
                    "Microsoft.Web/sites/write",
                    "Microsoft.Insights/metrics/read",
                    "Microsoft.Compute/virtualMachines/read",
                    "Microsoft.Network/publicIPAddresses/read",
                    "Microsoft.Network/networkInterfaces/read",
                    "Microsoft.Compute/virtualMachines/deallocate/action",
                    "Microsoft.Compute/virtualMachines/start/action",
                    "Microsoft.Compute/virtualMachines/delete",
                    "Microsoft.Compute/virtualMachines/write",
                    "Microsoft.Storage/storageAccounts/write",
                    "Microsoft.Network/networkInterfaces/join/action",
                    "Microsoft.Compute/disks/write"
                ],
                "notActions": [],
                "dataActions": [
                    "Microsoft.Storage/storageAccounts/blobServices/containers/blobs/delete",
                    "Microsoft.Storage/storageAccounts/blobServices/containers/blobs/read",
                    "Microsoft.Storage/storageAccounts/blobServices/containers/blobs/write",
                    "Microsoft.Storage/storageAccounts/blobServices/containers/blobs/move/action",
                    "Microsoft.Storage/storageAccounts/blobServices/containers/blobs/add/action"
                ],
                "notDataActions": []
            }
        ]
    }
} -
In the pasted code block, locate the expression /subscriptions/YOUR_SUBSCRIPTION_ID and replace YOUR_SUBSCRIPTION_ID with the subscription ID we asked you to save earlier.
Show the instructions with images
- After editing the code, click on the Save button.
Show the instructions with images
- Click the Review + create first, and then click the Create button.
Show the instructions with images
You should have received a system message indicating that the role has been successfully created.
5. Role Assignment
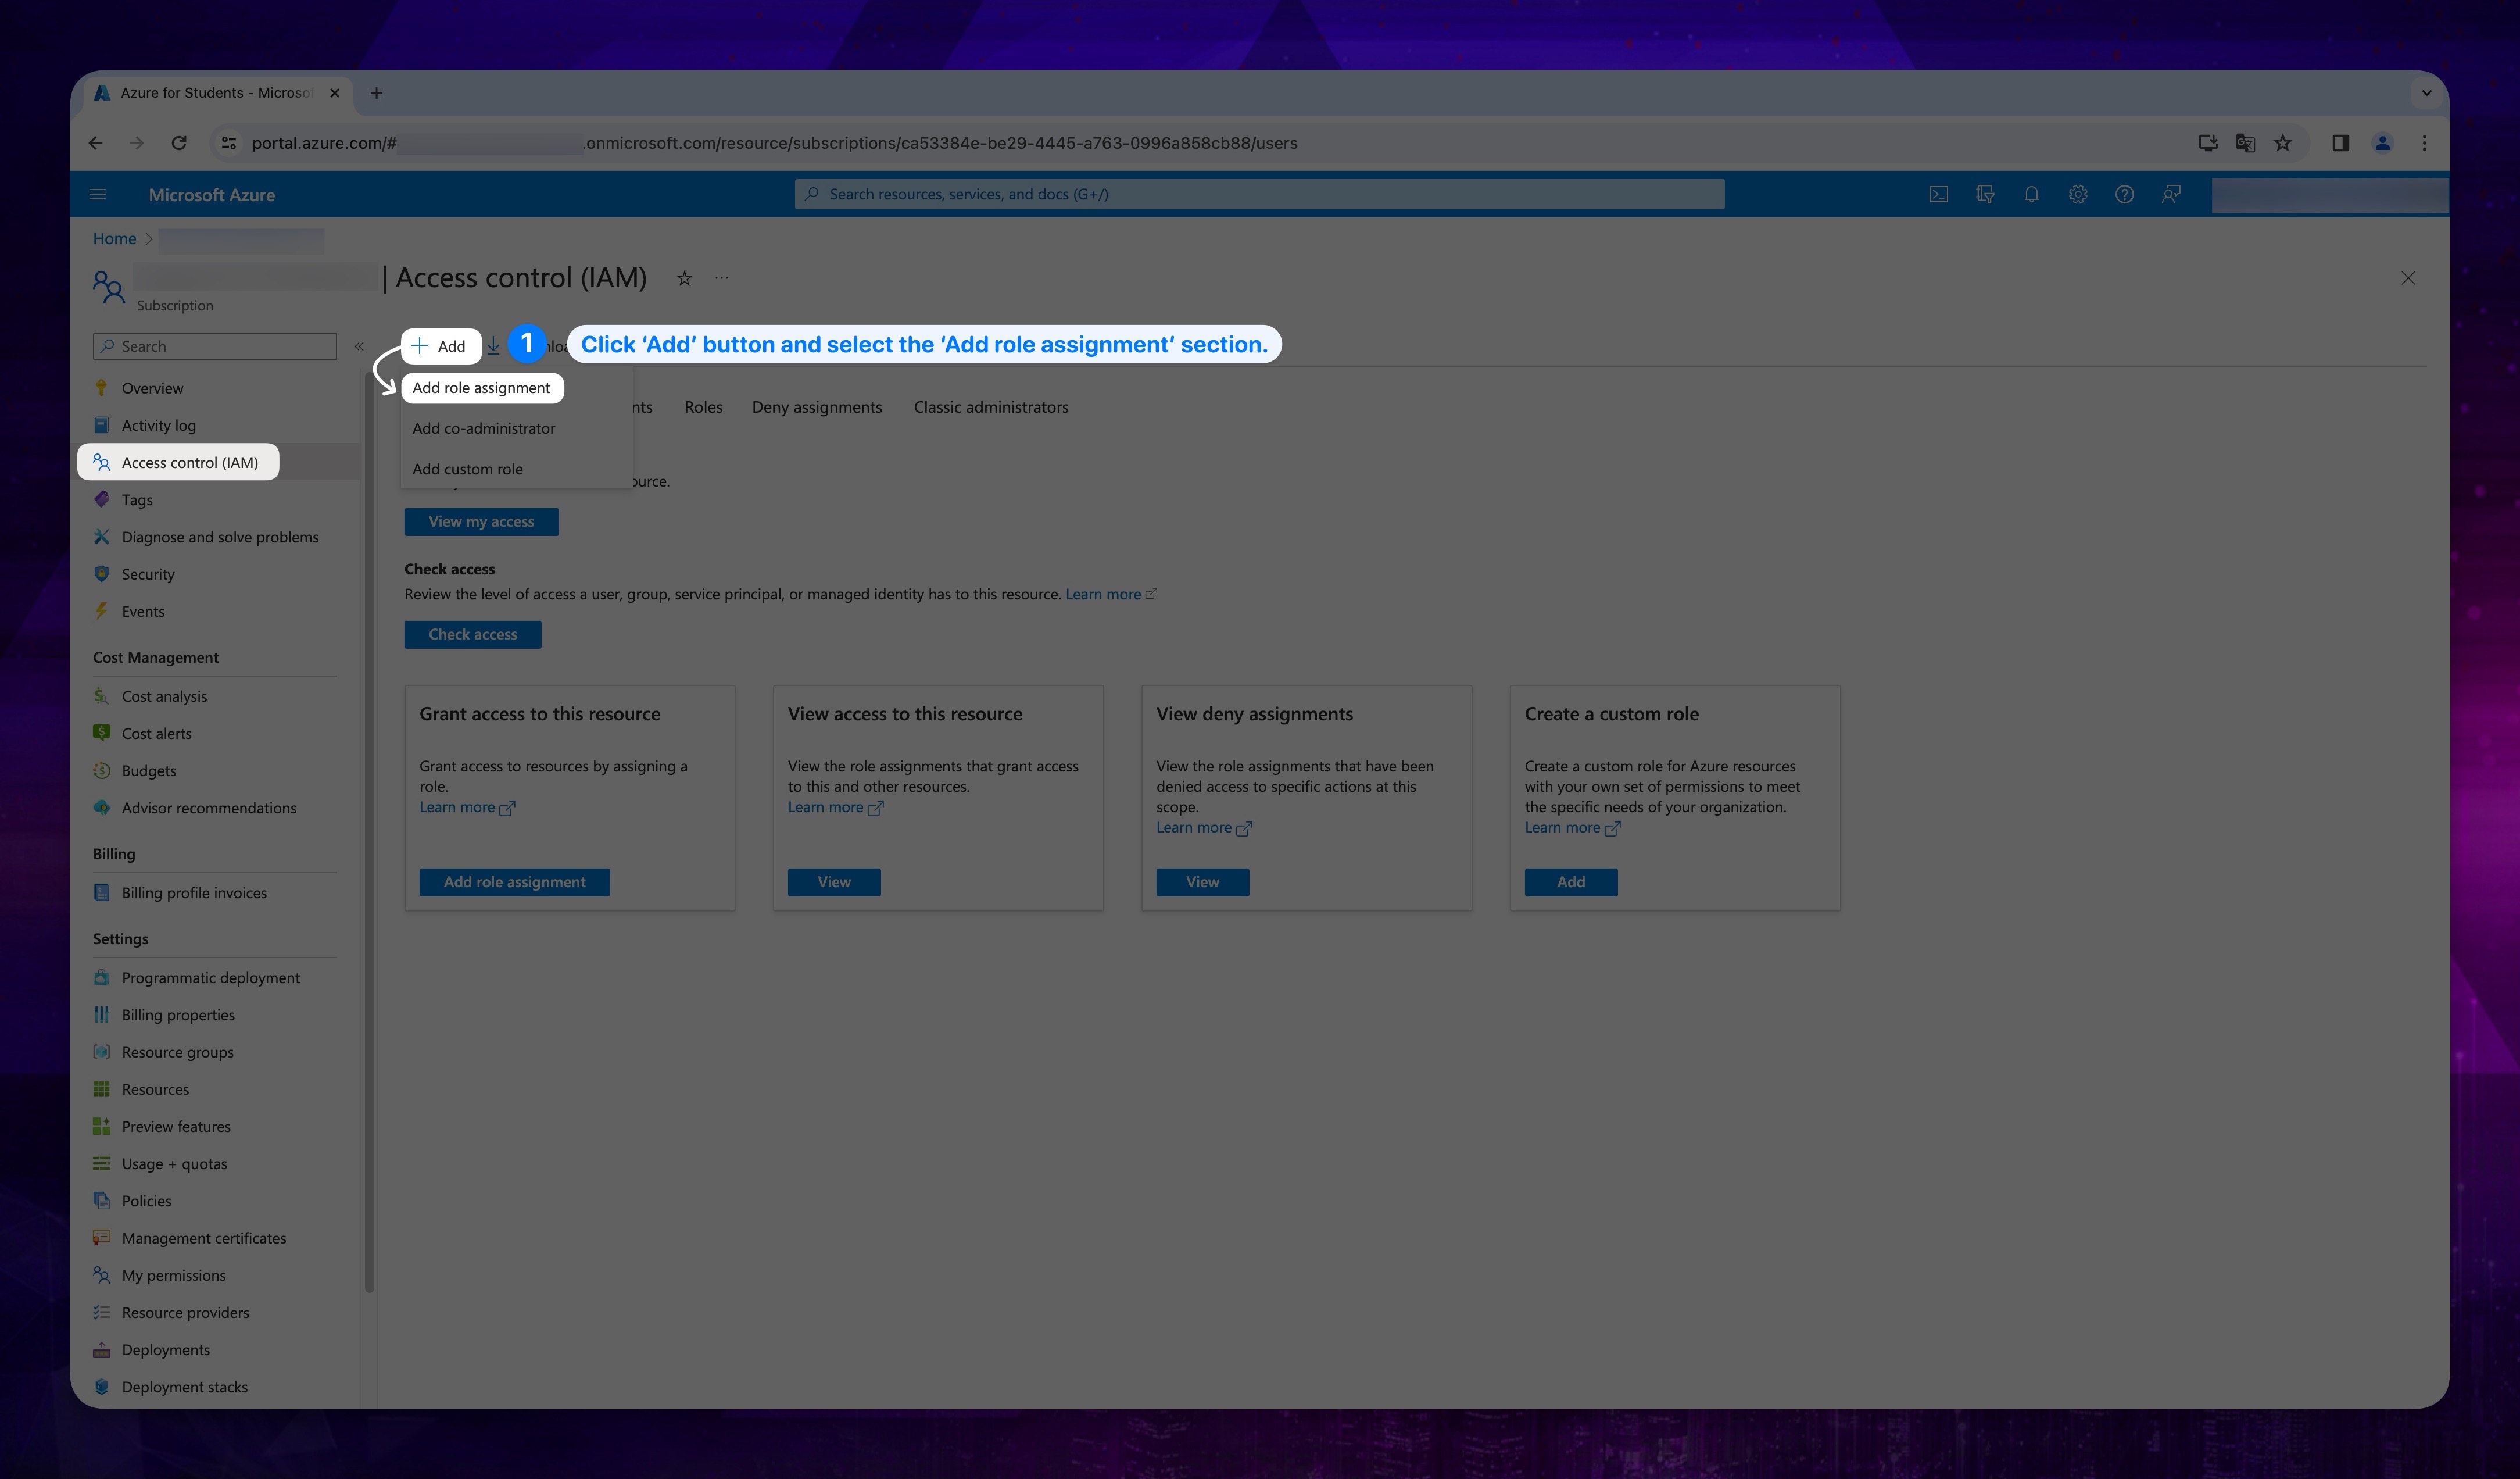
- Click Access Control (IAM) in the left menu under your subscription, then click the Add button at the top of the page and select Add role assignment.
Show the instructions with images
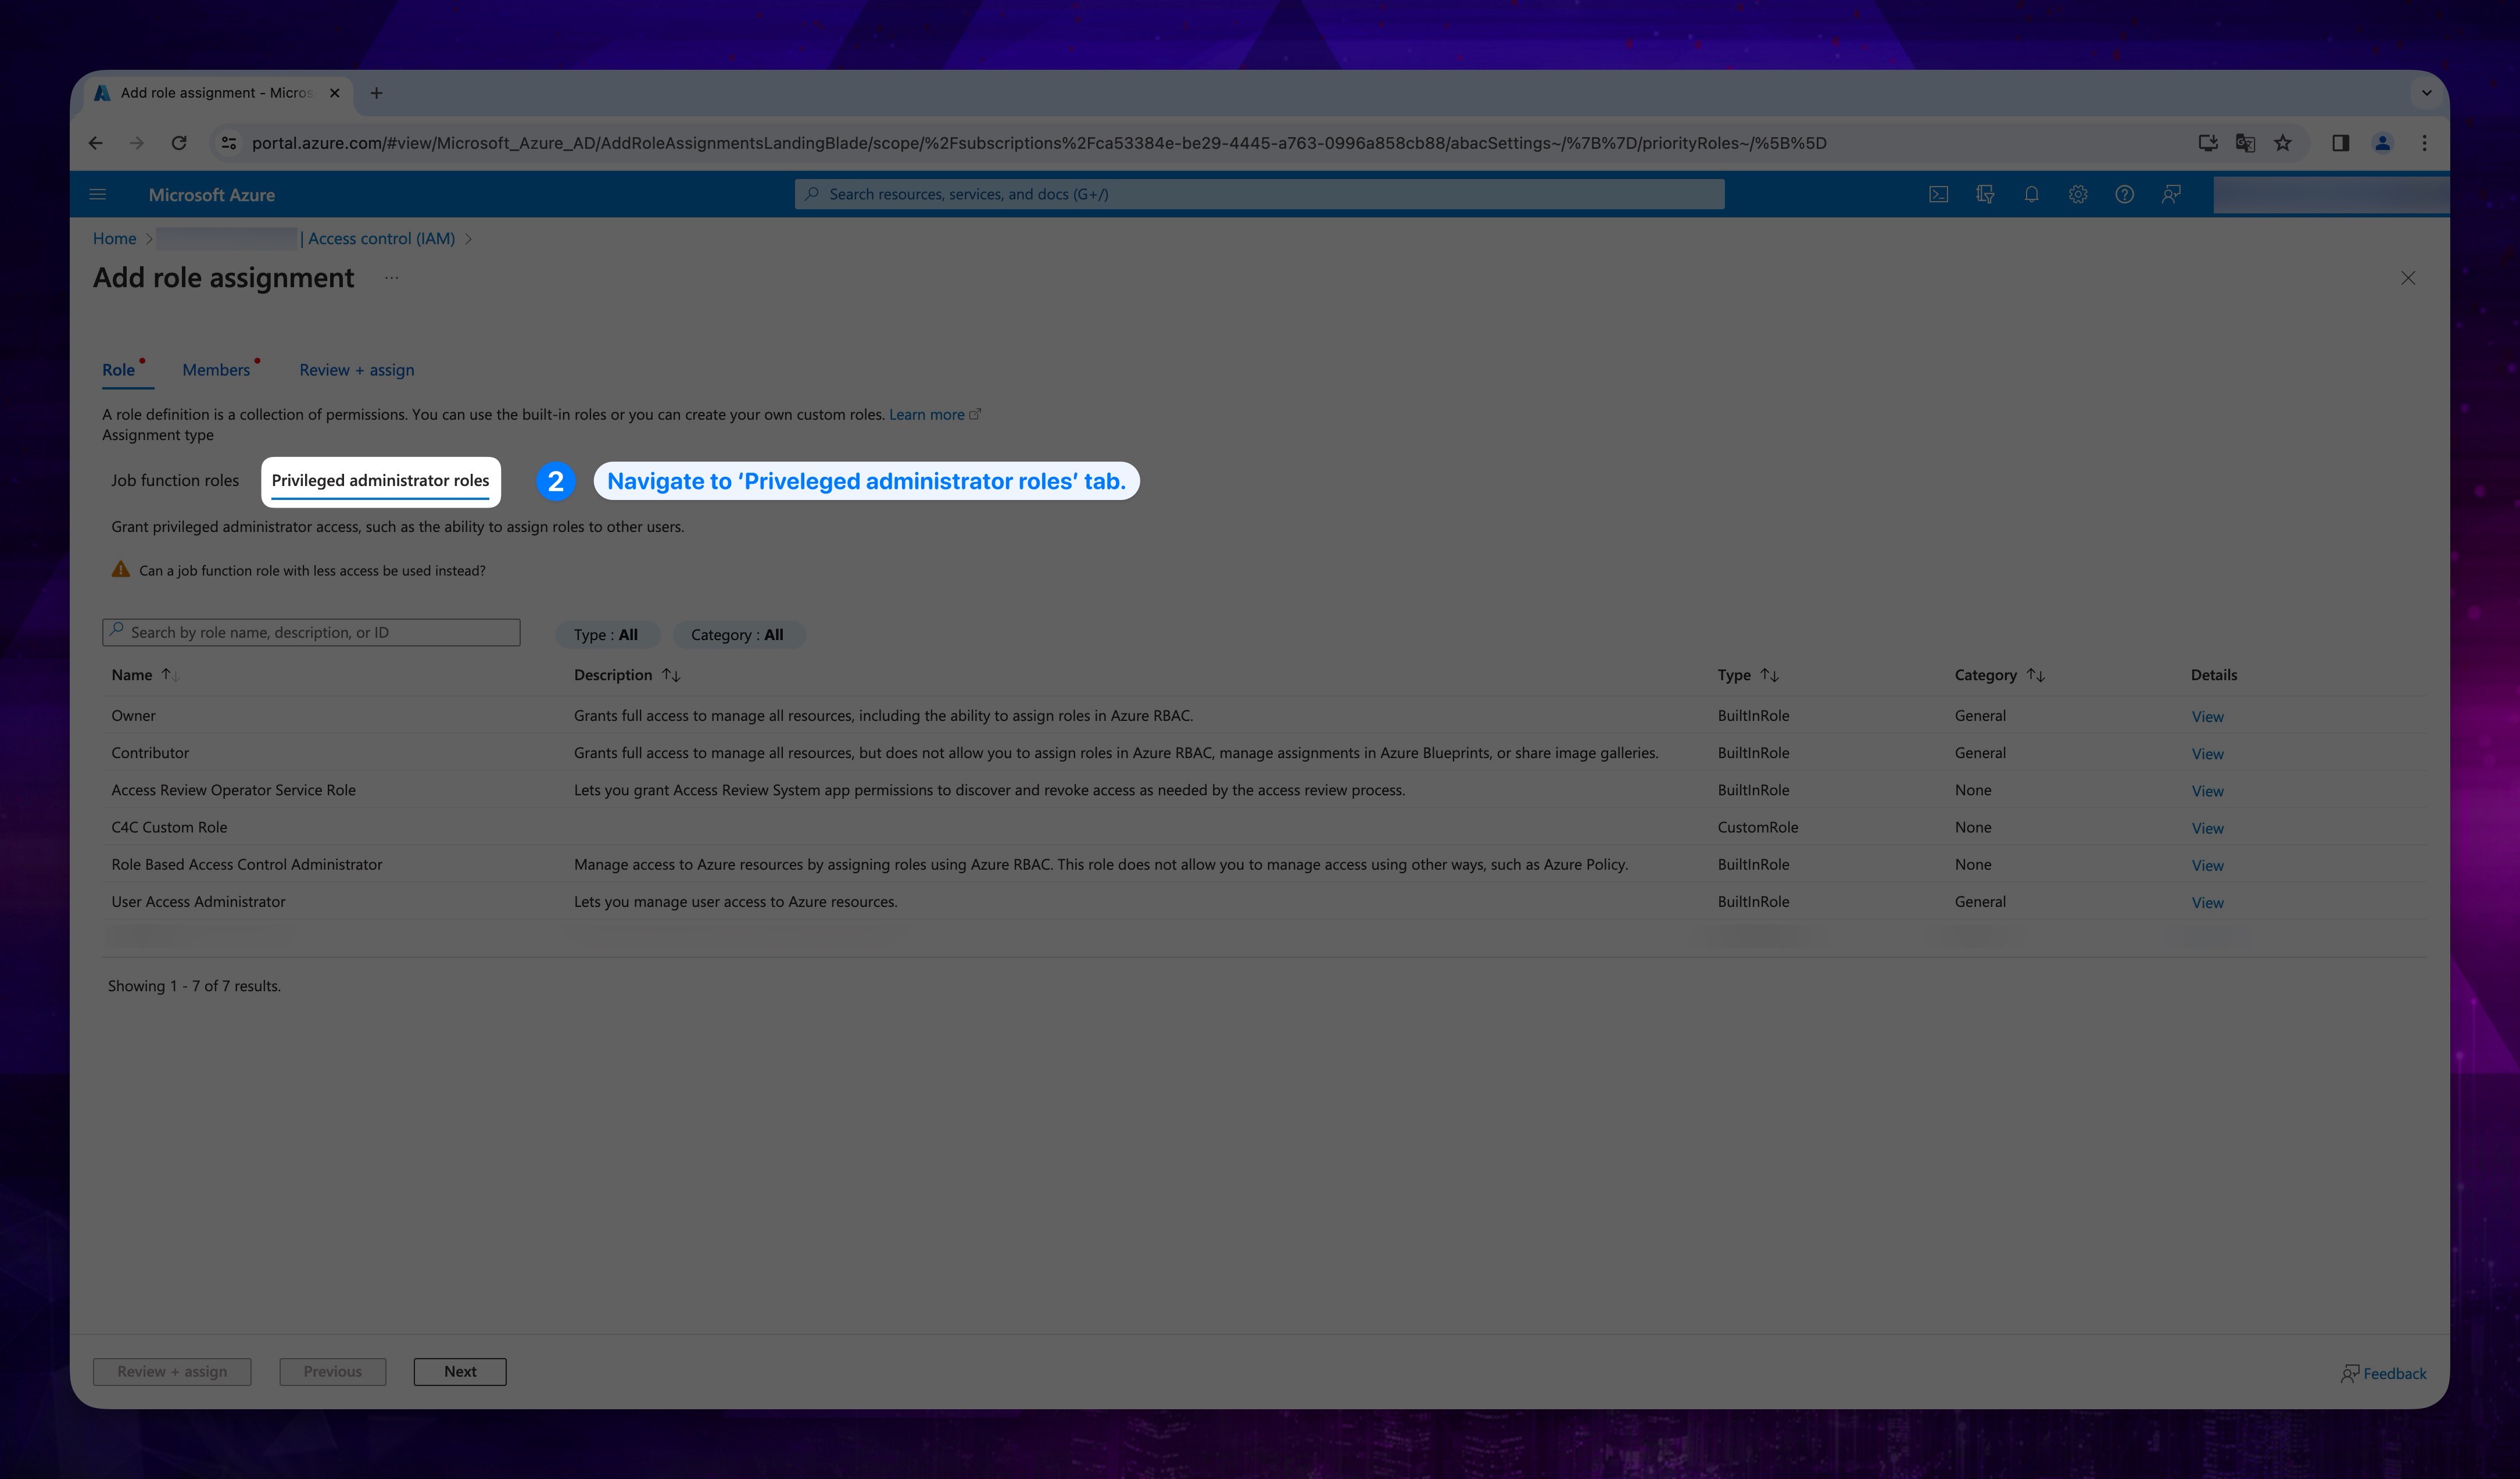
- Click Priveleged administrator roles under the Role tab.
Show the instructions with images
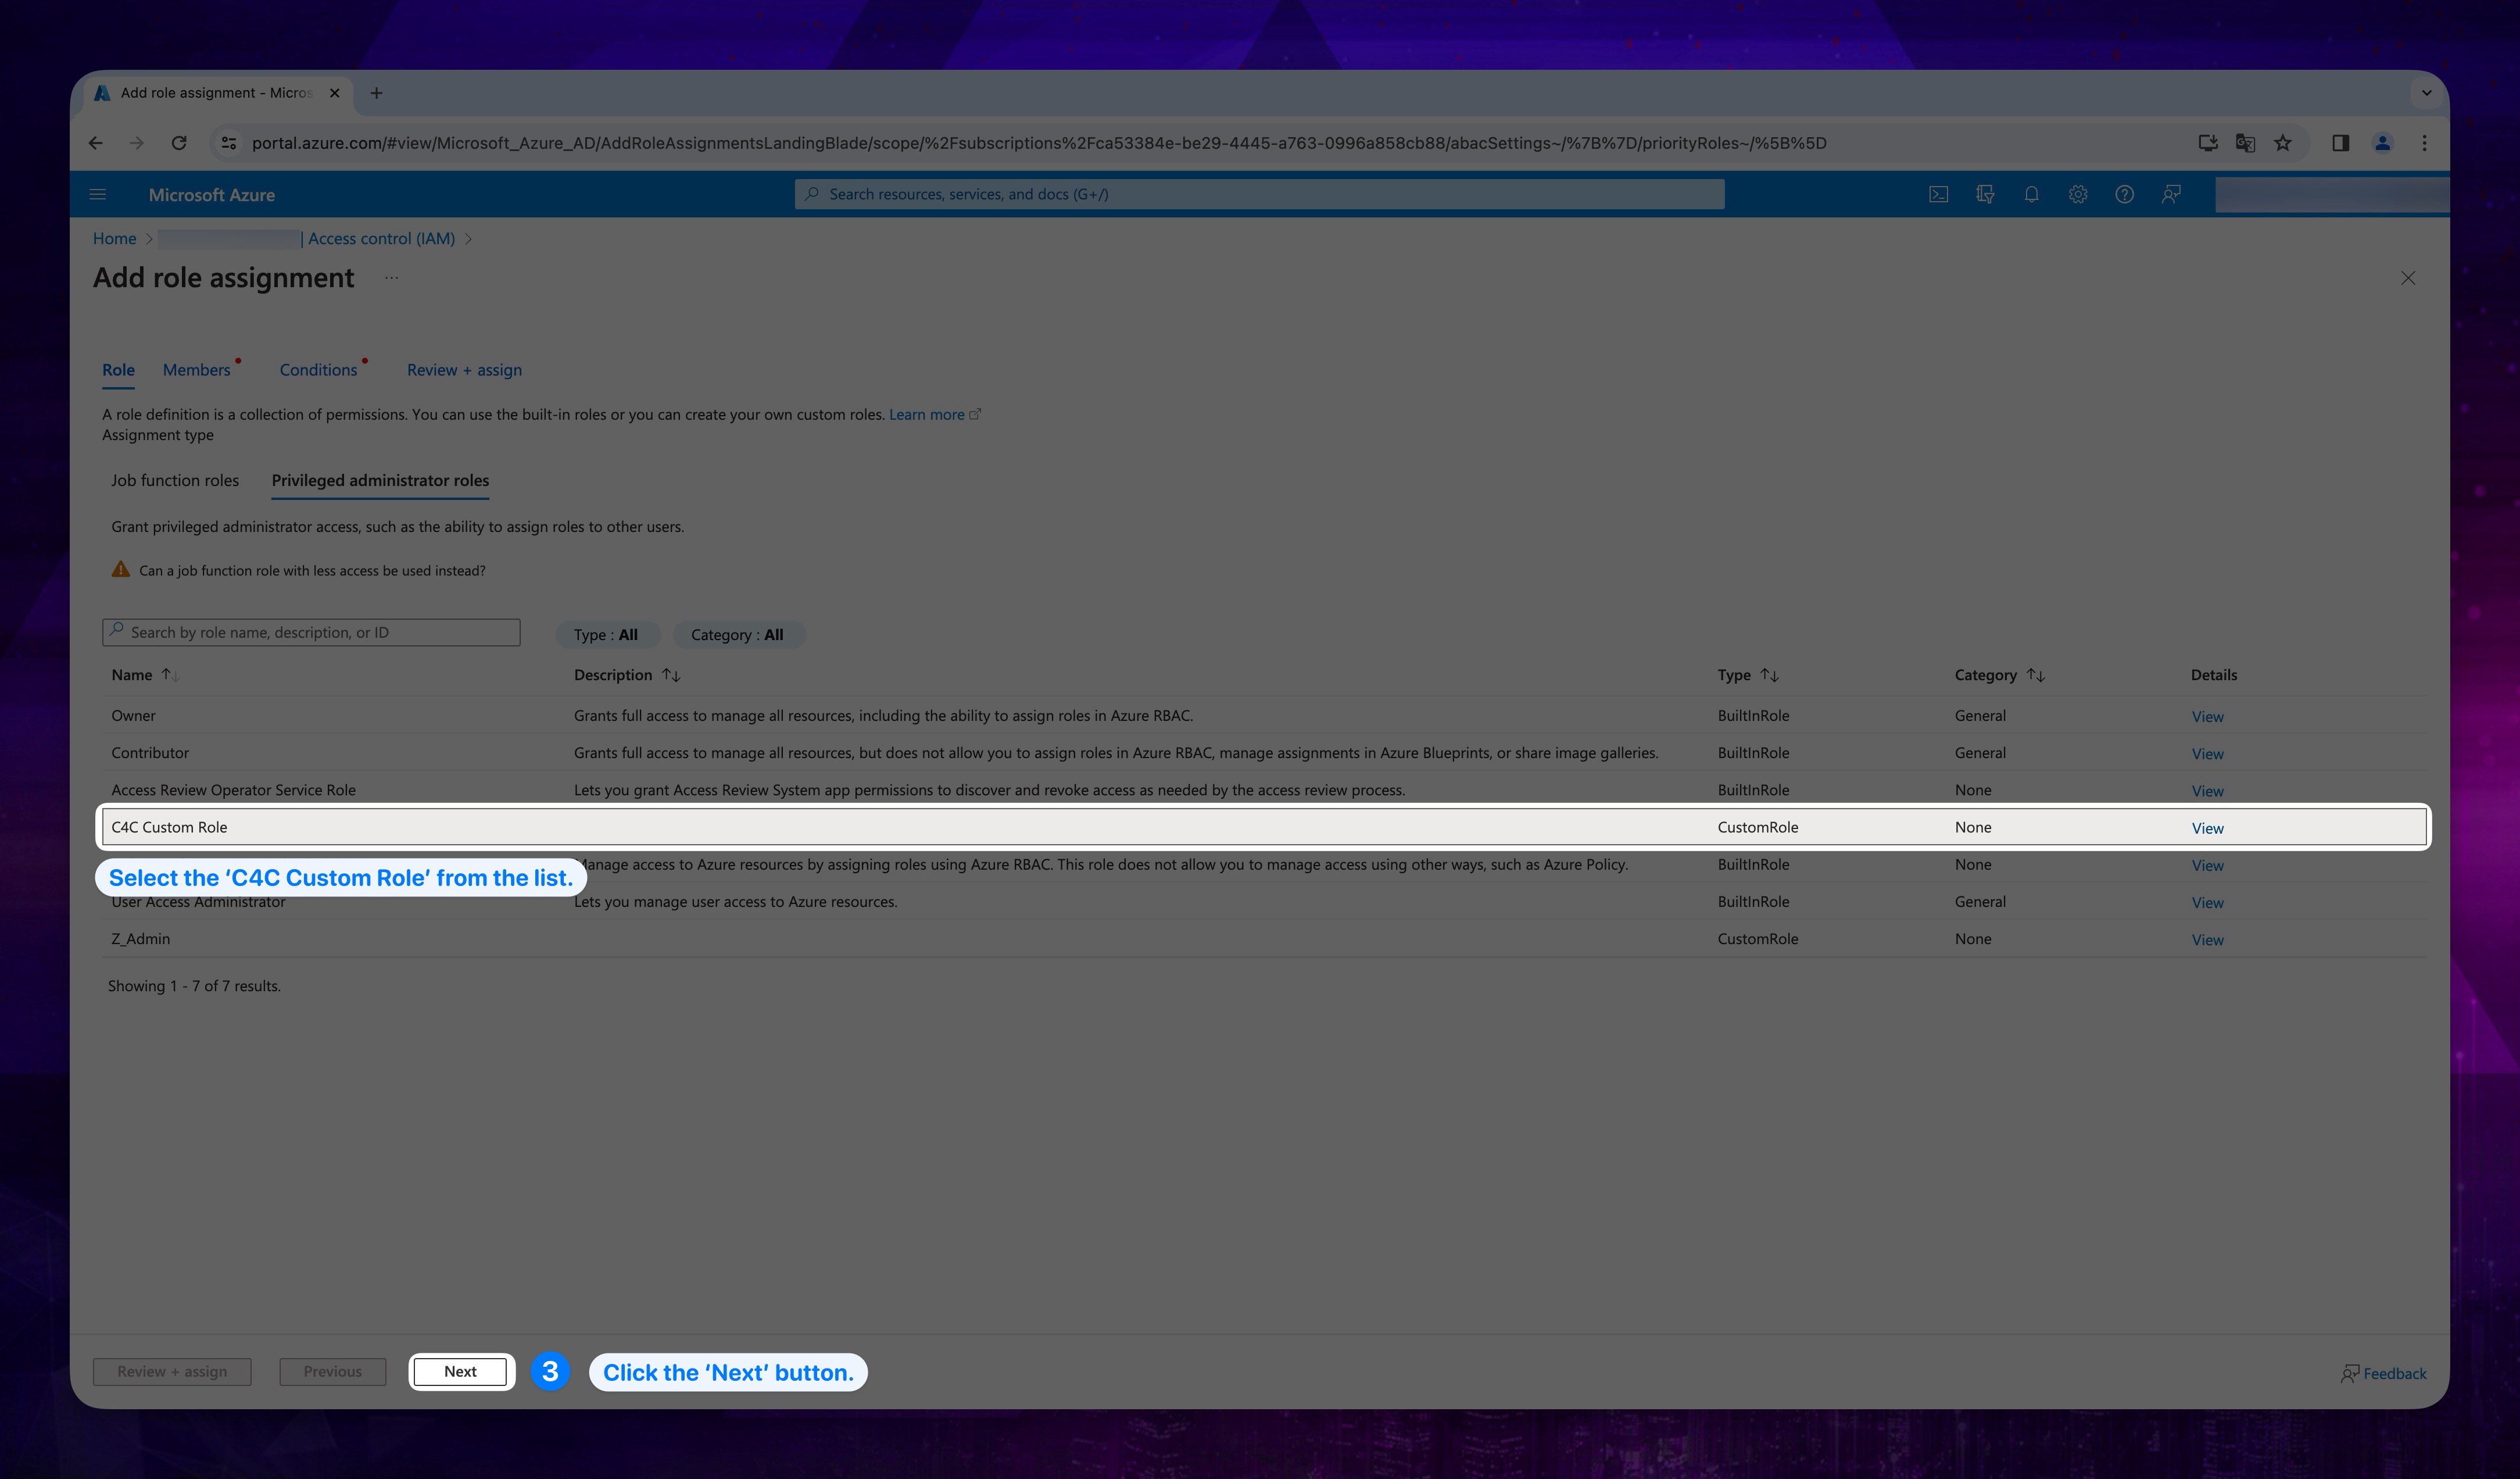
- Then search for the role (C4C Custom Role) that we cerated earlier and select it from the list. Afterward click Next button.
Show the instructions with images
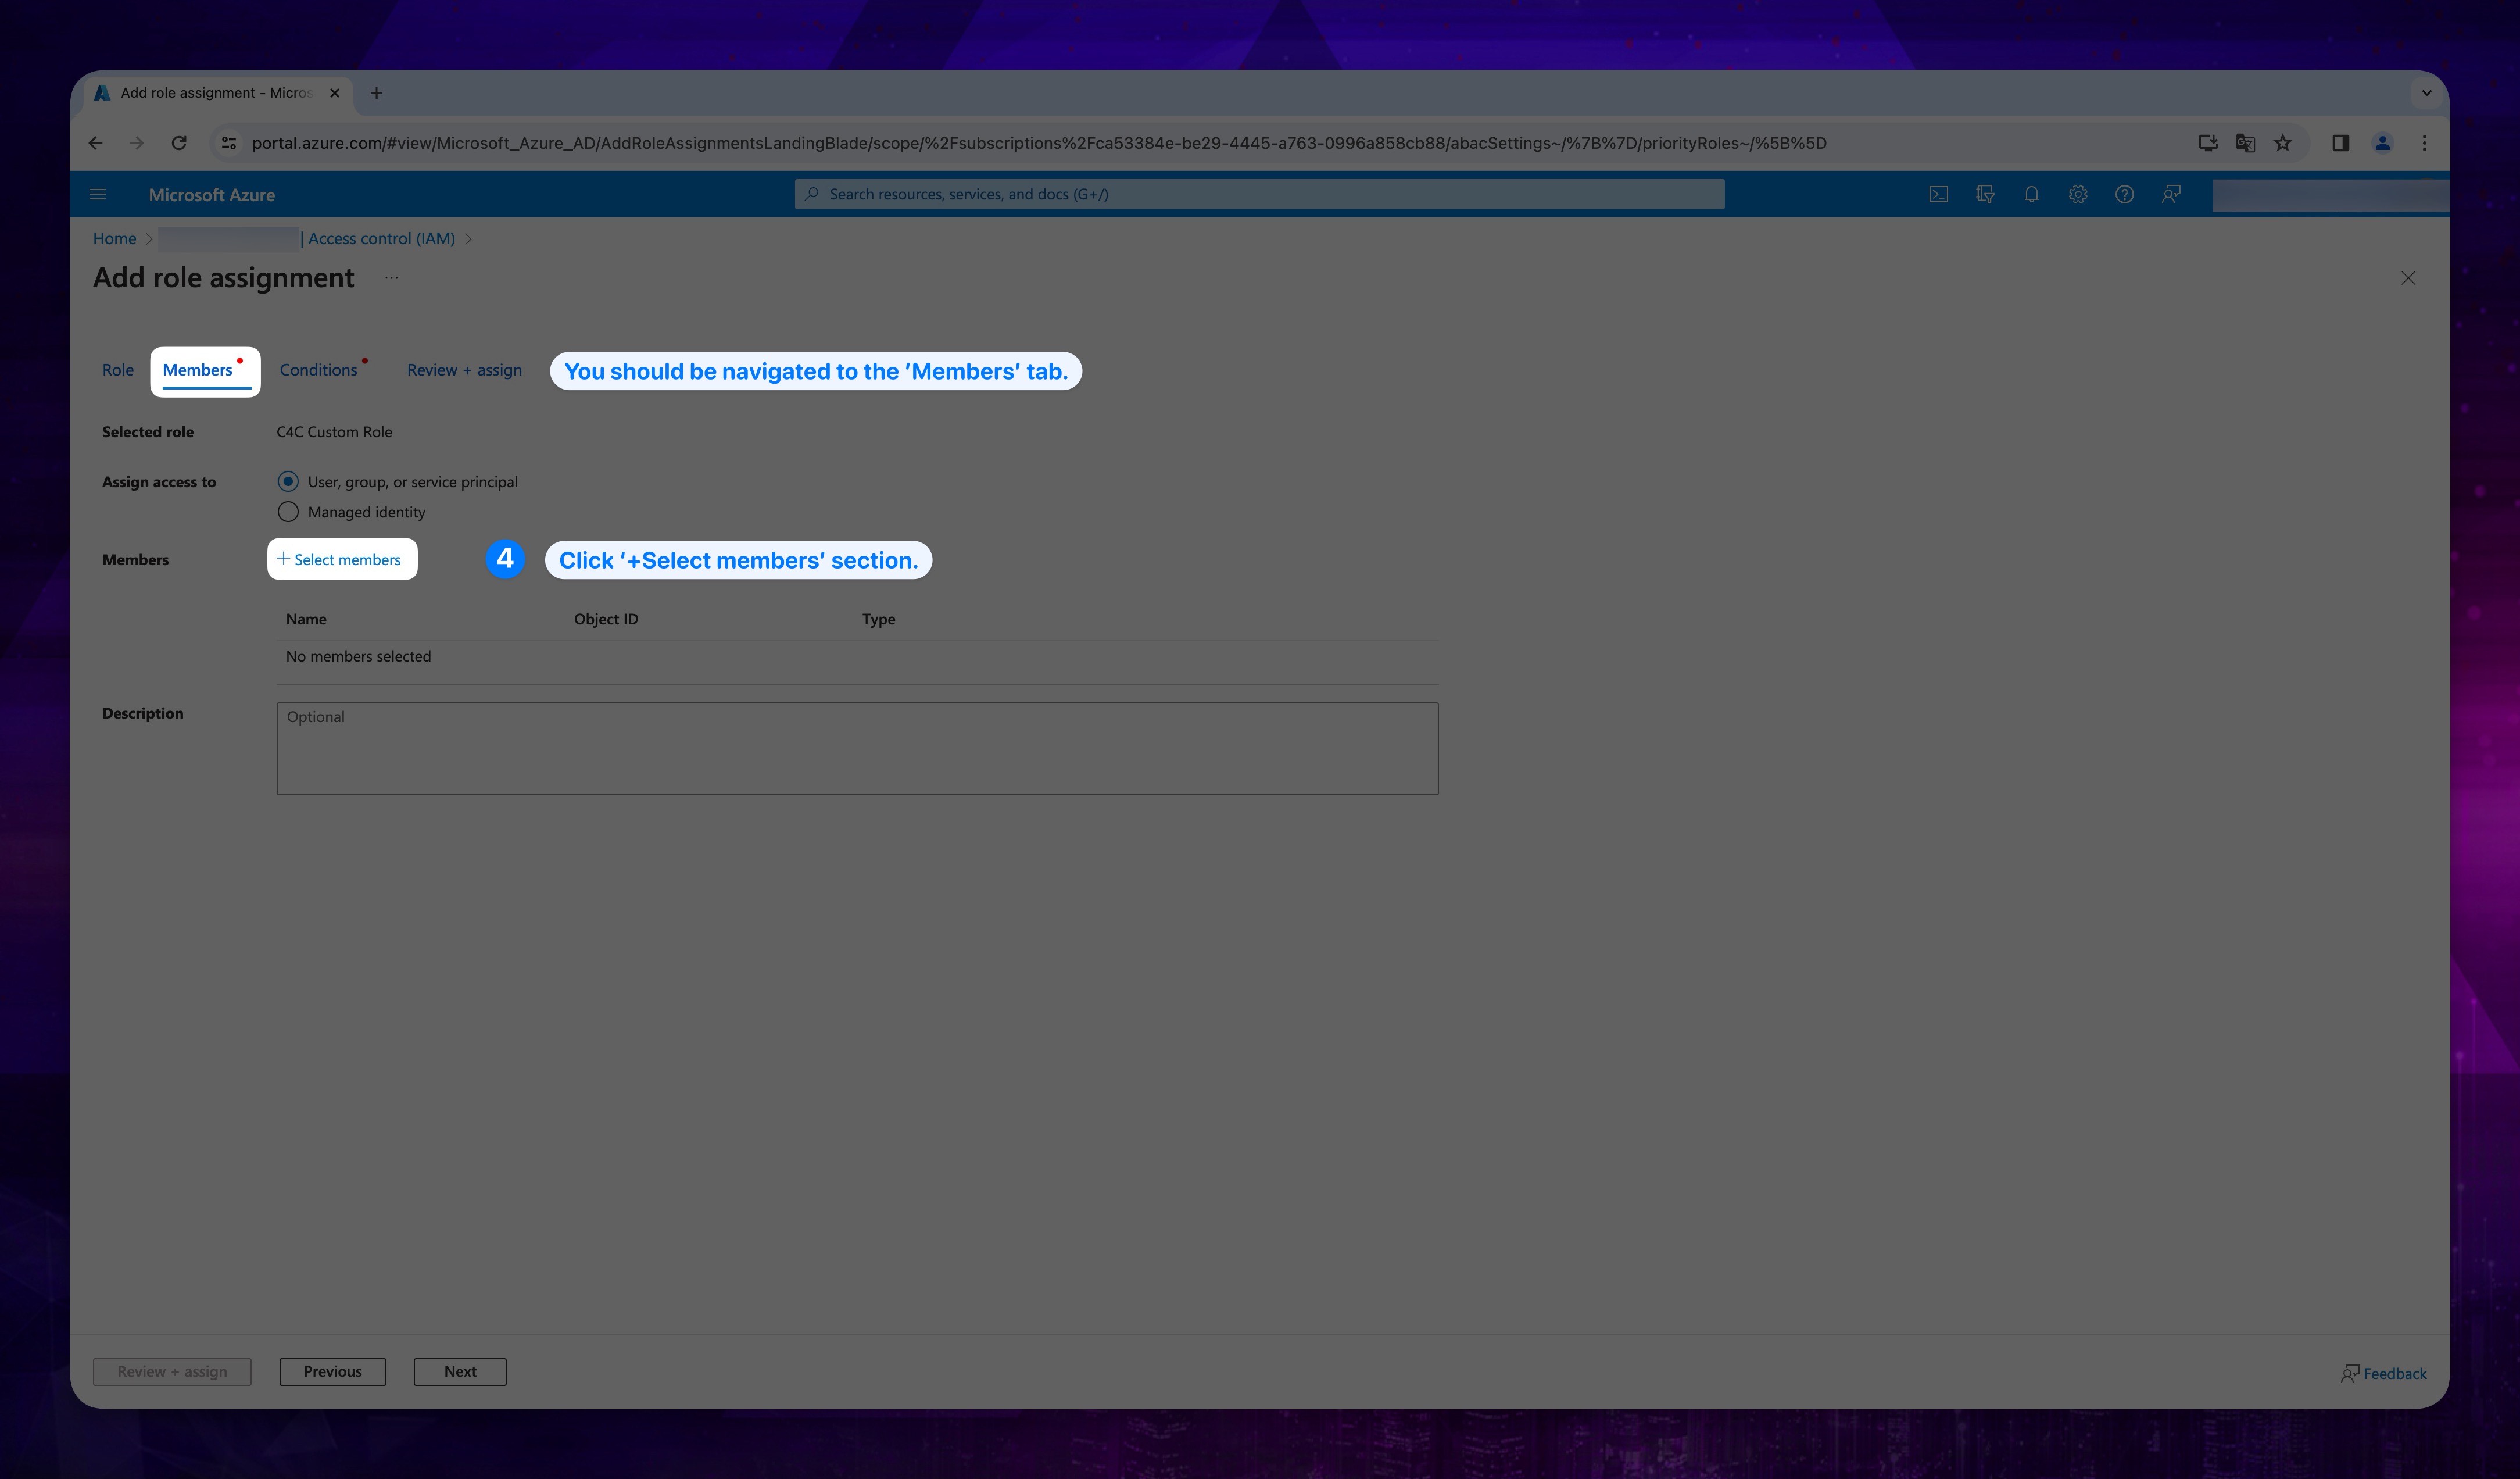
- You should be navigated to the Members tab. In that section click +Select members.
Show the instructions with images
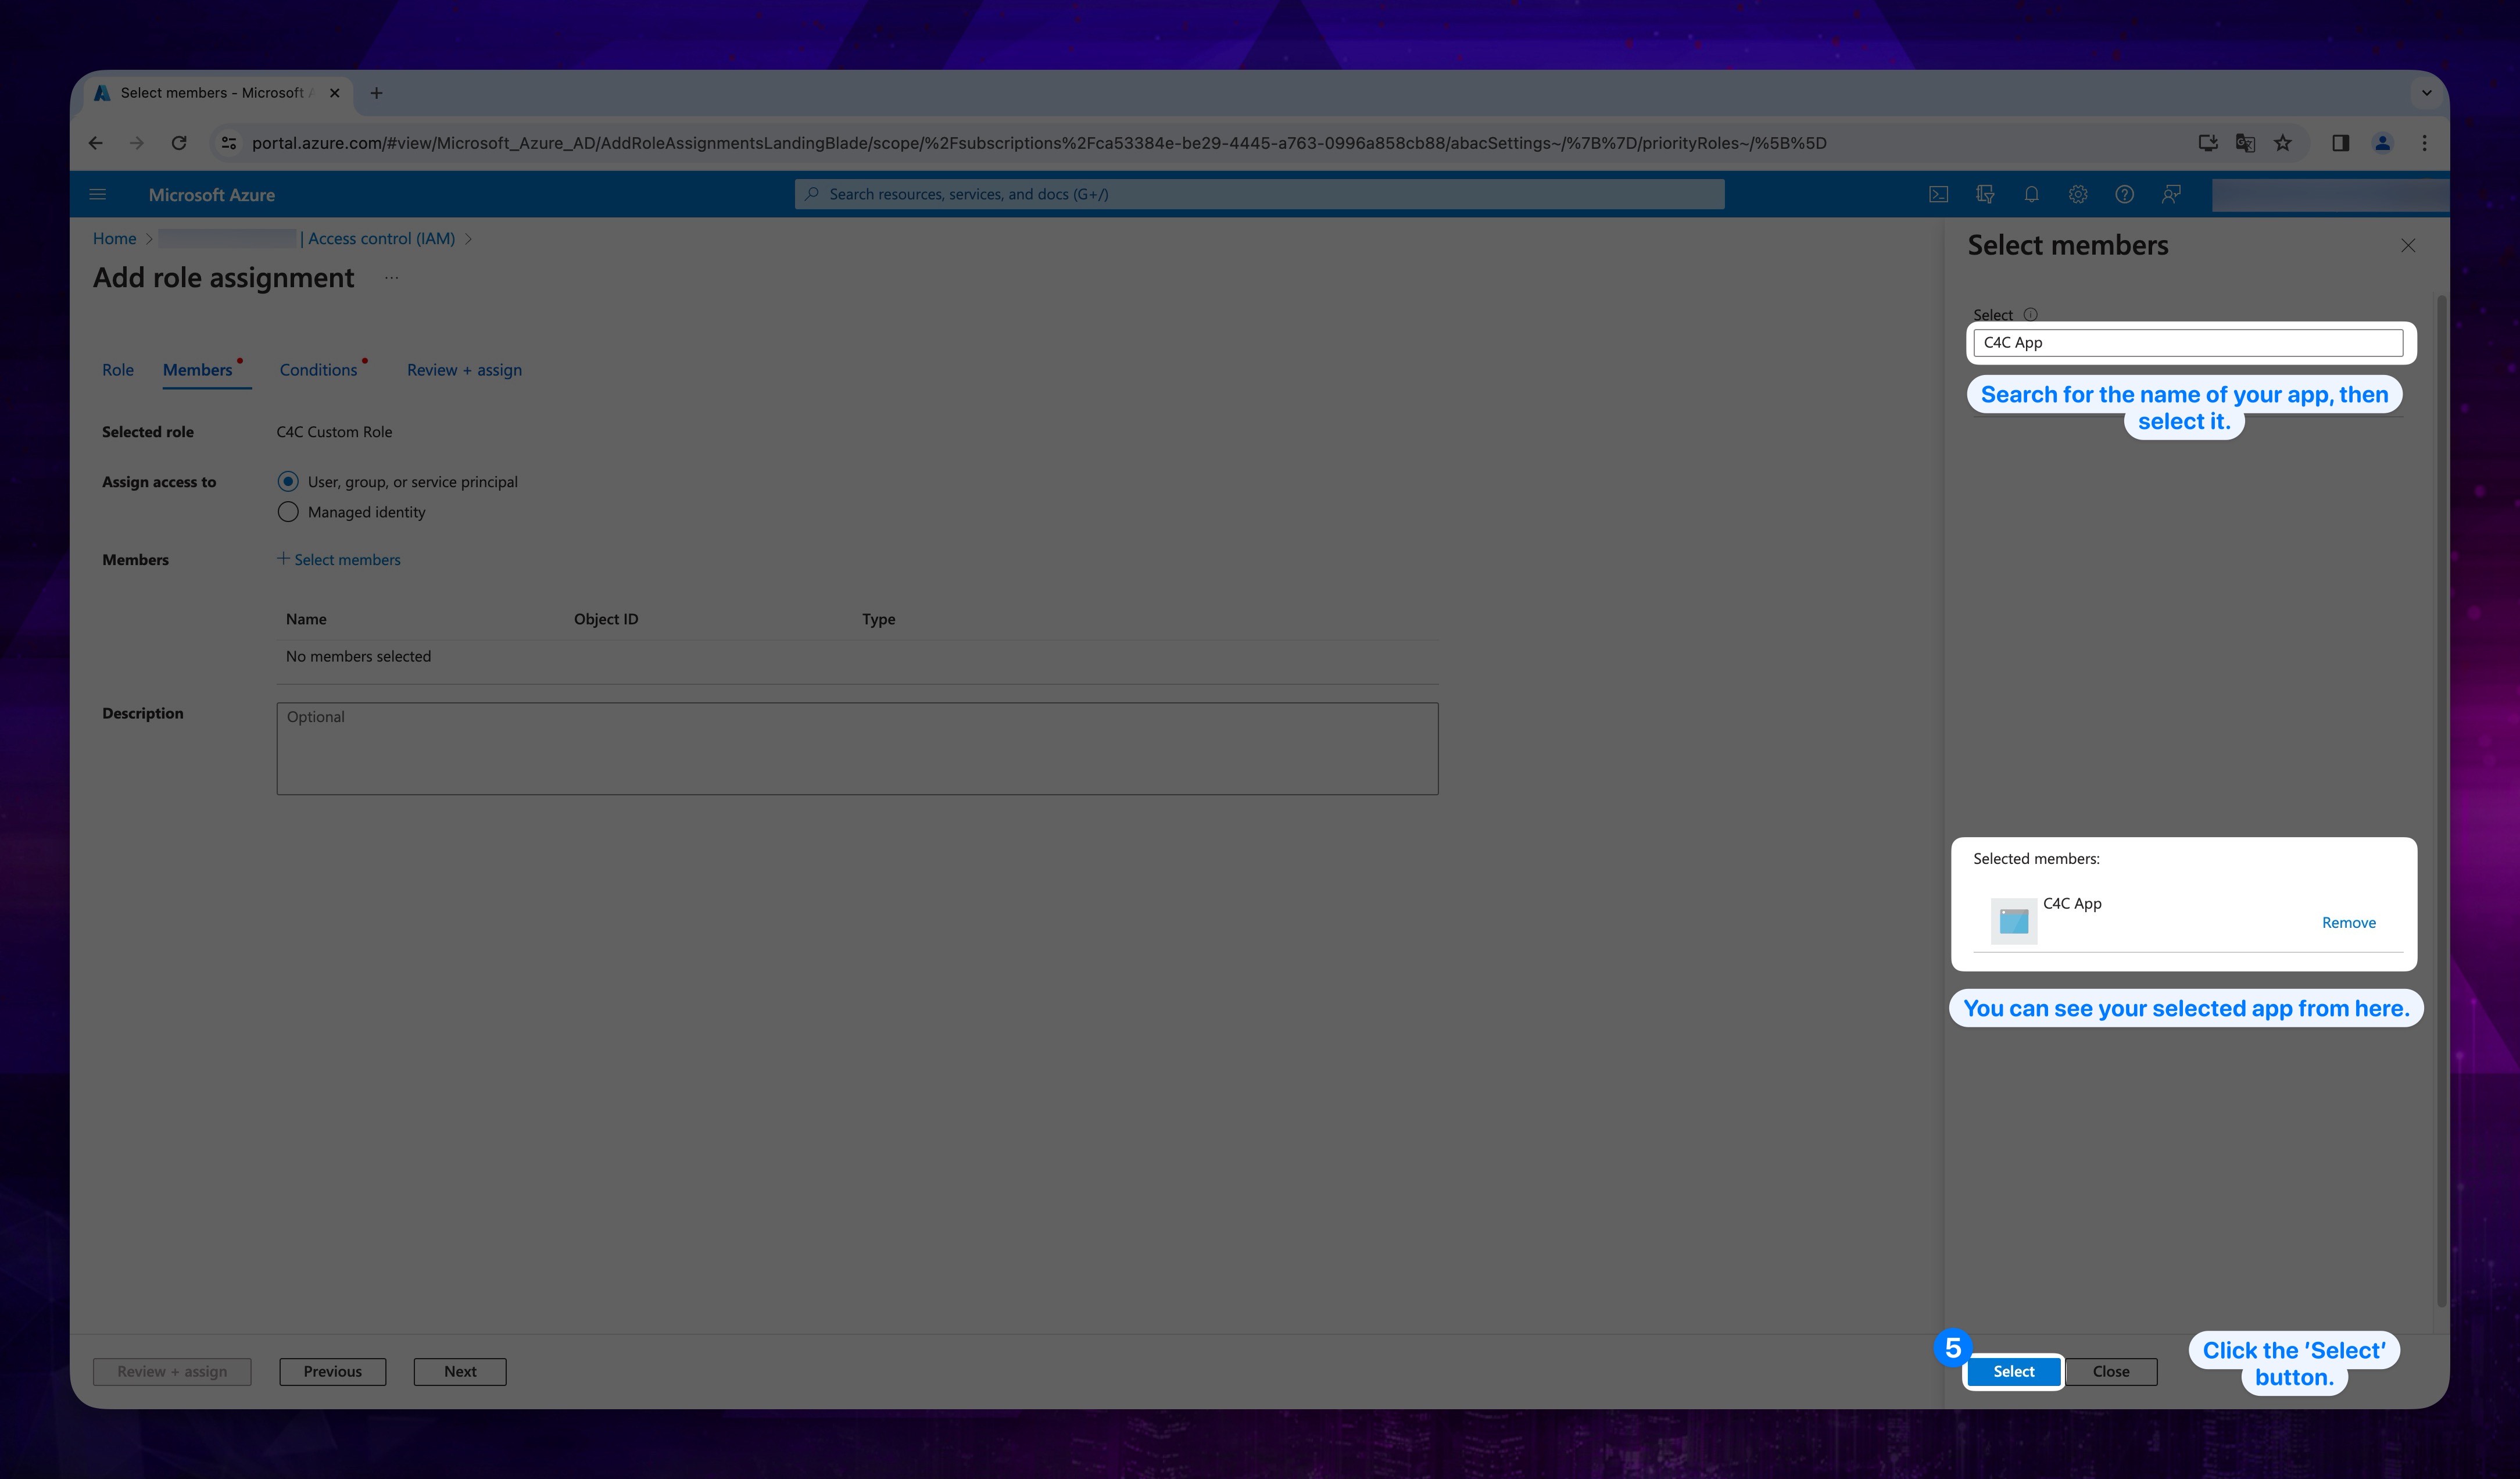
- Search for the name of your app which we registered at App Registration. Then click Select button.
Show the instructions with images
- Afterward click Next button, which located bottom of the page. You must be navigated to Conditions tab.
Show the instructions with images

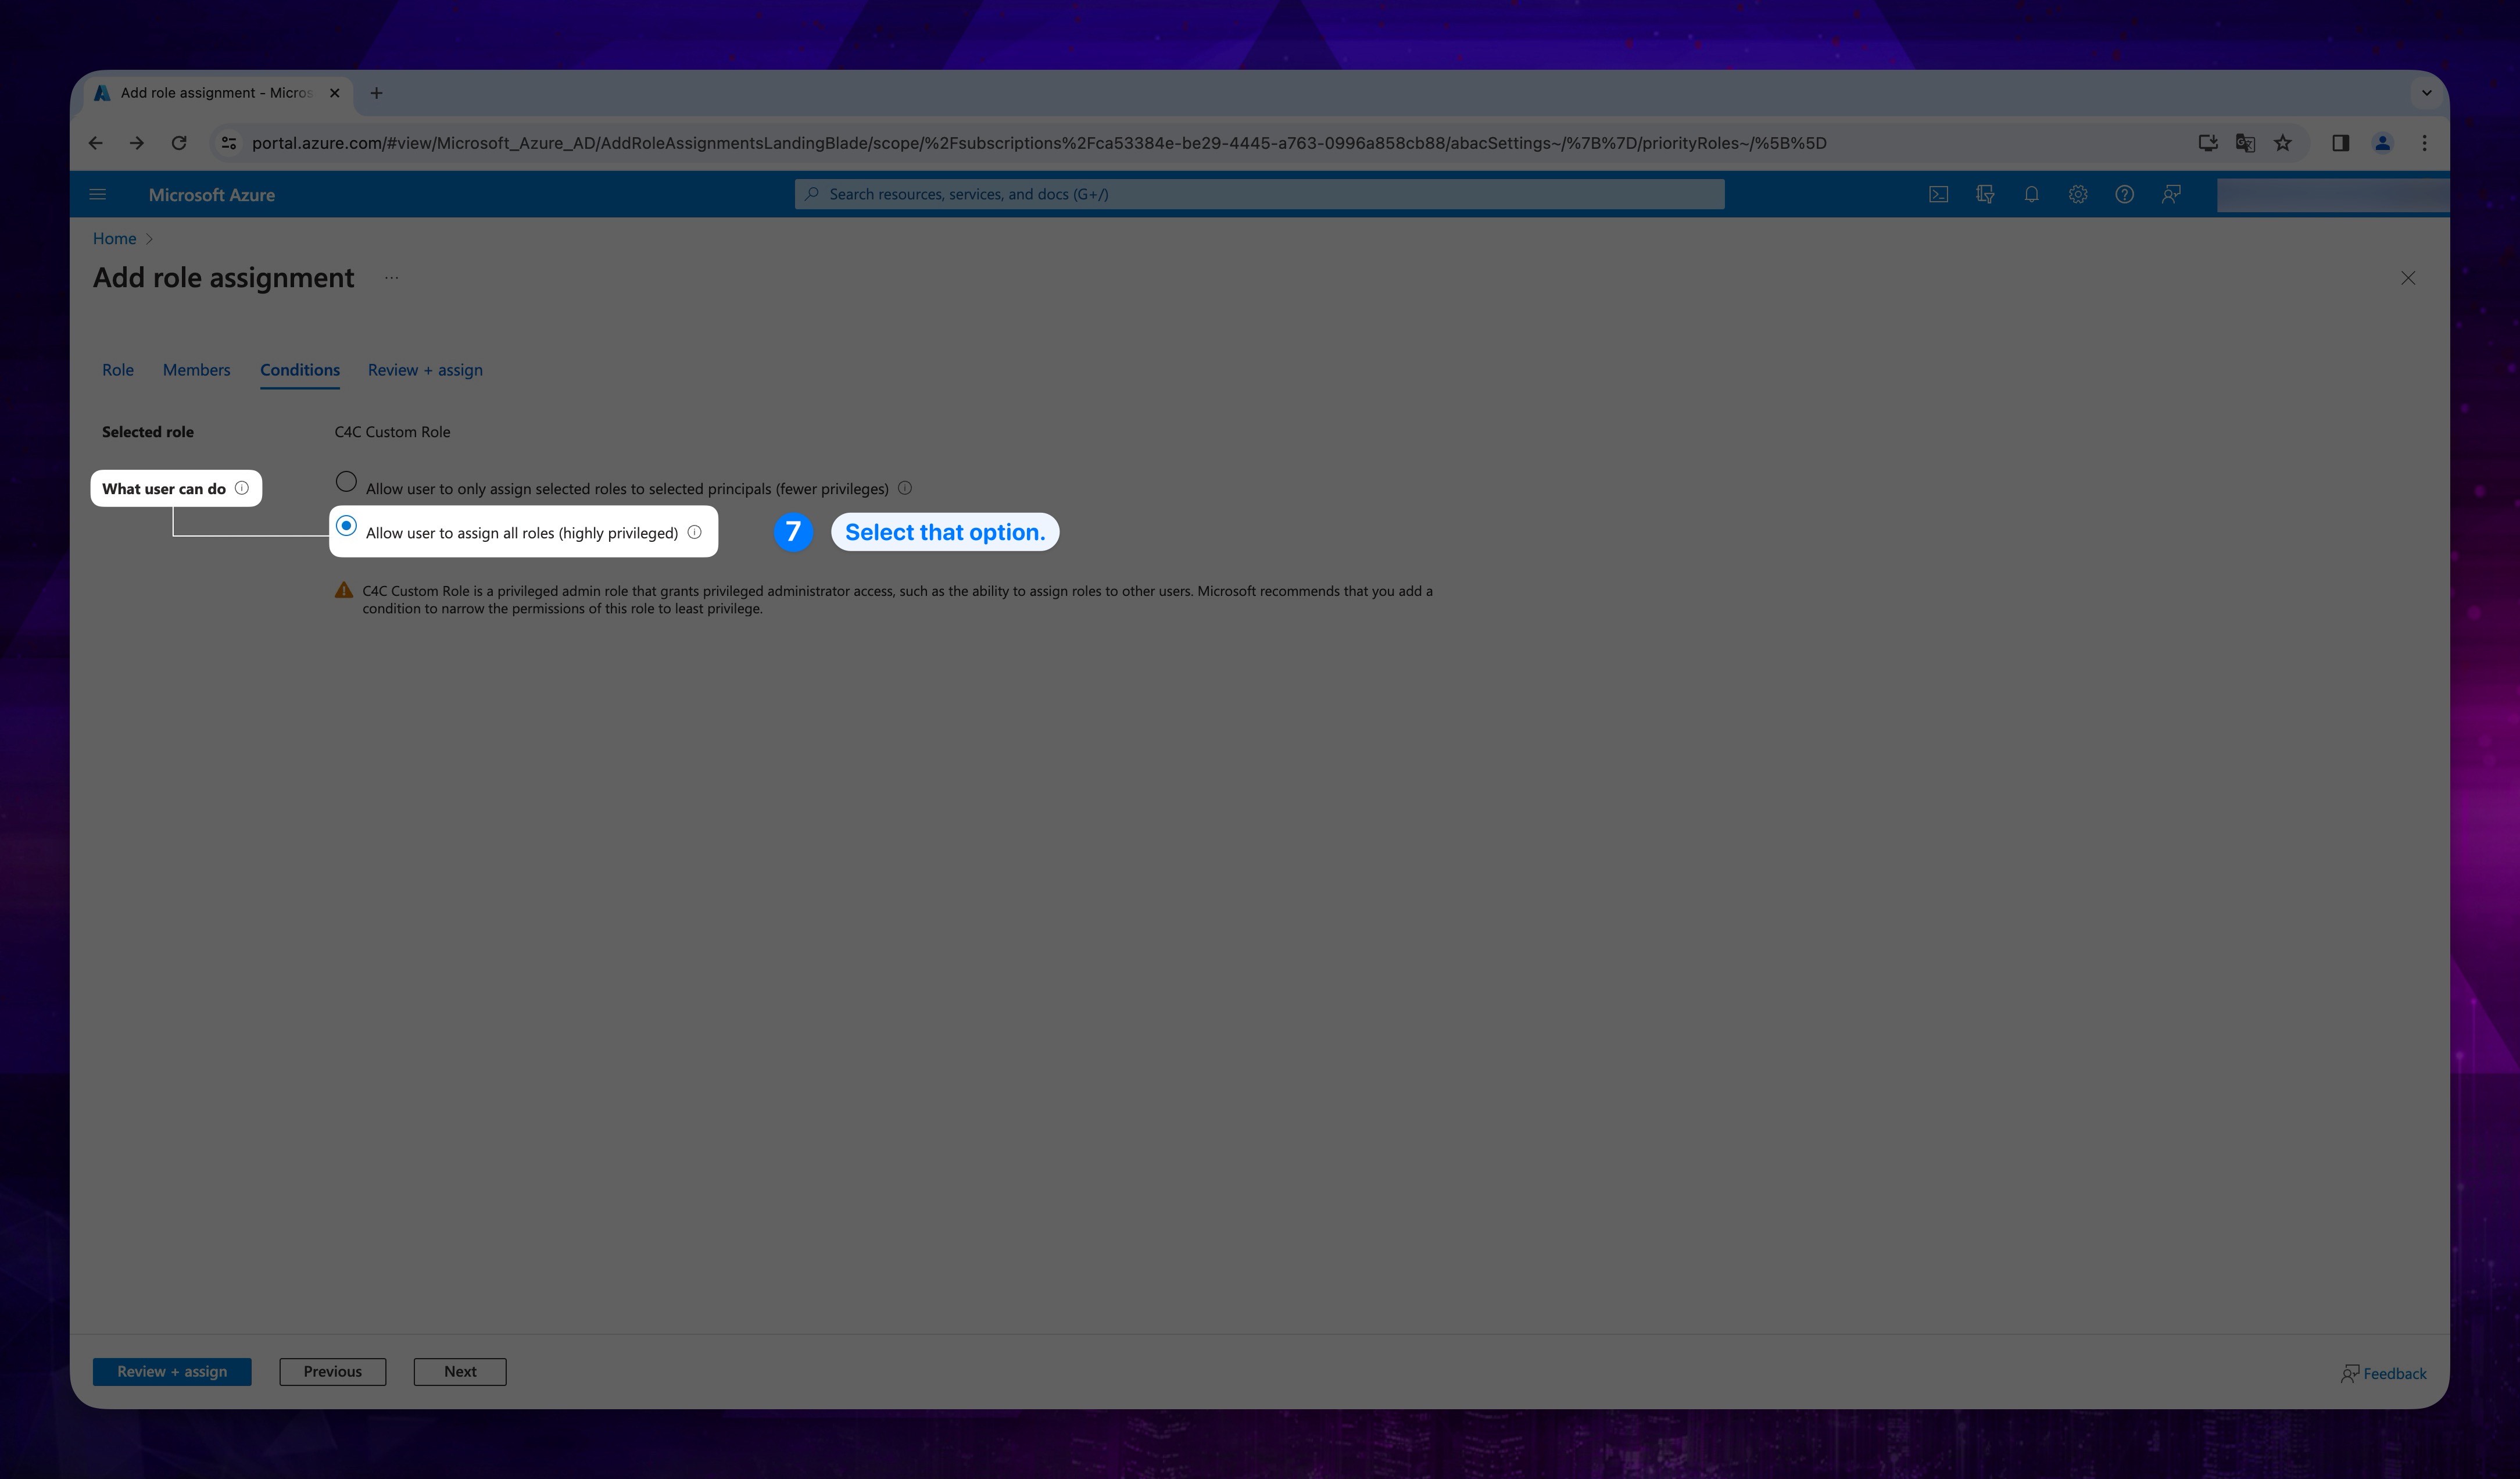
- For getting the required permissions, please select 'Allow user to assign all roles' option for What user can do section.
Show the instructions with images
- Click Review + assign button.
Show the instructions with images
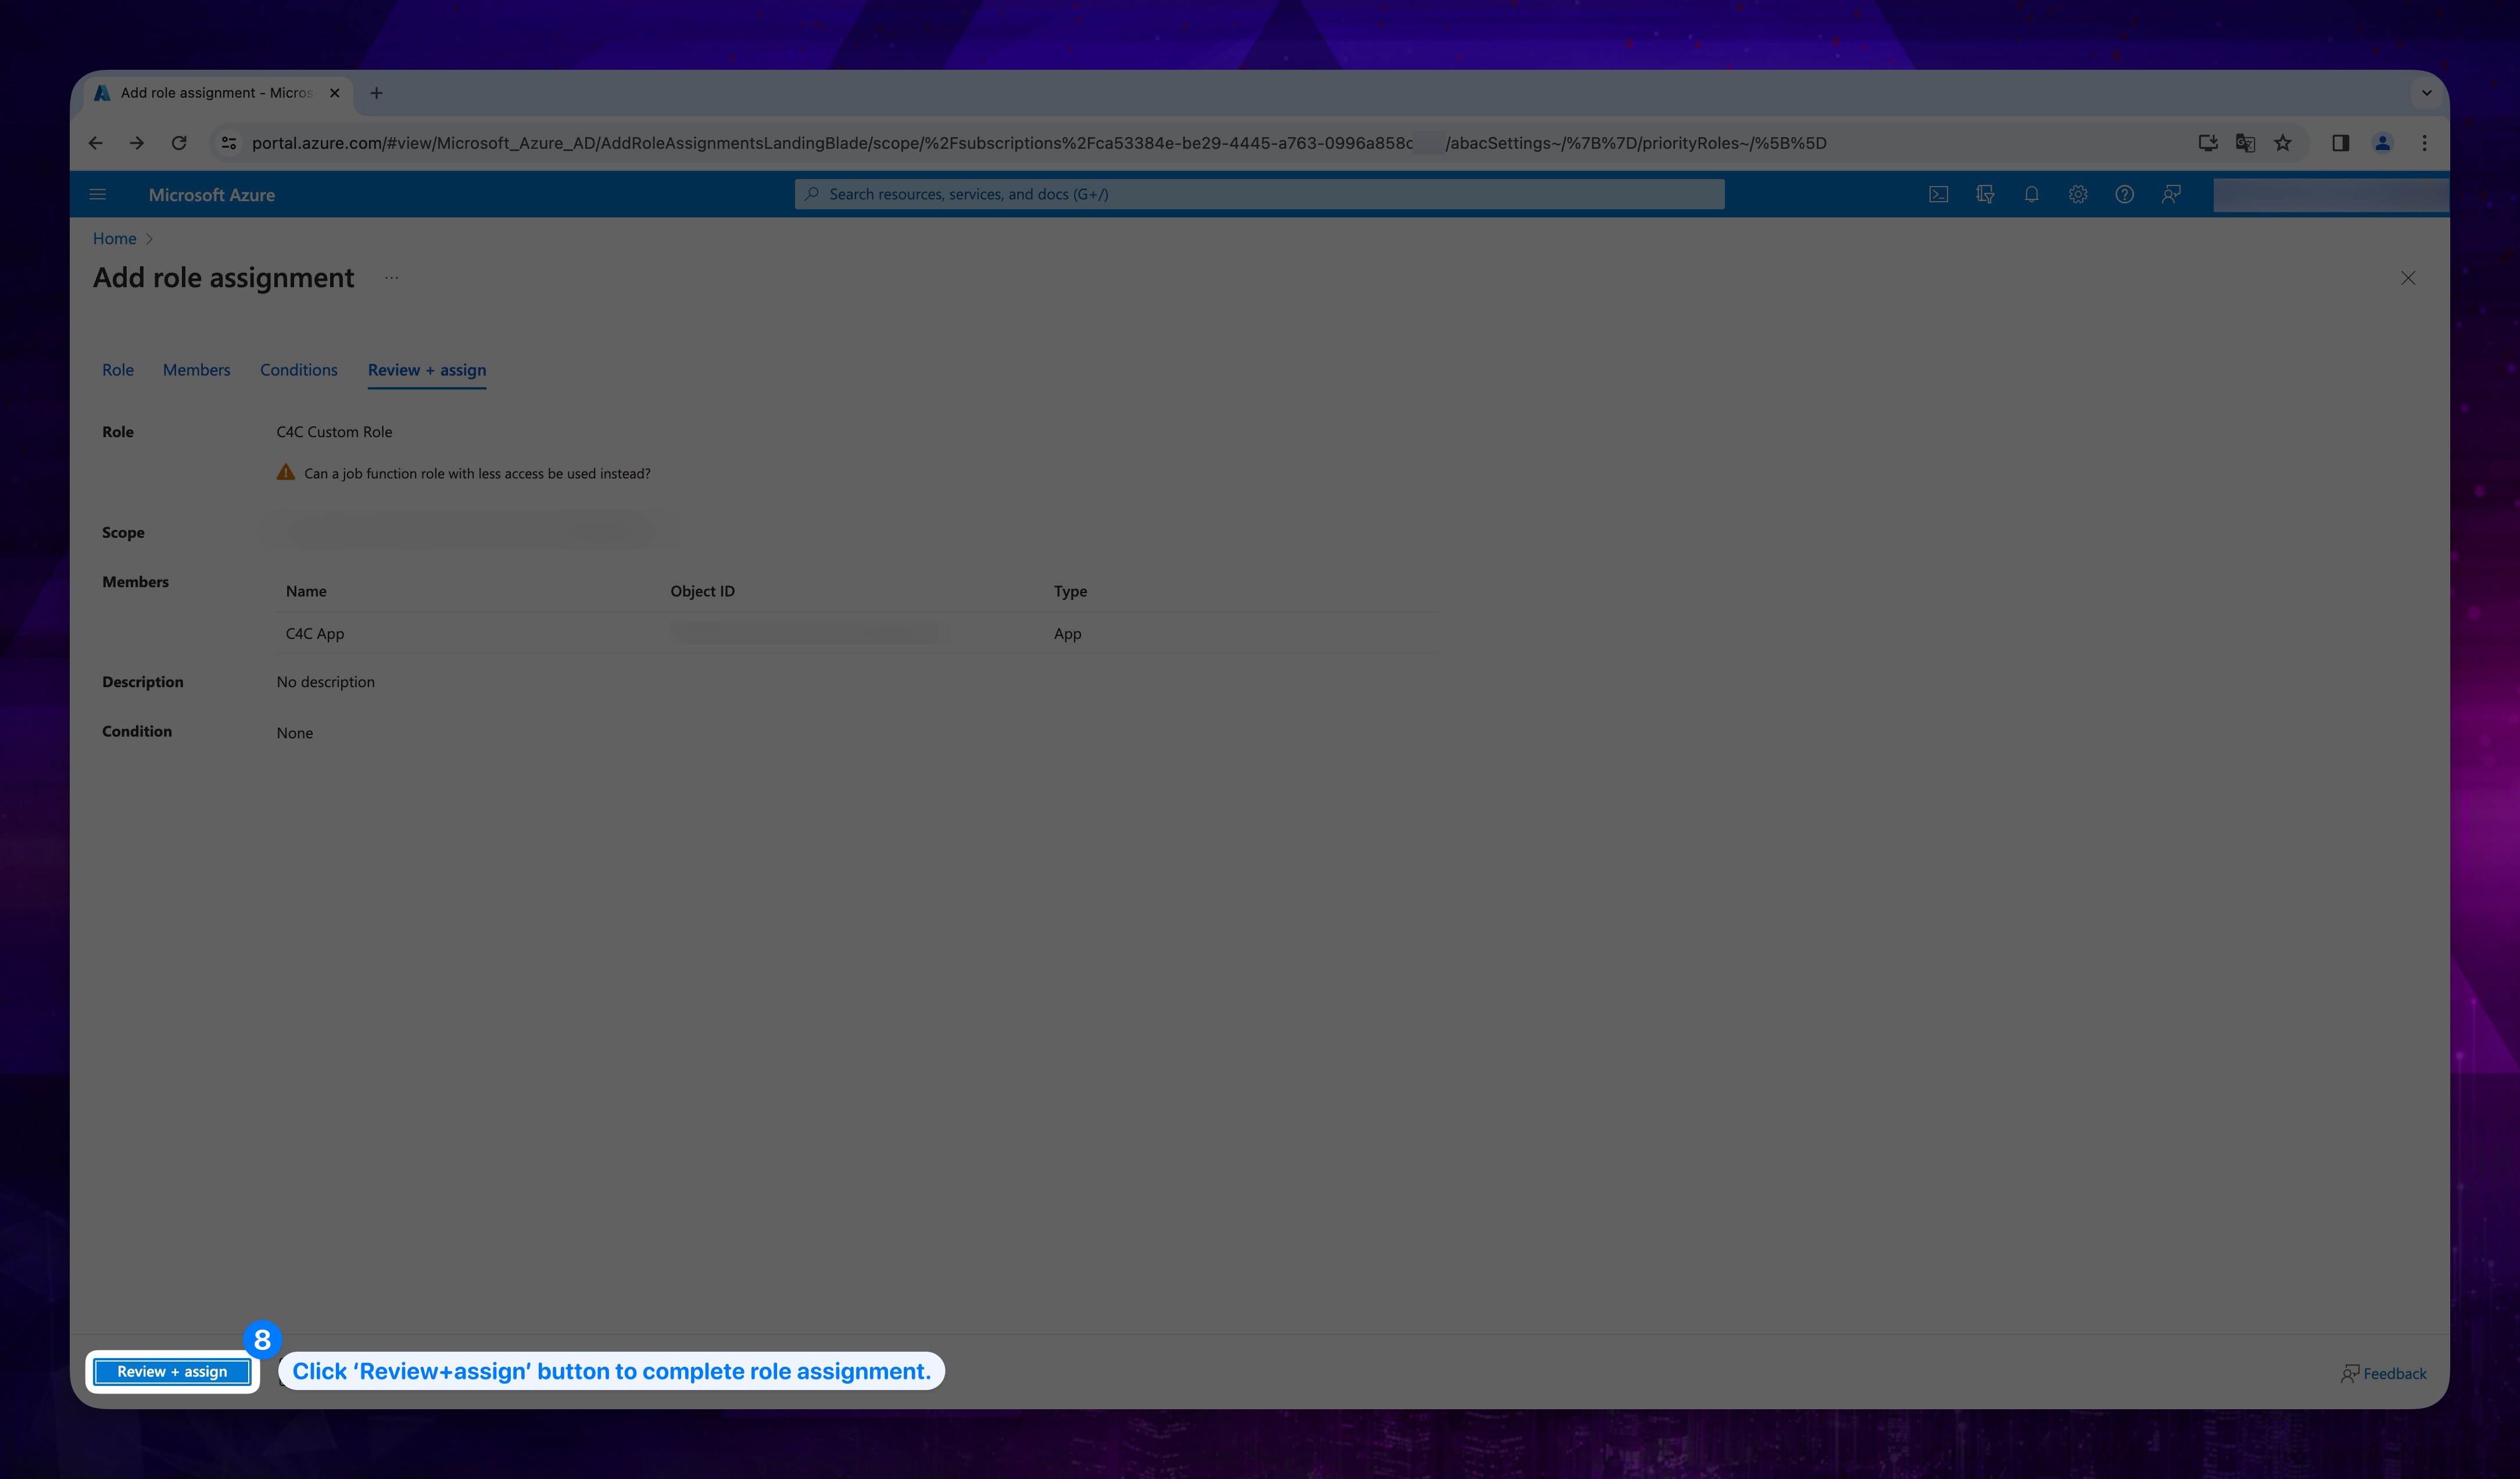
You must get an notification that says Added Role assignment.
You should also proceed these steps to assign Reader and Reader and Data Access roles too. But they not be listed under Priveleged administrator roles, please check Job function roles section too.
6. Administrative Role Assignment
-
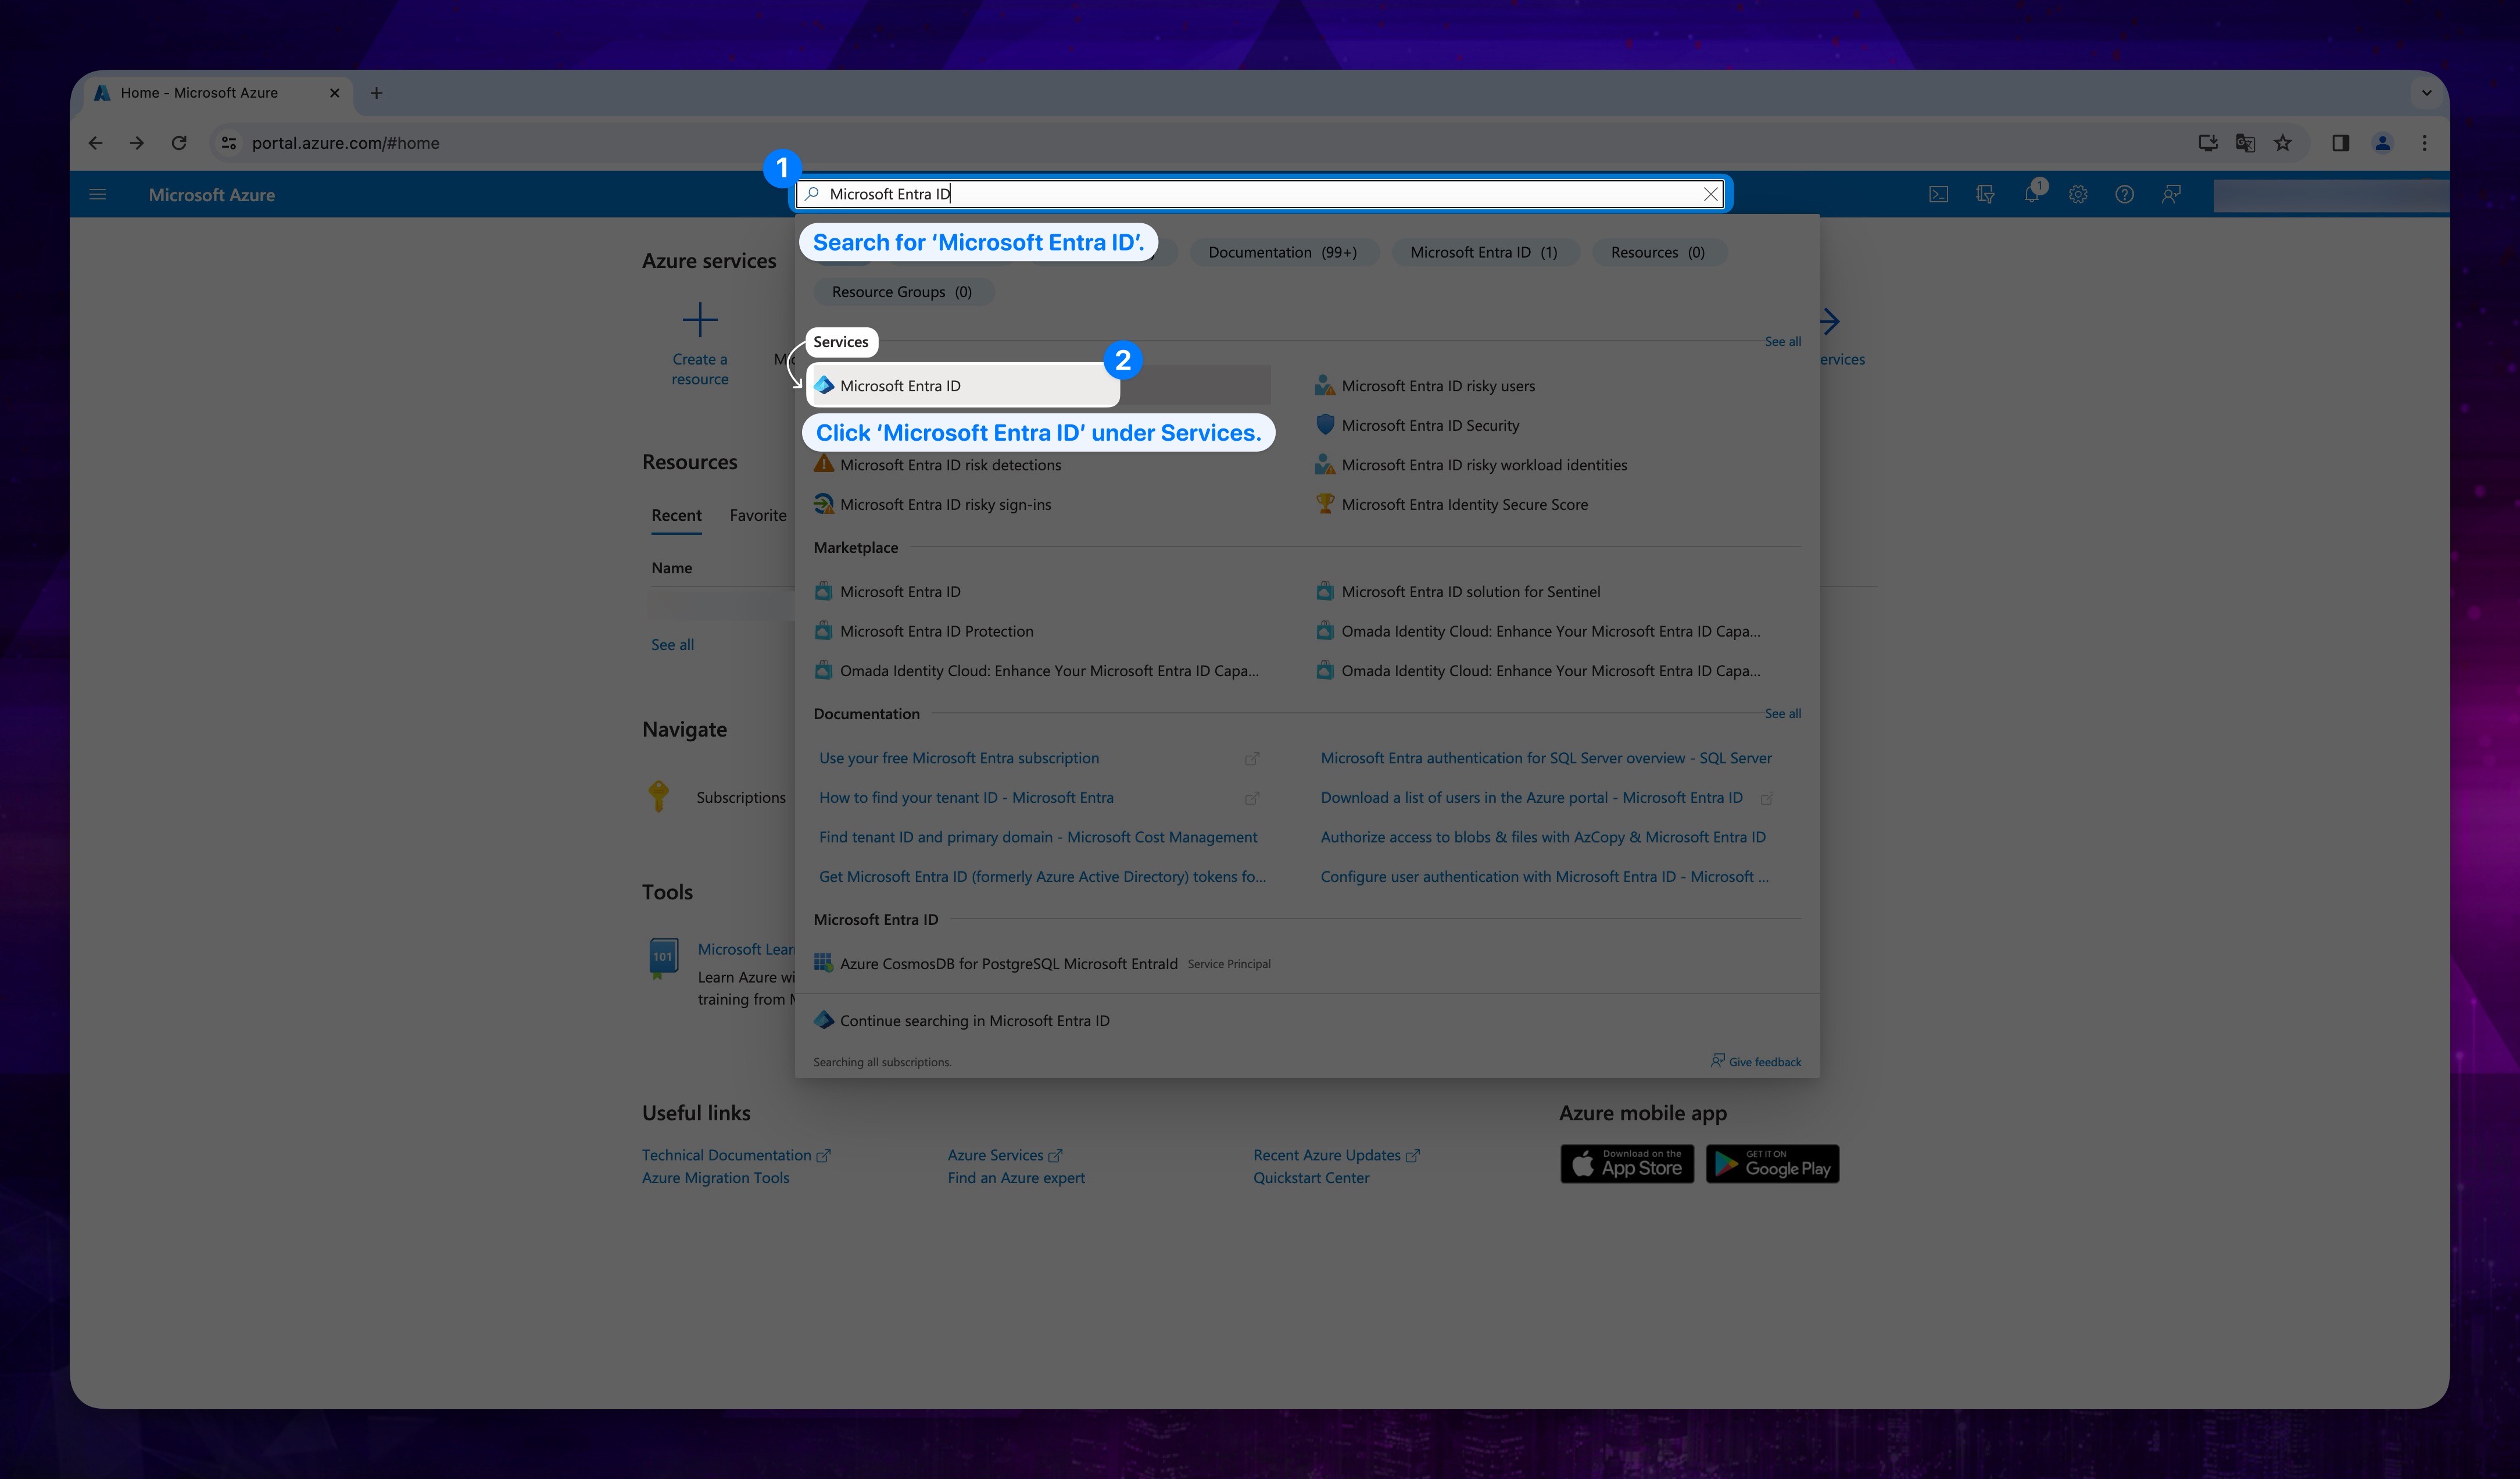
Click the search bar and seacrh for Microsoft Entra ID.
-
Under Services click Microsoft Entra ID.
Show the instructions with images
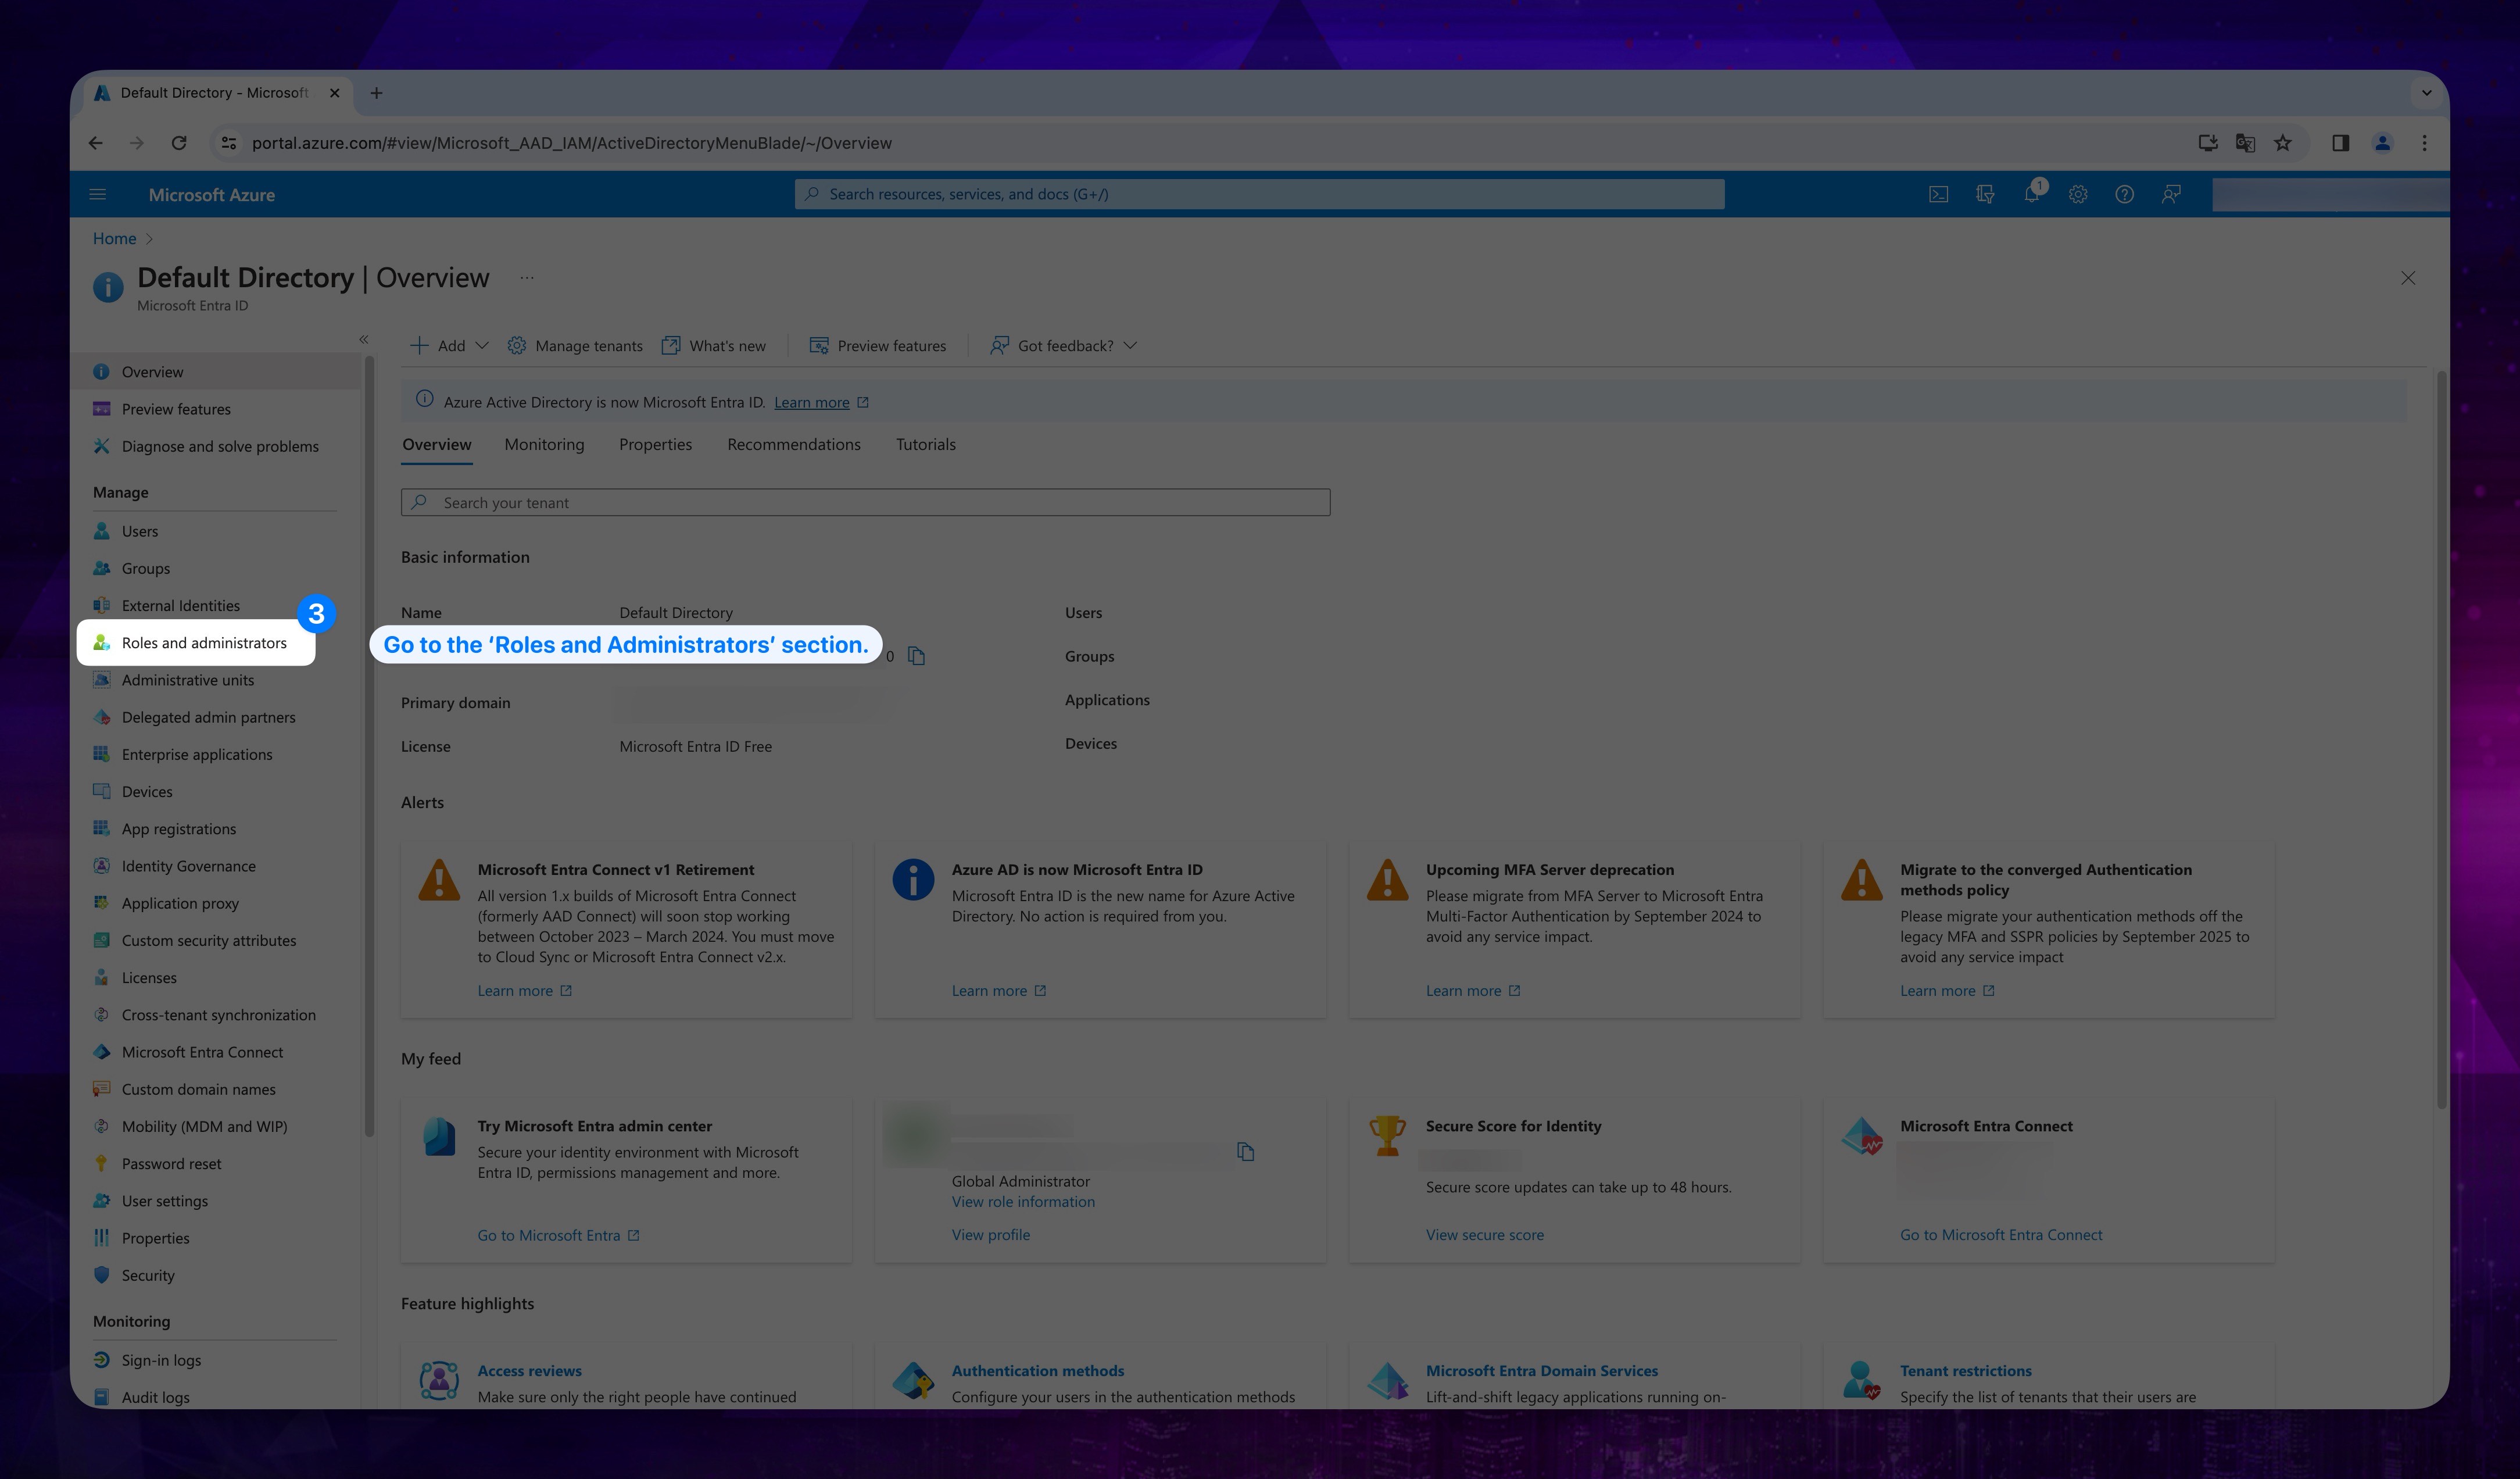
- On the opened page, click on Roles and administrators from the left menu.
Show the instructions with images
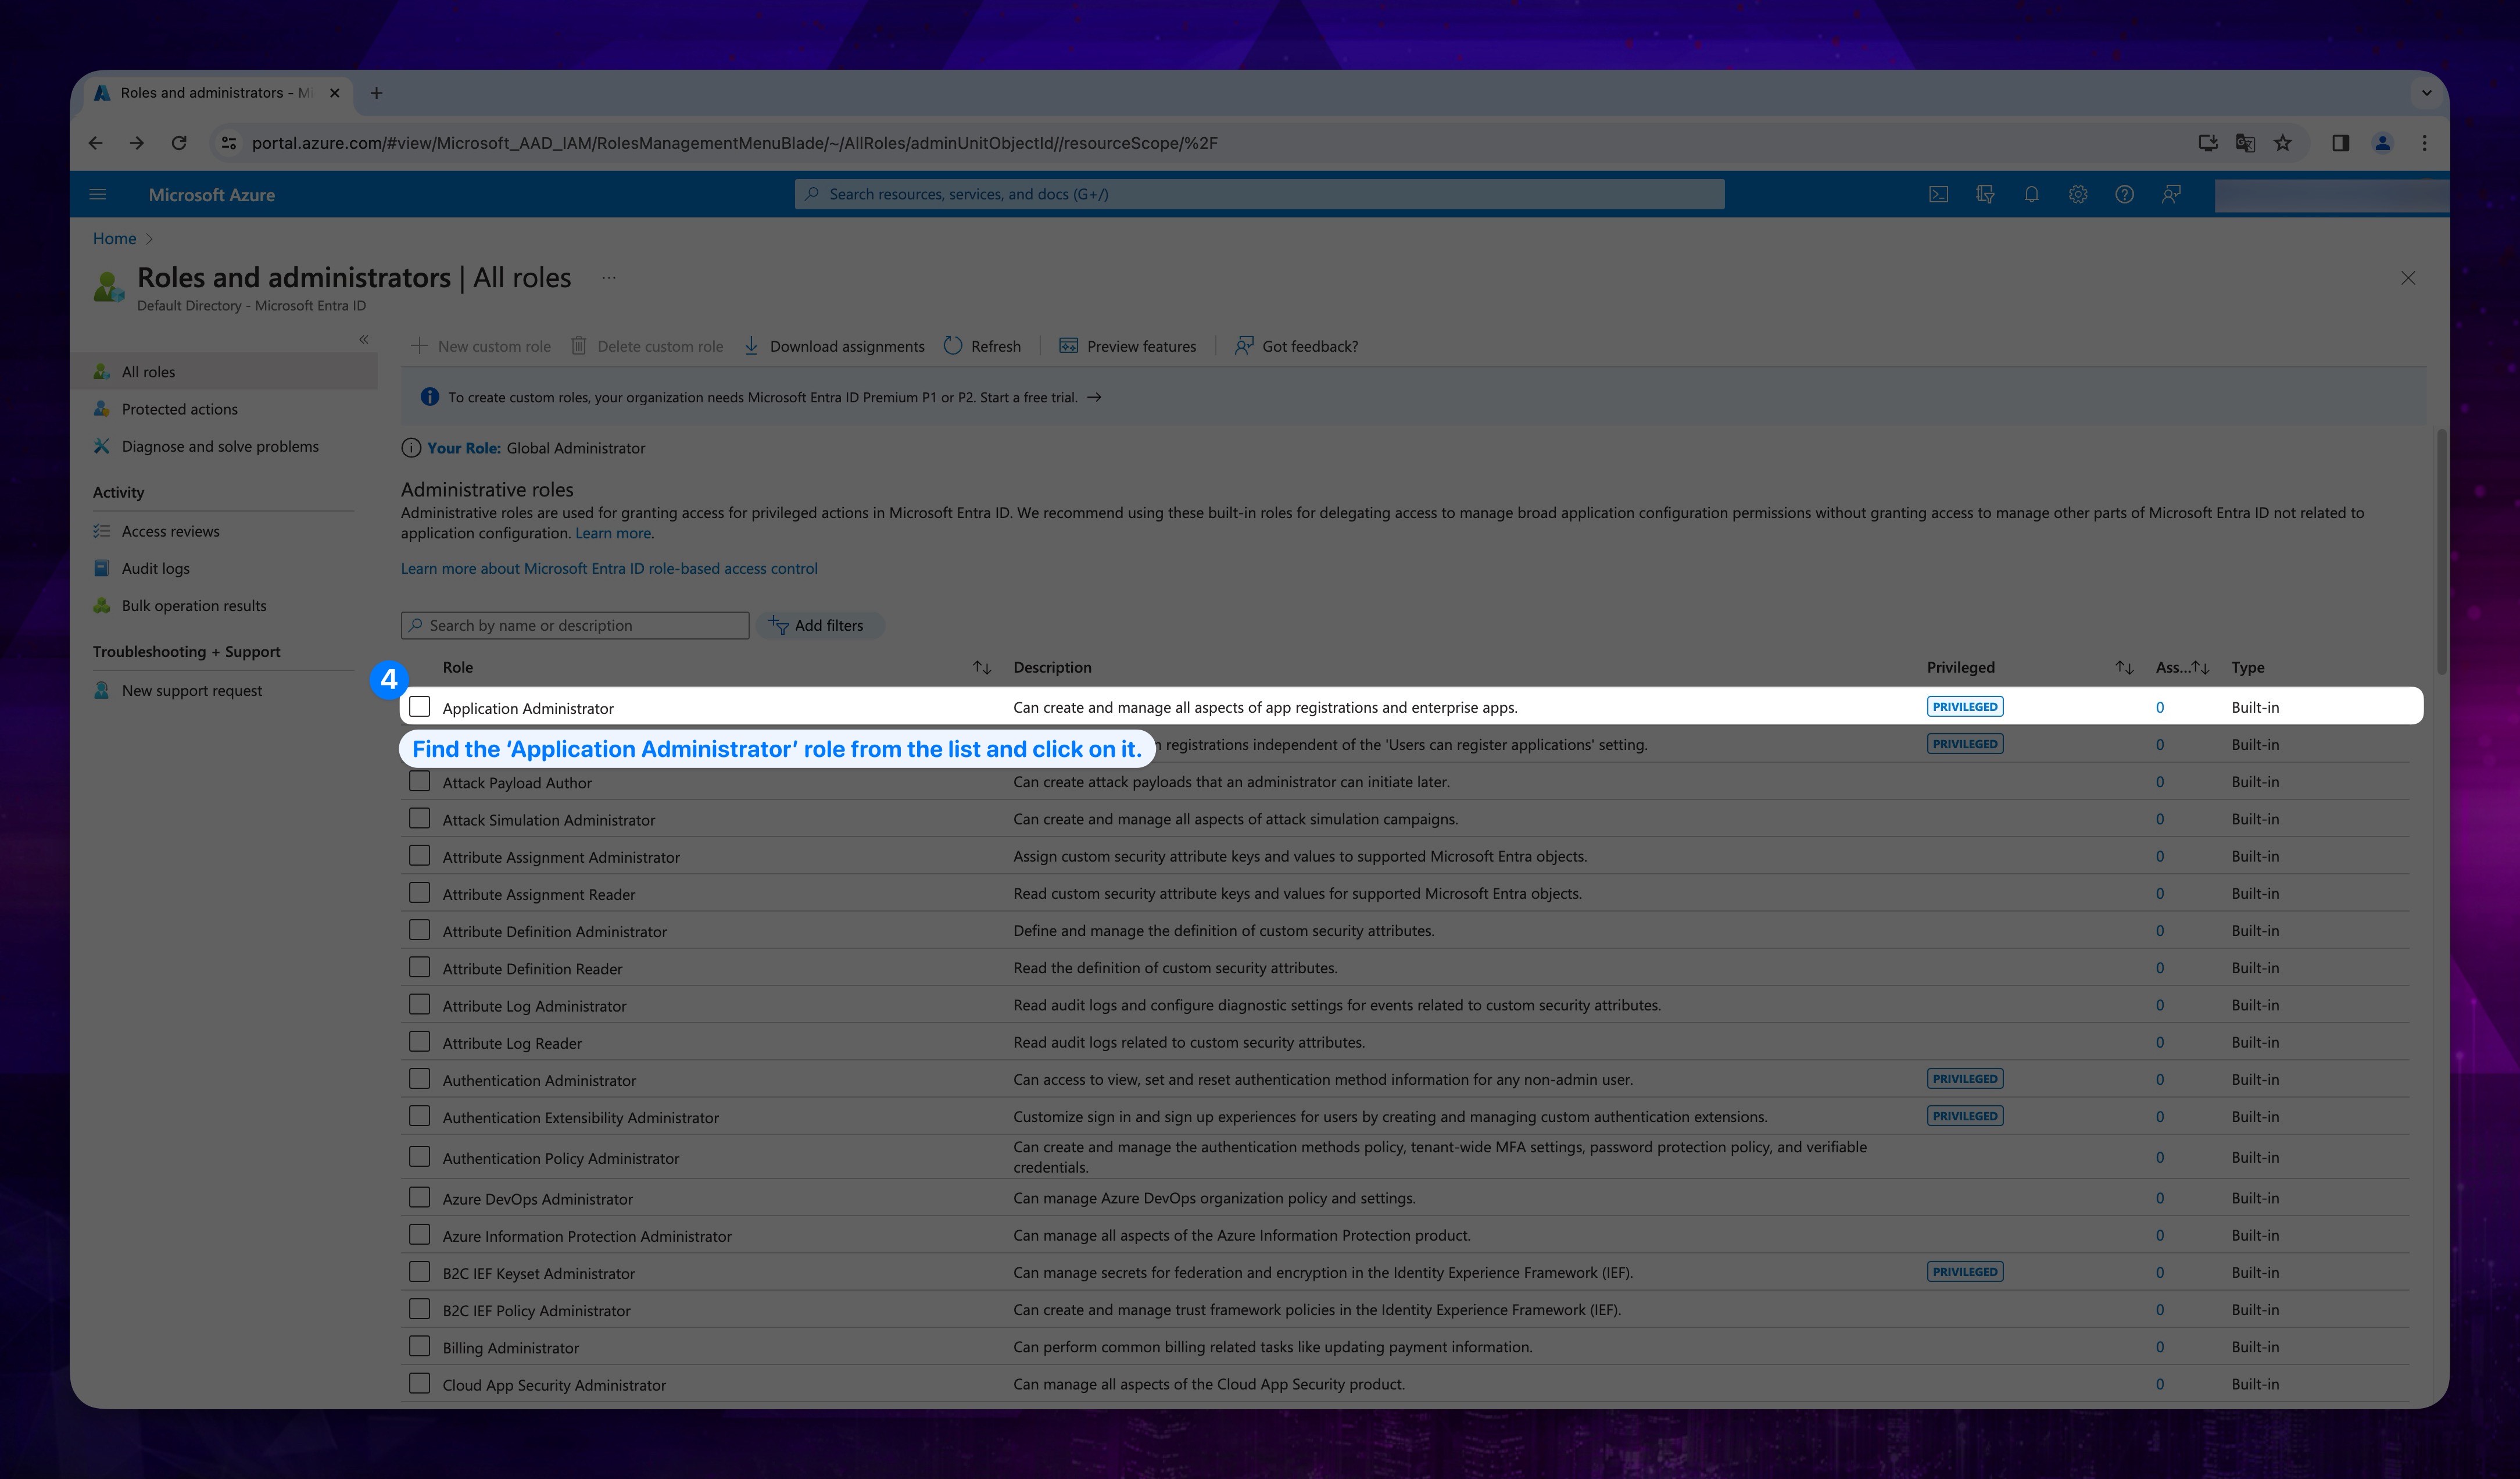
- After entering the Roles and Administrators section, locate Application Administrator role in the list in front of you and click on it.
Show the instructions with images
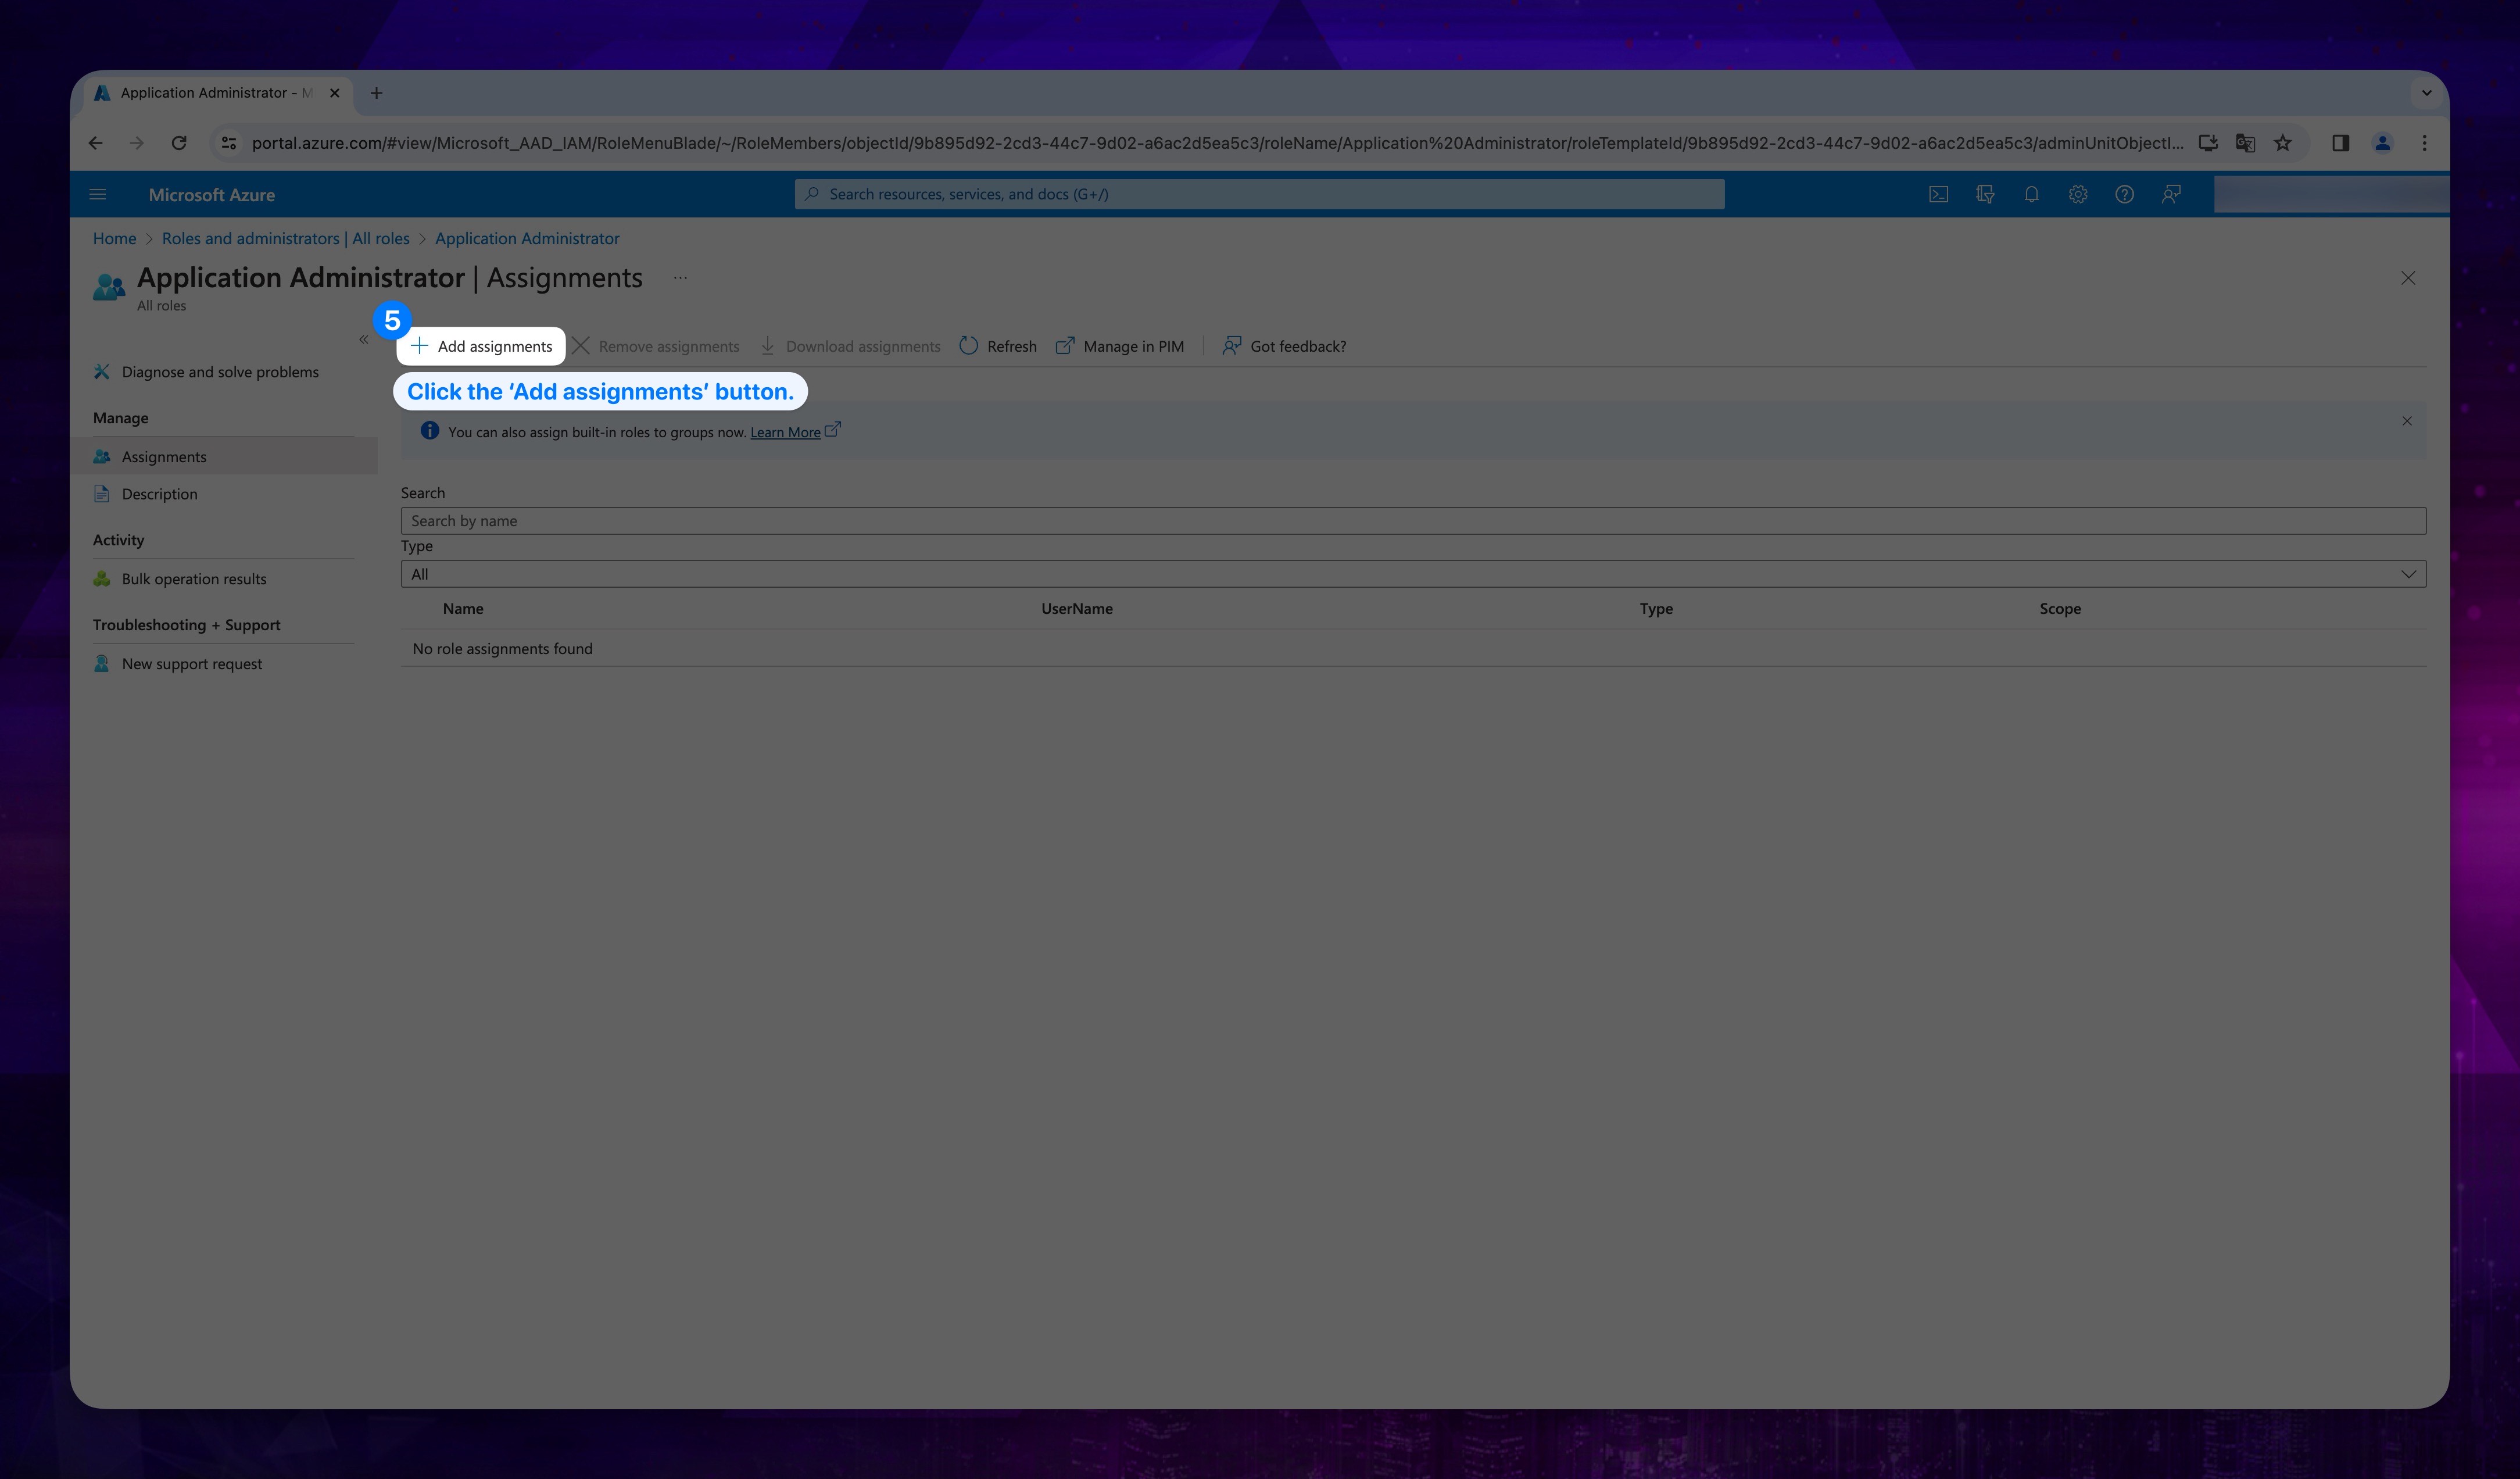
- Click on the Add Assignments button located at the top.
Show the instructions with images
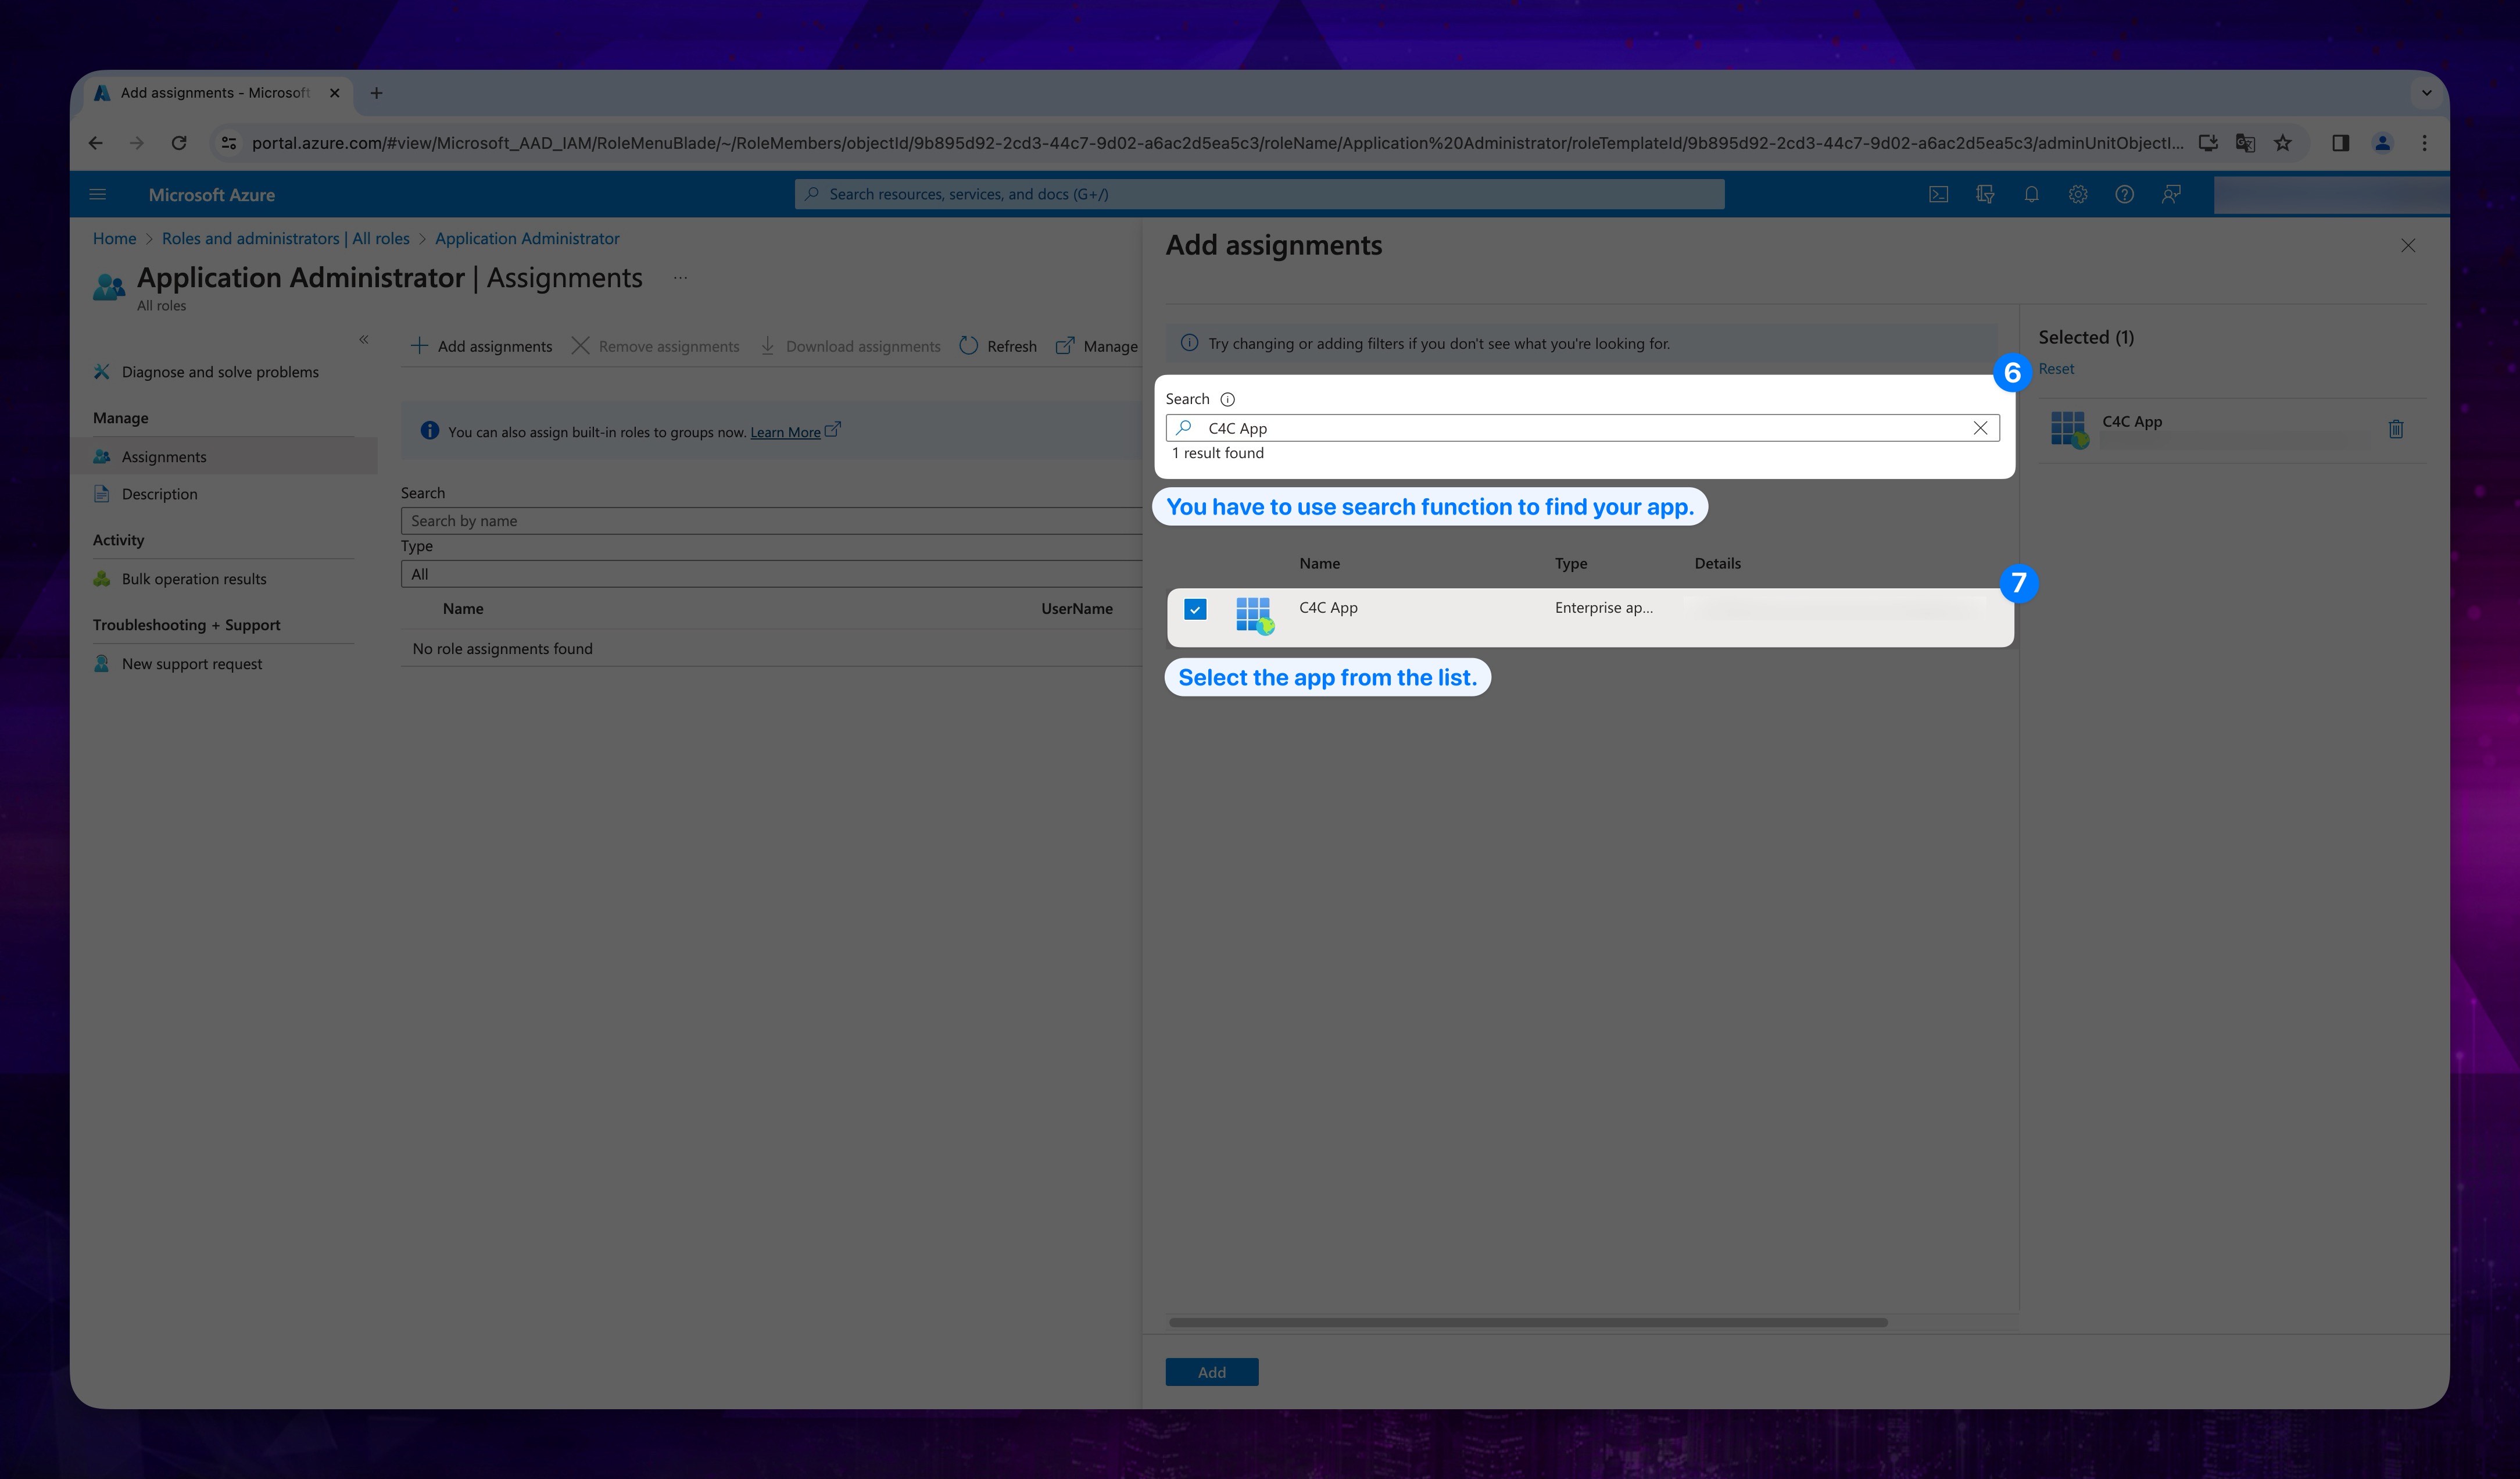
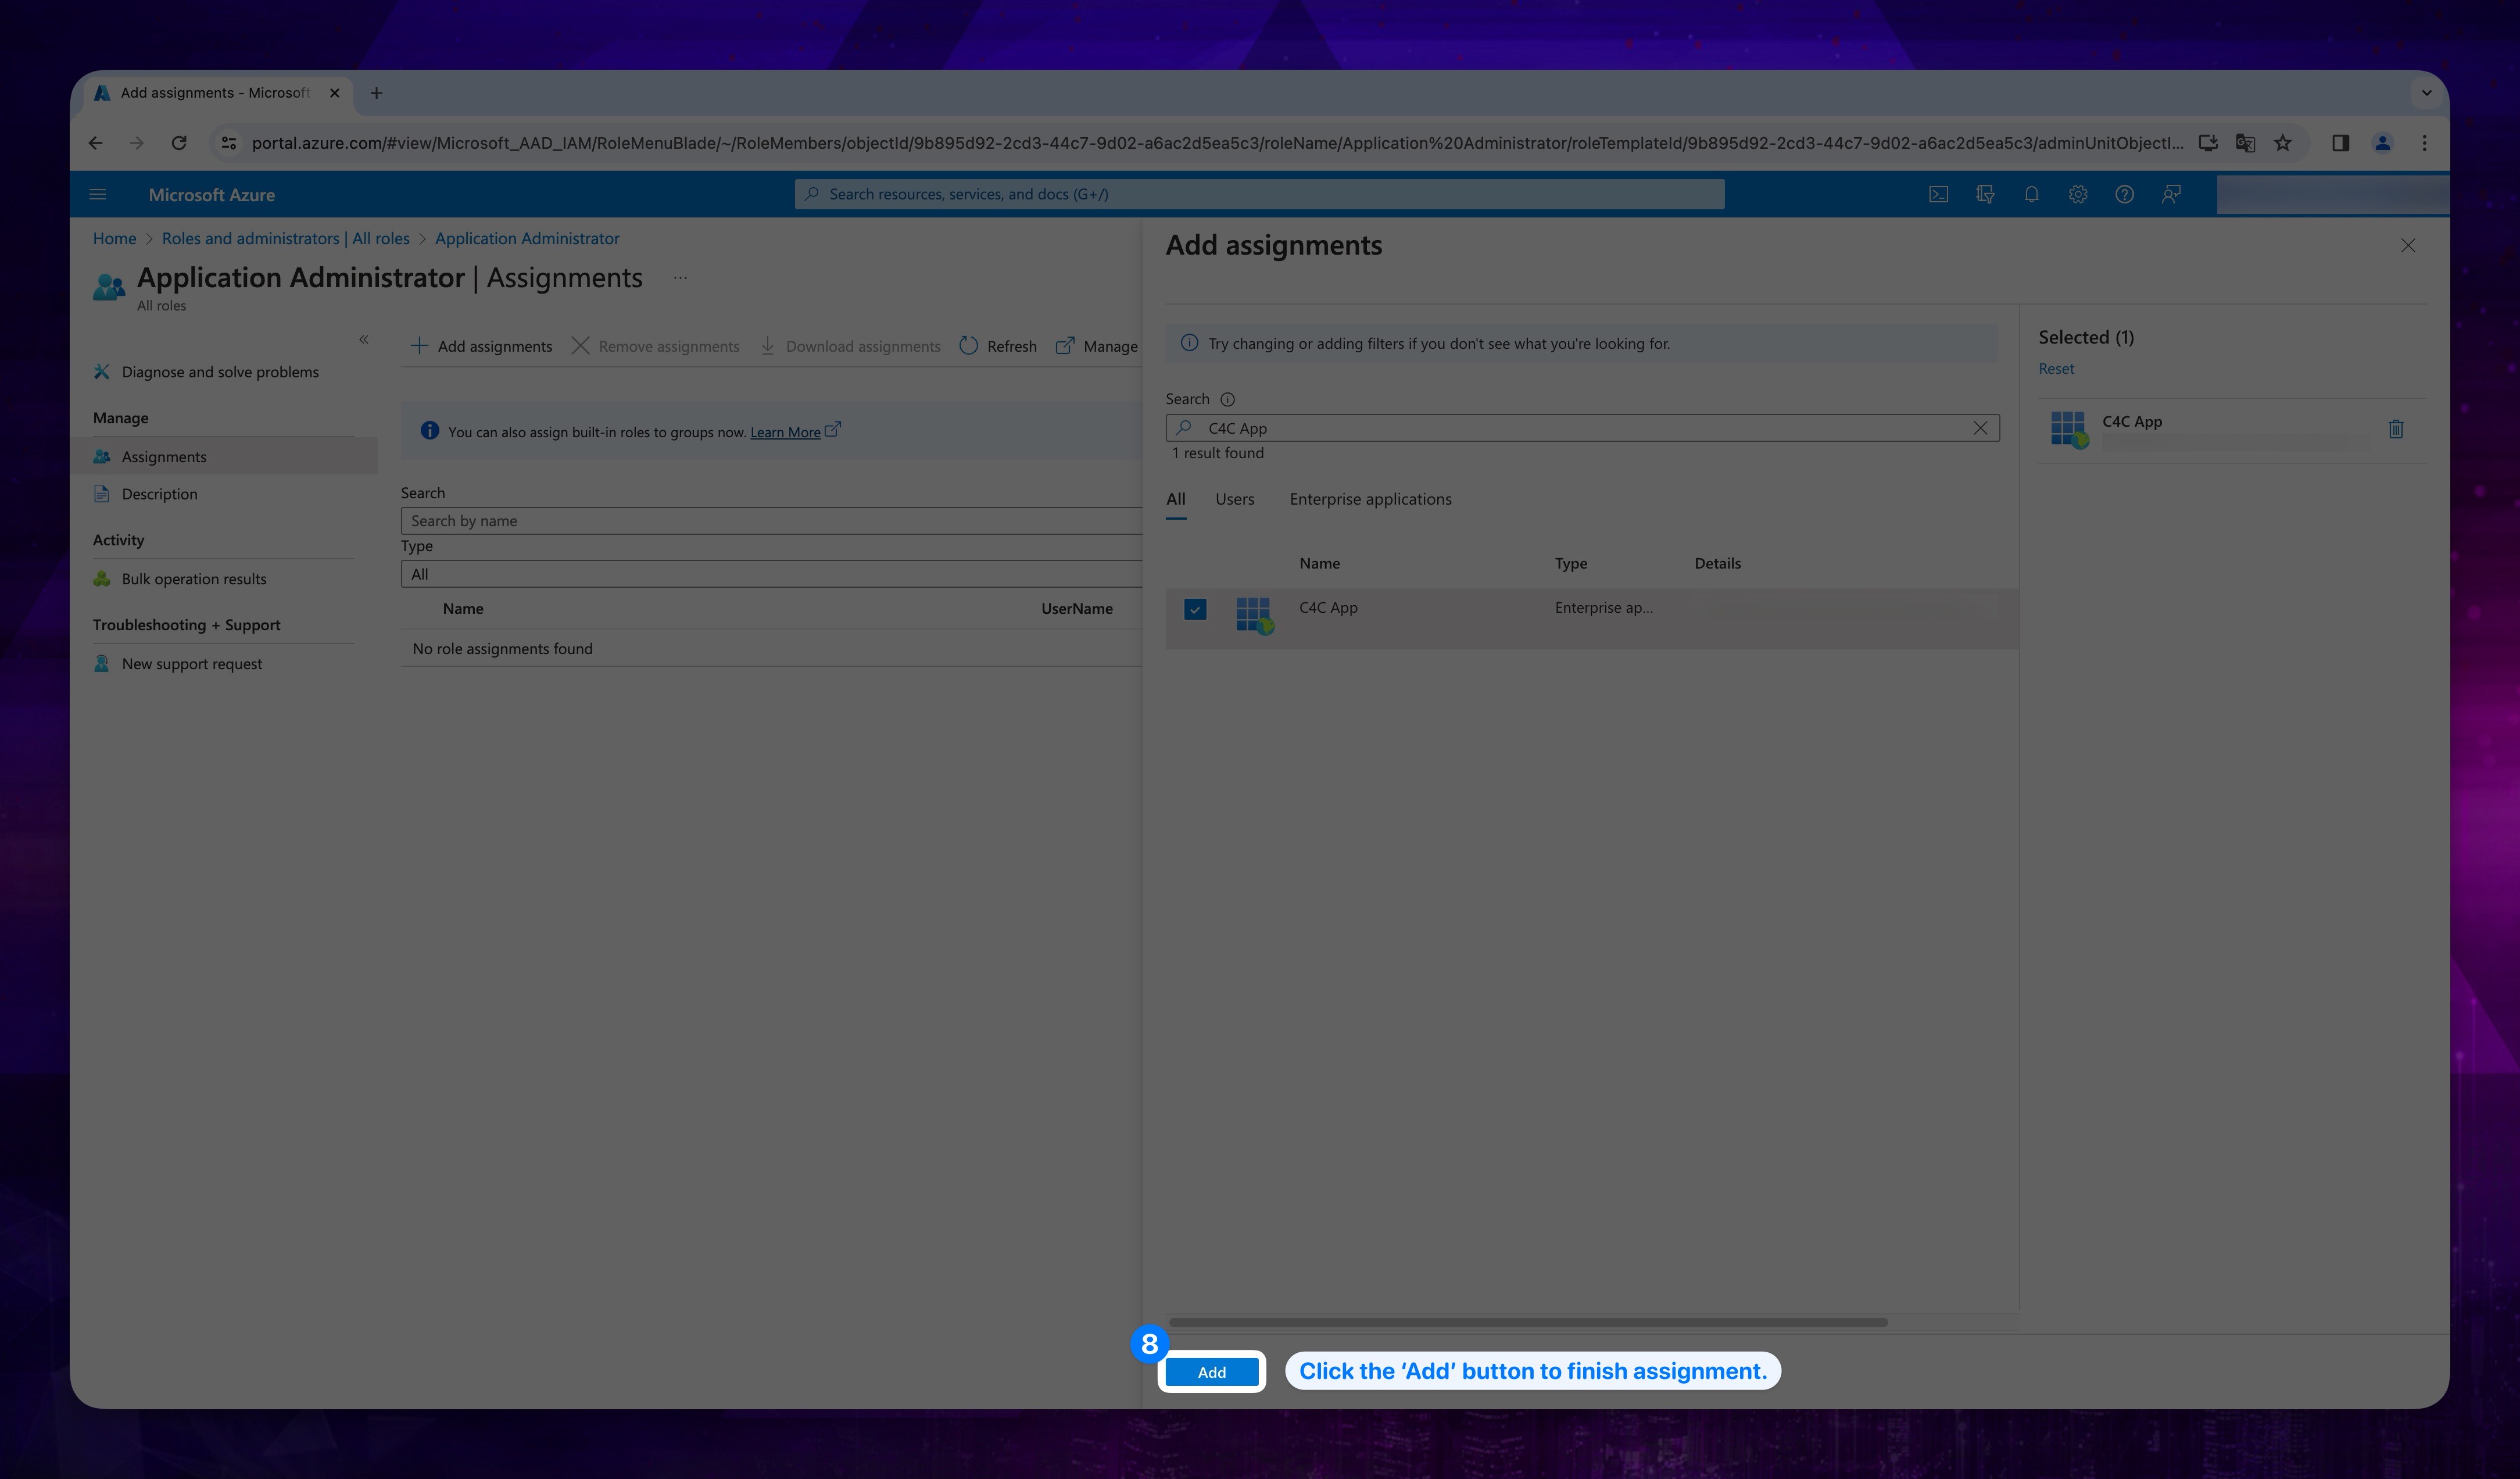
-
In the opened section, you need to find and select the application you previously registered. (The application we registered at App Registration step.)
CRITICAL STEPPlease search for the name of the application in the search bar for this process. It will not appear if you try to find it manually.
-
After finding your app, click on it and select it.
Show the instructions with images
- Finally, click on the Add button.
Show the instructions with images
7. Resource Provider Enabling
It's crucial to confirm that certain providers are registered within your subscription. Follow the steps below to verify and, if necessary, register the providers.
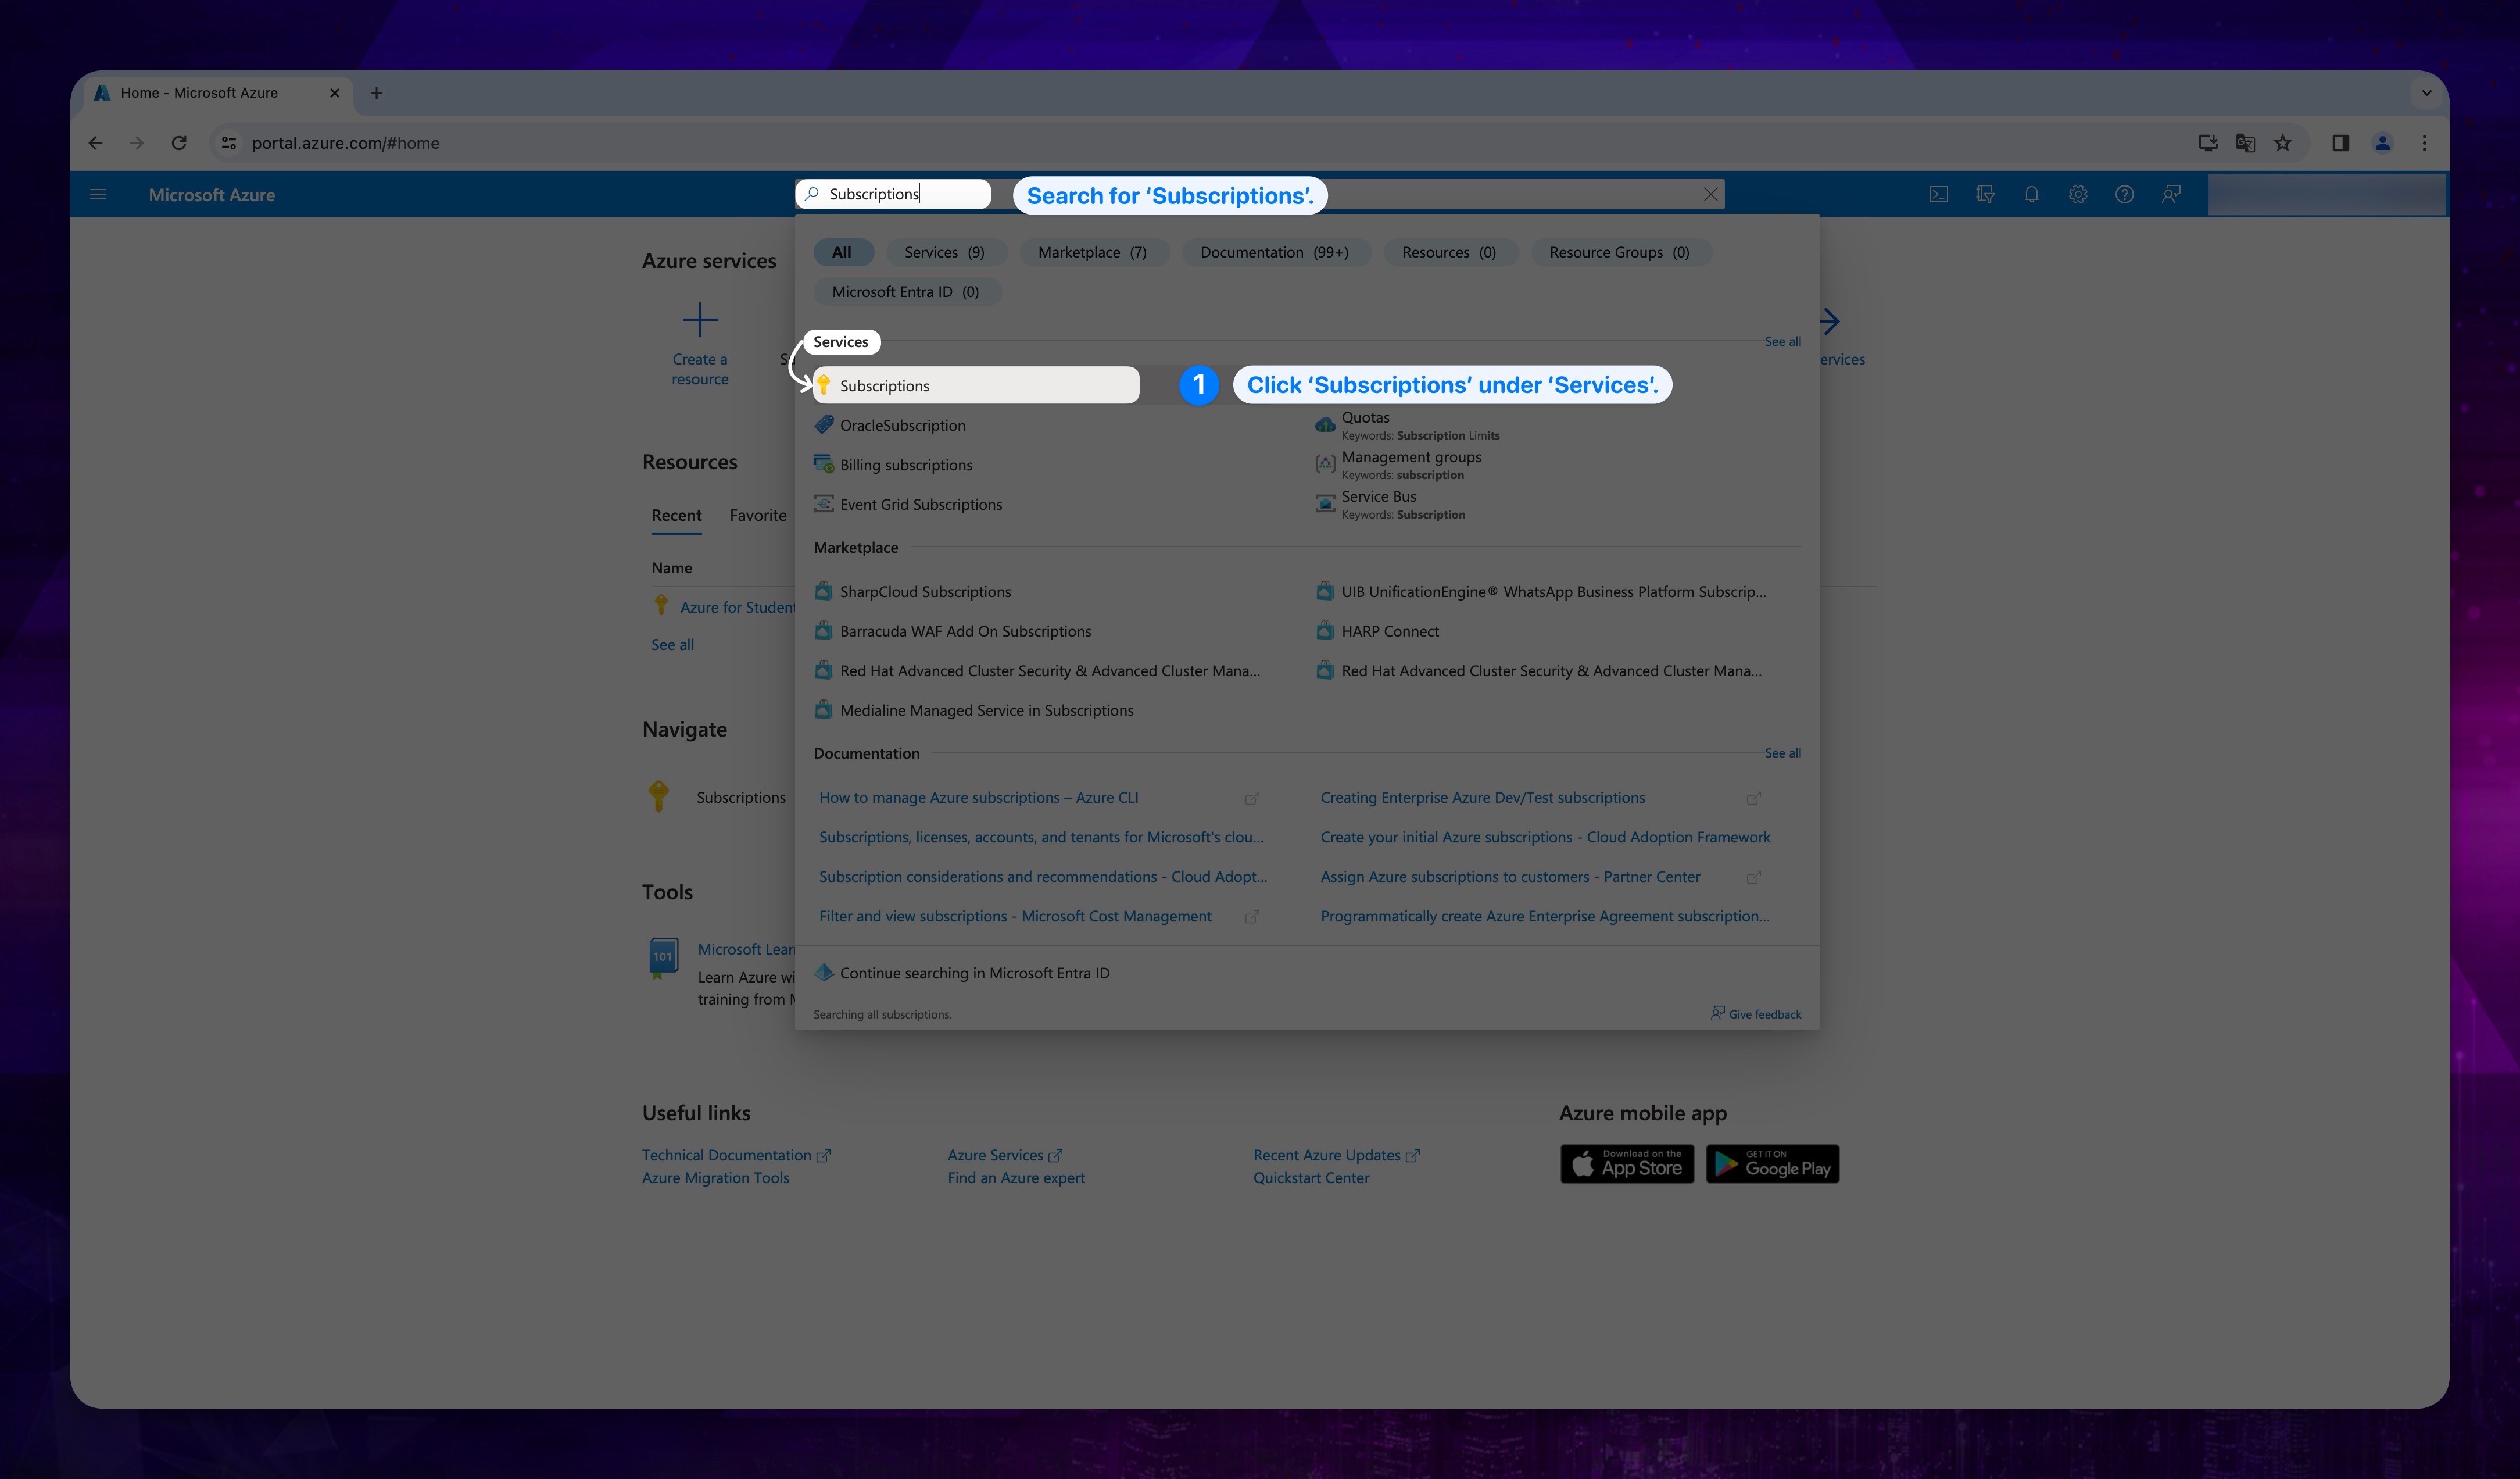
- Go to the search bar and look for Subscriptions, then choose Subscriptions under Services.
Show the instructions with images
-
Click on the subscription you selected when obtaining your credentials.
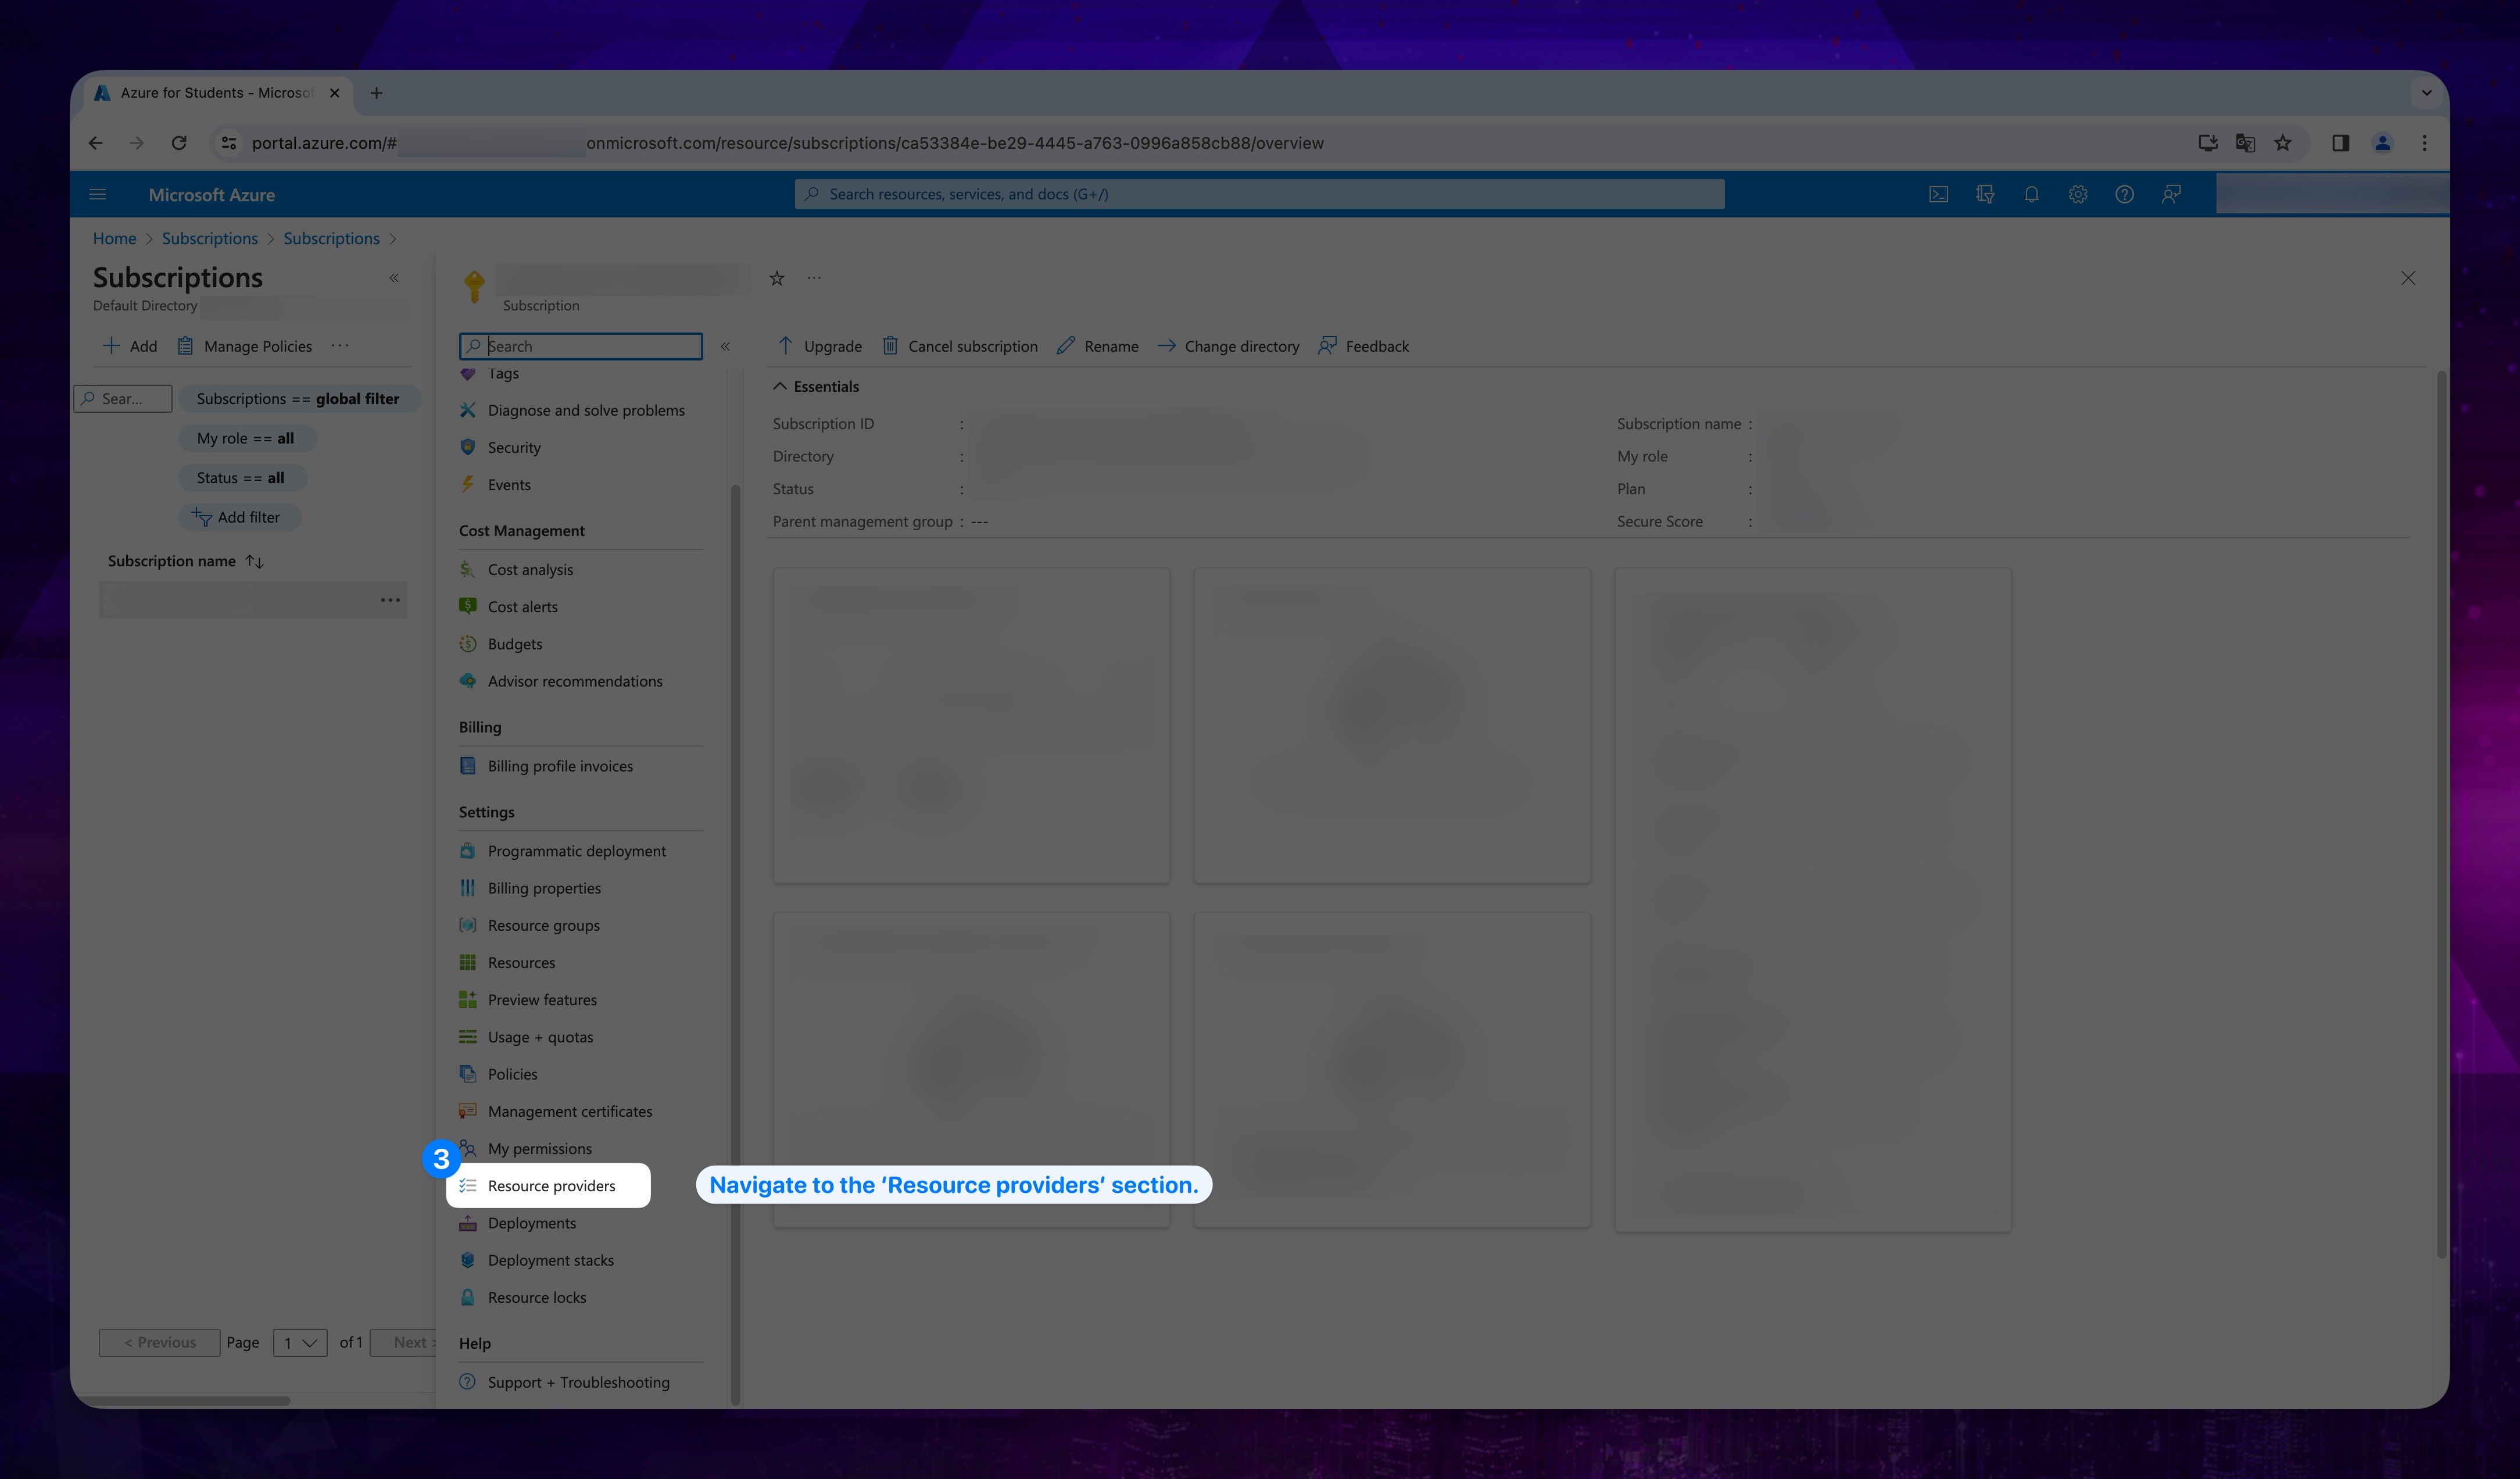
-
Open the Resource providers section from the side menu.
Show the instructions with images
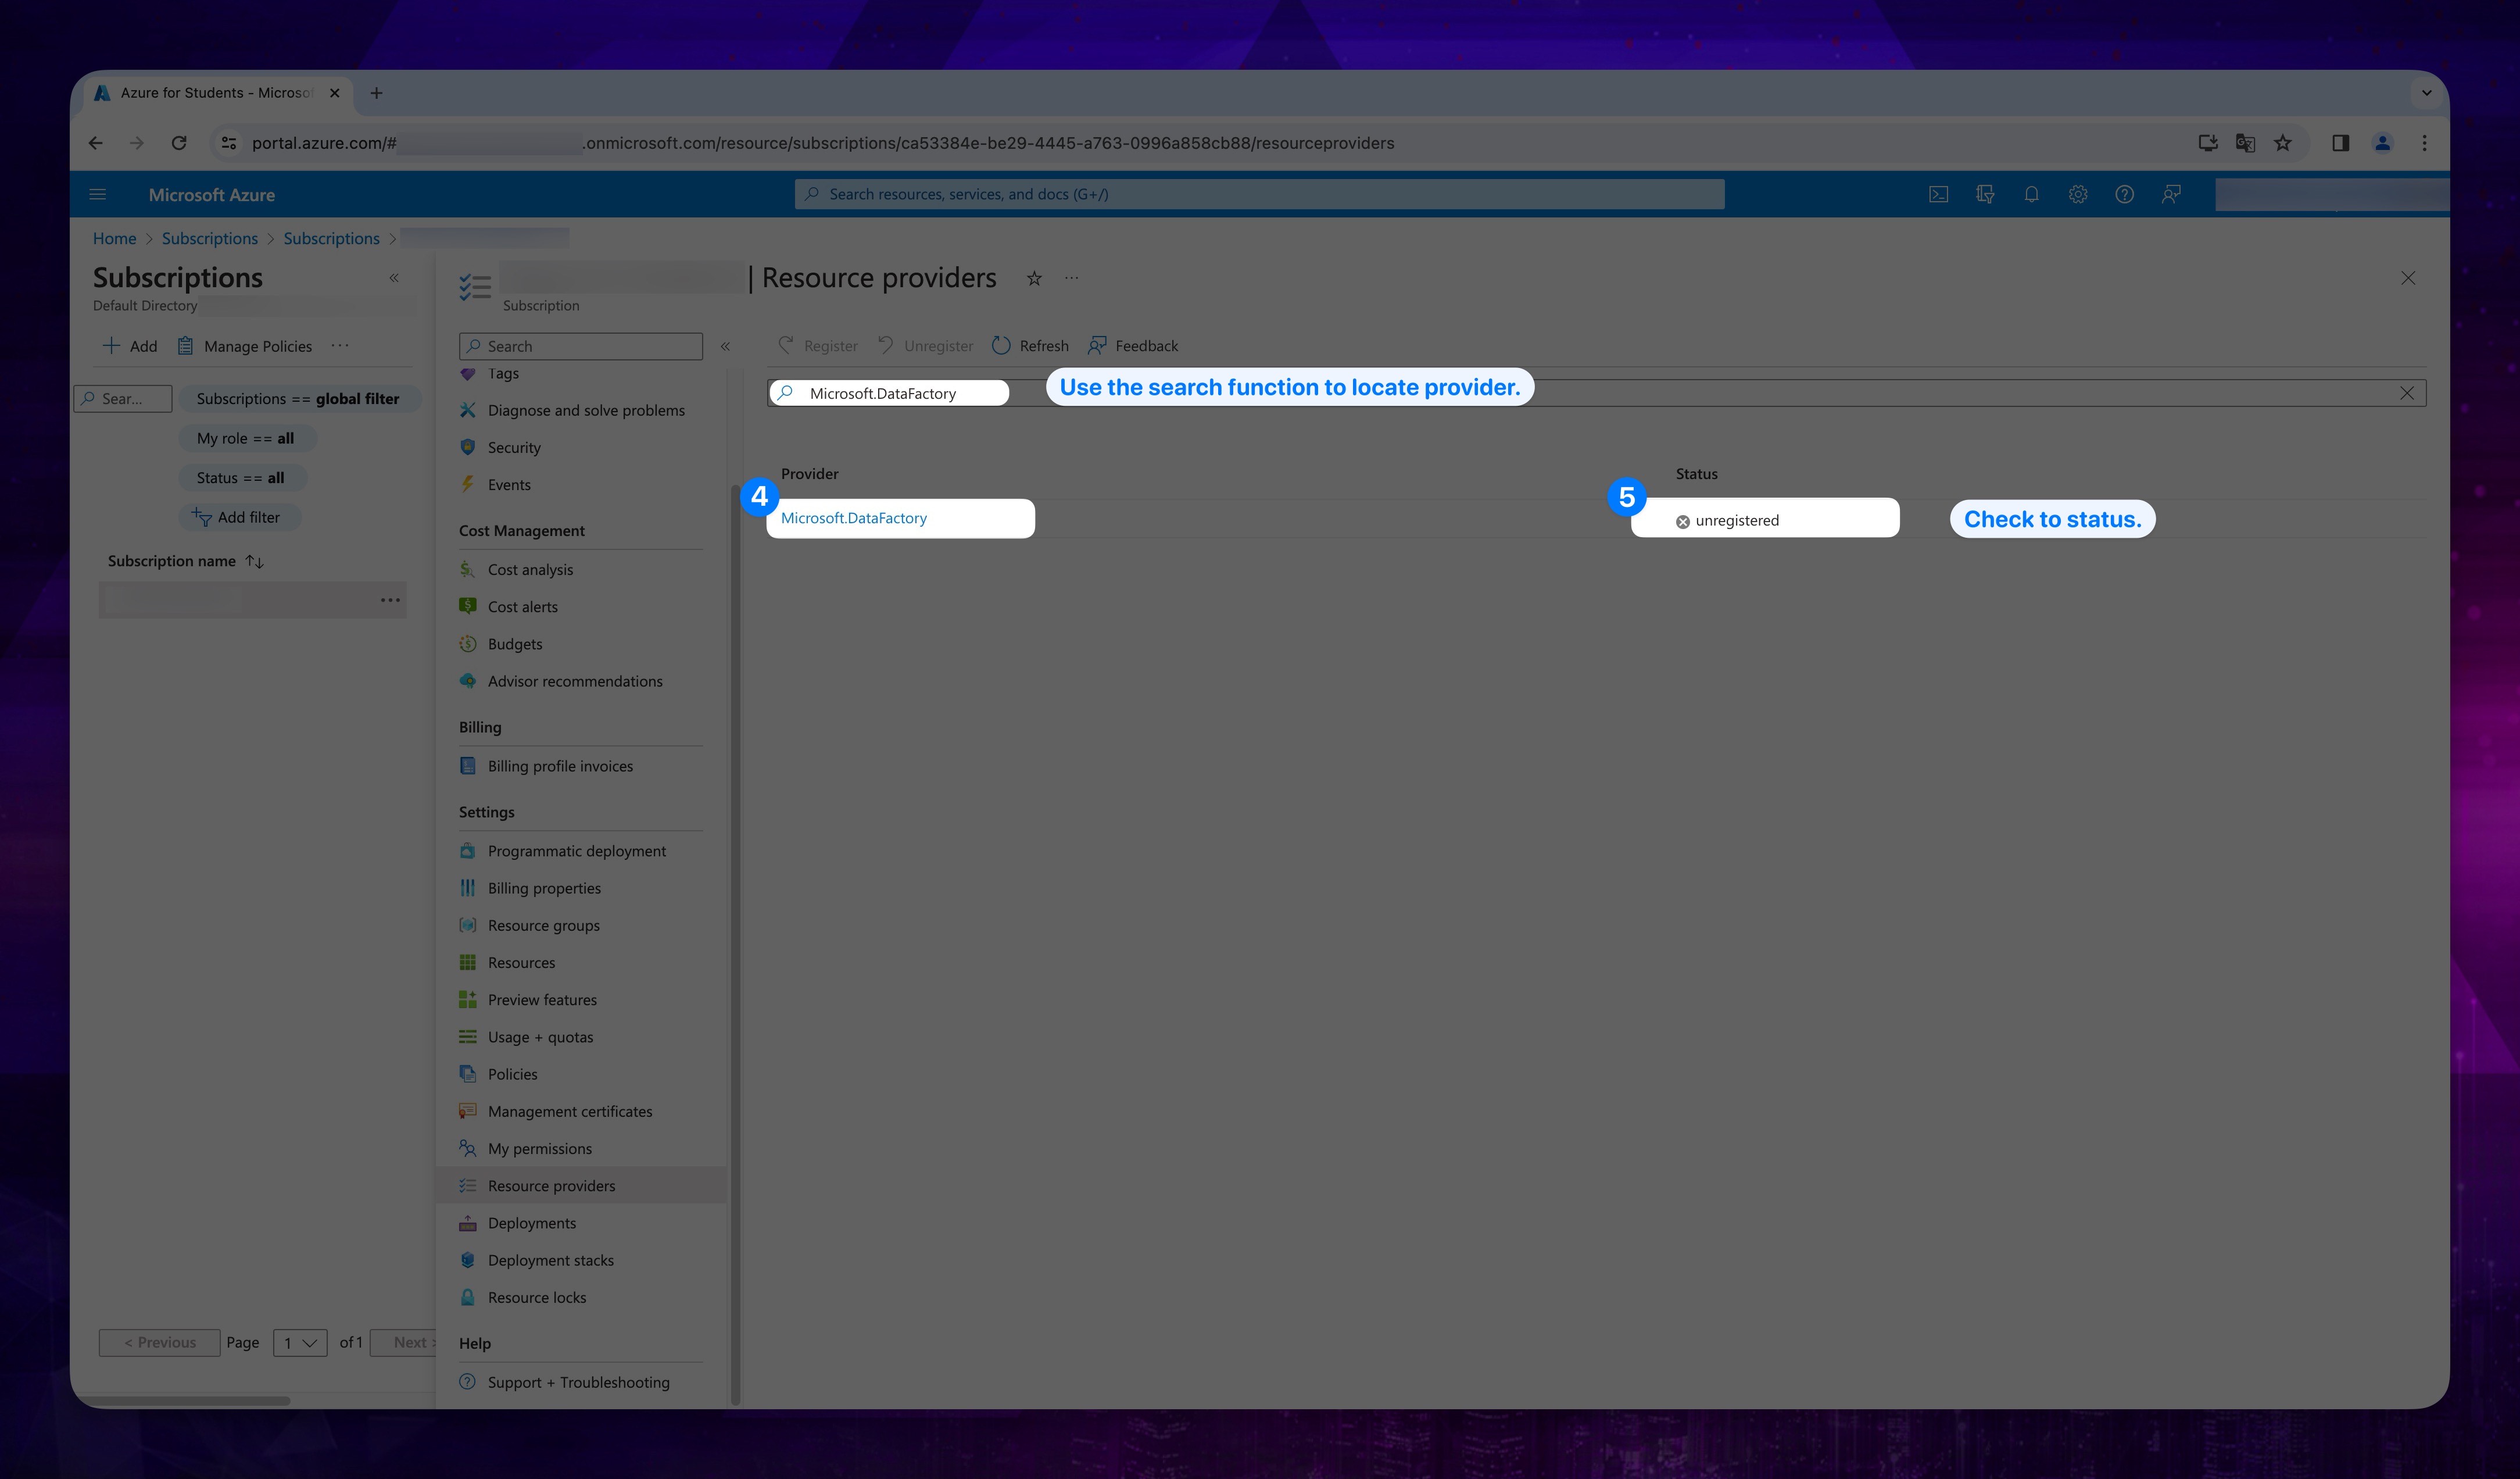
-
In the Resource providers menu, you can use the search bar or scroll down to locate the
- Microsoft.DataFactory
- Microsoft.SignalRService
- Microsoft.AppConfiguration providers.
-
After finding the relevant providers, check the status tab to verify whether the provider is registered for the subscription.
Show the instructions with images
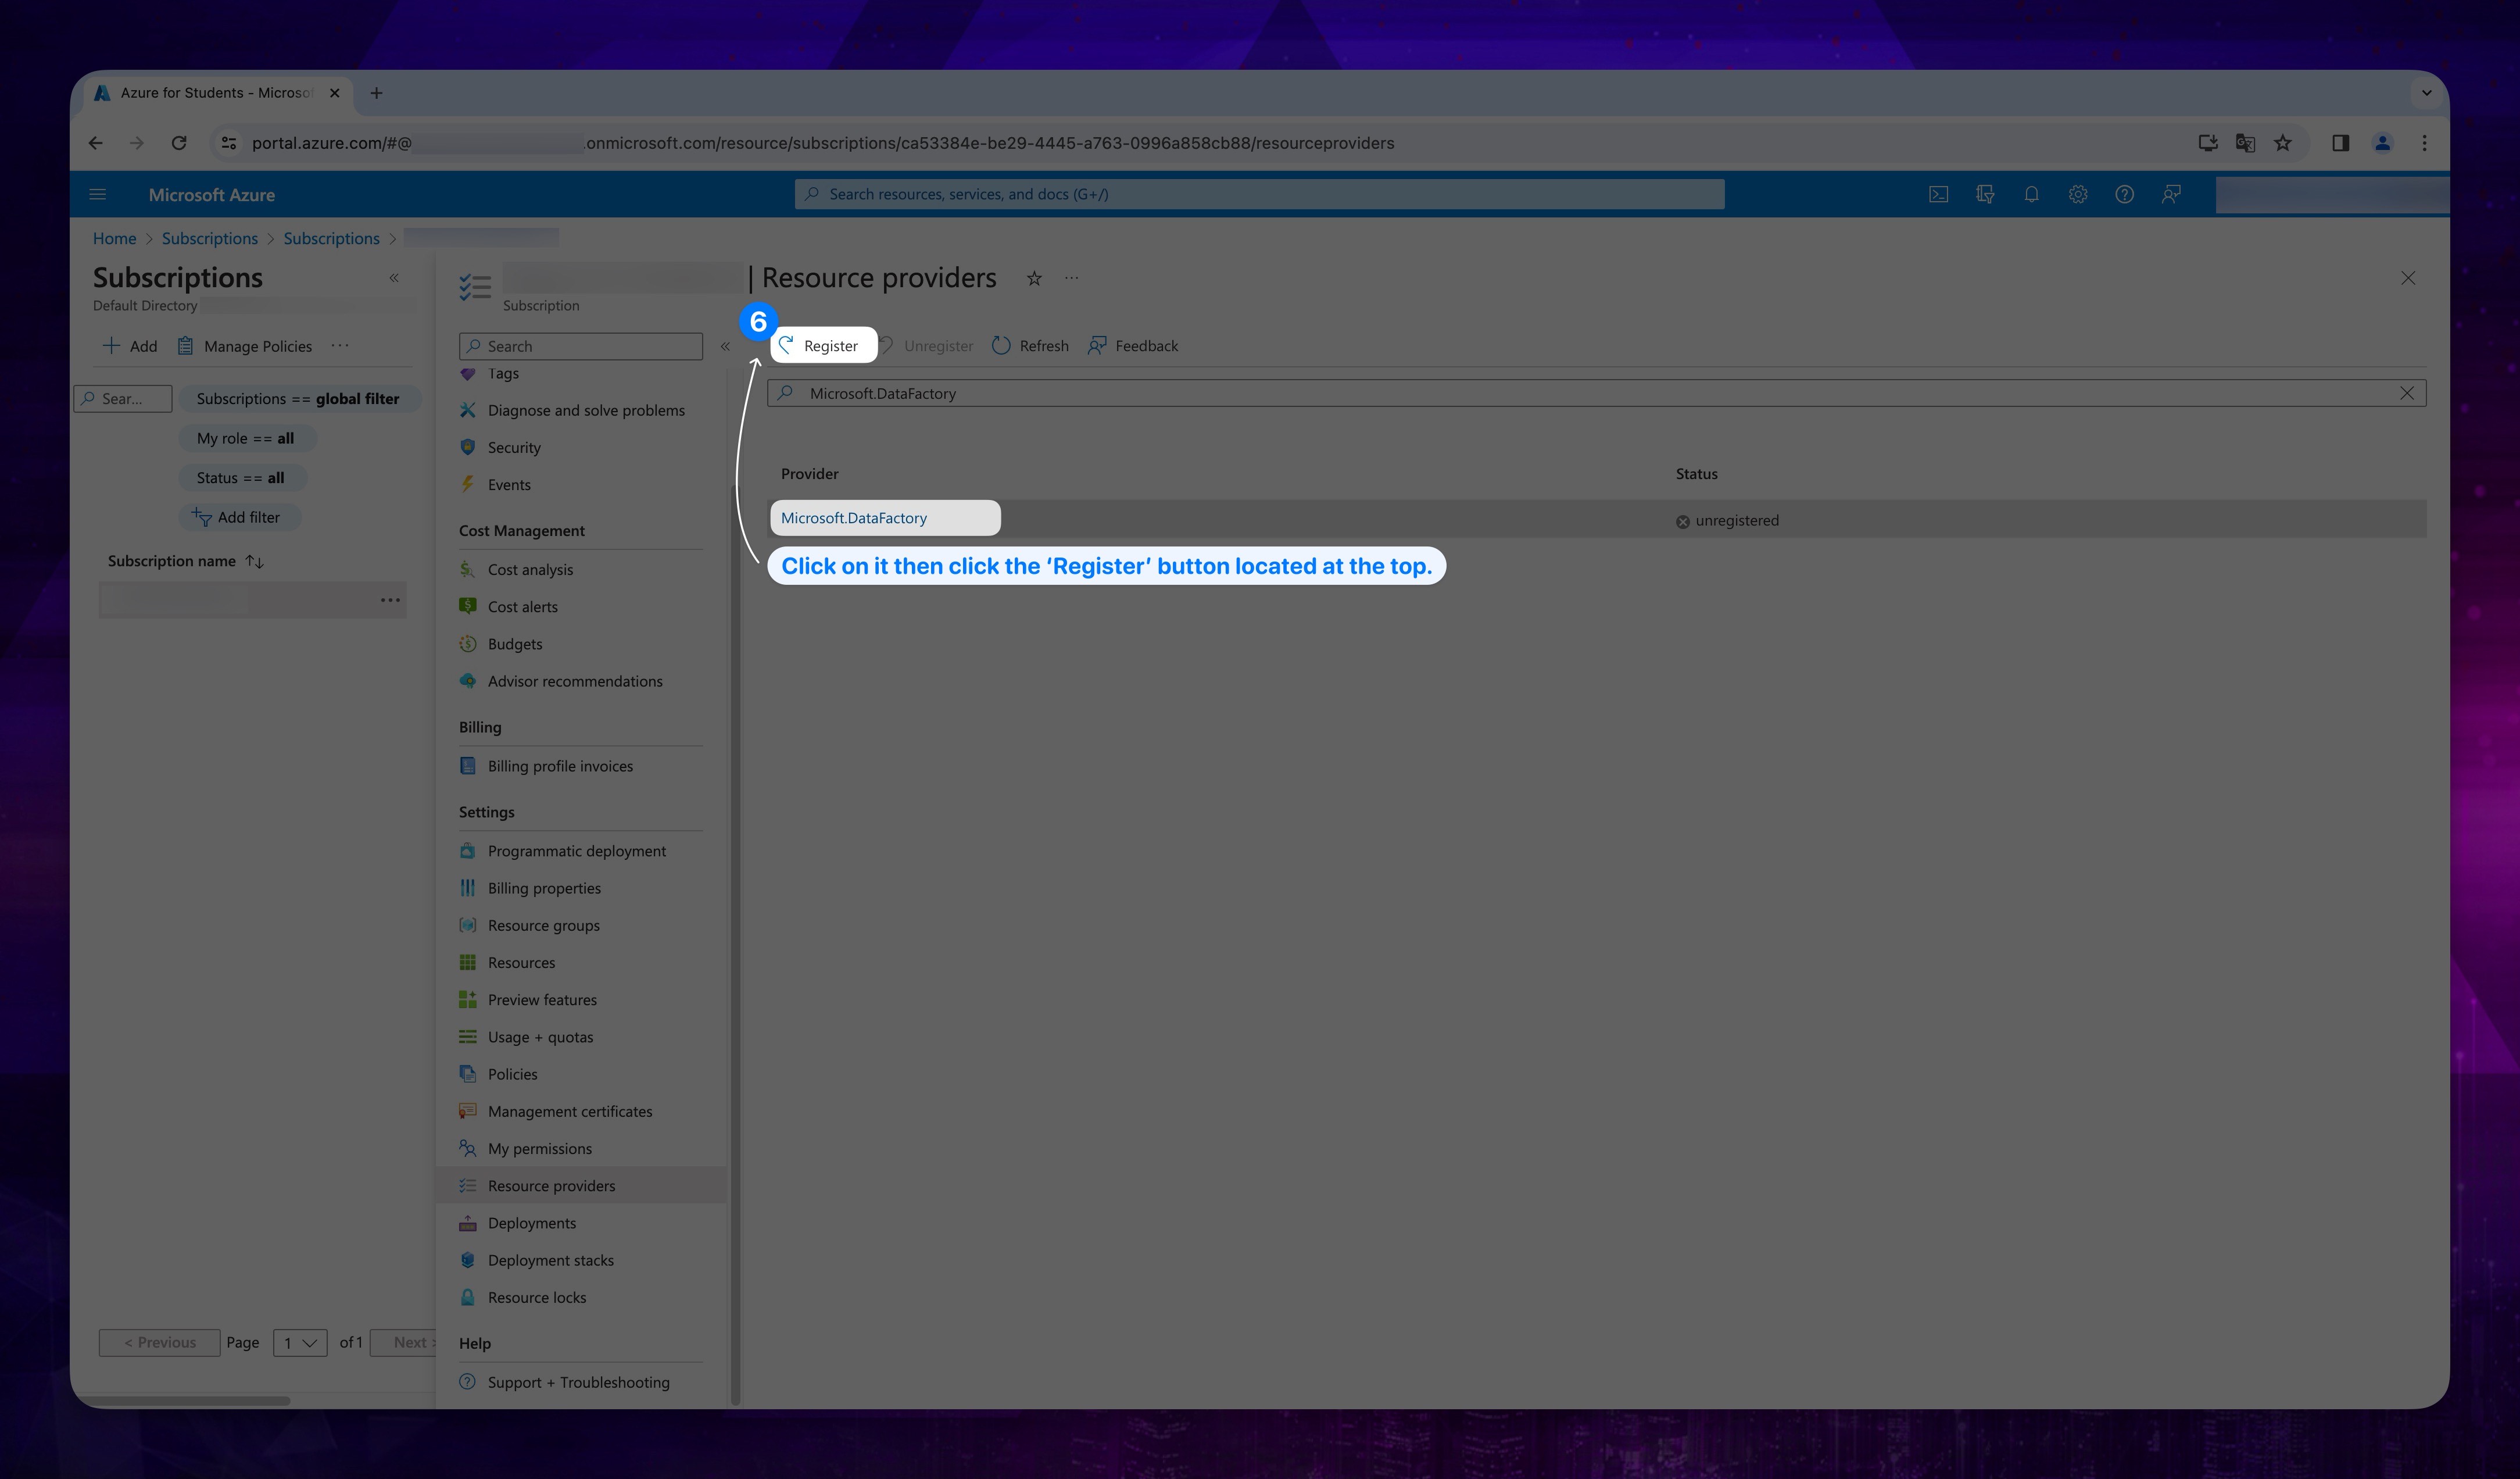
- If the provider is not registered, after clicking on it, select the Register button located at the top to register the provider.
Show the instructions with images
- Wait for the registration process to complete. This may take a few moments.
After changing the status of the relevant provider to Registered, you can proceed with the remaining steps.
Please note that you may require the necessary permissions or roles to register a resource provider in your Azure subscription. If you do not have the required permissions, you may need to reach out to your Azure administrator or the person responsible for managing your Azure subscription.